
This guide shows you how to use GMA Next-Gen SDK to load and display ads from myTarget using mediation, covering waterfall integrations. It covers how to add myTarget to an ad unit's mediation configuration, and how to integrate the myTarget SDK and adapter into an Android app.
Supported integrations and ad formats
The mediation adapter for myTarget has the following capabilities:
| Integration | |
|---|---|
| Bidding | |
| Waterfall | |
| Formats | |
| Banner | |
| Interstitial | |
| Rewarded | |
| Native | |
Requirements
- Android API level 24 or higher
Latest GMA Next-Gen SDK.
Complete the mediation Get started guide.
Step 1: Set up configurations in myTarget UI
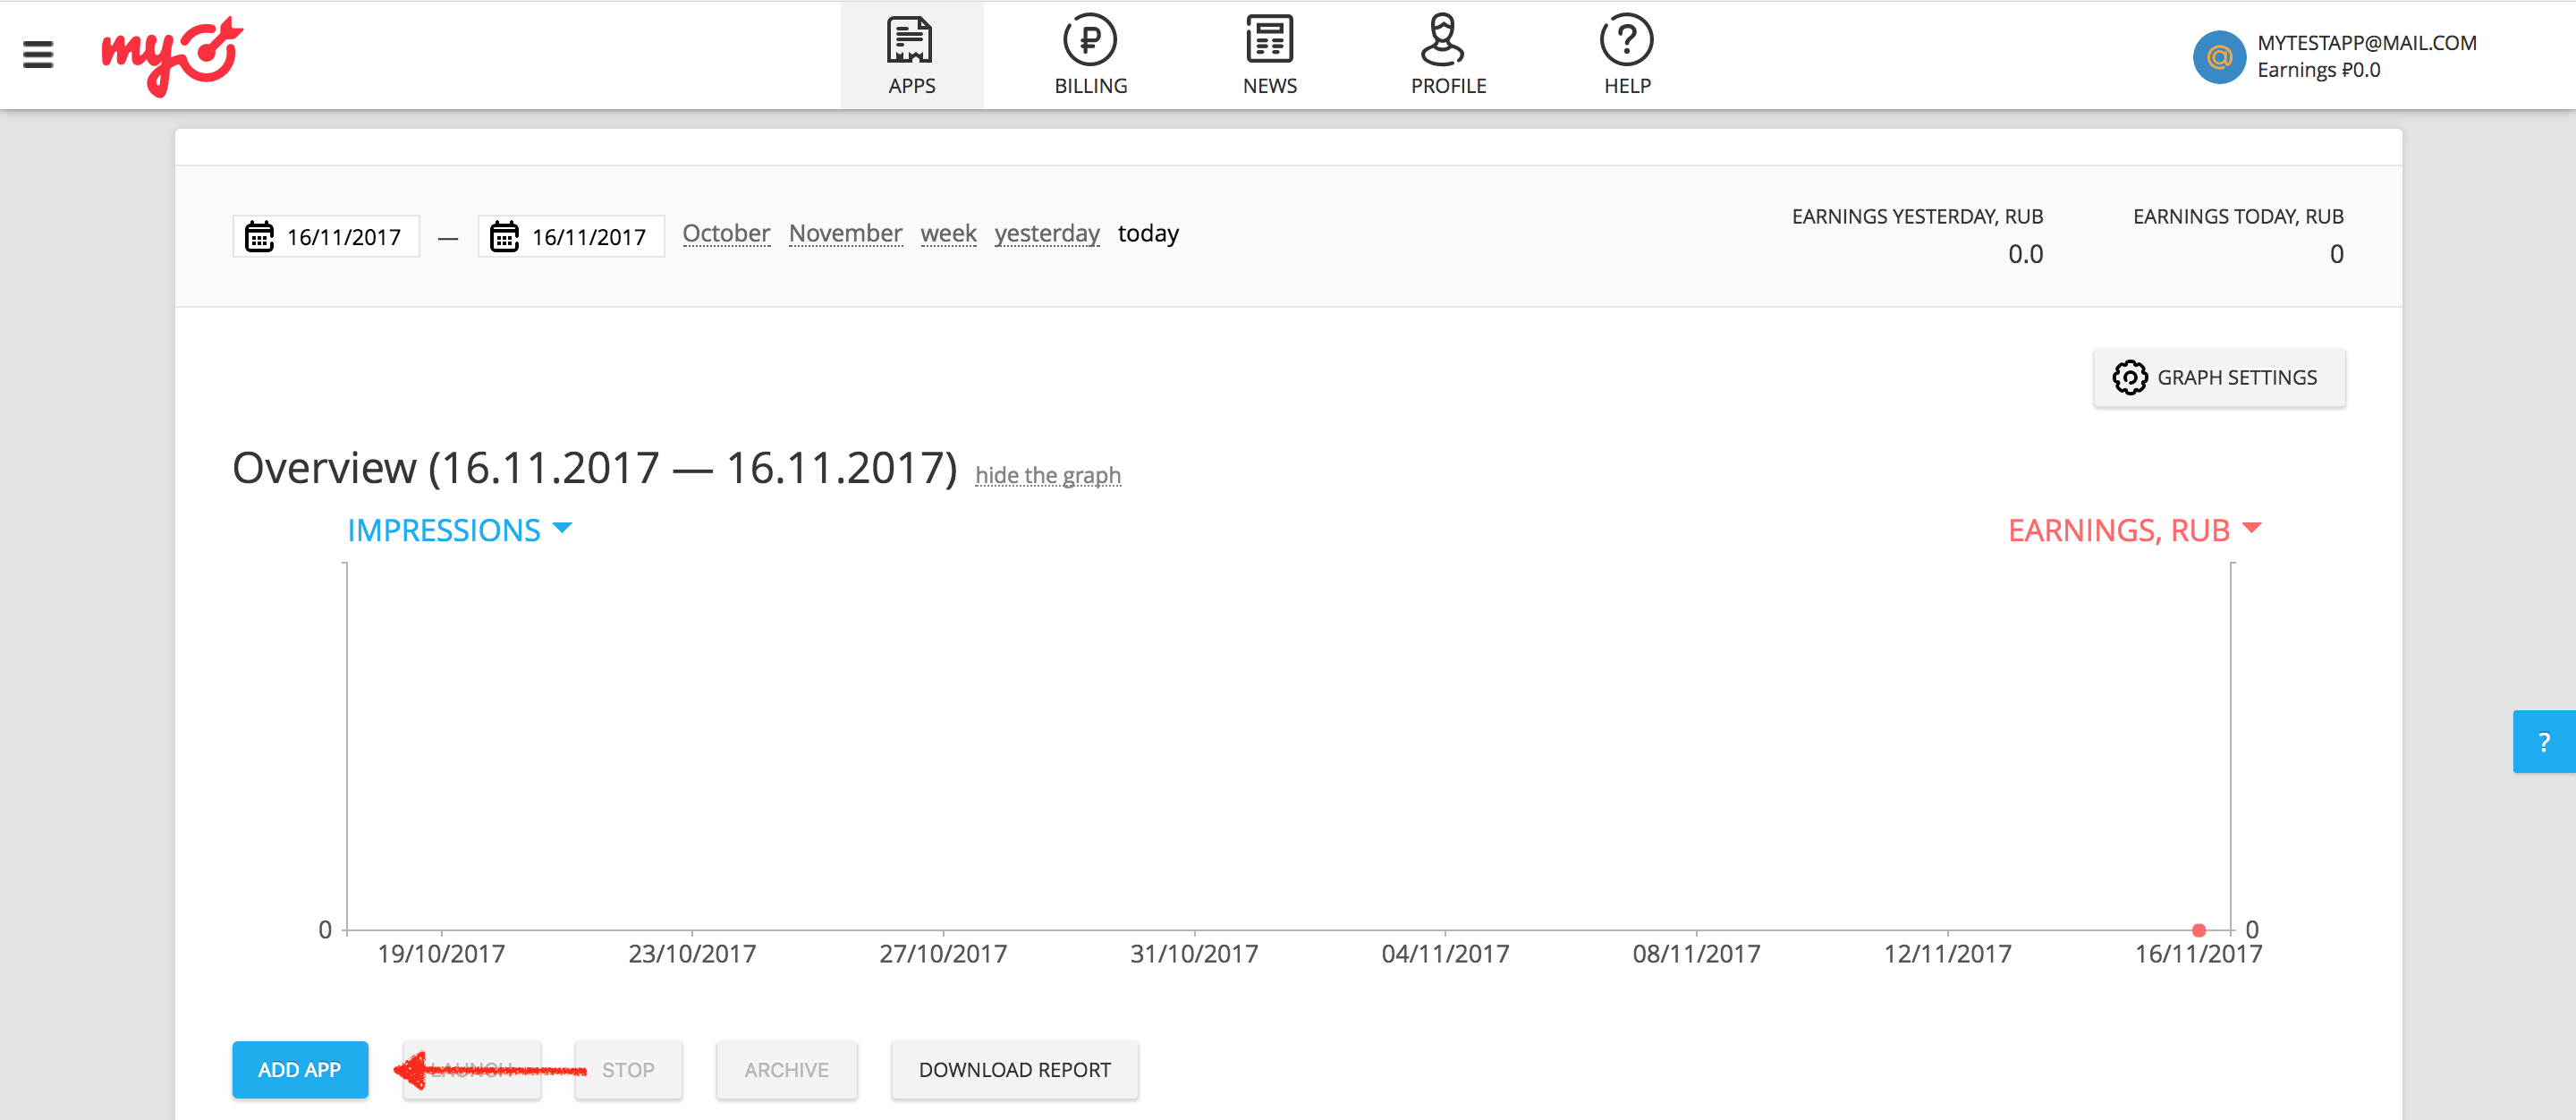
Log in to your myTarget account. Navigate to the Apps page by clicking on APPS on the header. Add your app by clicking ADD APP.
Next, provide the Google Play URL for your app.
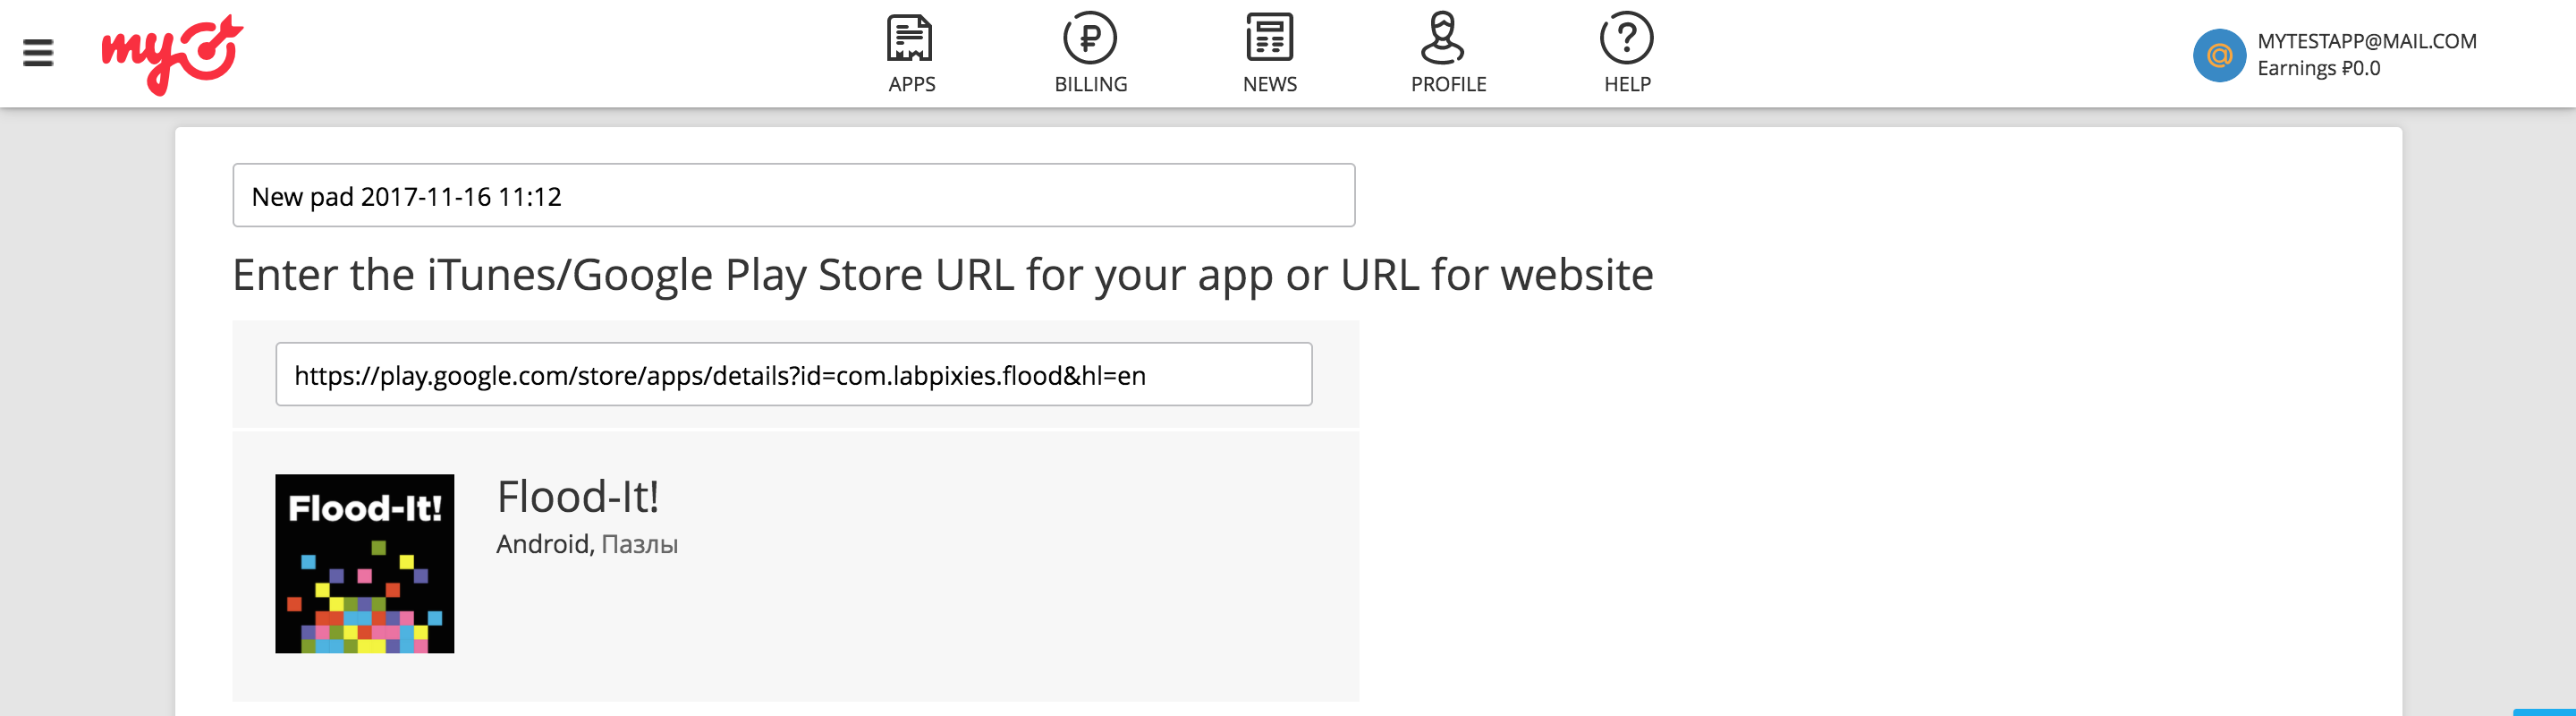
When adding an app, myTarget requires you to create an ad unit before you can complete the process.
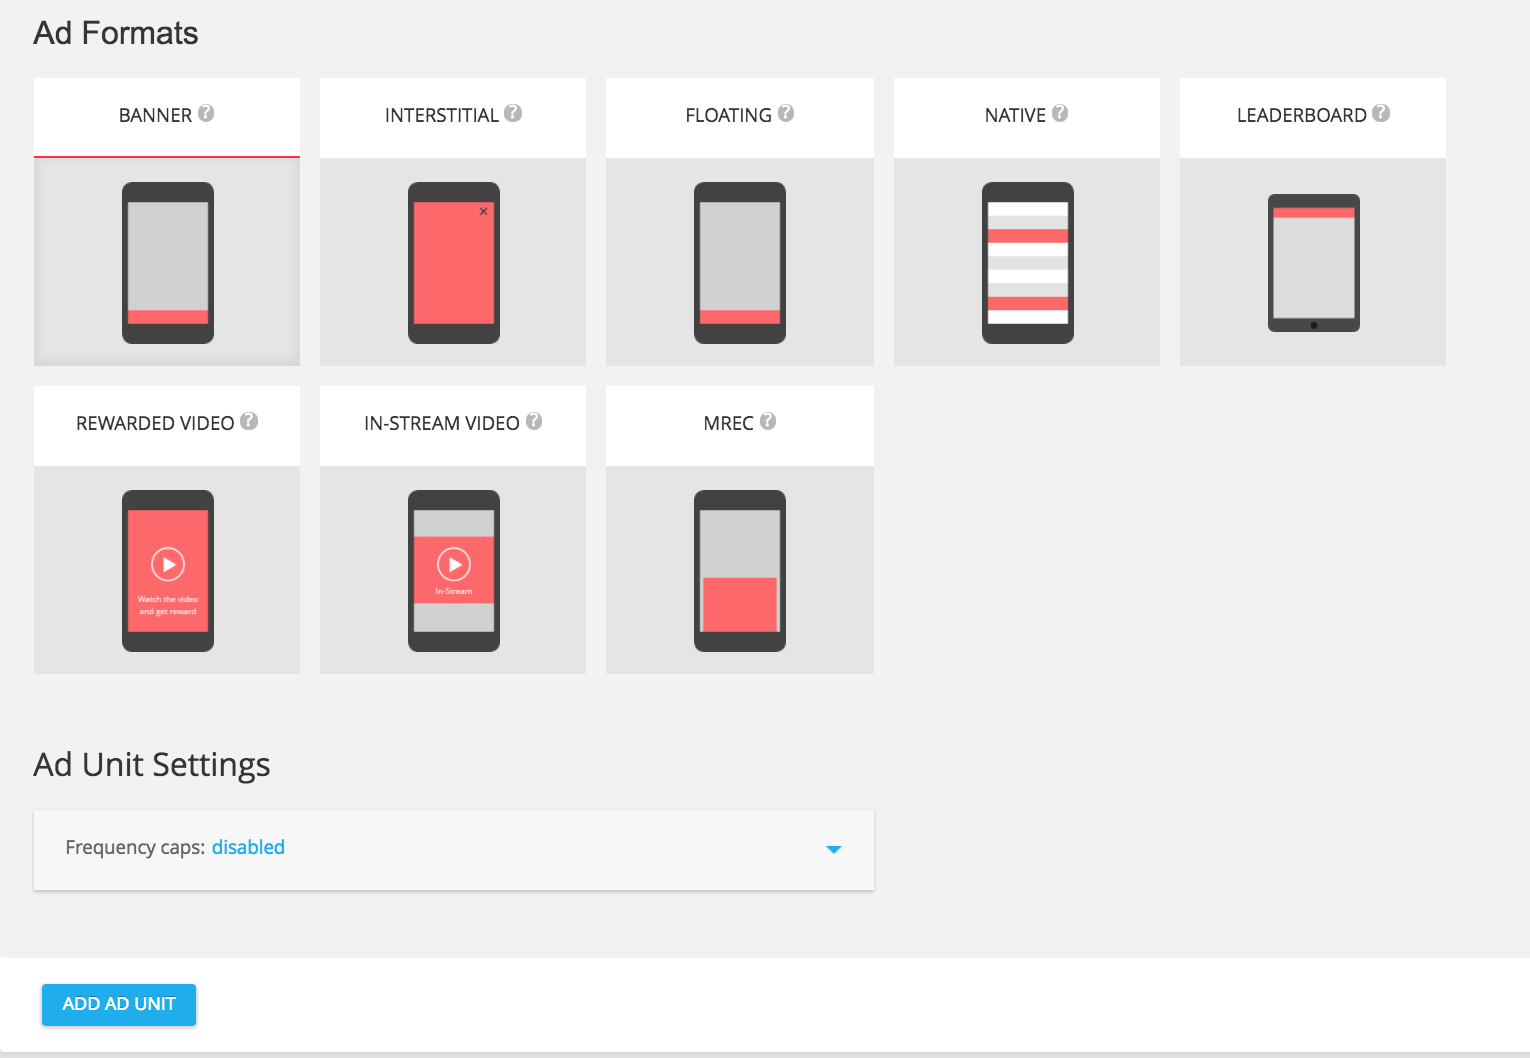
Banner
Select BANNER from the available ad formats, and then click the ADD AD UNIT button.
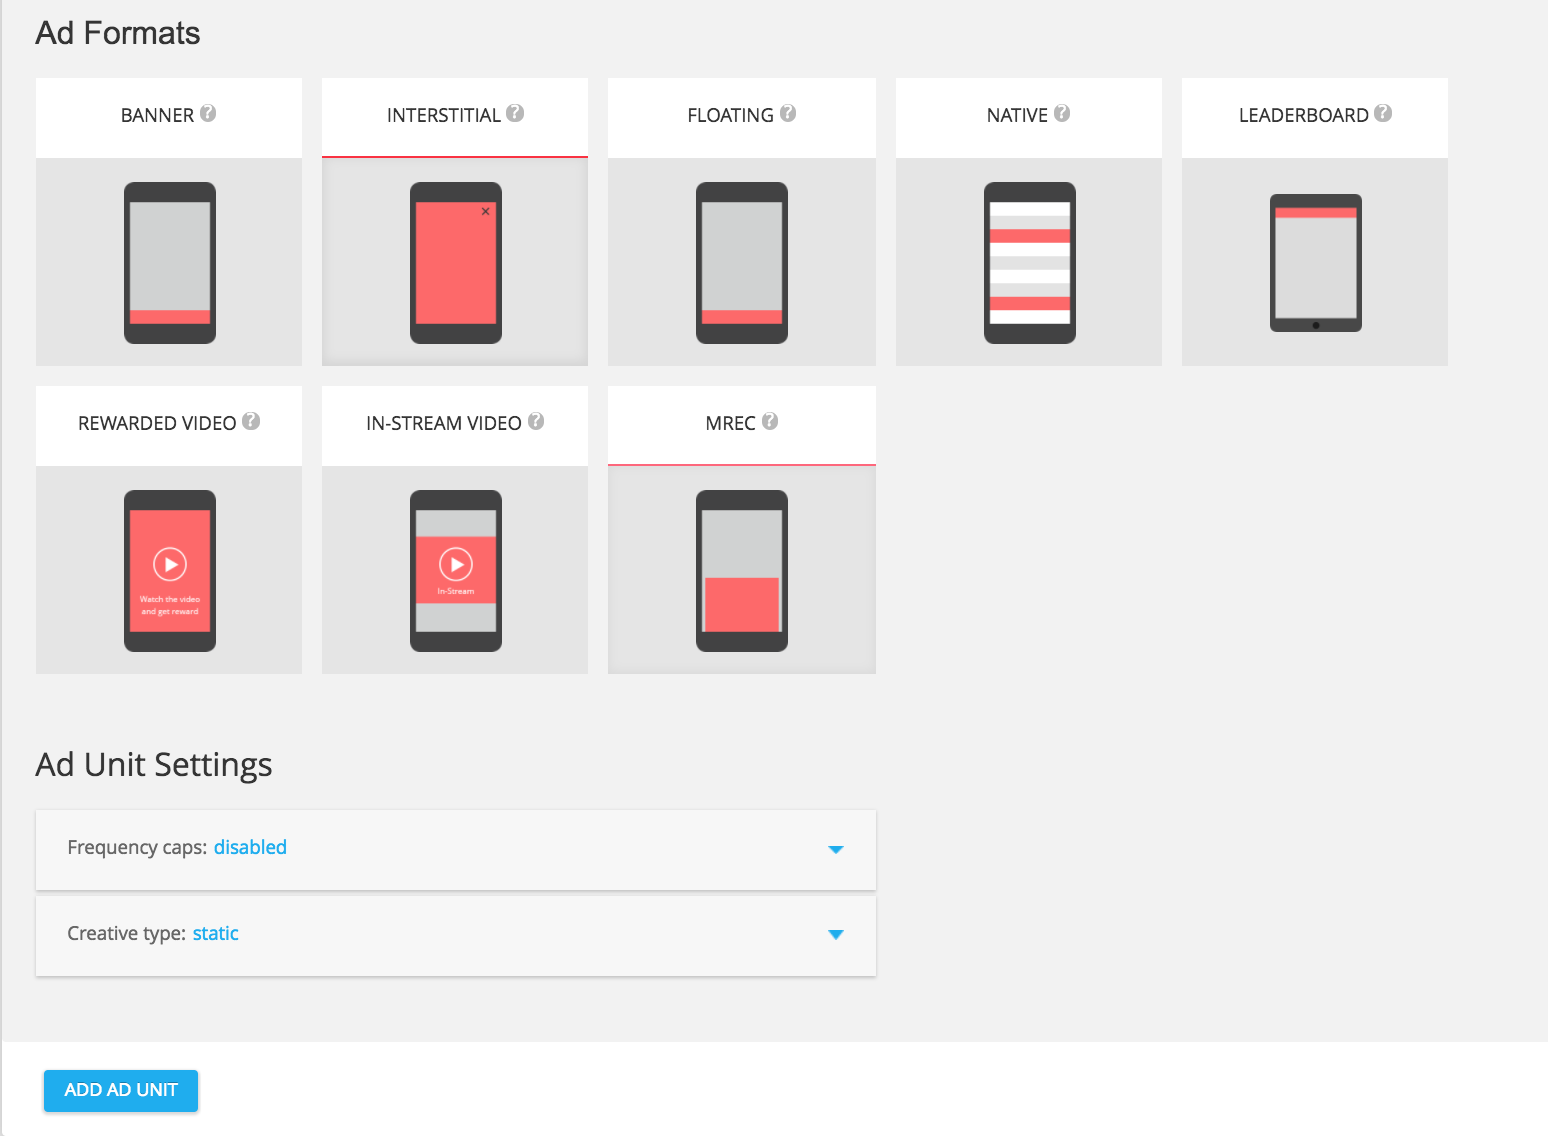
Interstitial
Select INTERSTITIAL from the available ad formats, and then click the ADD AD UNIT button.
Rewarded
Select REWARDED VIDEO from the available ad formats, and then click the ADD AD UNIT button.
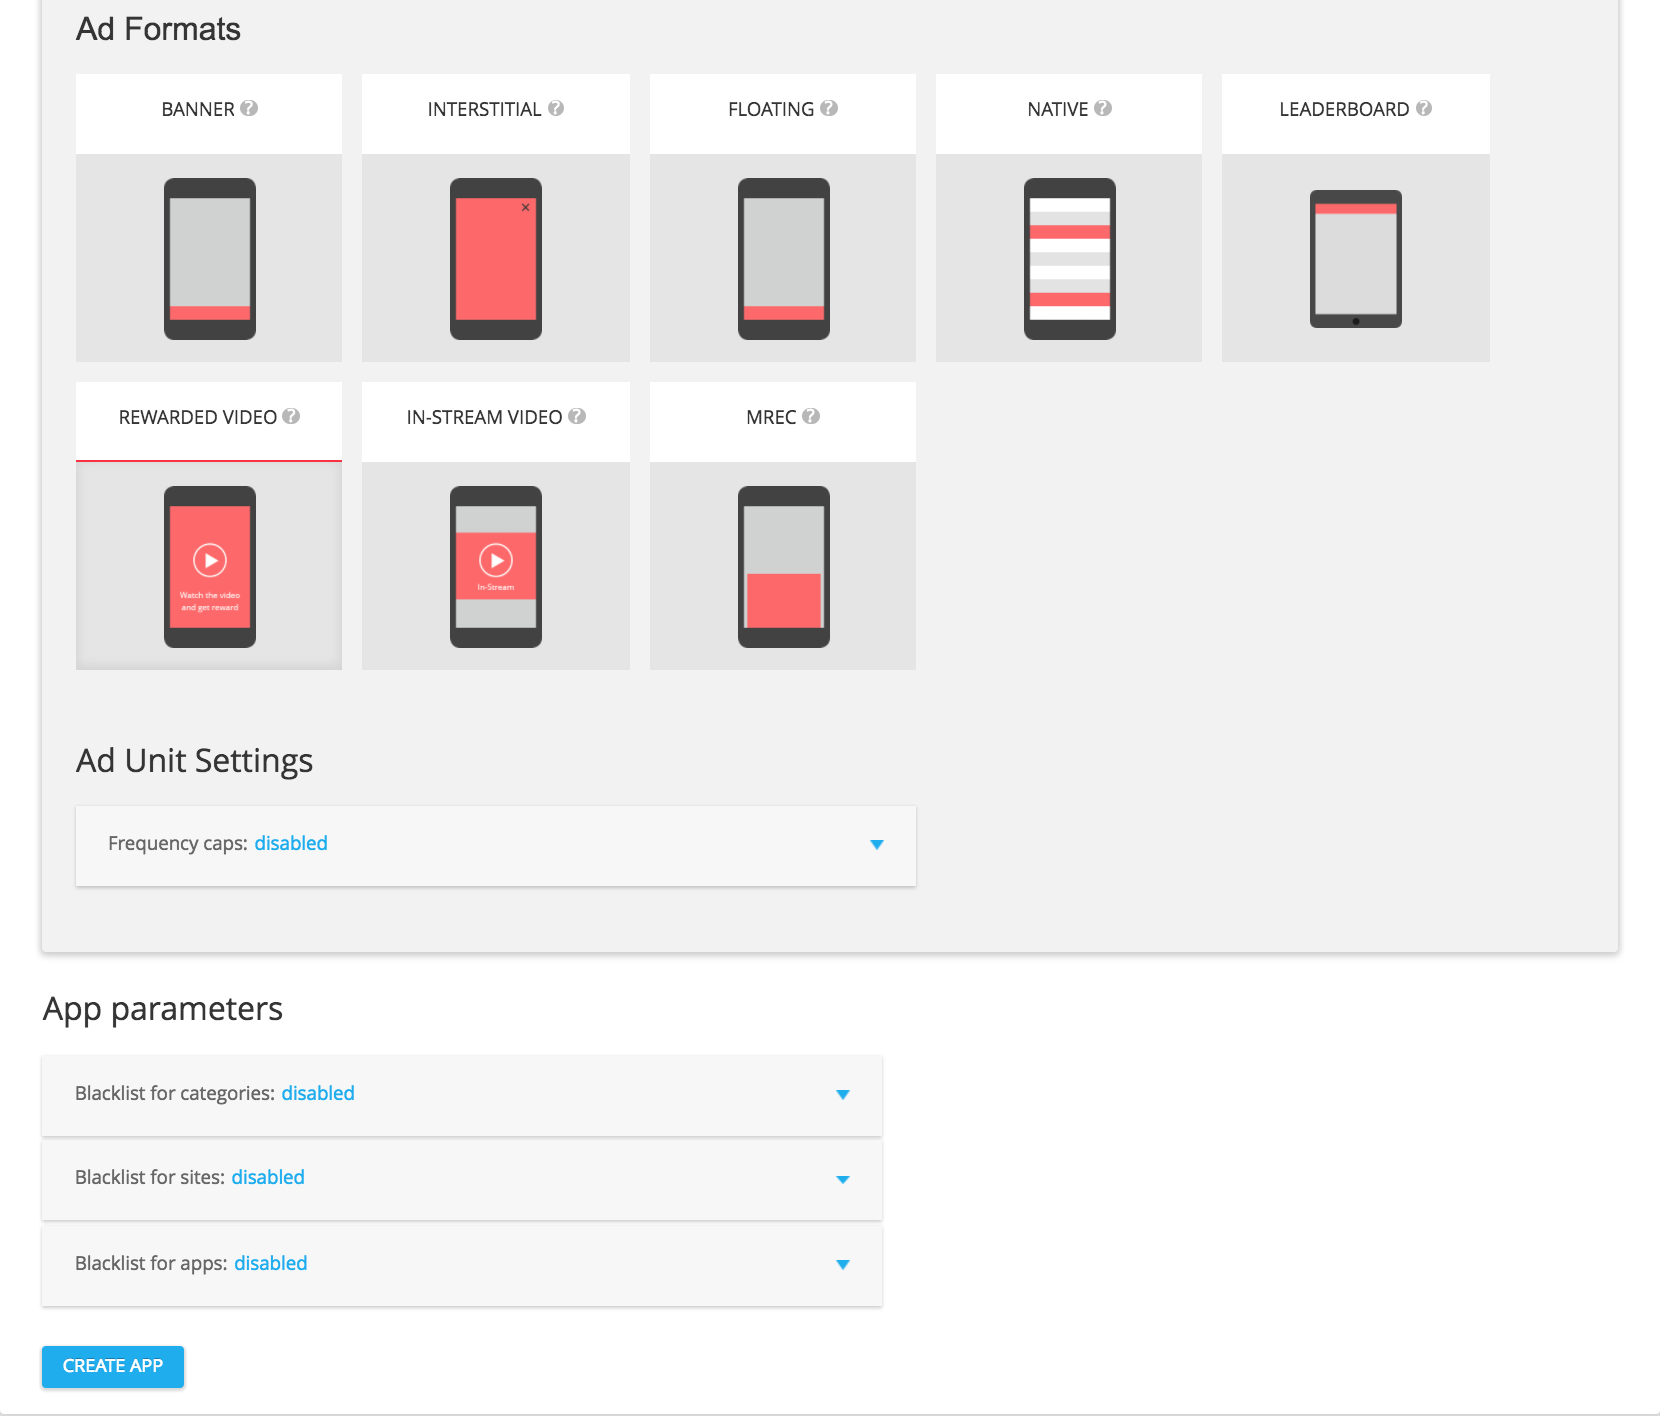
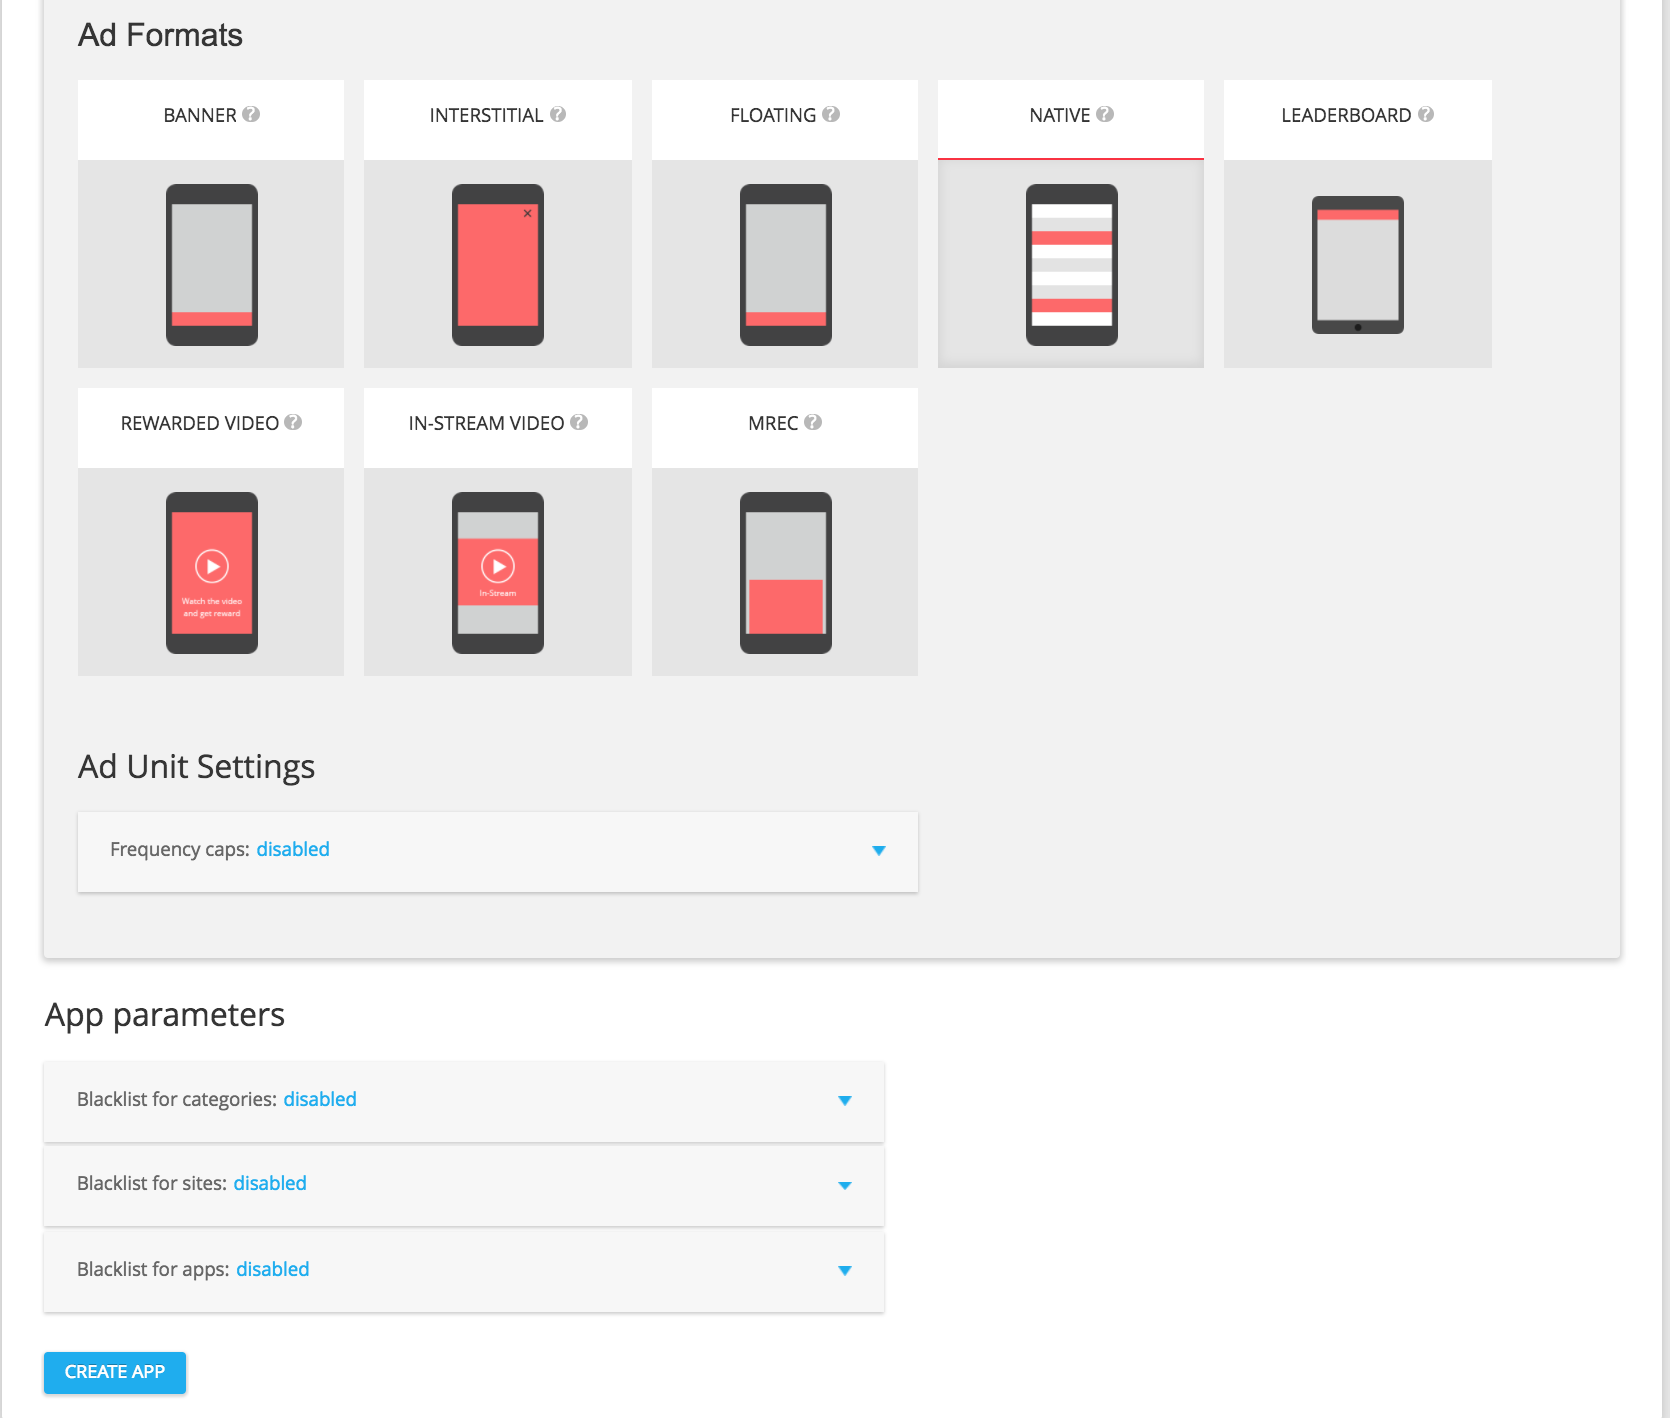
Native
Select NATIVE from the available ad formats, and then click on ADD AD UNIT.
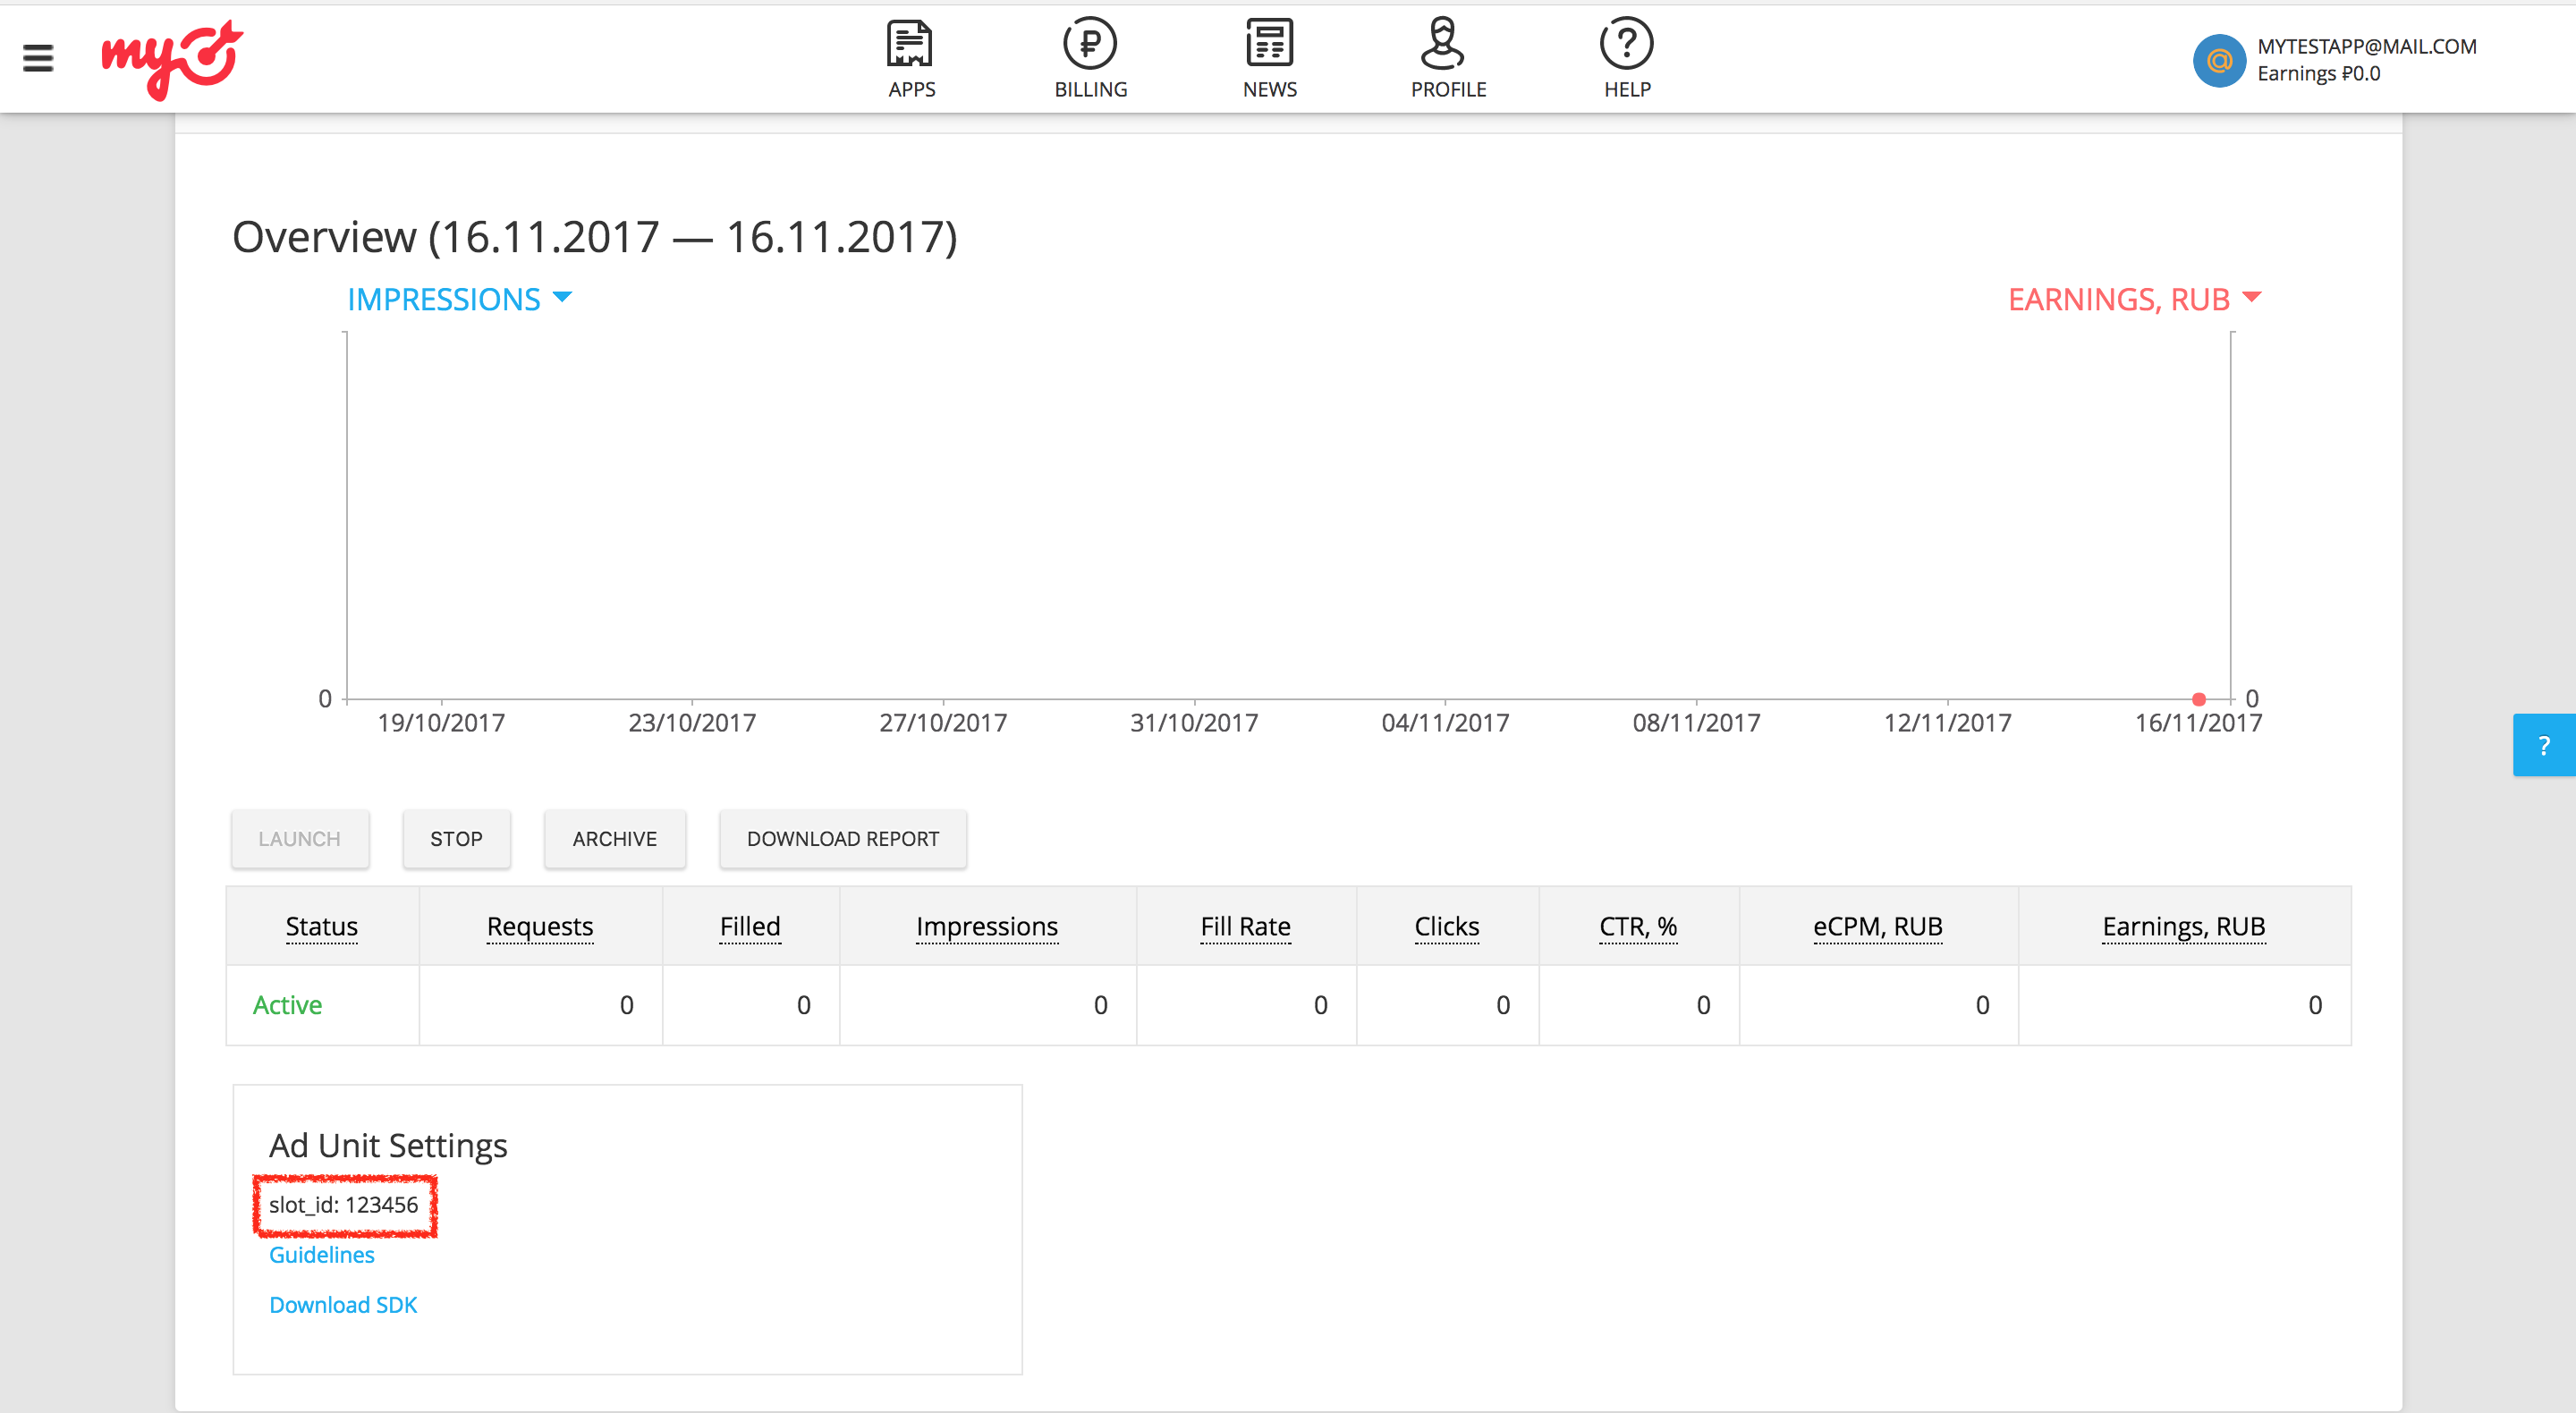
In your ad unit's details page, make a note of your slot ID which can be found under the ad unit settings as slot_id. This slot ID will be used to set up your Ad Manager ad unit in the next section.
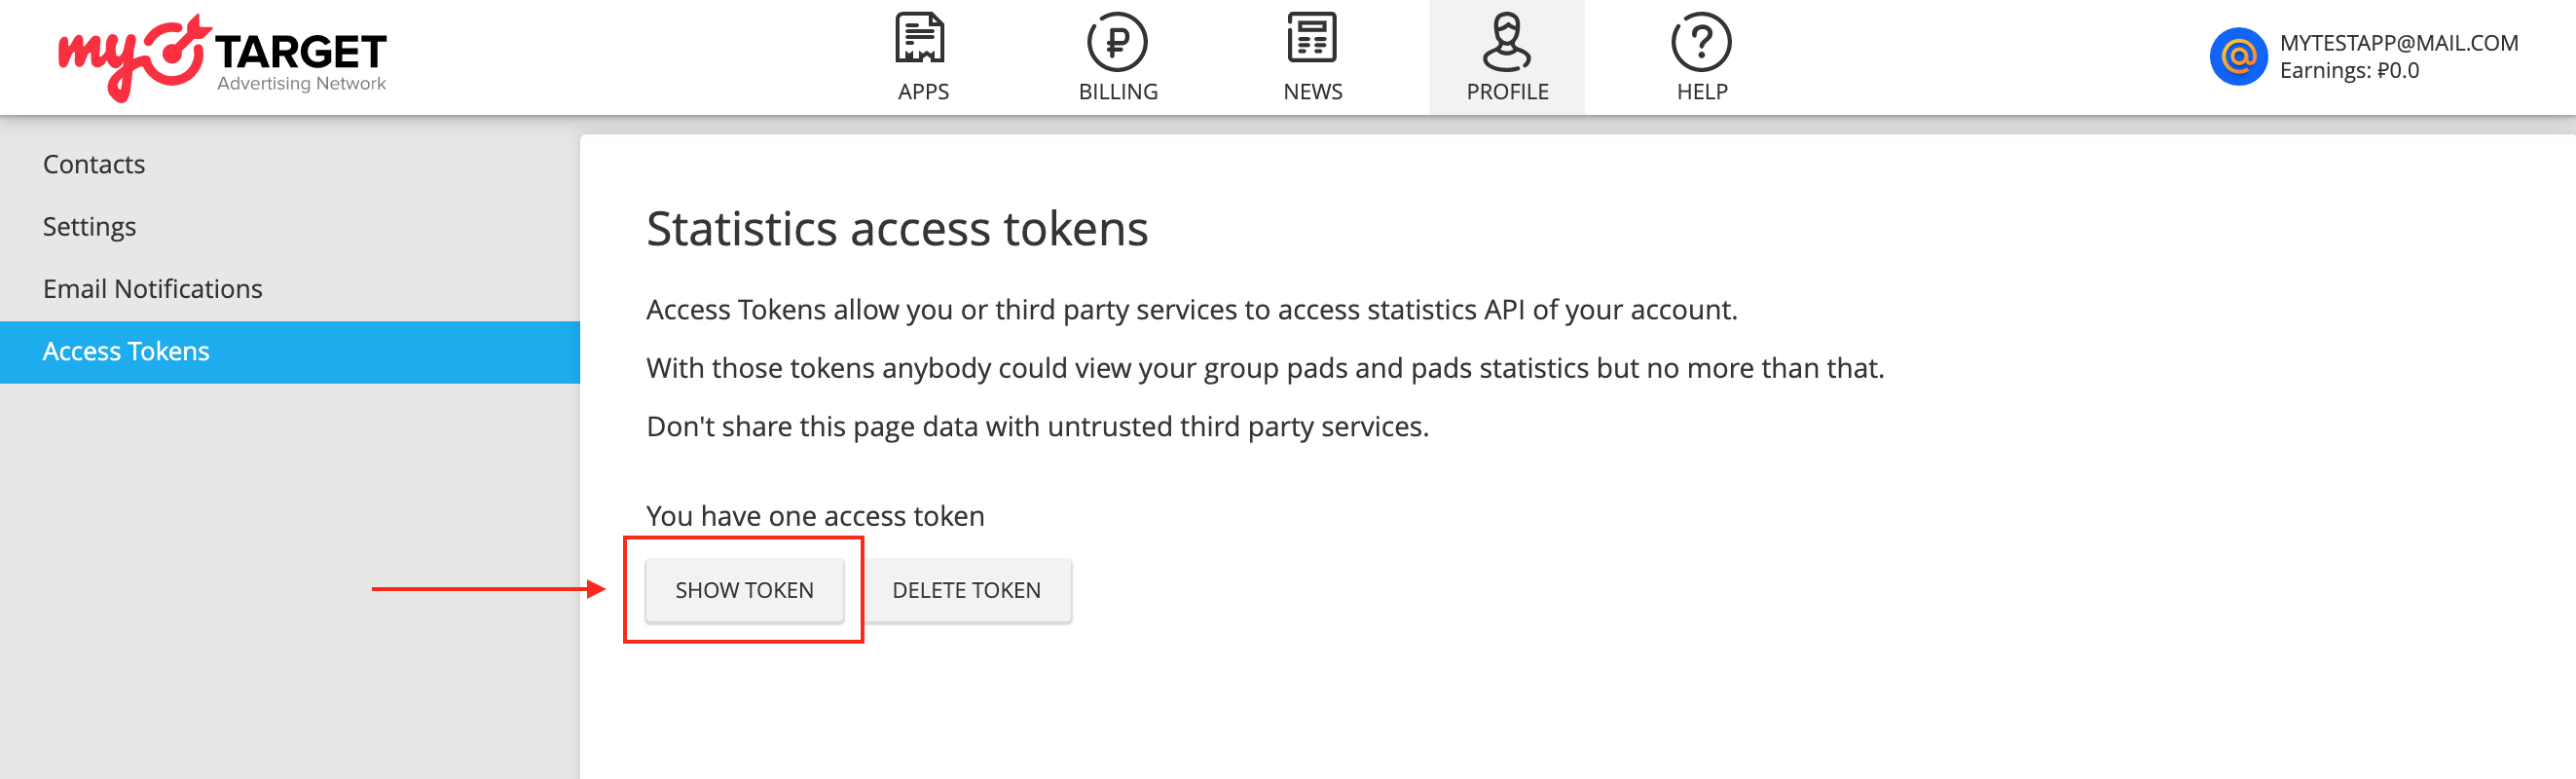
In addition to the slot_id, you'll also need your myTarget Permanent Access Token to set up your AdMob ad unit ID. Navigate to the Profile tab and select Access Tokens. Click Create Token or Show Token to view your myTarget Permanent Access Token.
Update your app-ads.txt
Authorized Sellers for Apps app-ads.txt is an IAB Tech Lab initiative that helps ensure your
app ad inventory is only sold through channels you've identified as authorized. To prevent a
significant loss in ad revenue, you'll need to implement an app-ads.txt file.
If you haven't done so already,
create an app-ads.txt file for Ad Manager.
To implement app-ads.txt for myTarget, see
How to create and publish a file.
Turn on test mode
Follow the instructions in myTarget's documentation to add and configure a test device in myTarget UI.
Step 2: Set up myTarget demand in Ad Manager UI
Configure mediation settings for your ad unit
Sign in to your Ad Manager account.
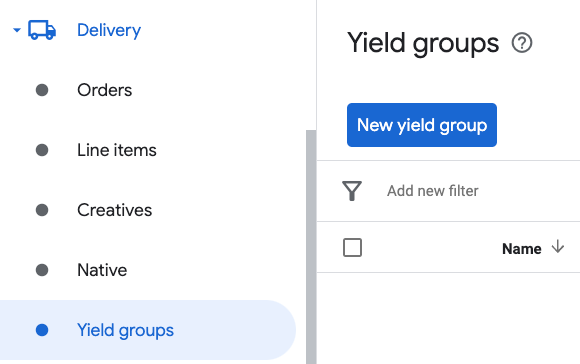
Navigate to Delivery > Yield groups and click the New yield group button.
Enter a unique Name for your yield group, set the Status to Active, select your Ad Format, and set the Inventory type to Mobile App. Under the Targeting > Inventory section, select the ad unit under Inventory and Mobile application to which you want to add mediation.
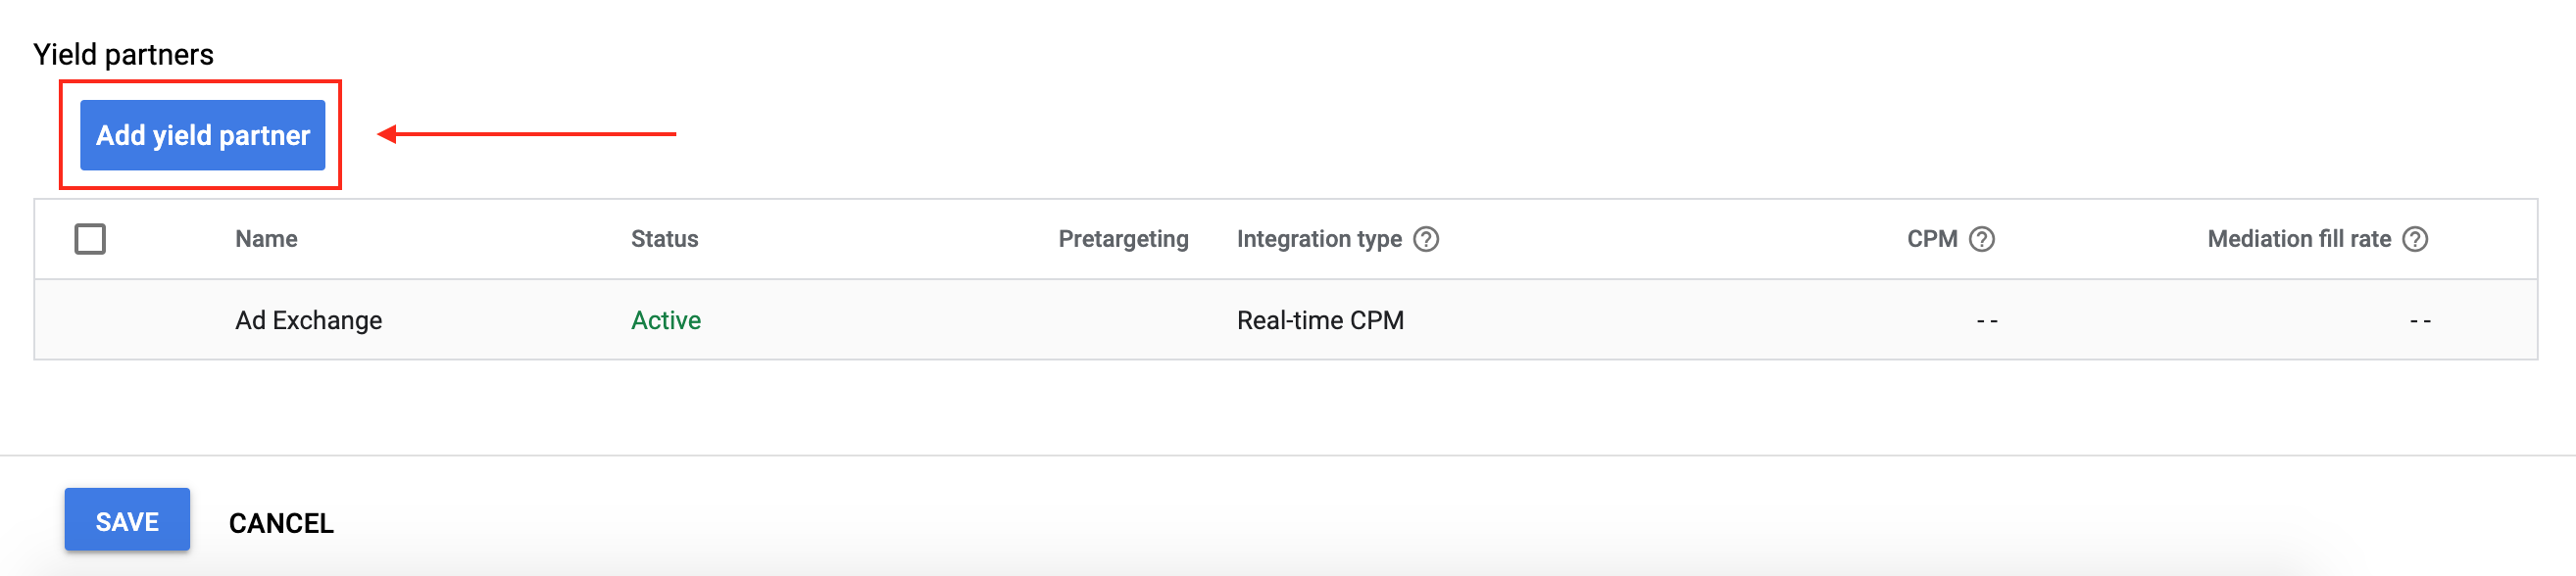
Next, click the Add yield partner button.
If you already have a Yield partner for myTarget, you can select it. Otherwise, select Create a new yield partner.
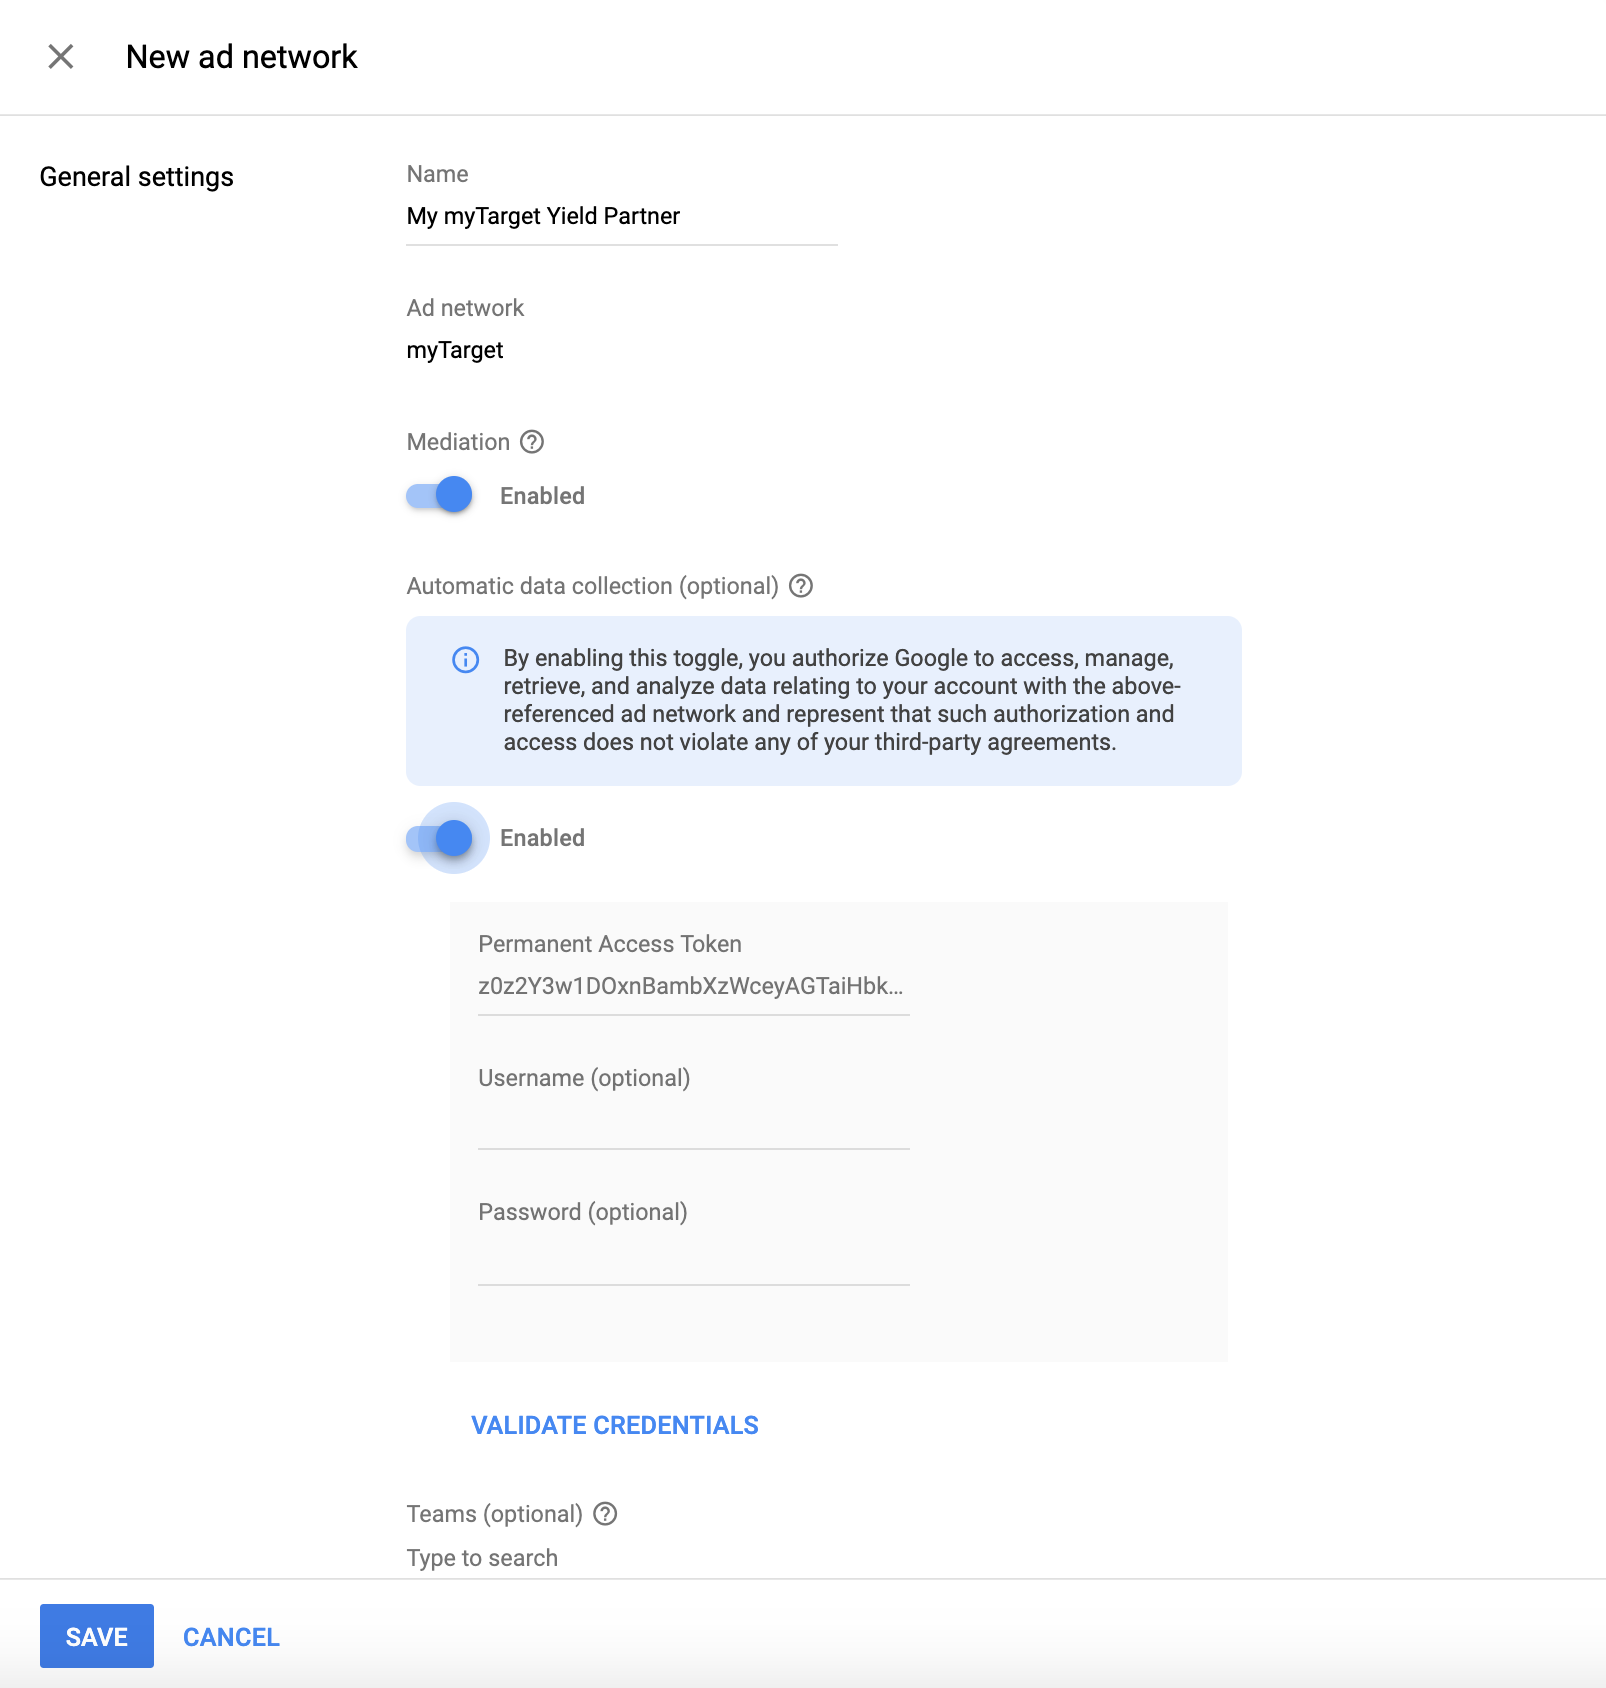
Select myTarget as the Ad network, enter a unique Name and enable Mediation.
Turn on Automatic data collection, and enter the Permanent Access Token obtained in the previous section.
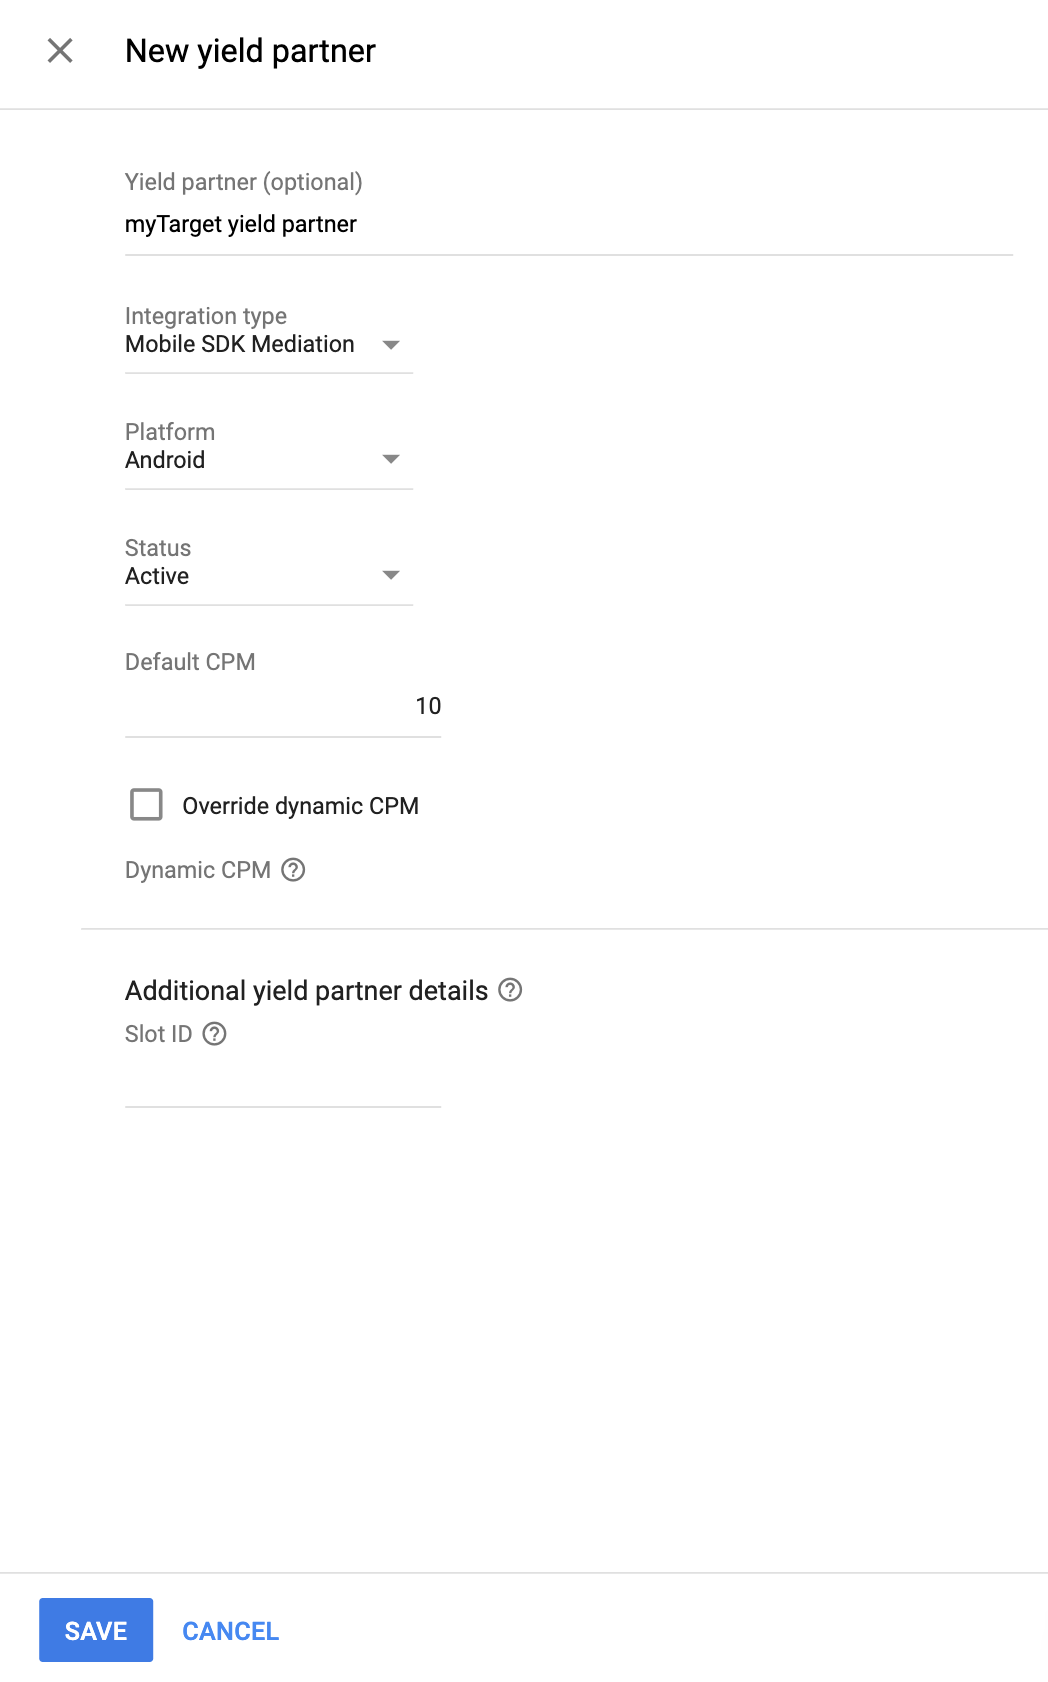
Once the Yield partner is selected, choose Mobile SDK Mediation as the Integration type, Android as the Platform, and Active as the Status. Enter the Slot ID obtained in the previous section. Then, enter a Default CPM value.
Click Save at the bottom of the page when done.
Add Mail.ru to GDPR and US state regulations ad partners list
Follow the steps in European regulations settings and US state regulations settings to add Mail.ru to the European and US state regulations ad partners list in the Ad Manager UI.
Step 3: Import the myTarget SDK and adapter
Android Studio integration (recommended)
In your app-level gradle file, add the following implementation dependencies and configurations:
Kotlin
dependencies {
    implementation("com.google.android.libraries.ads.mobile.sdk:ads-mobile-sdk:1.2.1")
    implementation("com.google.ads.mediation:mytarget:5.47.1.0")
}

configurations.configureEach {
    exclude(group = "com.google.android.gms", module = "play-services-ads")
    exclude(group = "com.google.android.gms", module = "play-services-ads-lite")
}
Groovy
dependencies {
    implementation 'com.google.android.libraries.ads.mobile.sdk:ads-mobile-sdk:1.2.1'
    implementation 'com.google.ads.mediation:mytarget:5.47.1.0'
}

configurations.configureEach {
    exclude group: 'com.google.android.gms', module: 'play-services-ads'
    exclude group: 'com.google.android.gms', module: 'play-services-ads-lite'
}
Manual integration
To include the myTarget SDK, consult the myTarget Android SDK documentation.
Navigate to the myTarget adapter artifacts on Google's Maven Repository. Select the latest version, download the myTarget adapter's .aar file, and add it to your project.
Step 4: Implement privacy settings on myTarget SDK
EU consent and GDPR
To comply with Google EU User Consent Policy, you must make certain disclosures to your users in the European Economic Area (EEA), the UK, and Switzerland, and obtain their consent for the use of cookies or other local storage where legally required, and for the collection, sharing, and use of personal data for ads personalization. This policy reflects the requirements of the EU ePrivacy Directive and the General Data Protection Regulation (GDPR). You are responsible for verifying consent is propagated to each ad source in your mediation chain. Google is unable to pass the user's consent choice to such networks automatically.
In SDK version 5.1.0, myTarget added a user consent API to support privacy requirements. The following sample code shows how to pass this consent information to the myTarget SDK. If you choose to call this method, it is recommended that you do so prior to requesting ads through GMA Next-Gen SDK.
Java
MyTargetPrivacy.setUserConsent(true);
Kotlin
MyTargetPrivacy.setUserConsent(true)
Additionally, if the user is known to be in an age-restricted category, you can use the following code to pass this consent information to the myTarget SDK.
Java
MyTargetPrivacy.setUserAgeRestricted(true);
Kotlin
MyTargetPrivacy.setUserAgeRestricted(true)
See myTarget's Privacy and GDPR guide for more information and the values that can be provided in the method.
US states privacy laws
US states privacy laws require giving users the right to opt out of the "sale" of their "personal information" (as the law defines those terms), with the opt-out offered through a prominent "Do Not Sell My Personal Information" link on the "selling" party's homepage. The US states privacy laws compliance guide offers the ability to enable restricted data processing for Google ad serving, but Google is unable to apply this setting to each ad network in your mediation chain. Therefore, you must identify each ad network in your mediation chain that may participate in the sale of personal information and follow guidance from each of those networks to ensure compliance.
In SDK version 5.9.0, myTarget added a user consent API to support privacy requirements. The following sample code shows how to pass this consent information to the myTarget SDK. If you choose to call this method, it is recommended that you do so prior to requesting ads through GMA Next-Gen SDK.
Java
MyTargetPrivacy.setCcpaUserConsent(true);
Kotlin
MyTargetPrivacy.setCcpaUserConsent(true)
Contact myTarget support for more information and the values that can be provided in the method.
Step 5: Add required code
No additional code is required for myTarget integration.
Step 6: Test your implementation
Enable test ads
Make sure you register your test device for Ad Manager and enable test mode in myTarget UI.
Verify test ads
To verify that you are receiving test ads from myTarget, enable single ad source testing in ad inspector using the myTarget (Waterfall) ad source(s).
Optional steps
Using native ads
Ad rendering
The myTarget adapter returns its native ads as
NativeAd
objects. It populates the following
fields
for a
NativeAd.
| Field | Populated by myTarget adapter |
|---|---|
| Headline | Always |
| Image | Always |
| Body | Always |
| App icon | Always |
| Call to action | Always |
| Star rating | Not guaranteed |
| Store | Not guaranteed |
| Price | Not guaranteed |
| Logo | Not guaranteed |
| Advertiser | Always |
The myTarget SDK always returns 0 for mediaView width and height, so the
myTarget adapter always returns 0 for
getAspectRatio().
The myTarget SDK will fix this issue in a future release.
Impression and click tracking
GMA Next-Gen SDK uses the myTarget SDK's callbacks for impression and click tracking, so the reports from both sources should match up with few to no discrepancies.
Error codes
If the adapter fails to receive an ad from myTarget, you can check the
underlying error from the ad response using
ResponseInfo.getAdSourceResponses()
under the following classes:
com.google.ads.mediation.mytarget.MyTargetAdapter
com.google.ads.mediation.mytarget.MyTargetNativeAdapter
com.google.ads.mediation.mytarget.MyTargetRewardedAdapter
Here are the codes and accompanying messages thrown by the myTarget adapter when an ad fails to load:
| Error code | Reason |
|---|---|
| 100 | myTarget SDK returned an error. |
| 101 | myTarget server parameters configured in the Ad Manager UI are missing/invalid. |
| 102 | The requested ad size does not match a myTarget supported banner size. |
| 103 | Ad request is not a Unified native ad request. |
| 104 | The loaded native ad from myTarget is different from the requested native ad. |
| 105 | The loaded native ad from myTarget is missing some required assets (e.g. image or icon). |
myTarget Android Mediation Adapter Changelog
Version 5.47.1.1 (In progress)
- Maps
AgeRestrictedTreatmentto myTarget's age restriction settings. - Updated interstitial and native ad implementation to use updated mediation adapter APIs.
Version 5.47.1.0
- Added property to build the adapter with GMA Next-Gen SDK dependency.
- Updated banner ad implementation to use updated mediation adapter APIs.
- Verified compatibility with myTarget SDK version 5.47.1.
Built and tested with:
- Google Mobile Ads SDK version 25.2.0.
- Google Mobile Ads Next-Gen SDK version 1.1.1.
- MyTarget SDK version 5.47.1.
Version 5.45.3.0
- Verified compatibility with myTarget SDK version 5.45.3.
Built and tested with:
- Google Mobile Ads SDK version 25.0.0.
- MyTarget SDK version 5.45.3.
Version 5.27.4.1
- Added support for forwarding the tagForChildDirectedTreatment and tagForUnderAgeOfConsent Google Mobile Ads SDK parameter to the myTarget SDK.
Built and tested with:
- Google Mobile Ads SDK version 24.9.0.
- MyTarget SDK version 5.27.4.
Version 5.27.4.0
- Verified compatibility with myTarget SDK version 5.27.4.
Built and tested with:
- Google Mobile Ads SDK version 24.7.0.
- MyTarget SDK version 5.27.4.
Version 5.27.3.0
- Verified compatibility with myTarget SDK version 5.27.3.
Built and tested with:
- Google Mobile Ads SDK version 24.6.0.
- MyTarget SDK version 5.27.3.
Version 5.27.2.0
- Verified compatibility with myTarget SDK version 5.27.2.
Built and tested with:
- Google Mobile Ads SDK version 24.4.0.
- MyTarget SDK version 5.27.2.
Version 5.27.1.1
- Updated the minimum required Android API level to 23.
- Updated the minimum required Google Mobile Ads SDK version to 24.0.0.
Built and tested with:
- Google Mobile Ads SDK version 24.0.0.
- MyTarget SDK version 5.27.1.
Version 5.27.1.0
- Verified compatibility with myTarget SDK version 5.27.1.
Built and tested with:
- Google Mobile Ads SDK version 23.6.0.
- MyTarget SDK version 5.27.1.
Version 5.27.0.0
- Verified compatibility with myTarget SDK version 5.27.0.
Built and tested with:
- Google Mobile Ads SDK version 23.6.0.
- MyTarget SDK version 5.27.0.
Version 5.26.0.0
- Verified compatibility with myTarget SDK version 5.26.0.
Built and tested with:
- Google Mobile Ads SDK version 23.5.0.
- MyTarget SDK version 5.26.0.
Version 5.25.0.0
- Verified compatibility with myTarget SDK version 5.25.0.
Built and tested with:
- Google Mobile Ads SDK version 23.5.0.
- MyTarget SDK version 5.25.0.
Version 5.23.0.0
- Updated adapter to implement
onFailedToShowmethod for fullscreen ads. - Verified compatibility with myTarget SDK version 5.23.0.
Built and tested with:
- Google Mobile Ads SDK version 23.4.0.
- MyTarget SDK version 5.23.0.
Version 5.22.1.0
- Increased the maximum heap size for the Gradle JVM from 512MB to 1GB.
- Verified compatibility with myTarget SDK version 5.22.1.
Built and tested with:
- Google Mobile Ads SDK version 23.2.0.
- MyTarget SDK version 5.22.1.
Version 5.21.1.0
- Verified compatibility with myTarget SDK version 5.21.1.
Built and tested with:
- Google Mobile Ads SDK version 23.2.0.
- MyTarget SDK version 5.21.1.
Version 5.21.0.0
- Verified compatibility with myTarget SDK version 5.21.0.
Built and tested with:
- Google Mobile Ads SDK version 23.0.0.
- MyTarget SDK version 5.21.0.
Version 5.20.1.0
- Updated the minimum required Google Mobile Ads SDK version to 23.0.0.
- Verified compatibility with myTarget SDK version 5.20.1.
Built and tested with:
- Google Mobile Ads SDK version 23.0.0.
- MyTarget SDK version 5.20.1.
Version 5.20.0.0
- Verified compatibility with myTarget SDK version 5.20.0.
Built and tested with:
- Google Mobile Ads SDK version 22.5.0.
- MyTarget SDK version 5.20.0.
Version 5.19.0.0
- Verified compatibility with myTarget SDK version 5.19.0.
Built and tested with:
- Google Mobile Ads SDK version 22.3.0.
- MyTarget SDK version 5.19.0.
Version 5.18.0.0
- Verified compatibility with myTarget SDK version 5.18.0.
Built and tested with:
- Google Mobile Ads SDK version 22.2.0.
- MyTarget SDK version 5.18.0.
Version 5.17.0.0
- Verified compatibility with myTarget SDK version 5.17.0.
Built and tested with:
- Google Mobile Ads SDK version 22.2.0.
- MyTarget SDK version 5.17.0.
Version 5.16.5.0
- Verified compatibility with myTarget SDK version 5.16.5.
Built and tested with:
- Google Mobile Ads SDK version 22.0.0.
- MyTarget SDK version 5.16.5.
Version 5.16.4.1
- Updated adapter to use new
VersionInfoclass. - Updated the minimum required Google Mobile Ads SDK version to 22.0.0.
Built and tested with:
- Google Mobile Ads SDK version 22.0.0.
- MyTarget SDK version 5.16.4.
Version 5.16.4.0
- Verified compatibility with myTarget SDK version 5.16.4.
- Updated the minimum required Google Mobile Ads SDK version to 21.5.0.
Built and tested with:
- Google Mobile Ads SDK version 21.5.0.
- MyTarget SDK version 5.16.4.
Version 5.16.3.0
- Verified compatibility with myTarget SDK version 5.16.3.
- Updated the minimum required Google Mobile Ads SDK version to 21.4.0.
Built and tested with:
- Google Mobile Ads SDK version 21.4.0.
- MyTarget SDK version 5.16.3.
Version 5.16.2.0
- Verified compatibility with myTarget SDK version 5.16.2.
Built and tested with:
- Google Mobile Ads SDK version 21.3.0.
- MyTarget SDK version 5.16.2.
Version 5.16.1.0
- Verified compatibility with myTarget SDK version 5.16.1.
Built and tested with:
- Google Mobile Ads SDK version 21.3.0.
- MyTarget SDK version 5.16.1.
Version 5.16.0.0
- Verified compatibility with myTarget SDK version 5.16.0.
Built and tested with:
- Google Mobile Ads SDK version 21.3.0.
- MyTarget SDK version 5.16.0.
Version 5.15.5.0
- Verified compatibility with myTarget SDK version 5.15.5.
- Updated the minimum required Google Mobile Ads SDK version to 21.3.0.
Built and tested with:
- Google Mobile Ads SDK version 21.3.0.
- MyTarget SDK version 5.15.5.
Version 5.15.4.0
- Verified compatibility with myTarget SDK version 5.15.4.
- Updated the minimum required Google Mobile Ads SDK version to 21.1.0.
Built and tested with:
- Google Mobile Ads SDK version 21.1.0.
- MyTarget SDK version 5.15.4.
Version 5.15.3.0
- Verified compatibility with myTarget SDK version 5.15.3.
Built and tested with:
- Google Mobile Ads SDK version 21.0.0.
- MyTarget SDK version 5.15.3.
Version 5.15.2.1
- Updated the minimum required Google Mobile Ads SDK version to 21.0.0.
- Updated the minimum required Android API level to 19.
Built and tested with:
- Google Mobile Ads SDK version 21.0.0.
- MyTarget SDK version 5.15.2.
Version 5.15.2.0
- Verified compatibility with myTarget SDK version 5.15.2.
Built and tested with:
- Google Mobile Ads SDK version 20.6.0.
- MyTarget SDK version 5.15.2.
Version 5.15.1.0
- Verified compatibility with myTarget SDK version 5.15.1.
- Updated
compileSdkVersionandtargetSdkVersionto API 31. - Updated the minimum required Google Mobile Ads SDK version to 20.6.0.
Built and tested with:
- Google Mobile Ads SDK version 20.6.0.
- MyTarget SDK version 5.15.1.
Version 5.15.0.0
- Verified compatibility with myTarget SDK version 5.15.0.
Built and tested with:
- Google Mobile Ads SDK version 20.5.0.
- MyTarget SDK version 5.15.0.
Version 5.14.4.0
- Verified compatibility with myTarget SDK version 5.14.4.
- Added mediation extras handling for
CustomParams. - Fixed an issue where the native ad
MediaViewwas not properly registered as a clickable asset. - Updated the minimum required Google Mobile Ads SDK version to 20.5.0.
Built and tested with:
- Google Mobile Ads SDK version 20.5.0.
- MyTarget SDK version 5.14.4.
Version 5.14.3.0
- Verified compatibility with myTarget SDK version 5.14.3.
Built and tested with:
- Google Mobile Ads SDK version 20.4.0.
- MyTarget SDK version 5.14.3.
Version 5.14.2.0
- Verified compatibility with myTarget SDK version 5.14.2.
Built and tested with:
- Google Mobile Ads SDK version 20.4.0.
- MyTarget SDK version 5.14.2.
Version 5.14.1.0
- Verified compatibility with myTarget SDK version 5.14.1.
- Updated the minimum required Google Mobile Ads SDK version to 20.4.0.
Built and tested with:
- Google Mobile Ads SDK version 20.4.0.
- MyTarget SDK version 5.14.1.
Version 5.13.4.0
- Verified compatibility with myTarget SDK version 5.13.4.
Built and tested with:
- Google Mobile Ads SDK version 20.3.0.
- MyTarget SDK version 5.13.4.
Version 5.13.3.0
- Verified compatibility with myTarget SDK version 5.13.3.
- Updated the minimum required Google Mobile Ads SDK version to 20.3.0.
Built and tested with:
- Google Mobile Ads SDK version 20.3.0.
- MyTarget SDK version 5.13.3.
Version 5.13.2.0
- Verified compatibility with myTarget SDK version 5.13.2.
Built and tested with:
- Google Mobile Ads SDK version 20.2.0.
- MyTarget SDK version 5.13.2.
Version 5.13.1.0
- Verified compatibility with myTarget SDK version 5.13.1.
- Updated the minimum required Google Mobile Ads SDK version to 20.2.0.
Built and tested with:
- Google Mobile Ads SDK version 20.2.0.
- MyTarget SDK version 5.13.1.
Version 5.13.0.0
- Verified compatibility with myTarget SDK version 5.13.0.
Built and tested with:
- Google Mobile Ads SDK version 20.1.0.
- MyTarget SDK version 5.13.0.
Version 5.12.3.0
- Verified compatibility with myTarget SDK version 5.12.3.
- Updated the minimum required Google Mobile Ads SDK version to 20.1.0.
Built and tested with:
- Google Mobile Ads SDK version 20.1.0.
- MyTarget SDK version 5.12.3.
Version 5.12.2.0
- Verified compatibility with myTarget SDK version 5.12.2.
- Updated the minimum required Google Mobile Ads SDK version to 20.0.0.
Built and tested with:
- Google Mobile Ads SDK version 20.0.0.
- MyTarget SDK version 5.12.2.
Version 5.11.12.0
- Verified compatibility with myTarget SDK version 5.11.12.
Built and tested with:
- Google Mobile Ads SDK version 19.7.0.
- MyTarget SDK version 5.11.12.
Version 5.11.10.0
- Verified compatibility with myTarget SDK version 5.11.10.
- Added descriptive error codes and reasons for adapter load/show failures.
- Updated the minimum required Google Mobile Ads SDK version to 19.7.0.
Built and tested with:
- Google Mobile Ads SDK version 19.7.0.
- MyTarget SDK version 5.11.10.
Version 5.11.7.0
- Verified compatibility with myTarget SDK version 5.11.7.
Built and tested with:
- Google Mobile Ads SDK version 19.6.0.
- MyTarget SDK version 5.11.7.
Version 5.11.6.0
- Verified compatibility with myTarget SDK version 5.11.6.
- Removed support for the deprecated
NativeContentAdandNativeAppInstallAdformats. Apps should request for unified native ads. - Fixed an issue where banner ads sometimes load with a larger size than requested.
- Updated the minimum required Google Mobile Ads SDK version to 19.6.0.
Built and tested with:
- Google Mobile Ads SDK version 19.6.0.
- MyTarget SDK version 5.11.6.
Version 5.11.5.0
- Verified compatibility with myTarget SDK version 5.11.5.
Built and tested with:
- Google Mobile Ads SDK version 19.5.0.
- MyTarget SDK version 5.11.5.
Version 5.11.4.0
- Verified compatibility with myTarget SDK version 5.11.4.
Built and tested with:
- Google Mobile Ads SDK version 19.5.0.
- MyTarget SDK version 5.11.4.
Version 5.11.3.0
- Added support for myTarget's adaptive banner ad size.
- Verified compatibility with myTarget SDK version 5.11.3.
- Updated the minimum required Google Mobile Ads SDK version to 19.5.0.
Built and tested with:
- Google Mobile Ads SDK version 19.5.0.
- MyTarget SDK version 5.11.3.
Version 5.10.0.0
- Verified compatibility with myTarget SDK version 5.10.0.
- Updated the minimum required Google Mobile Ads SDK version to 19.4.0.
Built and tested with:
- Google Mobile Ads SDK version 19.4.0.
- MyTarget SDK version 5.10.0.
Version 5.9.1.0
- Verified compatibility with myTarget SDK version 5.9.1.
Built and tested with:
- Google Mobile Ads SDK version 19.2.0.
- MyTarget SDK version 5.9.1.
Version 5.8.4.0
- Verified compatibility with myTarget SDK version 5.8.4.
Built and tested with:
- Google Mobile Ads SDK version 19.2.0.
- MyTarget SDK version 5.8.4.
Version 5.8.3.0
- Verified compatibility with myTarget SDK version 5.8.3.
- Updated the minimum required Google Mobile Ads SDK version to 19.2.0.
Built and tested with:
- Google Mobile Ads SDK version 19.2.0.
- MyTarget SDK version 5.8.3.
Version 5.8.2.0
- Verified compatibility with myTarget SDK version 5.8.2.
- Updated the adapter to support inline adaptive banner requests.
Built and tested with:
- Google Mobile Ads SDK version 19.1.0.
- MyTarget SDK version 5.8.2.
Version 5.8.1.0
- Verified compatibility with myTarget SDK version 5.8.1.
Built and tested with:
- Google Mobile Ads SDK version 19.1.0.
- MyTarget SDK version 5.8.1.
Version 5.8.0.0
- Verified compatibility with myTarget SDK version 5.8.0.
Built and tested with:
- Google Mobile Ads SDK version 19.1.0.
- MyTarget SDK version 5.8.0.
Version 5.7.1.0
- Verified compatibility with myTarget SDK version 5.7.1.
Built and tested with:
- Google Mobile Ads SDK version 19.1.0.
- MyTarget SDK version 5.7.1.
Version 5.7.0.0
- Verified compatibility with myTarget SDK version 5.7.0.
- Updated the minimum required Google Mobile Ads SDK version to 19.1.0.
Built and tested with:
- Google Mobile Ads SDK version 19.1.0.
- MyTarget SDK version 5.7.0.
Version 5.6.3.0
- Verified compatibility with myTarget SDK version 5.6.3.
Built and tested with:
- Google Mobile Ads SDK version 19.0.1.
- MyTarget SDK version 5.6.3.
Version 5.6.2.0
- Verified compatibility with myTarget SDK version 5.6.2.
- Updated the minimum required Google Mobile Ads SDK version to 19.0.1.
Built and tested with:
- Google Mobile Ads SDK version 19.0.1.
- MyTarget SDK version 5.6.2.
Version 5.6.1.0
- Verified compatibility with myTarget SDK version 5.6.1.
Built and tested with:
- Google Mobile Ads SDK version 19.0.0.
- MyTarget SDK version 5.6.1.
Version 5.6.0.0
- Verified compatibility with myTarget SDK version 5.6.0.
- Updated the minimum required Google Mobile Ads SDK version to 19.0.0.
- Updated the minimum required Android API level to 16.
Built and tested with:
- Google Mobile Ads SDK version 19.0.0.
- MyTarget SDK version 5.6.0.
Version 5.5.5.0
- Verified compatibility with myTarget SDK version 5.5.5.
- Updated the minimum required Google Mobile Ads SDK version to 18.3.0.
Built and tested with:
- Google Mobile Ads SDK version 18.3.0.
- MyTarget SDK version 5.5.5.
Version 5.4.6.0
- Verified compatibility with myTarget SDK version 5.4.6.
- Updated the minimum required Google Mobile Ads SDK version to 18.2.0.
Version 5.4.5.0
- Verified compatibility with myTarget SDK version 5.4.5.
- Updated the minimum required Google Mobile Ads SDK version to 18.1.0.
Version 5.4.0.0
- Verified compatibility with myTarget SDK version 5.4.0.
Version 5.3.9.1
- Added support for flexible banner ad sizes.
Version 5.3.9.0
- Verified compatibility with myTarget SDK version 5.3.9.
- Updated adapter to support new open-beta Rewarded API.
- Updated the minimum required Google Mobile Ads SDK version to 17.2.0.
Version 5.3.6.0
- Verified compatibility with myTarget SDK version 5.3.6.
Version 5.2.5.0
- Verified compatibility with myTarget SDK version 5.2.5.
- Fixed a bug where the adapter fails to request a Banner ad when using a custom size.
Version 5.2.2.0
- Verified compatibility with myTarget SDK version 5.2.2.
Version 5.2.1.0
- Verified compatibility with myTarget SDK version 5.2.1.
Version 5.2.0.0
- Verified compatibility with myTarget SDK version 5.2.0.
Version 5.1.4.0
- Verified compatibility with myTarget SDK version 5.1.4.
Version 5.1.3.0
- Verified compatibility with myTarget SDK version 5.1.3.
Version 5.1.2.0
- Verified compatibility with myTarget SDK version 5.1.2.
Version 5.1.1.0
- Verified compatibility with myTarget SDK version 5.1.1.
Version 5.1.0.1
- Updated adapter to use the Unified Native Ads adapter API.
Version 5.1.0.0
- Verified compatibility with myTarget SDK version 5.1.0.
Version 5.0.4.0
- Verified compatibility with myTarget SDK version 5.0.4.
Version 5.0.2.1
- Updated the adapter to make it compatible with Google Mobile Ads SDK version 15.0.0.
Version 5.0.2.0
- Verified compatibility with myTarget SDK version 5.0.2.
Version 5.0.0.0
- Verified compatibility with myTarget SDK version 5.0.0.
- Updated the adapter to make it compatible with myTarget SDK 5.0.0 and Android Studio 3.1.
Version 4.7.2.0
- Verified compatibility with myTarget SDK version 4.7.2.
Version 4.7.1.0
- Verified compatibility with myTarget SDK version 4.7.1.
- Added support for video and carousel ads inside MediaView.
Version 4.6.28.0
- Updated the adapter project for Android Studio 3.0.
- Verified compatibility with myTarget SDK version 4.6.28.
Version 4.6.27.0
- First release!
- Added support for banner, interstitial, rewarded, and native ads.