コレクションでコンテンツを整理
必要に応じて、コンテンツの保存と分類を行います。
登録フローの選択
AFP での重要なプロセスのひとつは、ユーザーが AdSense を利用するための申し込みフローを選択することです。申し込みすることで、ユーザーは新しい AdSense アカウントを作成(または既存の AdSense アカウントにログイン)し、そのアカウントをプラットフォームにリンクできるようになります。どのフローを選ぶかは、開発にかけたい技術リソースと、ユーザーに提供したい導入手順の利便性の程度に応じて決定することができます。
方法 1: API を使わないフロー
方法 1 では API を使わないため、必要な技術リソースが少なくて済みます。必要になるのは、プラットフォーム内のユーザー インターフェースを構築するウェブ デベロッパーのみです。その反面、この方法ではユーザーが申し込みフローを終えるために必要なステップが増えることになります。
API を使わない申し込みフローの概要

実装
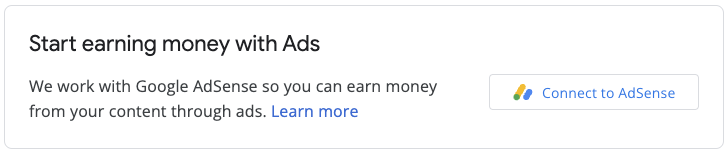
API を使わない申し込みフローを実装するには、AdSense 収益化用の UI コンポーネントを用意する必要があります。たとえば、ユーザーがアクセスするページ(「ユーザー プロフィール」や「アカウント設定」のページ)に、次の要素を含む収益化ページを追加します。
- AdSense の概要と、プラットフォームで AdSense が機能する仕組みを示した簡潔な説明。ユーザーは、新しい AdSense アカウントを申し込んでいるのか、既存の AdSense アカウントを使っているのかを完全に把握する必要があります。
- AdSense プログラム ポリシーに関する情報。申し込むユーザーは、AdSense プログラムとそのポリシーについて把握する必要があります。
- ユーザーが受け取る収益の分配率。AdSense での収益について、プラットフォームとそのユーザー(パブリッシャー)の間での収益分配率をユーザーに明示することが重要です。この情報は、AdSense のオンボーディング フローの中でも表示されます。
- [AdSense をリンク] ボタン。このボタンをクリックすると新しいタブが開き、対象ユーザーが既存の AdSense アカウントを有しているかどうかに応じて適切な AdSense ページが表示されます。
カスタム URL の例:
https://adsense.google.com/adsense/signup?url={platform-site-url}
注: 申し込みページのカスタム URL が提供されており、URL 変数の内容を定義できます。
- ユーザーの AdSense パブリッシャー ID を収集して保存するための入力ボックス。上記のリンク先にアクセスしたユーザーは、この入力ボックスに自分のパブリッシャー ID をコピーして貼り付けることが求められます。
重要:ユーザーのパブリッシャー ID は必ず保存してください。そのユーザーのコンテンツ ページを正しいパブリッシャー情報でタグ付けするために必要です。詳しくは、ページに広告タグを追加するをご覧ください。
入力された文字列に間違いがないか確認してください。パブリッシャー ID の形式は、pub-1234567890987654
です。
または正規表現の場合は pub\-\d{16}
です。
重要: AdSense ユーザーが [AdSense をリンク] ボタンをクリックせずにパブリッシャー ID を貼り付ける可能性があるため、広告配信を始める前に必ずこのボタンをクリックするようユーザーに伝えてください。そうすることで、プラットフォームのドメインが AdSense アカウントの [サイト] ページにリストされます(このボタンの主な目的)。
- ユーザーのタグ設定の状況。ユーザーは、自分のページに広告コードが配置されたかどうか把握したいと考えます。ユーザー エクスペリエンスの一環として、ページに広告コードが配置されたことをユーザーが把握できるよう、タグ設定の完了をユーザーに知らせます。また、子アカウントのメタタグを追加すると、サイトの確認手順で AdSense の作業が円滑になります。また、ユーザーに代わってページに広告タグを公開する必要がなくなります。
方法 2: セミアシスト API フロー
方法 2 では AdSense Management API を使用します。これにより、申し込みフローが若干簡単になります。技術リソースがさらに必要となりますが、ユーザーが AdSense に申し込む際の手順は少なくなります。
セミアシスト API フローの概要

実装
API を使ったセミアシスト申し込みフローを実装するには、AdSense 収益化用の UI コンポーネントを用意する必要があります。たとえば、ユーザーがアクセスするページ(「ユーザー プロフィール」や「アカウント設定」のページ)に、次の要素を含む収益化ページを追加します。
- AdSense の概要と、プラットフォームで AdSense が機能する仕組みを示した簡潔な説明。ユーザーは、新しい AdSense アカウントを申し込んでいるのか、既存の AdSense アカウントを使っているのかを完全に把握する必要があります。
- AdSense プログラム ポリシーに関する情報。申し込むユーザーは、AdSense プログラムとそのポリシーについて把握する必要があります。
- ユーザーが受け取る収益の分配率。AdSense での収益について、プラットフォームとそのユーザー(パブリッシャー)の間での収益分配率をユーザーに明示することが重要です。この情報は、AdSense のオンボーディング フローの中でも表示されます。
- [AdSense をリンク] ボタン。このボタンがクリックされると、AdSense Management API を使ってユーザーの AdSense アカウント情報にアクセスする権限がプラットフォームに付与されます。このボタンの実装手順については、AdSense のデベロッパー向けドキュメントをご覧ください。この API を使うと、次の 2 つのステップを実施できます。
- AdSense Management API を使って、ユーザーの AdSense パブリッシャー ID を取得する。入力された文字列に間違いがないか確認してください。
パブリッシャー ID の形式は、pub-1234567890987654
です。または正規表現の場合は pub\-\d{16}
です。重要: ユーザーのパブリッシャー ID は必ず保存してください。そのユーザーのコンテンツ ページと正しいパブリッシャー情報をタグ付けするために必要です。詳しくは、ページに広告タグを追加するをご覧ください。
- AdSense Management API を使って、ユーザーがそのプラットフォームのサイトを自分の AdSense アカウントに追加したかどうか確認する。まだ追加されていない場合は、ユーザーに下のリンクをクリックして設定を完了するように促します。この API で確認する必要があるサイトの名前は、以下のリンク内の
{platform-site-url}
変数です。
https://adsense.google.com/adsense/signup?url={platform-site-url}
注: 申し込みページのカスタム URL が提供されており、url 変数の内容を定義できます。
- - ユーザーのタグ設定の状況。ユーザーは、自分のページに広告コードが配置されたかどうか把握したいと考えます。ユーザー エクスペリエンスの一環として、ページに広告コードが配置されたことをユーザーが把握できるよう、タグ設定の完了をユーザーに知らせます。また、子アカウントのメタタグを追加すると、サイトの確認手順で AdSense の作業が円滑になります。また、ユーザーに代わってページに広告タグを公開する必要がなくなります。
オプション 3: 埋め込み接続
埋め込みコネクトを使用すると、さまざまな状態の AdSense アカウントを扱う複雑さをすべて解消できます。埋め込み Connect フローでは、特定のユーザーの AdSense アカウントのアカウント、広告クライアント、サイトのステータスに基づいて、ユーザーごとにカスタマイズされたオンボーディング エクスペリエンスが提供されるため、管理者が手動でオンボーディングを行う必要はありません。

実装には、JavaScript ライブラリ、AdSense が登録ウィジェットをレンダリングする空の div、ユーザーが登録フローを完了した後にパブリッシャー ID を保存できるコールバック関数が必要です。AdSense Management API を補完的に使用して、広告ユニットや自動広告の状態を取得するなど、機能を拡張できます。
Embedded Connect の詳細
特に記載のない限り、このページのコンテンツはクリエイティブ・コモンズの表示 4.0 ライセンスにより使用許諾されます。コードサンプルは Apache 2.0 ライセンスにより使用許諾されます。詳しくは、Google Developers サイトのポリシーをご覧ください。Java は Oracle および関連会社の登録商標です。
[null,null,[],[[["\u003cp\u003eAdSense for Platforms (AFP) offers three signup flow options to onboard users, each with varying technical requirements and user experiences.\u003c/p\u003e\n"],["\u003cp\u003eThe API-less flow is the simplest to implement but requires more user steps; the Semi-assisted API flow utilizes the AdSense Management API for a smoother experience; and Embedded Connect provides a fully customized and automated signup process.\u003c/p\u003e\n"],["\u003cp\u003eAll signup flows necessitate clear communication with users about AdSense policies, revenue share, and tagging status, ensuring transparency and understanding.\u003c/p\u003e\n"],["\u003cp\u003eRegardless of the chosen flow, securely storing the user's AdSense Publisher ID is crucial for proper ad serving and revenue tracking.\u003c/p\u003e\n"],["\u003cp\u003eAFP provides flexibility for platforms to tailor the signup experience to their specific needs and technical capabilities while adhering to AdSense guidelines.\u003c/p\u003e\n"]]],["The document outlines three signup flows for integrating AdSense into a platform. The API-less flow requires users to manually connect their AdSense account via a link and input their publisher ID. The semi-assisted API flow utilizes the AdSense Management API to retrieve the user's publisher ID and check their site status, reducing user steps. Embedded Connect, a third option, uses a JavaScript library for a streamlined experience and handles complex account states automatically. All options involve displaying AdSense policies and revenue sharing information.\n"],null,["Choose a sign up flow\n---------------------\n\nAn important decision with AFP is to choose a sign up flow to onboard your users. The purpose of the sign up is to allow your users to create a new AdSense account (or sign in to an existing AdSense account) and link it to your platform. The option you choose will depend on the technical resources you want to invest in development and the onboarding experience you want to provide for your users.\n\n### Option 1: API-less flow\n\nOption 1 requires the fewest technical resources as it doesn't use an API. You will only need a web developer to build the user interface within your platform. However, the trade-off is that this option requires your users to take more steps to complete the signup flow.\n\n#### Overview of the API-less signup flow\n\n#### Implementation\n\nTo implement an API-less signup flow, you need to provide a UI component for AdSense monetization. For example, on the page where your users access their \"user profile\" or \"account settings\", add a monetization page that includes the following:\n\n- A short description of AdSense and how it interacts with your platform. Users should be completely aware that they're either signing up for a new AdSense account or using their existing AdSense account.\n- Information about the [AdSense Program policies](https://support.google.com/adsense/answer/48182). All users who sign up should be aware of the AdSense Program and its policies.\n- The revenue share that your users will receive. It's important to explicitly show users what percentage of the AdSense revenue you will keep and what percentage the publisher will keep. AdSense will additionally show this information during the onboarding flow.\n- A \"Connect AdSense\" button. This button will open a new tab and take the user to the correct page in AdSense depending on whether or not they have an existing AdSense account. \n Example custom URL: \n `https://adsense.google.com/adsense/signup?url={platform-site-url}` \n **Note:** Google will provide you with the URL of the custom signup page, and help you define the contents of the URL variable.\n- An input box to collect and store the user's AdSense publisher ID. After a user visits the link above, they will need to copy and paste their publisher ID into this input box. \n **Important:** It's critical that you store the user's publisher ID so that you can tag the user's content pages with the correct publisher information. See the [Add the ad tag to your pages](/adsense/platforms/transparent/ad-tags) for more information. \n Make sure you validate the inputted string. The format of a publisher ID is: `pub-1234567890987654` \n Or in regex terms: `pub\\-\\d{16}` \n **Important:** Some AdSense users may paste their publisher ID without clicking on the \"Connect AdSense\" button. It's important to let users know that the **Sites** page in their AdSense account needs to have the platform domain listed before ads can be served. This is the primary purpose of this button.\n- The user's tagging status. Users will want to know whether their ad code has been placed on their pages or not. As part of the user experience, let your users know when you've tagged their pages with their AdSense publisher ID. You can additionally populate the [child account meta tag](/adsense/platforms/transparent/meta-tags#child_account) which will assist AdSense during the site verification steps. This also removes the need to publish ad tags on their pages on the user's behalf.\n\n### Option 2: Semi-assisted API flow\n\nOption 2 uses the [AdSense Management API](https://developers.google.com/adsense/management) to slightly simplify the signup flow. It requires more technical resources but reduces the number of steps your users need to take to sign up for AdSense.\n\n#### Overview of the semi-assisted API flow\n\n#### Implementation\n\nTo implement a semi-assisted signup flow with an API, you need to provide a UI component for AdSense monetization. For example, on the page where your users access their \"user profile\" or \"account settings\", add a monetization page that includes the following:\n\n- A short description of AdSense and how it interacts with your platform. Users should be completely aware that they are signing up for a Google AdSense account, or using their existing AdSense account.\n- Information about the [AdSense Program policies](https://support.google.com/adsense/answer/48182). All users who sign up should be aware of the AdSense Program and its policies.\n- The revenue share that your users will receive. It's important to explicitly show users what percentage of the AdSense revenue you will keep and what percentage the publisher will keep. AdSense will additionally show this information during the onboarding flow.\n- A \"Connect AdSense\" button. This button will authorize you as the platform to access an AdSense customer's account information using the [AdSense Management API](https://developers.google.com/adsense/management). Please follow the instructions on our developer documentation to set this up. Using this API you can perform the next two steps.\n- Use the AdSense Management API to collect the user's AdSense publisher ID. Make sure you validate the inputted string. \n The format of a publisher ID is: `pub-1234567890987654` \n Or in regex terms: `pub\\-\\d{16}` \n **Important:** It's critical that you store the user's publisher ID so that you can tag the user's content pages with the correct publisher information. See the See the [Add the ad tag to your pages](/adsense/platforms/transparent/ad-tags) for more information.\n- Use the AdSense Management API to check if the user has added the platform site to their AdSense account. If not, ask the user to follow the link below to complete the set up. The name of the site you should check for in the API is the `{platform-site-url}` variable in the link below. \n `https://adsense.google.com/adsense/signup?url={platform-site-url}` \n **Note:** Google will provide you with the URL of the custom signup page, and help you define the contents of the url variable.\n- - The user's tagging status. Users will want to know whether their ad code has been placed on their pages or not. As part of the user experience, let your users know when you've tagged their pages with their AdSense publisher ID. You can additionally populate the [child account meta tag](/adsense/platforms/transparent/meta-tags#child_account) which will assist AdSense during the site verification steps. This also removes the need to publish ad tags on their pages on the user's behalf.\n\n### Option 3: Embedded Connect\n\nEmbedded Connect removes all the complexity of dealing with AdSense accounts in different states. Depending on the account, ad client and site statuses for a given user's AdSense account, the Embedded Connect flow will present a customized onboarding experience for each user so that you don't have to.\n\nThe implementation involves a JavaScript library, an empty div where AdSense will render a sign-up widget, and some callback functions which will allow you to save the publisher ID once the user has completed the sign-up flow. You can supplementally use the [AdSense Management API](/adsense/management) to augment the experience, for example by retrieving ad units or the state of Auto ads.\n\n[Learn more about Embedded Connect](/adsense/platforms/transparent/embedded-connect)"]]