컬렉션을 사용해 정리하기
내 환경설정을 기준으로 콘텐츠를 저장하고 분류하세요.
가입 절차 선택
AFP에서 중요한 결정은 사용자를 온보딩하기 위한 가입 절차를 선택하는 일입니다. 가입의 목적은 사용자가 새로운 애드센스 계정을 생성 (또는 기존 애드센스 계정에 로그인)하도록 하여 계정을 플랫폼에 연결하기 위함입니다. 선택하는 옵션은 개발에 투자하고자 하는 기술 리소스와 더불어 사용자에게 제공하고자 하는 온보딩 경험에 따라 달라집니다.
옵션 1: API가 없는 절차
옵션 1에서는 API를 사용하지 않으므로 가장 적은 기술 리소스를 필요로 합니다. 플랫폼 내에서 사용자 인터페이스를 구축할 웹 개발자만 있으면 됩니다. 하지만 이 옵션을 사용할 경우 사용자가 가입 절차를 완료하려면 여러 단계를 거쳐야 한다는 단점이 있습니다.
API가 없는 가입 절차 개요

구현
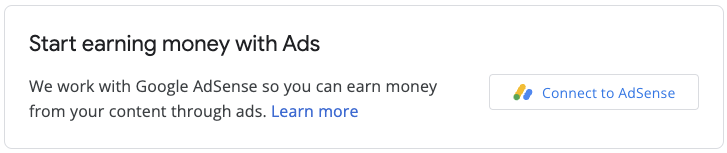
API가 없는 가입 절차를 구현하려면 애드센스 수익 창출을 위한 UI 구성요소를 제공해야 합니다. 예를 들어 사용자가 '사용자 프로필' 또는 '계정 설정'에 액세스하는 페이지에 다음을 포함하는 수익 창출 페이지를 추가합니다.
- 애드센스에 관한 짧은 설명 및 애드센스와 플랫폼이 상호작용하는 방식. 사용자는 새로운 애드센스 계정에 가입하고 있거나 기존 애드센스 계정을 사용하고 있다는 사실을 전적으로 인지하고 있어야 합니다.
- 애드센스 프로그램 정책에 관한 정보 가입하는 모든 사용자는 애드센스 프로그램 및 정책을 알아야 합니다.
- 사용자가 받게 될 수익 배분율. 애드센스 수익 중 플랫폼이 차지할 비율과 게시자가 차지할 비율을 명시적으로 표시해야 합니다. 애드센스에서는 온보딩 과정에서 이 정보를 부가적으로 표시합니다.
- '애드센스 연결' 버튼. 이 버튼을 누르면 새 탭이 열리고 기존 애드센스 계정 보유 여부에 따라 사용자는 애드센스의 올바른 페이지로 이동합니다.
맞춤 URL 예:
https://adsense.google.com/adsense/signup?url={platform-site-url}
참고: Google에서 맞춤 가입 페이지 URL을 제공하며, URL 변수의 콘텐츠를 정의할 수 있도록 지원합니다.
- 사용자의 애드센스 게시자 ID를 수집하고 저장하기 위한 입력 상자. 사용자가 위의 링크를 방문한 후 게시자 ID를 복사하여 입력 상자에 붙여넣어야 합니다.
중요: 올바른 게시자 정보로 사용자의 콘텐츠 페이지를 태그할 수 있도록 사용자의 게시자 ID를 저장해야 합니다. 자세한 내용은 페이지에 광고 태그 추가하기를 참고하세요.
입력된 문자열을 확인해야 합니다. 게시자 ID 형식은 pub-1234567890987654
입니다. 또는 정규식 용어로는 pub\-\d{16}
입니다. 중요: 일부 애드센스 사용자는 '애드센스 연결' 버튼을 클릭하지 않고도 게시자 ID를 붙여넣을 수 있습니다. 사용자의 애드센스 계정에 있는 사이트 페이지에 플랫폼 도메인이 등록되어 있어야 광고를 게재할 수 있다고 사용자에게 알려야 합니다. 이는 이 버튼의 주목적입니다.
- 사용자의 태그 추가 상태. 사용자는 광고 코드가 페이지에 추가되었는지 확인하고 싶어 합니다. 사용자 환경의 일환으로, 사용자의 애드센스 게시자 ID를 사용하여 사용자의 페이지에 태그를 언제 추가했는지 사용자에게 알리세요. 사이트 인증 단계에서 애드센스를 지원하는 하위 계정 메타 태그를 추가로 입력할 수도 있습니다. 또한 사용자를 대신하여 페이지에 광고 태그를 게시할 필요가 없습니다.
옵션 2: API 일부 지원형 절차
옵션 2에서는 AdSense Management API를 사용하여 가입 절차를 약간 간소화합니다. 옵션 2의 경우, 기술 리소스를 더 필요로 하지만 애드센스에 가입하기 위해 사용자가 거쳐야 할 단계의 수가 줄어듭니다.
API 일부 지원형 절차 개요

구현
API를 사용하여 일부 지원형 가입 절차를 구현하려면 애드센스 수익 창출을 위한 UI 구성요소를 제공해야 합니다. 예를 들어 사용자가 '사용자 프로필' 또는 '계정 설정'에 액세스하는 페이지에 다음을 포함하는 수익 창출 페이지를 추가합니다.
- 애드센스에 관한 짧은 설명 및 애드센스와 플랫폼이 상호작용하는 방식. 사용자는 Google 애드센스 계정에 가입하고 있거나 기존 애드센스 계정을 사용하고 있다는 사실을 전적으로 인지하고 있어야 합니다.
- 애드센스 프로그램 정책에 관한 정보 가입하는 모든 사용자는 애드센스 프로그램 및 정책을 알아야 합니다.
- 사용자가 받게 될 수익 배분율. 애드센스 수익 중 플랫폼이 차지할 비율과 게시자가 차지할 비율을 명시적으로 표시해야 합니다. 애드센스에서는 온보딩 과정에서 이 정보를 부가적으로 표시합니다.
- '애드센스 연결' 버튼. 이 버튼을 통해 플랫폼으로서 승인을 받아 AdSense Management API를 사용하여 애드센스 고객의 계정 정보에 액세스할 수 있습니다. 이와 같이 설정하려면 개발자 문서에 나와 있는 안내를 따르세요. 이 API를 사용하면 다음 두 가지 작업을 처리할 수 있습니다.
- AdSense Management API를 사용하여 사용자의 애드센스 게시자 ID를 수집합니다. 입력된 문자열을 확인해야 합니다.
게시자 ID 형식은 pub-1234567890987654
입니다.
또는 정규식 용어로는 pub\-\d{16}
입니다.
중요: 사용자의 콘텐츠 페이지에 올바른 게시자 정보를 태그할 수 있도록 사용자의 게시자 ID를 저장해야 합니다. 자세한 내용은 페이지에 광고 태그 추가하기를 참고하세요.
- AdSense Management API를 사용하여 사용자가 애드센스 계정에 플랫폼 사이트를 추가했는지 확인합니다. 사용자가 아직 추가하지 않은 경우, 사용자에게 아래 링크를 따라 설정을 완료하라고 안내합니다. API에서 확인해야 하는 사이트의 이름은 아래 링크의
{platform-site-url}
변수입니다.
https://adsense.google.com/adsense/signup?url={platform-site-url}
참고: Google에서 맞춤 가입 페이지의 URL을 제공하며, url 변수의 콘텐츠를 정의할 수 있도록 지원합니다.
- - 사용자의 태그 추가 상태 사용자는 광고 코드가 페이지에 추가되었는지 확인하고 싶어 합니다. 사용자 환경의 일환으로, 사용자의 애드센스 게시자 ID를 사용하여 사용자의 페이지에 태그를 언제 추가했는지 사용자에게 알리세요. 사이트 인증 단계에서 애드센스를 지원하는 하위 계정 메타 태그를 추가로 입력할 수도 있습니다. 또한 사용자를 대신하여 페이지에 광고 태그를 게시할 필요가 없습니다.
옵션 3: 삽입된 연결
삽입된 연결을 사용하면 다양한 상태의 애드센스 계정을 처리하는 데 따르는 복잡성을 모두 제거할 수 있습니다. 특정 사용자의 애드센스 계정의 계정, 광고 클라이언트, 사이트 상태에 따라 삽입된 연결 흐름은 관리자가 직접 하지 않아도 각 사용자에게 맞춤설정된 온보딩 환경을 제공합니다.

구현에는 JavaScript 라이브러리, 애드센스가 가입 위젯을 렌더링할 빈 div, 사용자가 가입 절차를 완료하면 게시자 ID를 저장할 수 있는 일부 콜백 함수가 포함됩니다. 애드센스 관리 API를 보완적으로 사용하여 광고 단위 또는 자동 광고의 상태를 검색하는 등 환경을 개선할 수 있습니다.
Embedded Connect 자세히 알아보기
달리 명시되지 않는 한 이 페이지의 콘텐츠에는 Creative Commons Attribution 4.0 라이선스에 따라 라이선스가 부여되며, 코드 샘플에는 Apache 2.0 라이선스에 따라 라이선스가 부여됩니다. 자세한 내용은 Google Developers 사이트 정책을 참조하세요. 자바는 Oracle 및/또는 Oracle 계열사의 등록 상표입니다.
[null,null,[],[[["\u003cp\u003eAdSense for Platforms (AFP) offers three signup flow options to onboard users, each with varying technical requirements and user experiences.\u003c/p\u003e\n"],["\u003cp\u003eThe API-less flow is the simplest to implement but requires more user steps; the Semi-assisted API flow utilizes the AdSense Management API for a smoother experience; and Embedded Connect provides a fully customized and automated signup process.\u003c/p\u003e\n"],["\u003cp\u003eAll signup flows necessitate clear communication with users about AdSense policies, revenue share, and tagging status, ensuring transparency and understanding.\u003c/p\u003e\n"],["\u003cp\u003eRegardless of the chosen flow, securely storing the user's AdSense Publisher ID is crucial for proper ad serving and revenue tracking.\u003c/p\u003e\n"],["\u003cp\u003eAFP provides flexibility for platforms to tailor the signup experience to their specific needs and technical capabilities while adhering to AdSense guidelines.\u003c/p\u003e\n"]]],["The document outlines three signup flows for integrating AdSense into a platform. The API-less flow requires users to manually connect their AdSense account via a link and input their publisher ID. The semi-assisted API flow utilizes the AdSense Management API to retrieve the user's publisher ID and check their site status, reducing user steps. Embedded Connect, a third option, uses a JavaScript library for a streamlined experience and handles complex account states automatically. All options involve displaying AdSense policies and revenue sharing information.\n"],null,["Choose a sign up flow\n---------------------\n\nAn important decision with AFP is to choose a sign up flow to onboard your users. The purpose of the sign up is to allow your users to create a new AdSense account (or sign in to an existing AdSense account) and link it to your platform. The option you choose will depend on the technical resources you want to invest in development and the onboarding experience you want to provide for your users.\n\n### Option 1: API-less flow\n\nOption 1 requires the fewest technical resources as it doesn't use an API. You will only need a web developer to build the user interface within your platform. However, the trade-off is that this option requires your users to take more steps to complete the signup flow.\n\n#### Overview of the API-less signup flow\n\n#### Implementation\n\nTo implement an API-less signup flow, you need to provide a UI component for AdSense monetization. For example, on the page where your users access their \"user profile\" or \"account settings\", add a monetization page that includes the following:\n\n- A short description of AdSense and how it interacts with your platform. Users should be completely aware that they're either signing up for a new AdSense account or using their existing AdSense account.\n- Information about the [AdSense Program policies](https://support.google.com/adsense/answer/48182). All users who sign up should be aware of the AdSense Program and its policies.\n- The revenue share that your users will receive. It's important to explicitly show users what percentage of the AdSense revenue you will keep and what percentage the publisher will keep. AdSense will additionally show this information during the onboarding flow.\n- A \"Connect AdSense\" button. This button will open a new tab and take the user to the correct page in AdSense depending on whether or not they have an existing AdSense account. \n Example custom URL: \n `https://adsense.google.com/adsense/signup?url={platform-site-url}` \n **Note:** Google will provide you with the URL of the custom signup page, and help you define the contents of the URL variable.\n- An input box to collect and store the user's AdSense publisher ID. After a user visits the link above, they will need to copy and paste their publisher ID into this input box. \n **Important:** It's critical that you store the user's publisher ID so that you can tag the user's content pages with the correct publisher information. See the [Add the ad tag to your pages](/adsense/platforms/transparent/ad-tags) for more information. \n Make sure you validate the inputted string. The format of a publisher ID is: `pub-1234567890987654` \n Or in regex terms: `pub\\-\\d{16}` \n **Important:** Some AdSense users may paste their publisher ID without clicking on the \"Connect AdSense\" button. It's important to let users know that the **Sites** page in their AdSense account needs to have the platform domain listed before ads can be served. This is the primary purpose of this button.\n- The user's tagging status. Users will want to know whether their ad code has been placed on their pages or not. As part of the user experience, let your users know when you've tagged their pages with their AdSense publisher ID. You can additionally populate the [child account meta tag](/adsense/platforms/transparent/meta-tags#child_account) which will assist AdSense during the site verification steps. This also removes the need to publish ad tags on their pages on the user's behalf.\n\n### Option 2: Semi-assisted API flow\n\nOption 2 uses the [AdSense Management API](https://developers.google.com/adsense/management) to slightly simplify the signup flow. It requires more technical resources but reduces the number of steps your users need to take to sign up for AdSense.\n\n#### Overview of the semi-assisted API flow\n\n#### Implementation\n\nTo implement a semi-assisted signup flow with an API, you need to provide a UI component for AdSense monetization. For example, on the page where your users access their \"user profile\" or \"account settings\", add a monetization page that includes the following:\n\n- A short description of AdSense and how it interacts with your platform. Users should be completely aware that they are signing up for a Google AdSense account, or using their existing AdSense account.\n- Information about the [AdSense Program policies](https://support.google.com/adsense/answer/48182). All users who sign up should be aware of the AdSense Program and its policies.\n- The revenue share that your users will receive. It's important to explicitly show users what percentage of the AdSense revenue you will keep and what percentage the publisher will keep. AdSense will additionally show this information during the onboarding flow.\n- A \"Connect AdSense\" button. This button will authorize you as the platform to access an AdSense customer's account information using the [AdSense Management API](https://developers.google.com/adsense/management). Please follow the instructions on our developer documentation to set this up. Using this API you can perform the next two steps.\n- Use the AdSense Management API to collect the user's AdSense publisher ID. Make sure you validate the inputted string. \n The format of a publisher ID is: `pub-1234567890987654` \n Or in regex terms: `pub\\-\\d{16}` \n **Important:** It's critical that you store the user's publisher ID so that you can tag the user's content pages with the correct publisher information. See the See the [Add the ad tag to your pages](/adsense/platforms/transparent/ad-tags) for more information.\n- Use the AdSense Management API to check if the user has added the platform site to their AdSense account. If not, ask the user to follow the link below to complete the set up. The name of the site you should check for in the API is the `{platform-site-url}` variable in the link below. \n `https://adsense.google.com/adsense/signup?url={platform-site-url}` \n **Note:** Google will provide you with the URL of the custom signup page, and help you define the contents of the url variable.\n- - The user's tagging status. Users will want to know whether their ad code has been placed on their pages or not. As part of the user experience, let your users know when you've tagged their pages with their AdSense publisher ID. You can additionally populate the [child account meta tag](/adsense/platforms/transparent/meta-tags#child_account) which will assist AdSense during the site verification steps. This also removes the need to publish ad tags on their pages on the user's behalf.\n\n### Option 3: Embedded Connect\n\nEmbedded Connect removes all the complexity of dealing with AdSense accounts in different states. Depending on the account, ad client and site statuses for a given user's AdSense account, the Embedded Connect flow will present a customized onboarding experience for each user so that you don't have to.\n\nThe implementation involves a JavaScript library, an empty div where AdSense will render a sign-up widget, and some callback functions which will allow you to save the publisher ID once the user has completed the sign-up flow. You can supplementally use the [AdSense Management API](/adsense/management) to augment the experience, for example by retrieving ad units or the state of Auto ads.\n\n[Learn more about Embedded Connect](/adsense/platforms/transparent/embedded-connect)"]]