با مجموعهها، منظم بمانید
ذخیره و طبقهبندی محتوا براساس اولویتهای شما.
یک جریان ثبت نام را انتخاب کنید
یک تصمیم مهم با AFP این است که یک جریان ثبت نام برای کاربران خود انتخاب کنید. هدف از ثبت نام این است که به کاربران خود اجازه دهید یک حساب AdSense جدید ایجاد کنند (یا به یک حساب AdSense موجود وارد شوند) و آن را به پلت فرم شما پیوند دهند. گزینه ای که انتخاب می کنید به منابع فنی که می خواهید در توسعه سرمایه گذاری کنید و تجربه حضوری که می خواهید برای کاربران خود ارائه دهید بستگی دارد.
گزینه 1: جریان بدون API
گزینه 1 به کمترین منابع فنی نیاز دارد زیرا از API استفاده نمی کند. برای ایجاد رابط کاربری در پلتفرم خود فقط به یک توسعه دهنده وب نیاز دارید. با این حال، مبادله این است که این گزینه از کاربران شما میخواهد تا گامهای بیشتری برای تکمیل جریان ثبتنام بردارند.
مروری بر جریان ثبت نام بدون API

پیاده سازی
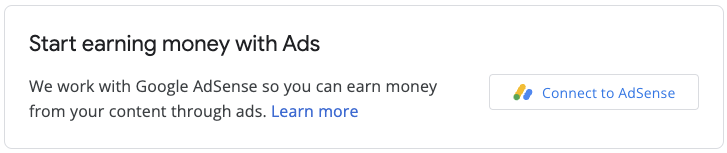
برای اجرای یک جریان ثبت نام بدون API، باید یک مؤلفه رابط کاربری برای کسب درآمد AdSense ارائه دهید. برای مثال، در صفحهای که کاربران شما به «نمایه کاربر» یا «تنظیمات حساب» خود دسترسی دارند، یک صفحه کسب درآمد اضافه کنید که شامل موارد زیر است:
- شرح کوتاهی از AdSense و نحوه تعامل آن با پلتفرم شما. کاربران باید کاملاً آگاه باشند که یا در حال ثبت نام برای یک حساب AdSense جدید هستند یا از حساب AdSense موجود خود استفاده می کنند.
- اطلاعاتی درباره خطمشیهای برنامه AdSense . همه کاربرانی که ثبت نام می کنند باید از برنامه AdSense و خط مشی های آن آگاه باشند.
- سهم درآمدی که کاربران شما دریافت خواهند کرد. این مهم است که به طور صریح به کاربران نشان دهید که چه درصدی از درآمد AdSense را حفظ خواهید کرد و چه درصدی را ناشر حفظ خواهد کرد. AdSense علاوه بر این، این اطلاعات را در طول جریان ورود نشان خواهد داد.
- دکمه "اتصال AdSense". این دکمه یک برگه جدید باز می کند و کاربر را بسته به اینکه آیا یک حساب AdSense موجود دارد یا نه، به صفحه صحیح AdSense می برد.
نمونه URL سفارشی:
https://adsense.google.com/adsense/signup?url={platform-site-url}
توجه: گوگل URL صفحه ثبت نام سفارشی را در اختیار شما قرار می دهد و به شما کمک می کند تا محتوای متغیر URL را تعریف کنید. - یک کادر ورودی برای جمع آوری و ذخیره شناسه ناشر AdSense کاربر. پس از بازدید کاربر از پیوند بالا، باید شناسه ناشر خود را کپی کرده و در این کادر ورودی جایگذاری کند.
مهم: بسیار مهم است که شناسه ناشر کاربر را ذخیره کنید تا بتوانید صفحات محتوای کاربر را با اطلاعات ناشر صحیح برچسب گذاری کنید. برای اطلاعات بیشتر به تگ تبلیغ به صفحات خود اضافه کنید .
مطمئن شوید که رشته ورودی را تایید کرده اید. فرمت شناسه ناشر: pub-1234567890987654
یا به عبارت regex: pub\-\d{16}
مهم: برخی از کاربران AdSense ممکن است شناسه ناشر خود را بدون کلیک کردن روی دکمه "اتصال AdSense" جایگذاری کنند. مهم است که به کاربران اطلاع دهید که صفحه Sites در حساب AdSense آنها باید دامنه پلتفرم را قبل از ارائه تبلیغات فهرست کرده باشد. این هدف اصلی این دکمه است. - وضعیت برچسب گذاری کاربر کاربران می خواهند بدانند که آیا کد تبلیغاتی آنها در صفحات آنها قرار گرفته است یا خیر. به عنوان بخشی از تجربه کاربری، به کاربران خود اطلاع دهید وقتی صفحات آنها را با شناسه ناشر AdSense آنها برچسب گذاری کرده اید. همچنین میتوانید متا تگ حساب فرزند را پر کنید که به AdSense در طی مراحل تأیید سایت کمک میکند. این همچنین نیاز به انتشار برچسب های تبلیغاتی در صفحات آنها از طرف کاربر را از بین می برد.
گزینه 2: جریان API نیمه کمکی
گزینه 2 از API مدیریت AdSense استفاده می کند تا جریان ثبت نام را کمی ساده کند. به منابع فنی بیشتری نیاز دارد اما تعداد مراحلی را که کاربران شما برای ثبت نام در AdSense باید انجام دهند را کاهش می دهد.
مروری بر جریان API نیمه کمکی

پیاده سازی
برای اجرای یک جریان ثبت نام نیمه کمکی با یک API، باید یک مؤلفه رابط کاربری برای کسب درآمد AdSense ارائه دهید. برای مثال، در صفحهای که کاربران شما به «نمایه کاربر» یا «تنظیمات حساب» خود دسترسی دارند، یک صفحه کسب درآمد اضافه کنید که شامل موارد زیر است:
- شرح کوتاهی از AdSense و نحوه تعامل آن با پلتفرم شما. کاربران باید کاملاً آگاه باشند که برای یک حساب Google AdSense ثبت نام کرده اند یا از حساب AdSense موجود خود استفاده می کنند.
- اطلاعاتی درباره خطمشیهای برنامه AdSense . همه کاربرانی که ثبت نام می کنند باید از برنامه AdSense و خط مشی های آن آگاه باشند.
- سهم درآمدی که کاربران شما دریافت خواهند کرد. این مهم است که به طور صریح به کاربران نشان دهید که چه درصدی از درآمد AdSense را حفظ خواهید کرد و چه درصدی را ناشر حفظ خواهد کرد. AdSense علاوه بر این، این اطلاعات را در طول جریان ورود نشان خواهد داد.
- دکمه "اتصال AdSense". این دکمه به شما اجازه میدهد تا با استفاده از API مدیریت AdSense به اطلاعات حساب مشتری AdSense دسترسی داشته باشید. لطفاً دستورالعملهای موجود در اسناد توسعهدهنده ما را برای تنظیم آن دنبال کنید. با استفاده از این API می توانید دو مرحله بعدی را انجام دهید.
- از API مدیریت AdSense برای جمع آوری شناسه ناشر AdSense کاربر استفاده کنید. مطمئن شوید که رشته ورودی را تایید کرده اید.
فرمت شناسه ناشر: pub-1234567890987654
یا به عبارت regex: pub\-\d{16}
مهم: بسیار مهم است که شناسه ناشر کاربر را ذخیره کنید تا بتوانید صفحات محتوای کاربر را با اطلاعات ناشر صحیح برچسب گذاری کنید. برای اطلاعات بیشتر به تگ مشاهده آگهی افزودن به صفحات خود مراجعه کنید. - از API مدیریت AdSense استفاده کنید تا بررسی کنید آیا کاربر سایت پلتفرم را به حساب AdSense خود اضافه کرده است یا خیر. در غیر این صورت، از کاربر بخواهید برای تکمیل تنظیمات، پیوند زیر را دنبال کند. نام سایتی که باید در API بررسی کنید، متغیر
{platform-site-url}
در لینک زیر است.
https://adsense.google.com/adsense/signup?url={platform-site-url}
توجه: گوگل URL صفحه ثبت نام سفارشی را در اختیار شما قرار می دهد و به شما کمک می کند تا محتوای متغیر url را تعریف کنید. - - وضعیت برچسب گذاری کاربر. کاربران می خواهند بدانند که آیا کد تبلیغاتی آنها در صفحات آنها قرار گرفته است یا خیر. به عنوان بخشی از تجربه کاربری، به کاربران خود اطلاع دهید وقتی صفحات آنها را با شناسه ناشر AdSense آنها برچسب گذاری کرده اید. همچنین میتوانید متا تگ حساب فرزند را پر کنید که به AdSense در طی مراحل تأیید سایت کمک میکند. این همچنین نیاز به انتشار برچسب های تبلیغاتی در صفحات آنها از طرف کاربر را از بین می برد.
گزینه 3: Embedded Connect
Embedded Connect تمام پیچیدگی های برخورد با حساب های AdSense را در ایالت های مختلف حذف می کند. بسته به حساب، سرویس گیرنده آگهی و وضعیت سایت برای حساب AdSense یک کاربر خاص، جریان اتصال جاسازی شده یک تجربه ورود سفارشی شده برای هر کاربر ارائه می دهد تا شما مجبور نباشید.

این پیادهسازی شامل یک کتابخانه جاوا اسکریپت، یک div خالی است که در آن AdSense یک ابزارک ثبتنام را ارائه میکند، و برخی عملکردهای برگشتی که به شما امکان میدهند شناسه ناشر را پس از تکمیل جریان ثبتنام ذخیره کنید. میتوانید از API مدیریت AdSense برای تقویت تجربه استفاده کنید، برای مثال با بازیابی واحدهای تبلیغاتی یا وضعیت تبلیغات خودکار.
درباره Embedded Connect بیشتر بیاموزید
جز در مواردی که غیر از این ذکر شده باشد،محتوای این صفحه تحت مجوز Creative Commons Attribution 4.0 License است. نمونه کدها نیز دارای مجوز Apache 2.0 License است. برای اطلاع از جزئیات، به خطمشیهای سایت Google Developers مراجعه کنید. جاوا علامت تجاری ثبتشده Oracle و/یا شرکتهای وابسته به آن است.
[null,null,[],[[["\u003cp\u003eAdSense for Platforms (AFP) offers three signup flow options to onboard users, each with varying technical requirements and user experiences.\u003c/p\u003e\n"],["\u003cp\u003eThe API-less flow is the simplest to implement but requires more user steps; the Semi-assisted API flow utilizes the AdSense Management API for a smoother experience; and Embedded Connect provides a fully customized and automated signup process.\u003c/p\u003e\n"],["\u003cp\u003eAll signup flows necessitate clear communication with users about AdSense policies, revenue share, and tagging status, ensuring transparency and understanding.\u003c/p\u003e\n"],["\u003cp\u003eRegardless of the chosen flow, securely storing the user's AdSense Publisher ID is crucial for proper ad serving and revenue tracking.\u003c/p\u003e\n"],["\u003cp\u003eAFP provides flexibility for platforms to tailor the signup experience to their specific needs and technical capabilities while adhering to AdSense guidelines.\u003c/p\u003e\n"]]],["The document outlines three signup flows for integrating AdSense into a platform. The API-less flow requires users to manually connect their AdSense account via a link and input their publisher ID. The semi-assisted API flow utilizes the AdSense Management API to retrieve the user's publisher ID and check their site status, reducing user steps. Embedded Connect, a third option, uses a JavaScript library for a streamlined experience and handles complex account states automatically. All options involve displaying AdSense policies and revenue sharing information.\n"],null,["Choose a sign up flow\n---------------------\n\nAn important decision with AFP is to choose a sign up flow to onboard your users. The purpose of the sign up is to allow your users to create a new AdSense account (or sign in to an existing AdSense account) and link it to your platform. The option you choose will depend on the technical resources you want to invest in development and the onboarding experience you want to provide for your users.\n\n### Option 1: API-less flow\n\nOption 1 requires the fewest technical resources as it doesn't use an API. You will only need a web developer to build the user interface within your platform. However, the trade-off is that this option requires your users to take more steps to complete the signup flow.\n\n#### Overview of the API-less signup flow\n\n#### Implementation\n\nTo implement an API-less signup flow, you need to provide a UI component for AdSense monetization. For example, on the page where your users access their \"user profile\" or \"account settings\", add a monetization page that includes the following:\n\n- A short description of AdSense and how it interacts with your platform. Users should be completely aware that they're either signing up for a new AdSense account or using their existing AdSense account.\n- Information about the [AdSense Program policies](https://support.google.com/adsense/answer/48182). All users who sign up should be aware of the AdSense Program and its policies.\n- The revenue share that your users will receive. It's important to explicitly show users what percentage of the AdSense revenue you will keep and what percentage the publisher will keep. AdSense will additionally show this information during the onboarding flow.\n- A \"Connect AdSense\" button. This button will open a new tab and take the user to the correct page in AdSense depending on whether or not they have an existing AdSense account. \n Example custom URL: \n `https://adsense.google.com/adsense/signup?url={platform-site-url}` \n **Note:** Google will provide you with the URL of the custom signup page, and help you define the contents of the URL variable.\n- An input box to collect and store the user's AdSense publisher ID. After a user visits the link above, they will need to copy and paste their publisher ID into this input box. \n **Important:** It's critical that you store the user's publisher ID so that you can tag the user's content pages with the correct publisher information. See the [Add the ad tag to your pages](/adsense/platforms/transparent/ad-tags) for more information. \n Make sure you validate the inputted string. The format of a publisher ID is: `pub-1234567890987654` \n Or in regex terms: `pub\\-\\d{16}` \n **Important:** Some AdSense users may paste their publisher ID without clicking on the \"Connect AdSense\" button. It's important to let users know that the **Sites** page in their AdSense account needs to have the platform domain listed before ads can be served. This is the primary purpose of this button.\n- The user's tagging status. Users will want to know whether their ad code has been placed on their pages or not. As part of the user experience, let your users know when you've tagged their pages with their AdSense publisher ID. You can additionally populate the [child account meta tag](/adsense/platforms/transparent/meta-tags#child_account) which will assist AdSense during the site verification steps. This also removes the need to publish ad tags on their pages on the user's behalf.\n\n### Option 2: Semi-assisted API flow\n\nOption 2 uses the [AdSense Management API](https://developers.google.com/adsense/management) to slightly simplify the signup flow. It requires more technical resources but reduces the number of steps your users need to take to sign up for AdSense.\n\n#### Overview of the semi-assisted API flow\n\n#### Implementation\n\nTo implement a semi-assisted signup flow with an API, you need to provide a UI component for AdSense monetization. For example, on the page where your users access their \"user profile\" or \"account settings\", add a monetization page that includes the following:\n\n- A short description of AdSense and how it interacts with your platform. Users should be completely aware that they are signing up for a Google AdSense account, or using their existing AdSense account.\n- Information about the [AdSense Program policies](https://support.google.com/adsense/answer/48182). All users who sign up should be aware of the AdSense Program and its policies.\n- The revenue share that your users will receive. It's important to explicitly show users what percentage of the AdSense revenue you will keep and what percentage the publisher will keep. AdSense will additionally show this information during the onboarding flow.\n- A \"Connect AdSense\" button. This button will authorize you as the platform to access an AdSense customer's account information using the [AdSense Management API](https://developers.google.com/adsense/management). Please follow the instructions on our developer documentation to set this up. Using this API you can perform the next two steps.\n- Use the AdSense Management API to collect the user's AdSense publisher ID. Make sure you validate the inputted string. \n The format of a publisher ID is: `pub-1234567890987654` \n Or in regex terms: `pub\\-\\d{16}` \n **Important:** It's critical that you store the user's publisher ID so that you can tag the user's content pages with the correct publisher information. See the See the [Add the ad tag to your pages](/adsense/platforms/transparent/ad-tags) for more information.\n- Use the AdSense Management API to check if the user has added the platform site to their AdSense account. If not, ask the user to follow the link below to complete the set up. The name of the site you should check for in the API is the `{platform-site-url}` variable in the link below. \n `https://adsense.google.com/adsense/signup?url={platform-site-url}` \n **Note:** Google will provide you with the URL of the custom signup page, and help you define the contents of the url variable.\n- - The user's tagging status. Users will want to know whether their ad code has been placed on their pages or not. As part of the user experience, let your users know when you've tagged their pages with their AdSense publisher ID. You can additionally populate the [child account meta tag](/adsense/platforms/transparent/meta-tags#child_account) which will assist AdSense during the site verification steps. This also removes the need to publish ad tags on their pages on the user's behalf.\n\n### Option 3: Embedded Connect\n\nEmbedded Connect removes all the complexity of dealing with AdSense accounts in different states. Depending on the account, ad client and site statuses for a given user's AdSense account, the Embedded Connect flow will present a customized onboarding experience for each user so that you don't have to.\n\nThe implementation involves a JavaScript library, an empty div where AdSense will render a sign-up widget, and some callback functions which will allow you to save the publisher ID once the user has completed the sign-up flow. You can supplementally use the [AdSense Management API](/adsense/management) to augment the experience, for example by retrieving ad units or the state of Auto ads.\n\n[Learn more about Embedded Connect](/adsense/platforms/transparent/embedded-connect)"]]