लिंक की झलक देखें

जब उपयोगकर्ता Google Chat में कोई लिंक शेयर करते हैं, तो कॉन्टेक्स्ट स्विच होने से रोकने के लिए, आपका Chat ऐप्लिकेशन उनके मैसेज में कार्ड अटैच करके, लिंक की झलक दिखा सकता है. इससे, लोगों को ज़्यादा जानकारी मिलती है और वे Google Chat से ही कार्रवाई कर पाते हैं.

उदाहरण के लिए, मान लें कि किसी कंपनी के सभी ग्राहक सेवा एजेंट और Case-y नाम का चैट ऐप्लिकेशन, Google Chat के एक स्पेस में शामिल हैं. एजेंट अक्सर चैट स्पेस में, ग्राहक सेवा से जुड़े केस के लिंक शेयर करते हैं. ऐसा करने पर, उनके सहयोगियों को केस का लिंक खोलकर, असाइनी, स्टेटस, और विषय जैसी जानकारी देखनी पड़ती है. इसी तरह, अगर किसी व्यक्ति को किसी केस का मालिकाना हक लेना है या उसका स्टेटस बदलना है, तो उसे लिंक खोलना होगा.

लिंक की झलक दिखाने की सुविधा चालू होने पर, स्पेस में मौजूद Chat ऐप्लिकेशन, Case-y, जब भी कोई व्यक्ति केस का लिंक शेयर करता है, तो वह एक कार्ड अटैच करता है. इस कार्ड में, असाइनी, स्टेटस, और विषय की जानकारी दिखती है. कार्ड पर मौजूद बटन की मदद से, एजेंट केस का मालिकाना हक ले सकते हैं और सीधे चैट स्ट्रीम से स्टेटस बदल सकते हैं.

जब कोई व्यक्ति अपने मैसेज में लिंक जोड़ता है, तो एक चिप दिखता है. इससे उसे पता चलता है कि चैट ऐप्लिकेशन में लिंक की झलक दिख सकती है.
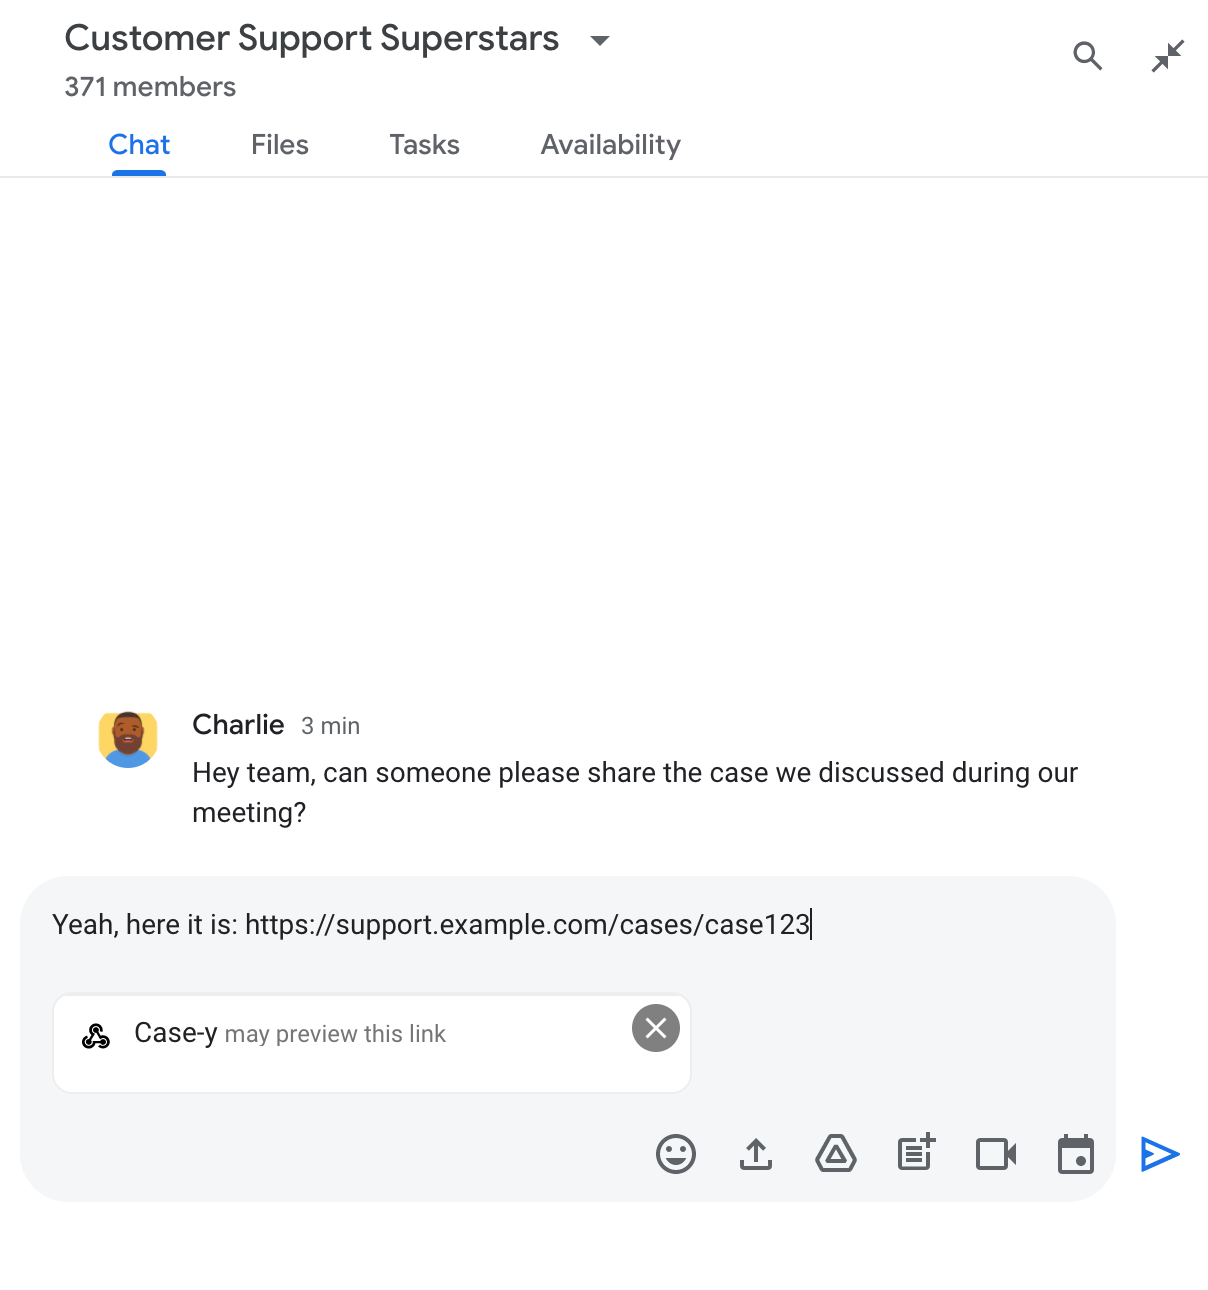
चैट ऐप्लिकेशन में लिंक की झलक दिखाने की सुविधा के बारे में बताने वाला चिप

मैसेज भेजने के बाद, लिंक को Chat ऐप्लिकेशन पर भेजा जाता है. इसके बाद, यह उपयोगकर्ता के मैसेज में कार्ड जनरेट करता है और उसे अटैच करता है.
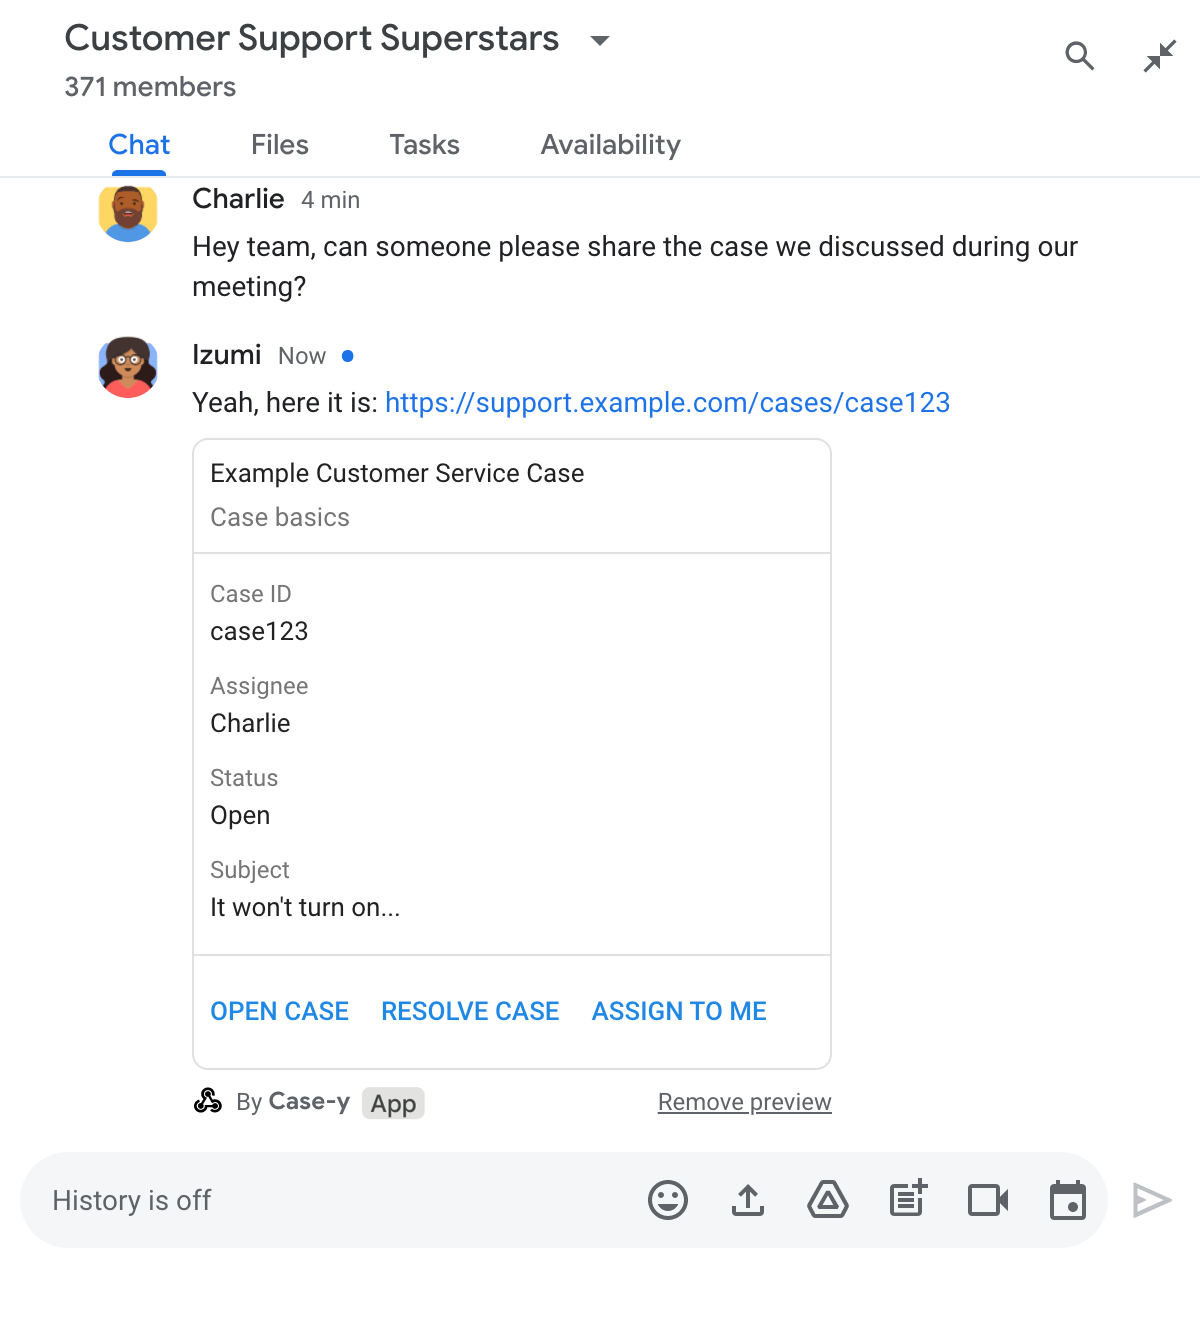
चैट ऐप्लिकेशन में मैसेज में कार्ड अटैच करके, लिंक की झलक दिखाना

लिंक के साथ-साथ, कार्ड में लिंक के बारे में ज़्यादा जानकारी भी दी जाती है. इसमें बटन जैसे इंटरैक्टिव एलिमेंट भी शामिल होते हैं. आपका Chat ऐप्लिकेशन, बटन पर क्लिक करने जैसे उपयोगकर्ता के इंटरैक्शन के हिसाब से, अटैच किए गए कार्ड को अपडेट कर सकता है.

अगर किसी व्यक्ति को अपने मैसेज में कार्ड अटैच करके, Chat ऐप्लिकेशन में लिंक की झलक नहीं दिखानी है, तो वह झलक वाले चिप पर पर क्लिक करके, झलक दिखाने की सुविधा को बंद कर सकता है. उपयोगकर्ता, झलक हटाएं पर क्लिक करके, अटैच किए गए कार्ड को किसी भी समय हटा सकते हैं.

ज़रूरी शर्तें

Node.js

Google Chat ऐप्लिकेशन, जिसमें इंटरैक्टिव सुविधाएं चालू हों. एचटीटीपी सेवा का इस्तेमाल करके, इंटरैक्टिव Chat ऐप्लिकेशन बनाने के लिए, यह क्विकस्टार्ट पूरा करें.

Python

Google Chat ऐप्लिकेशन, जिसमें इंटरैक्टिव सुविधाएं चालू हों. एचटीटीपी सेवा का इस्तेमाल करके, इंटरैक्टिव Chat ऐप्लिकेशन बनाने के लिए, यह क्विकस्टार्ट पूरा करें.

Java

Google Chat ऐप्लिकेशन, जिसमें इंटरैक्टिव सुविधाएं चालू हों. एचटीटीपी सेवा का इस्तेमाल करके, इंटरैक्टिव Chat ऐप्लिकेशन बनाने के लिए, यह क्विकस्टार्ट पूरा करें.

Apps Script

Google Chat ऐप्लिकेशन, जिसमें इंटरैक्टिव सुविधाएं चालू हों. Apps Script में इंटरैक्टिव Chat ऐप्लिकेशन बनाने के लिए, यह शुरुआती लेख पढ़ें.

Google Cloud Console में, Chat ऐप्लिकेशन के कॉन्फ़िगरेशन पेज पर, example.com, support.example.com, और support.example.com/cases/ जैसे खास लिंक को यूआरएल पैटर्न के तौर पर रजिस्टर करें, ताकि आपका Chat ऐप्लिकेशन उनकी झलक दिखा सके.
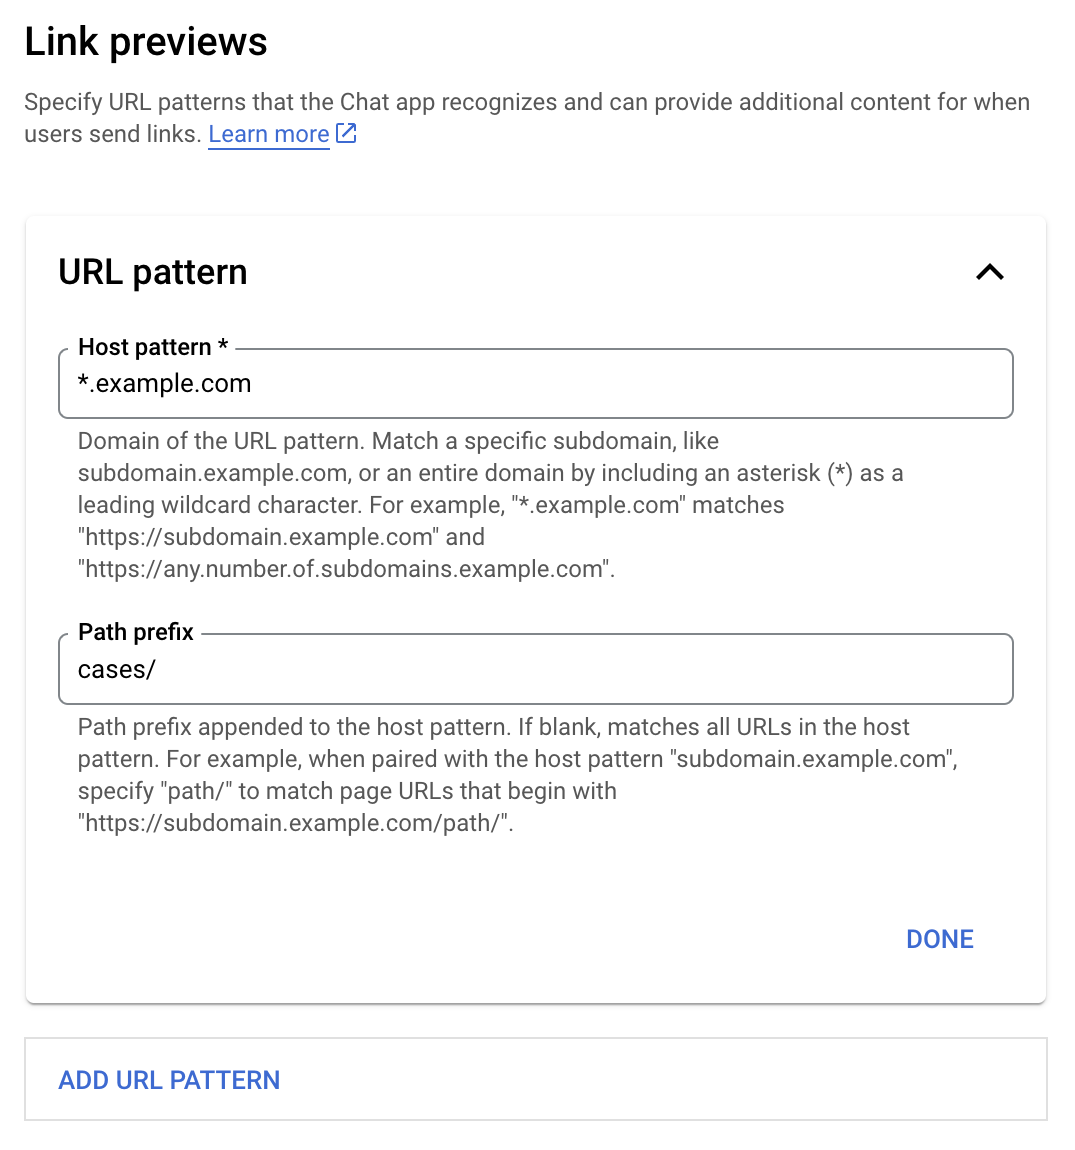
लिंक की झलक दिखाने की सुविधा का कॉन्फ़िगरेशन मेन्यू

  1. Google Cloud Console खोलें.
  2. "Google Cloud" के बगल में, डाउन ऐरो पर क्लिक करें और Chat ऐप्लिकेशन का प्रोजेक्ट खोलें.
  3. खोज फ़ील्ड में, Google Chat API टाइप करें और Google Chat API पर क्लिक करें.
  4. मैनेज करें > कॉन्फ़िगरेशन पर क्लिक करें.
  5. 'लिंक की झलक' में जाकर, यूआरएल पैटर्न जोड़ें या उसमें बदलाव करें.
    1. नए यूआरएल पैटर्न के लिए, लिंक की झलकें कॉन्फ़िगर करने के लिए, यूआरएल पैटर्न जोड़ें पर क्लिक करें.
    2. किसी मौजूदा यूआरएल पैटर्न के कॉन्फ़िगरेशन में बदलाव करने के लिए, डाउन ऐरो पर क्लिक करें.
  6. होस्ट पैटर्न फ़ील्ड में, यूआरएल पैटर्न का डोमेन डालें. Chat ऐप्लिकेशन, इस डोमेन के लिंक की झलक दिखाएगा.

    अगर आपको Chat ऐप्लिकेशन में subdomain.example.com जैसे किसी खास सबडोमेन के लिंक की झलक देखनी है, तो सबडोमेन शामिल करें.

    Chat ऐप्लिकेशन में पूरे डोमेन के लिंक की झलक देखने के लिए, सबडोमेन के तौर पर तारे के निशान (*) के साथ वाइल्डकार्ड वर्ण डालें. उदाहरण के लिए, *.example.com, subdomain.example.com और any.number.of.subdomains.example.com से मैच करता है.

  7. पाथ प्रीफ़िक्स फ़ील्ड में, होस्ट पैटर्न डोमेन में जोड़ने के लिए कोई पाथ डालें.

    होस्ट पैटर्न डोमेन में मौजूद सभी यूआरएल से मैच करने के लिए, पाथ प्रीफ़िक्स को खाली छोड़ दें.

    उदाहरण के लिए, अगर होस्ट पैटर्न support.example.com है, तो support.example.com/cases/ पर होस्ट किए गए केस के यूआरएल मैच करने के लिए, cases/ डालें.

  8. हो गया पर क्लिक करें.

  9. सेव करें पर क्लिक करें.

अब जब भी कोई व्यक्ति, Chat ऐप्लिकेशन से जुड़े चैट स्पेस में किसी मैसेज में, लिंक की झलक दिखाने वाले यूआरएल के पैटर्न से मैच करने वाला लिंक शामिल करता है, तो आपका ऐप्लिकेशन उस लिंक की झलक दिखाता है.

किसी लिंक के लिए, लिंक की झलक दिखाने की सुविधा कॉन्फ़िगर करने के बाद, आपका Chat ऐप्लिकेशन उस लिंक को पहचान सकता है और उस पर ज़्यादा जानकारी अटैच करके उसकी झलक दिखा सकता है.

जब किसी व्यक्ति के मैसेज में ऐसा लिंक शामिल होता है जो लिंक की झलक दिखाने वाले यूआरएल के पैटर्न से मैच करता है, तो आपके Chat ऐप्लिकेशन को MESSAGE इंटरैक्शन इवेंट मिलता है. ऐसा उन Chat स्पेस में होता है जिनमें आपका Chat ऐप्लिकेशन शामिल होता है. इंटरैक्शन इवेंट के JSON पेलोड में matchedUrl फ़ील्ड होता है:

JSON

message: {
  matchedUrl: {
    url: "https://support.example.com/cases/case123"
  },
  ... // other message attributes redacted
}

MESSAGE इवेंट के पेलोड में matchedUrl फ़ील्ड मौजूद होने पर, आपका Chat ऐप्लिकेशन, झलक वाले लिंक की मदद से मैसेज में जानकारी जोड़ सकता है. आपका Chat ऐप्लिकेशन, टेक्स्ट मैसेज या कार्ड अटैच करके जवाब दे सकता है.

मैसेज के ज़रिए जवाब देना

सामान्य जवाबों के लिए, आपका Chat ऐप्लिकेशन किसी लिंक की झलक दिखा सकता है. इसके लिए, वह लिंक पर सादे टेक्स्ट मैसेज के ज़रिए जवाब देगा. इस उदाहरण में एक मैसेज अटैच किया गया है, जिसमें लिंक की झलक वाले यूआरएल के पैटर्न से मैच करने वाले लिंक यूआरएल को दोहराया गया है.

Node.js

node/preview-link/index.js
// Reply with a text message for URLs of the subdomain "text"
if (event.message.matchedUrl.url.includes("text.example.com")) {
  return {
    text: 'event.message.matchedUrl.url: ' + event.message.matchedUrl.url
  };
}

Python

python/preview-link/main.py
# Reply with a text message for URLs of the subdomain "text"
if 'text.example.com' in event.get('message').get('matchedUrl').get('url'):
  return {
    'text': 'event.message.matchedUrl.url: ' +
            event.get('message').get('matchedUrl').get('url')
  }

Java

java/preview-link/src/main/java/com/google/chat/preview/App.java
// Reply with a text message for URLs of the subdomain "text"
if (event.at("/message/matchedUrl/url").asText().contains("text.example.com")) {
  return new Message().setText("event.message.matchedUrl.url: " +
    event.at("/message/matchedUrl/url").asText());
}

Apps Script

apps-script/preview-link/preview-link.gs
// Reply with a text message for URLs of the subdomain "text"
if (event.message.matchedUrl.url.includes("text.example.com")) {
  return {
    text: 'event.message.matchedUrl.url: ' + event.message.matchedUrl.url
  };
}

झलक वाले लिंक में कार्ड अटैच करने के लिए, UPDATE_USER_MESSAGE_CARDS टाइप का ActionResponse दिखाएं. इस उदाहरण में, एक बुनियादी कार्ड अटैच किया गया है.

चैट ऐप्लिकेशन में मैसेज में कार्ड अटैच करके, लिंक की झलक दिखाना

Node.js

node/preview-link/index.js
// Attach a card to the message for URLs of the subdomain "support"
if (event.message.matchedUrl.url.includes("support.example.com")) {
  // A hard-coded card is used in this example. In a real-life scenario,
  // the case information would be fetched and used to build the card.
  return {
    actionResponse: { type: 'UPDATE_USER_MESSAGE_CARDS' },
    cardsV2: [{
      cardId: 'attachCard',
      card: {
        header: {
          title: 'Example Customer Service Case',
          subtitle: 'Case basics',
        },
        sections: [{ widgets: [
          { decoratedText: { topLabel: 'Case ID', text: 'case123'}},
          { decoratedText: { topLabel: 'Assignee', text: 'Charlie'}},
          { decoratedText: { topLabel: 'Status', text: 'Open'}},
          { decoratedText: { topLabel: 'Subject', text: 'It won\'t turn on...' }},
          { buttonList: { buttons: [{
            text: 'OPEN CASE',
            onClick: { openLink: {
              url: 'https://support.example.com/orders/case123'
            }},
          }, {
            text: 'RESOLVE CASE',
            onClick: { openLink: {
              url: 'https://support.example.com/orders/case123?resolved=y',
            }},
          }, {
            text: 'ASSIGN TO ME',
            onClick: { action: { function: 'assign'}}
          }]}}
        ]}]
      }
    }]
  };
}

Python

python/preview-link/main.py
# Attach a card to the message for URLs of the subdomain "support"
if 'support.example.com' in event.get('message').get('matchedUrl').get('url'):
  # A hard-coded card is used in this example. In a real-life scenario,
  # the case information would be fetched and used to build the card.
  return {
    'actionResponse': { 'type': 'UPDATE_USER_MESSAGE_CARDS' },
    'cardsV2': [{
      'cardId': 'attachCard',
      'card': {
        'header': {
          'title': 'Example Customer Service Case',
          'subtitle': 'Case basics',
        },
        'sections': [{ 'widgets': [
          { 'decoratedText': { 'topLabel': 'Case ID', 'text': 'case123'}},
          { 'decoratedText': { 'topLabel': 'Assignee', 'text': 'Charlie'}},
          { 'decoratedText': { 'topLabel': 'Status', 'text': 'Open'}},
          { 'decoratedText': { 'topLabel': 'Subject', 'text': 'It won\'t turn on...' }},
          { 'buttonList': { 'buttons': [{
            'text': 'OPEN CASE',
            'onClick': { 'openLink': {
              'url': 'https://support.example.com/orders/case123'
            }},
          }, {
            'text': 'RESOLVE CASE',
            'onClick': { 'openLink': {
              'url': 'https://support.example.com/orders/case123?resolved=y',
            }},
          }, {
            'text': 'ASSIGN TO ME',
            'onClick': { 'action': { 'function': 'assign'}}
          }]}}
        ]}]
      }
    }]
  }

Java

java/preview-link/src/main/java/com/google/chat/preview/App.java
// Attach a card to the message for URLs of the subdomain "support"
if (event.at("/message/matchedUrl/url").asText().contains("support.example.com")) {
  // A hard-coded card is used in this example. In a real-life scenario,
  // the case information would be fetched and used to build the card.
  return new Message()
    .setActionResponse(new ActionResponse()
      .setType("UPDATE_USER_MESSAGE_CARDS"))
    .setCardsV2(List.of(new CardWithId()
      .setCardId("attachCard")
      .setCard(new GoogleAppsCardV1Card()
        .setHeader(new GoogleAppsCardV1CardHeader()
          .setTitle("Example Customer Service Case")
          .setSubtitle("Case basics"))
        .setSections(List.of(new GoogleAppsCardV1Section().setWidgets(List.of(
          new GoogleAppsCardV1Widget().setDecoratedText(new GoogleAppsCardV1DecoratedText()
            .setTopLabel("Case ID")
            .setText("case123")),
          new GoogleAppsCardV1Widget().setDecoratedText(new GoogleAppsCardV1DecoratedText()
            .setTopLabel("Assignee")
            .setText("Charlie")),
          new GoogleAppsCardV1Widget().setDecoratedText(new GoogleAppsCardV1DecoratedText()
            .setTopLabel("Status")
            .setText("Open")),
          new GoogleAppsCardV1Widget().setDecoratedText(new GoogleAppsCardV1DecoratedText()
            .setTopLabel("Subject")
            .setText("It won't turn on...")),
          new GoogleAppsCardV1Widget()
            .setButtonList(new GoogleAppsCardV1ButtonList().setButtons(List.of(
              new GoogleAppsCardV1Button()
                .setText("OPEN CASE")
                .setOnClick(new GoogleAppsCardV1OnClick()
                  .setOpenLink(new GoogleAppsCardV1OpenLink()
                    .setUrl("https://support.example.com/orders/case123"))),
              new GoogleAppsCardV1Button()
                .setText("RESOLVE CASE")
                .setOnClick(new GoogleAppsCardV1OnClick()
                  .setOpenLink(new GoogleAppsCardV1OpenLink()
                    .setUrl("https://support.example.com/orders/case123?resolved=y"))),
              new GoogleAppsCardV1Button()
                .setText("ASSIGN TO ME")
                .setOnClick(new GoogleAppsCardV1OnClick()
                  .setAction(new GoogleAppsCardV1Action().setFunction("assign")))))))))))));
}

Apps Script

इस उदाहरण में, कार्ड का JSON दिखाकर कार्ड का मैसेज भेजा जाता है. इसके अलावा, Apps Script की कार्ड सेवा का भी इस्तेमाल किया जा सकता है.

apps-script/preview-link/preview-link.gs
// Attach a card to the message for URLs of the subdomain "support"
if (event.message.matchedUrl.url.includes("support.example.com")) {
  // A hard-coded card is used in this example. In a real-life scenario,
  // the case information would be fetched and used to build the card.
  return {
    actionResponse: { type: 'UPDATE_USER_MESSAGE_CARDS' },
    cardsV2: [{
      cardId: 'attachCard',
      card: {
        header: {
          title: 'Example Customer Service Case',
          subtitle: 'Case basics',
        },
        sections: [{ widgets: [
          { decoratedText: { topLabel: 'Case ID', text: 'case123'}},
          { decoratedText: { topLabel: 'Assignee', text: 'Charlie'}},
          { decoratedText: { topLabel: 'Status', text: 'Open'}},
          { decoratedText: { topLabel: 'Subject', text: 'It won\'t turn on...' }},
          { buttonList: { buttons: [{
            text: 'OPEN CASE',
            onClick: { openLink: {
              url: 'https://support.example.com/orders/case123'
            }},
          }, {
            text: 'RESOLVE CASE',
            onClick: { openLink: {
              url: 'https://support.example.com/orders/case123?resolved=y',
            }},
          }, {
            text: 'ASSIGN TO ME',
            onClick: { action: { function: 'assign'}}
          }]}}
        ]}]
      }
    }]
  };
}

जब उपयोगकर्ता लिंक की झलक दिखाने वाले कार्ड से इंटरैक्ट करते हैं, तो आपका Chat ऐप्लिकेशन उस कार्ड को अपडेट कर सकता है. जैसे, कार्ड पर बटन पर क्लिक करना.

कार्ड को अपडेट करने के लिए, आपके Chat ऐप्लिकेशन को CARD_CLICKED इंटरैक्शन इवेंट को मैनेज करना होगा. साथ ही, यह इस बात के आधार पर actionResponse दिखाएगा कि लिंक की झलक वाला मैसेज किसने भेजा है:

  • अगर मैसेज किसी उपयोगकर्ता ने भेजा है, तो actionResponse.type को UPDATE_USER_MESSAGE_CARDS पर सेट करें.
  • अगर Chat ऐप्लिकेशन से मैसेज भेजा गया है, तो actionResponse.type को UPDATE_MESSAGE पर सेट करें.

यह पता लगाने के लिए कि मैसेज किसने भेजा है, इंटरैक्शन इवेंट के message.sender.type फ़ील्ड का इस्तेमाल किया जा सकता है. इससे यह पता चलता है कि मैसेज भेजने वाला व्यक्ति HUMAN उपयोगकर्ता था या BOT.

इस उदाहरण में दिखाया गया है कि जब कोई उपयोगकर्ता मुझे असाइन करें बटन पर क्लिक करता है, तो Chat ऐप्लिकेशन कैसे लिंक की झलक को अपडेट करता है. इसके लिए, यह ऐप्लिकेशन कार्ड के असाइन करने वाला फ़ील्ड अपडेट करता है और बटन को बंद कर देता है.
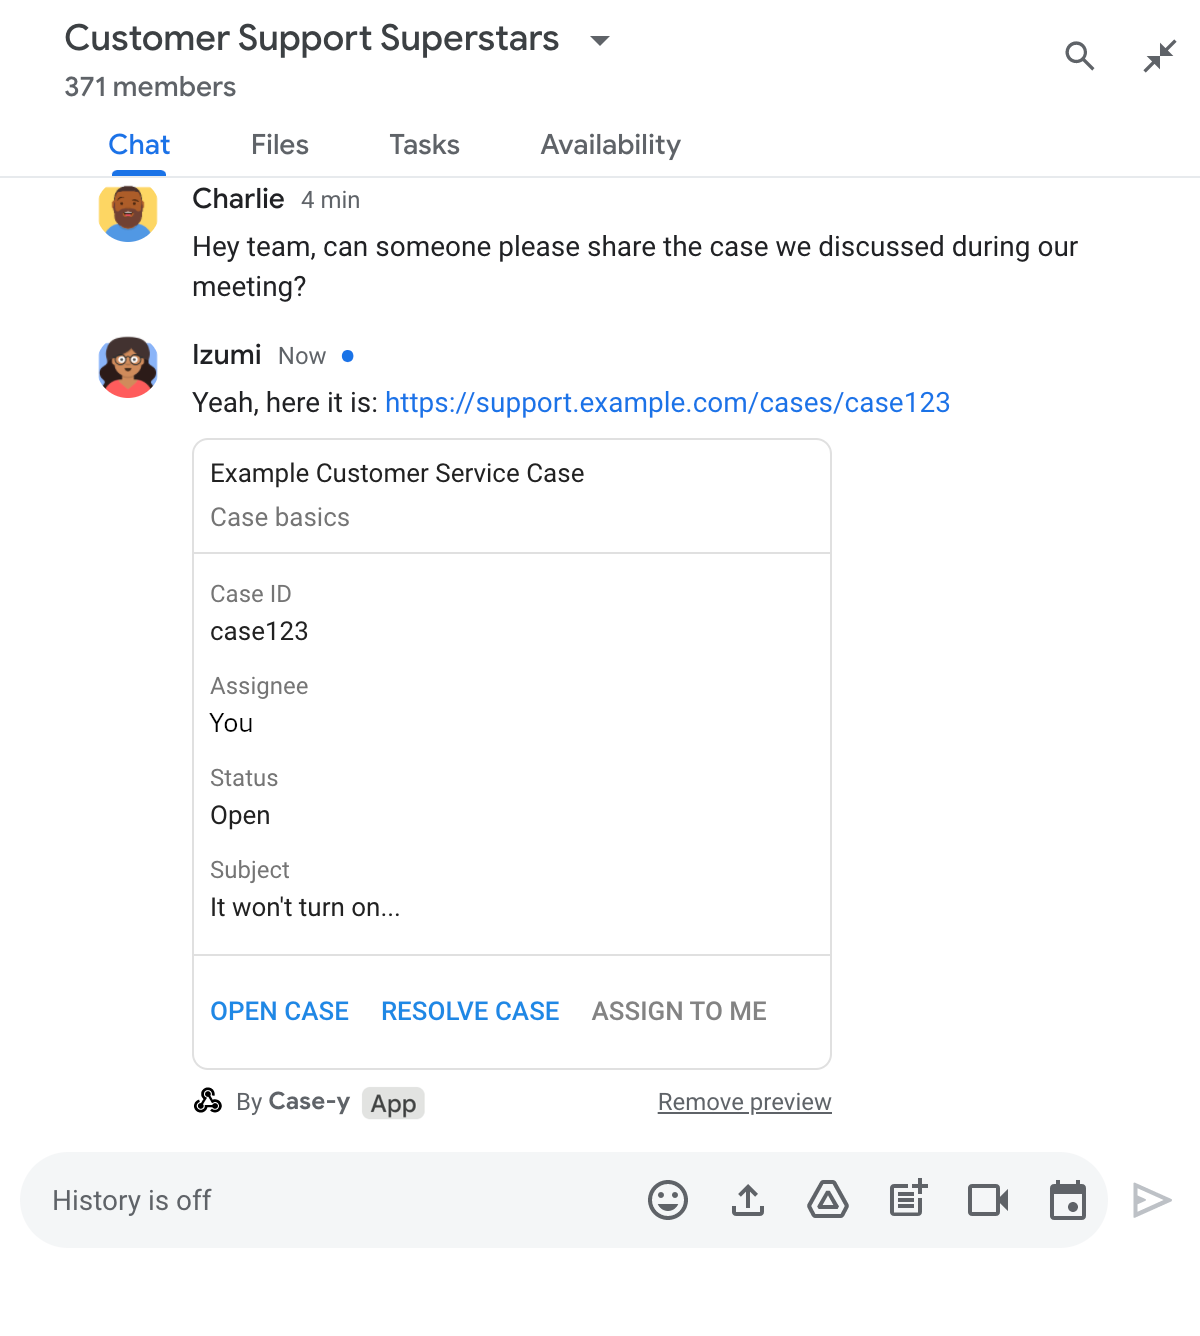
चैट ऐप्लिकेशन में, मैसेज में अटैच किए गए कार्ड के अपडेट किए गए वर्शन के साथ लिंक की झलक

Node.js

node/preview-link/index.js
/**
 * Updates a card that was attached to a message with a previewed link.
 *
 * @param {Object} event The event object from Chat.
 *
 * @return {Object} Response from the Chat app. Either a new card attached to
 * the message with the previewed link, or an update to an existing card.
 */
function onCardClick(event) {
  // To respond to the correct button, checks the button's actionMethodName.
  if (event.action.actionMethodName === 'assign') {
    // A hard-coded card is used in this example. In a real-life scenario,
    // an actual assign action would be performed before building the card.

    // Checks whether the message event originated from a human or a Chat app
    // and sets actionResponse.type to "UPDATE_USER_MESSAGE_CARDS if human or
    // "UPDATE_MESSAGE" if Chat app.
    const actionResponseType = event.message.sender.type === 'HUMAN' ?
      'UPDATE_USER_MESSAGE_CARDS' :
      'UPDATE_MESSAGE';

    // Returns the updated card that displays "You" for the assignee
    // and that disables the button.
    return {
      actionResponse: { type: actionResponseType },
      cardsV2: [{
        cardId: 'attachCard',
        card: {
          header: {
            title: 'Example Customer Service Case',
            subtitle: 'Case basics',
          },
          sections: [{ widgets: [
            { decoratedText: { topLabel: 'Case ID', text: 'case123'}},
            // The assignee is now "You"
            { decoratedText: { topLabel: 'Assignee', text: 'You'}},
            { decoratedText: { topLabel: 'Status', text: 'Open'}},
            { decoratedText: { topLabel: 'Subject', text: 'It won\'t turn on...' }},
            { buttonList: { buttons: [{
              text: 'OPEN CASE',
              onClick: { openLink: {
                url: 'https://support.example.com/orders/case123'
              }},
            }, {
              text: 'RESOLVE CASE',
              onClick: { openLink: {
                url: 'https://support.example.com/orders/case123?resolved=y',
              }},
            }, {
              text: 'ASSIGN TO ME',
              // The button is now disabled
              disabled: true,
              onClick: { action: { function: 'assign'}}
            }]}}
          ]}]
        }
      }]
    };
  }
}

Python

python/preview-link/main.py
def on_card_click(event: dict) -> dict:
  """Updates a card that was attached to a message with a previewed link."""
  # To respond to the correct button, checks the button's actionMethodName.
  if 'assign' == event.get('action').get('actionMethodName'):
    # A hard-coded card is used in this example. In a real-life scenario,
    # an actual assign action would be performed before building the card.

    # Checks whether the message event originated from a human or a Chat app
    # and sets actionResponse.type to "UPDATE_USER_MESSAGE_CARDS if human or
    # "UPDATE_MESSAGE" if Chat app.
    actionResponseType = 'UPDATE_USER_MESSAGE_CARDS' if \
      event.get('message').get('sender').get('type') == 'HUMAN' else \
      'UPDATE_MESSAGE'

    # Returns the updated card that displays "You" for the assignee
    # and that disables the button.
    return {
      'actionResponse': { 'type': actionResponseType },
      'cardsV2': [{
        'cardId': 'attachCard',
        'card': {
          'header': {
            'title': 'Example Customer Service Case',
            'subtitle': 'Case basics',
          },
          'sections': [{ 'widgets': [
            { 'decoratedText': { 'topLabel': 'Case ID', 'text': 'case123'}},
            # The assignee is now "You"
            { 'decoratedText': { 'topLabel': 'Assignee', 'text': 'You'}},
            { 'decoratedText': { 'topLabel': 'Status', 'text': 'Open'}},
            { 'decoratedText': { 'topLabel': 'Subject', 'text': 'It won\'t turn on...' }},
            { 'buttonList': { 'buttons': [{
              'text': 'OPEN CASE',
              'onClick': { 'openLink': {
                'url': 'https://support.example.com/orders/case123'
              }},
            }, {
              'text': 'RESOLVE CASE',
              'onClick': { 'openLink': {
                'url': 'https://support.example.com/orders/case123?resolved=y',
              }},
            }, {
              'text': 'ASSIGN TO ME',
              # The button is now disabled
              'disabled': True,
              'onClick': { 'action': { 'function': 'assign'}}
            }]}}
          ]}]
        }
      }]
    }

Java

java/preview-link/src/main/java/com/google/chat/preview/App.java
// Updates a card that was attached to a message with a previewed link.
Message onCardClick(JsonNode event) {
  // To respond to the correct button, checks the button's actionMethodName.
  if (event.at("/action/actionMethodName").asText().equals("assign")) {
    // A hard-coded card is used in this example. In a real-life scenario,
    // an actual assign action would be performed before building the card.

    // Checks whether the message event originated from a human or a Chat app
    // and sets actionResponse.type to "UPDATE_USER_MESSAGE_CARDS if human or
    // "UPDATE_MESSAGE" if Chat app.
    String actionResponseType =
      event.at("/message/sender/type").asText().equals("HUMAN")
      ? "UPDATE_USER_MESSAGE_CARDS" : "UPDATE_MESSAGE";

    // Returns the updated card that displays "You" for the assignee
    // and that disables the button.
    return new Message()
    .setActionResponse(new ActionResponse()
      .setType(actionResponseType))
    .setCardsV2(List.of(new CardWithId()
      .setCardId("attachCard")
      .setCard(new GoogleAppsCardV1Card()
        .setHeader(new GoogleAppsCardV1CardHeader()
          .setTitle("Example Customer Service Case")
          .setSubtitle("Case basics"))
        .setSections(List.of(new GoogleAppsCardV1Section().setWidgets(List.of(
          new GoogleAppsCardV1Widget().setDecoratedText(new GoogleAppsCardV1DecoratedText()
            .setTopLabel("Case ID")
            .setText("case123")),
          new GoogleAppsCardV1Widget().setDecoratedText(new GoogleAppsCardV1DecoratedText()
            .setTopLabel("Assignee")
            // The assignee is now "You"
            .setText("You")),
          new GoogleAppsCardV1Widget().setDecoratedText(new GoogleAppsCardV1DecoratedText()
            .setTopLabel("Status")
            .setText("Open")),
          new GoogleAppsCardV1Widget().setDecoratedText(new GoogleAppsCardV1DecoratedText()
            .setTopLabel("Subject")
            .setText("It won't turn on...")),
          new GoogleAppsCardV1Widget()
            .setButtonList(new GoogleAppsCardV1ButtonList().setButtons(List.of(
              new GoogleAppsCardV1Button()
                .setText("OPEN CASE")
                .setOnClick(new GoogleAppsCardV1OnClick()
                  .setOpenLink(new GoogleAppsCardV1OpenLink()
                    .setUrl("https://support.example.com/orders/case123"))),
              new GoogleAppsCardV1Button()
                .setText("RESOLVE CASE")
                .setOnClick(new GoogleAppsCardV1OnClick()
                  .setOpenLink(new GoogleAppsCardV1OpenLink()
                    .setUrl("https://support.example.com/orders/case123?resolved=y"))),
              new GoogleAppsCardV1Button()
                .setText("ASSIGN TO ME")
                // The button is now disabled
                .setDisabled(true)
                .setOnClick(new GoogleAppsCardV1OnClick()
                  .setAction(new GoogleAppsCardV1Action().setFunction("assign")))))))))))));
  }
  return null;
}

Apps Script

इस उदाहरण में, कार्ड का JSON दिखाकर कार्ड का मैसेज भेजा जाता है. इसके अलावा, Apps Script की कार्ड सेवा का भी इस्तेमाल किया जा सकता है.

apps-script/preview-link/preview-link.gs
/**
 * Updates a card that was attached to a message with a previewed link.
 *
 * @param {Object} event The event object from Chat.
 *
 * @return {Object} Response from the Chat app. Either a new card attached to
 * the message with the previewed link, or an update to an existing card.
 */
function onCardClick(event) {
  // To respond to the correct button, checks the button's actionMethodName.
  if (event.action.actionMethodName === 'assign') {
    // A hard-coded card is used in this example. In a real-life scenario,
    // an actual assign action would be performed before building the card.

    // Checks whether the message event originated from a human or a Chat app
    // and sets actionResponse.type to "UPDATE_USER_MESSAGE_CARDS if human or
    // "UPDATE_MESSAGE" if Chat app.
    const actionResponseType = event.message.sender.type === 'HUMAN' ?
      'UPDATE_USER_MESSAGE_CARDS' :
      'UPDATE_MESSAGE';

    // Returns the updated card that displays "You" for the assignee
    // and that disables the button.
    return {
      actionResponse: { type: actionResponseType },
      cardsV2: [{
        cardId: 'attachCard',
        card: {
          header: {
            title: 'Example Customer Service Case',
            subtitle: 'Case basics',
          },
          sections: [{ widgets: [
            { decoratedText: { topLabel: 'Case ID', text: 'case123'}},
            // The assignee is now "You"
            { decoratedText: { topLabel: 'Assignee', text: 'You'}},
            { decoratedText: { topLabel: 'Status', text: 'Open'}},
            { decoratedText: { topLabel: 'Subject', text: 'It won\'t turn on...' }},
            { buttonList: { buttons: [{
              text: 'OPEN CASE',
              onClick: { openLink: {
                url: 'https://support.example.com/orders/case123'
              }},
            }, {
              text: 'RESOLVE CASE',
              onClick: { openLink: {
                url: 'https://support.example.com/orders/case123?resolved=y',
              }},
            }, {
              text: 'ASSIGN TO ME',
              // The button is now disabled
              disabled: true,
              onClick: { action: { function: 'assign'}}
            }]}}
          ]}]
        }
      }]
    };
  }
}

सीमाएं और ज़रूरी बातें

Chat ऐप्लिकेशन के लिए, लिंक की झलक दिखाने की सुविधा कॉन्फ़िगर करते समय, इन सीमाओं और बातों का ध्यान रखें:

  • हर चैट ऐप्लिकेशन, ज़्यादा से ज़्यादा पांच यूआरएल पैटर्न के लिए लिंक की झलक दिखाने की सुविधा देता है.
  • Chat ऐप्लिकेशन में, हर मैसेज में एक लिंक की झलक दिखती है. अगर किसी मैसेज में, झलक दिखाने वाले एक से ज़्यादा लिंक मौजूद हैं, तो सिर्फ़ झलक दिखाने वाला पहला लिंक दिखता है.
  • चैट ऐप्लिकेशन सिर्फ़ उन लिंक की झलक दिखाते हैं जो https:// से शुरू होते हैं. इसलिए, https://support.example.com/cases/ की झलक दिखती है, लेकिन support.example.com/cases/ की नहीं.
  • अगर मैसेज में ऐसी कोई जानकारी शामिल नहीं है जो Chat ऐप्लिकेशन में भेजी जाती है, जैसे कि स्लैश कमांड, तो लिंक की झलक दिखाने की सुविधा से, Chat ऐप्लिकेशन में सिर्फ़ लिंक का यूआरएल भेजा जाता है.
  • अगर कोई उपयोगकर्ता लिंक पोस्ट करता है, तो Chat ऐप्लिकेशन सिर्फ़ तब लिंक की झलक दिखाने वाले कार्ड को अपडेट कर सकता है, जब उपयोगकर्ता उस कार्ड के साथ इंटरैक्ट करते हैं. जैसे, बटन पर क्लिक करना. उपयोगकर्ता के मैसेज को अलग-अलग समय पर अपडेट करने के लिए, Message संसाधन पर Chat API के update() तरीके को कॉल नहीं किया जा सकता.
  • चैट ऐप्लिकेशन को स्पेस में मौजूद सभी लोगों के लिए लिंक की झलक दिखानी होगी. इसलिए, मैसेज में privateMessageViewer फ़ील्ड को शामिल नहीं किया जाना चाहिए.

लिंक की झलक दिखाने की सुविधा लागू करने के दौरान, आपको अपने Chat ऐप्लिकेशन के लॉग पढ़कर, उसे डीबग करना पड़ सकता है. लॉग पढ़ने के लिए, Google Cloud Console पर लॉग एक्सप्लोरर पर जाएं.