
本页介绍了如何创建 HTTP Chat 应用。实现此架构的方法有很多种。在 Google Cloud 上,您可以使用 Cloud Run 和 App Engine。在本快速入门中,您 将编写并部署一个 Cloud Run 函数 ,Chat 应用将使用该函数来响应用户的消息。
借助此架构,您可以配置 Chat 以使用 HTTP 与 Google Cloud 或本地服务器集成,如下图所示:

在上图中,与 HTTP Chat 应用互动的用户具有以下信息流:
- 用户在 Chat 中向 Chat 应用发送消息,可以是私信,也可以是在 Chat 聊天室中发送。
- 系统会向 Web 服务器发送 HTTP 请求,该服务器可以是包含 Chat 应用逻辑的云端系统或本地系统。
- (可选)Chat 应用逻辑可以与 Google Workspace 服务(例如日历和表格)、其他 Google 服务(例如地图、YouTube 和 Vertex AI)或其他 Web 服务(例如项目管理系统或工单工具)集成。
- Web 服务器会将 HTTP 响应发送回 Chat 中的 Chat 应用服务。
- 响应会传递给用户。
- (可选)Chat 应用可以调用 Chat API 以异步发布消息或执行其他操作。
此架构让您可以灵活地使用系统中已有的现有库和组件,因为这些 Chat 应用可以使用不同的编程语言进行设计。
目标
- 设置环境。
- 创建和部署 Cloud Run 函数。
- 将应用发布到 Chat。
- 测试应用。
前提条件
- 拥有可访问 Google Chat的 Google Workspace商务版或企业版账号。
- 启用了结算功能的 Google Cloud 项目。如需检查现有项目是否已启用结算功能, 请参阅验证项目的 结算状态。如需创建项目并设置结算功能,请参阅 创建 Google Cloud 项目。
设置环境
在使用 Google API 之前,您需要在 Google 云项目中启用它们。您可以在单个 Google Cloud 项目中启用一个或多个 API。在 Google API 控制台中,启用 Google Chat API、Cloud Build API、Cloud Functions API, Cloud Pub/Sub API、Cloud Logging API、Artifact Registry API 和 Cloud Run API。
创建和部署 Cloud Run 函数
创建并部署一个 Cloud Run 函数,该函数会生成一个 Chat 卡片,其中包含发送者的显示名称和头像图片。当 Chat 应用收到消息时,它会运行该函数并使用卡片进行响应。
如需为 Chat 应用创建和部署函数,请完成以下步骤:
Node.js
在 Google API 控制台中,前往 Cloud Run 页面:
确保已选择 Chat 应用的项目。
点击编写函数 。
在创建服务 页面上,设置您的函数:
- 在服务名称 字段中,输入
quickstartchatapp。 - 在区域 列表中,选择一个区域。
- 在运行时 列表中,选择最新版本的 Node.js。
- 在身份验证 部分中,选择需要进行身份验证 。
- 点击创建,然后等待 Cloud Run 创建服务。 控制台会将您重定向到来源 标签页。
- 在服务名称 字段中,输入
在来源 标签页中:
- 在入口点 中,删除默认文本并输入
avatarApp。 将
index.js的内容替换为以下代码:点击保存并重新部署 。
- 在入口点 中,删除默认文本并输入
Python
在 Google API 控制台中,前往 Cloud Run 页面:
确保已选择 Chat 应用的项目。
点击编写函数 。
在创建服务 页面上,设置您的函数:
- 在服务名称 字段中,输入
quickstartchatapp。 - 在区域 列表中,选择一个区域。
- 在运行时 列表中,选择最新版本的 Python。
- 在身份验证 部分中,选择需要进行身份验证 。
- 点击创建,然后等待 Cloud Run 创建服务。 控制台会将您重定向到来源 标签页。
- 在服务名称 字段中,输入
在来源 标签页中:
- 在入口点 中,删除默认文本并输入
avatar_app。 将
main.py的内容替换为以下代码:点击保存并重新部署 。
- 在入口点 中,删除默认文本并输入
Java
在 Google API 控制台中,前往 Cloud Run 页面:
确保已选择 Chat 应用的项目。
点击编写函数 。
在创建服务 页面上,设置您的函数:
- 在服务名称 字段中,输入
quickstartchatapp。 - 在区域 列表中,选择一个区域。
- 在运行时 列表中,选择最新版本的 Java。
- 在身份验证 部分中,选择需要进行身份验证 。
- 点击创建,然后等待 Cloud Run 创建服务。 控制台会将您重定向到来源 标签页。
- 在服务名称 字段中,输入
在来源 标签页中:
- 在入口点 中,删除默认文本并输入
App。 - 将
src/main/java/com/example/Example.java重命名为src/main/java/AvatarApp.java。 将
AvatarApp.java的内容替换为以下代码:将
pom.xml的内容替换为以下代码:点击保存并重新部署 。
- 在入口点 中,删除默认文本并输入
授权 Google Chat 调用您的函数
如需授权 Google Chat 调用您的函数,请添加具有 Cloud Run Invoker 角色的 Google Chat 服务账号。
在 Google API 控制台中,前往 Cloud Run 页面:
在 Cloud Run 服务列表中,选中接收 函数旁边的复选框。(请勿点击函数本身。)
点击权限 。此时会打开权限 面板。
点击添加主账号 。
在新主账号 中,输入
chat@system.gserviceaccount.com。在选择角色 中,选择 Cloud Run > Cloud Run Invoker。
点击保存 。
配置 Chat 应用
部署 Cloud Run 函数后,请按照以下步骤将其转换为 Google Chat 应用:
在 Google API 控制台中,前往 Cloud Run 页面:
确保已选择启用了 Cloud Run 的项目。
在服务列表中,点击 quickstartchatapp 。
在服务详情 页面上,复制该函数的 网址 。
搜索“Google Chat API”,然后点击 Google Chat API,再点击 管理。
点击配置 并设置 Google Chat 应用:
- 清除将此 Chat 扩展应用构建为 Google Workspace 插件 。系统会打开一个对话框,要求您确认。在该对话框中,点击停用 。
- 在应用名称 中,输入
Quickstart App。 - 在头像网址中,输入
https://developers.google.com/chat/images/quickstart-app-avatar.png。 - 在说明 中,输入
Quickstart app。 - 在功能 下,选择加入聊天室和群组对话。
- 在连接设置 下,选择 HTTP 端点网址 。
- 在触发器下,选择为所有 触发器使用通用 HTTP 端点网址,并将 Cloud Run 函数触发器的网址粘贴到 框中。
- 在可见性下,选择 面向您网域中的特定人员和 群组提供此 Chat 扩展应用,然后输入您的电子邮件地址。
- 在日志 下,选择将错误记录到 Logging 。
点击保存 。
Chat 应用已准备好接收和回复 Chat 上的消息。
测试 Chat 应用
如需测试 Chat 应用,请打开与 Chat 应用的私信聊天室并发送消息:
使用您在添加自己作为受信任的测试人员时提供的 Google Workspace 账号打开 Google Chat。
- 点击 发起新聊天。
- 在添加 1 位或多位用户 字段中,输入 Chat 应用的名称。
从结果中选择 Chat 应用。系统会打开私信。
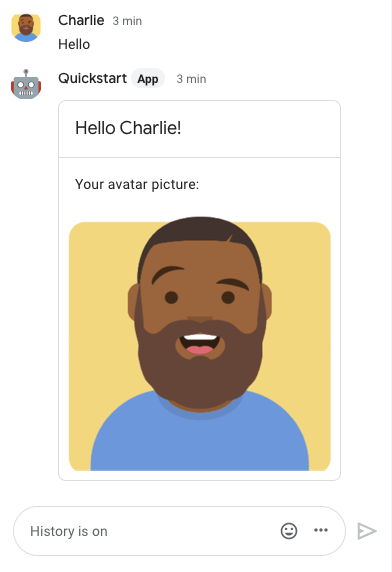
- 在与该应用的新私信中,输入
Hello并按enter键。
Chat 应用的响应包含一条 卡片消息,其中 显示了发送者的姓名和头像图片,如下图 所示:
如需添加受信任的测试人员并详细了解如何测试互动功能,请参阅 测试 Google Chat 应用的互动功能。
问题排查
当 Google Chat 应用或 卡片返回错误时, Chat 界面会显示一条消息,指出“出了点问题” 或“无法处理您的请求”。有时,Chat 界面不会显示任何错误消息,但 Chat 应用或卡片会产生意外结果;例如,卡片消息可能不会显示。
虽然 Chat 界面中可能不会显示错误消息, 但当 Chat 应用的错误日志记录功能开启后,系统会提供描述性错误消息和日志数据,帮助您修复错误。如需查看、 调试和修复错误方面的帮助,请参阅 排查和修复 Google Chat 错误。
清理
为避免因本教程中使用的 资源导致您的 Google Cloud 账号产生费用,我们建议您删除 云项目。
- 在 Google API 控制台中,前往管理资源 页面。依次点击 菜单 > IAM 和管理 > 管理资源。
- 在项目列表中,选择要删除的项目,然后点击 删除 .
- 在对话框中输入项目 ID,然后点击关停 以删除 项目。
相关主题
如需为 Chat 应用添加更多功能,请参阅以下内容: