1. Before you begin
One of the most common features of a website is displaying a Google map that highlights one or more locations for a business, establishment, or some other entity with a physical presence. How these maps are implemented can vary greatly depending on requirements, such as the number of locations and the frequency with which they change.
In this codelab, you look at the simplest use case—a small number of locations that rarely change, such as a store locator for a business with a chain of stores. In this case, you can use a relatively low-tech approach without any server-side programming. But that's not to say you can't be creative, and you do so by leveraging the GeoJSON data format to store and render arbitrary information about each store on your map, as well as customize the markers and overall style of the map itself.
Lastly, as an added bonus, you use Cloud Shell to develop and host your store locator. While using this tool isn't strictly required, doing so allows you to develop the store locator from any device running a web browser and make it available online to the public.
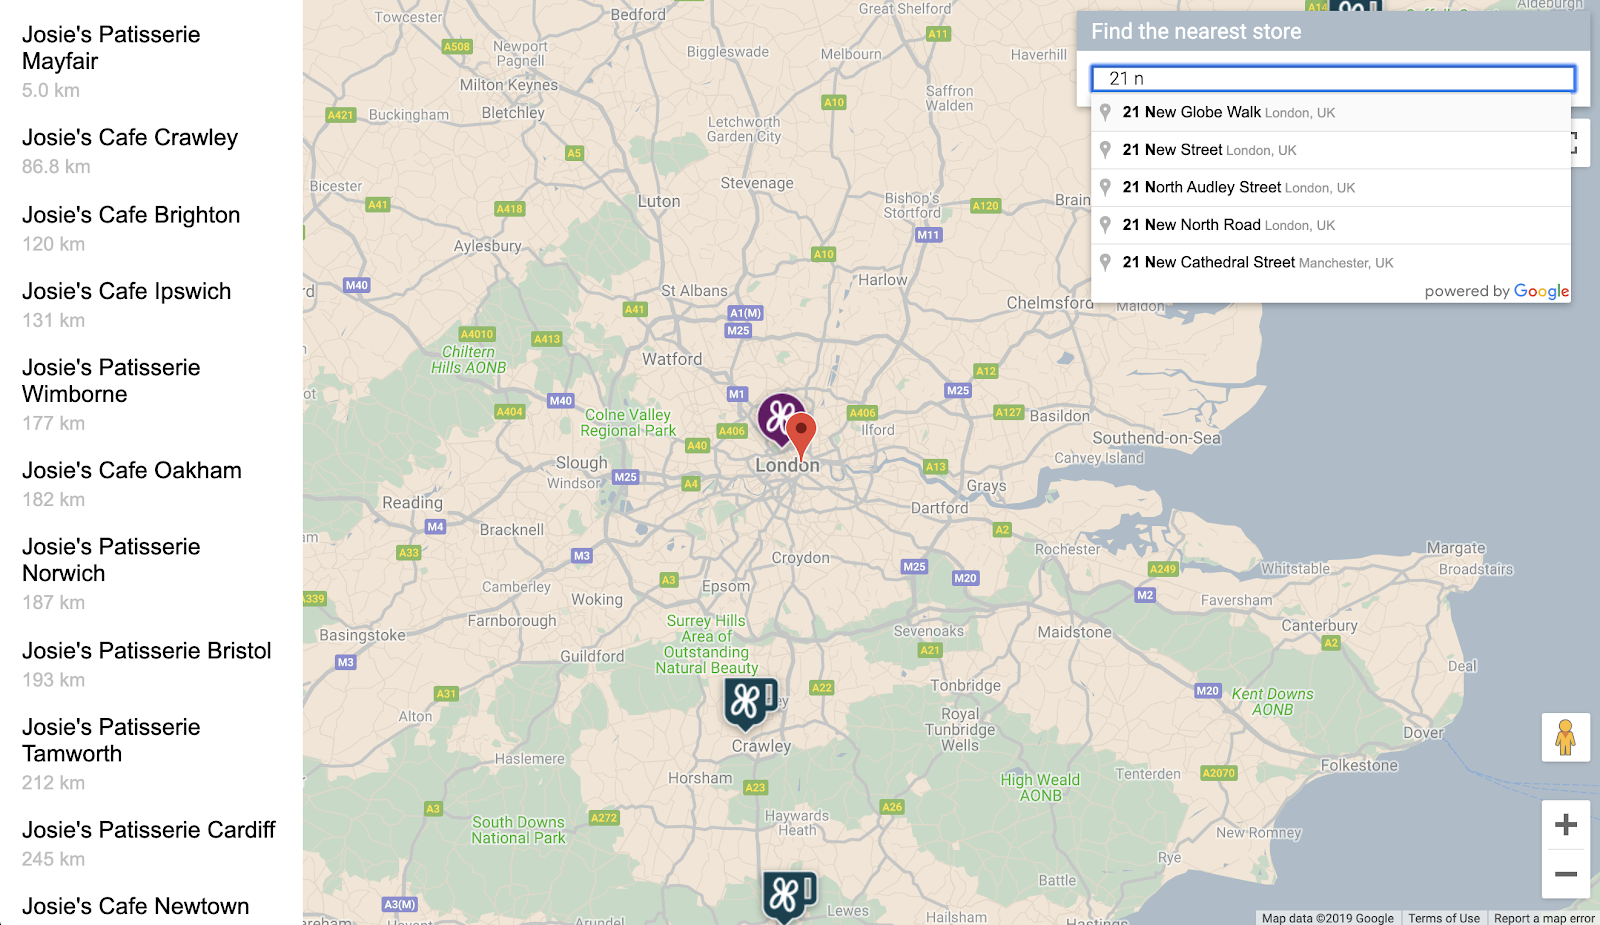
Prerequisites
- Basic knowledge of HTML and JavaScript
What you'll do
- Display a map with a set of store locations and information stored in GeoJSON format.
- Customize markers and the map itself.
- Display extra information about the store when its marker is clicked.
- Add a Place Autocomplete search bar to the webpage.
- Identify the store location closest to a user-supplied starting point.
2. Get set up
In Step 3 of the following section, enable the following three APIs for this codelab:
- Maps JavaScript API
- Places API
- Distance Matrix API
Get started with Google Maps Platform
If you haven't used Google Maps Platform before, follow the Get Started with Google Maps Platform guide or watch the Getting Started with Google Maps Platform playlist to complete the following steps:
- Create a billing account.
- Create a project.
- Enable Google Maps Platform APIs and SDKs (listed in the previous section).
- Generate an API key.
Activate Cloud Shell
In this codelab you use Cloud Shell, a command-line environment running in Google Cloud that provides access to products and resources running on Google Cloud, so that you can host and run your project completely from your web browser.
To activate Cloud Shell from Cloud Console, click Activate Cloud Shell  (it should only take a few moments to provision and connect to the environment).

This opens a new shell in the lower part of your browser after possibly showing an introductory interstitial.

Once connected to Cloud Shell, you should see that you are already authenticated and that the project is already set to the project ID you selected during setup.
$ gcloud auth list
Credentialed Accounts:
ACTIVE  ACCOUNT
  *     <myaccount>@<mydomain>.com
$ gcloud config list project
[core]
project = <YOUR_PROJECT_ID>
If for some reason the project is not set, run the following command:
$ gcloud config set project <YOUR_PROJECT_ID>
3. "Hello, World!" with a map
Start developing with a map
In Cloud Shell, you start by creating an HTML page that will serve as the basis for the rest of the codelab.
- In the toolbar of the Cloud Shell, click Launch Editor
 to open a code editor in a new tab.
This web-based code editor allows you to easily edit files in Cloud Shell.

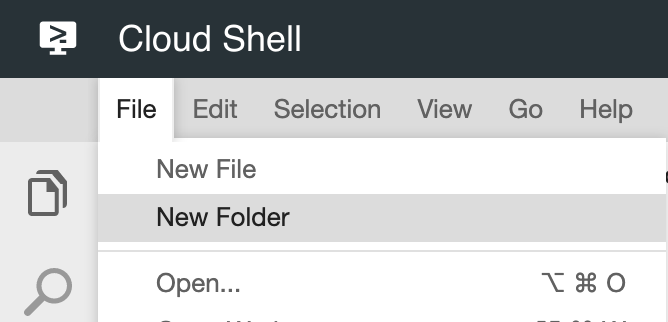
- Create a new
store-locatordirectory for your app in the code editor by clicking File > New Folder.
- Name the new folder
store-locator.
Next, you create a web page with a map.
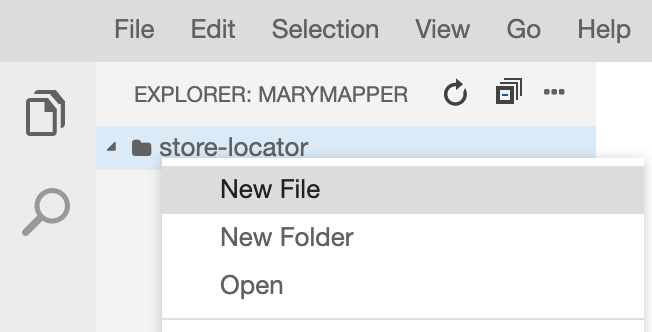
- Create a file in the
store-locatordirectory namedindex.html.
- Put the following content in the
index.htmlfile:
index.html
<html>

<head>
    <title>Store Locator</title>
    <style>
        #map {
            height: 100%;
        }

        html,
        body {
            height: 100%;
            margin: 0;
            padding: 0;
        }
    </style>
</head>

<body>
    <!-- The div to hold the map -->
    <div id="map"></div>

    <script src="app.js"></script>
    <script async defer src="https://maps.googleapis.com/maps/api/js?key=YOUR_API_KEY&libraries=places&callback=initMap&solution_channel=GMP_codelabs_simplestorelocator_v1_a">
    </script>
</body>

</html>
This is the HTML page that displays the map. It contains some CSS to ensure the map visually takes up the entire page, a <div> tag to hold the map, and a pair of <script> tags. The first script tag loads a JavaScript file called app.js, which contains all of the JavaScript code. The second script tag loads the API key, includes use of the Places Library for autocomplete functionality you'll add later, and specifies the name of the JavaScript function that runs once the Maps JavaScript API is loaded, namely initMap.
- Replace the text
YOUR_API_KEYin the code snippet with the API key you generated earlier in this codelab. - Lastly, create another file named
app.jswith the following code:
app.js
function initMap() {
   // Create the map.
    const map = new google.maps.Map(document.getElementById('map'), {
        zoom: 7,
        center: { lat: 52.632469, lng: -1.689423 },
    });

}
That's the minimum required code for creating a map. You pass in a reference to your <div> tag to hold the map, and specify the center and zoom level.
To test this app, you can run the simple Python HTTP server in Cloud Shell.
- Go to Cloud Shell and type the following:
$ cd store-locator
$ python3 -m http.server 8080
You see some lines of log output showing you that you are indeed running the simple HTTP server in Cloud Shell with the web app listening on localhost port 8080.
- Open a web browser tab on this app by clicking Web Preview
 in the Cloud Console toolbar and selecting Preview on port 8080.
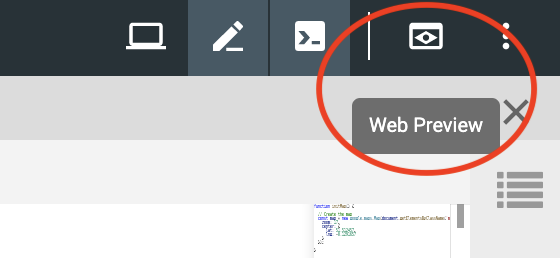
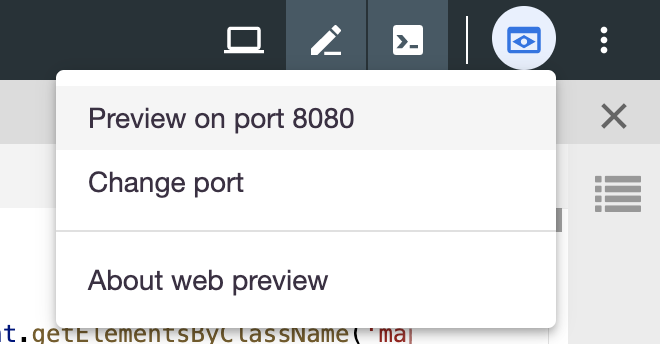
Clicking on this menu item opens a new tab in your web browser with the content of the HTML served from the simple Python HTTP server. If everything went well, you should see a map centered on London, England.
To stop the simple HTTP server, press Control+C in Cloud Shell.
4. Populate the map with GeoJSON
Now, take a look at the data for the stores. GeoJSON is a data format that represents simple geographical features, such as points, lines, or polygons on a map. The features can also contain arbitrary data. This makes GeoJSON an excellent candidate for representing the stores, which are essentially points on a map with a bit of additional data, such as the store's name, opening hours, and phone number. Most importantly, GeoJSON has first-class support in Google Maps, which means you can send a GeoJSON document to a Google map and it will render it on the map appropriately.
- Create a new file called
stores.jsonand paste in the following code:
stores.json
{
    "type": "FeatureCollection",
    "features": [{
            "geometry": {
                "type": "Point",
                "coordinates": [-0.1428115,
                    51.5125168
                ]
            },
            "type": "Feature",
            "properties": {
                "category": "patisserie",
                "hours": "10am - 6pm",
                "description": "Modern twists on classic pastries. We're part of a larger chain of patisseries and cafes.",
                "name": "Josie's Patisserie Mayfair",
                "phone": "+44 20 1234 5678",
                "storeid": "01"
            }
        },
        {
            "geometry": {
                "type": "Point",
                "coordinates": [-2.579623,
                    51.452251
                ]
            },
            "type": "Feature",
            "properties": {
                "category": "patisserie",
                "hours": "10am - 6pm",
                "description": "Come and try our award-winning cakes and pastries. We're part of a larger chain of patisseries and cafes.",
                "name": "Josie's Patisserie Bristol",
                "phone": "+44 117 121 2121",
                "storeid": "02"
            }
        },
        {
            "geometry": {
                "type": "Point",
                "coordinates": [
                    1.273459,
                    52.638072
                ]
            },
            "type": "Feature",
            "properties": {
                "category": "patisserie",
                "hours": "10am - 6pm",
                "description": "Whatever the occasion, whether it's a birthday or a wedding, Josie's Patisserie has the perfect treat for you. We're part of a larger chain of patisseries and cafes.",
                "name": "Josie's Patisserie Norwich",
                "phone": "+44 1603 123456",
                "storeid": "03"
            }
        },
        {
            "geometry": {
                "type": "Point",
                "coordinates": [-1.9912838,
                    50.8000418
                ]
            },
            "type": "Feature",
            "properties": {
                "category": "patisserie",
                "hours": "10am - 6pm",
                "description": "A gourmet patisserie that will delight your senses. We're part of a larger chain of patisseries and cafes.",
                "name": "Josie's Patisserie Wimborne",
                "phone": "+44 1202 343434",
                "storeid": "04"
            }
        },
        {
            "geometry": {
                "type": "Point",
                "coordinates": [-2.985933,
                    53.408899
                ]
            },
            "type": "Feature",
            "properties": {
                "category": "patisserie",
                "hours": "10am - 6pm",
                "description": "Spoil yourself or someone special with our classic pastries. We're part of a larger chain of patisseries and cafes.",
                "name": "Josie's Patisserie Liverpool",
                "phone": "+44 151 444 4444",
                "storeid": "05"
            }
        },
        {
            "geometry": {
                "type": "Point",
                "coordinates": [-1.689423,
                    52.632469
                ]
            },
            "type": "Feature",
            "properties": {
                "category": "patisserie",
                "hours": "10am - 6pm",
                "description": "Come and feast your eyes and tastebuds on our delicious pastries and cakes. We're part of a larger chain of patisseries and cafes.",
                "name": "Josie's Patisserie Tamworth",
                "phone": "+44 5555 55555",
                "storeid": "06"
            }
        },
        {
            "geometry": {
                "type": "Point",
                "coordinates": [-3.155305,
                    51.479756
                ]
            },
            "type": "Feature",
            "properties": {
                "category": "patisserie",
                "hours": "10am - 6pm",
                "description": "Josie's Patisserie is family-owned, and our delectable pastries, cakes, and great coffee are renowed. We're part of a larger chain of patisseries and cafes.",
                "name": "Josie's Patisserie Cardiff",
                "phone": "+44 29 6666 6666",
                "storeid": "07"
            }
        },
        {
            "geometry": {
                "type": "Point",
                "coordinates": [-0.725019,
                    52.668891
                ]
            },
            "type": "Feature",
            "properties": {
                "category": "cafe",
                "hours": "8am - 9:30pm",
                "description": "Oakham's favorite spot for fresh coffee and delicious cakes. We're part of a larger chain of patisseries and cafes.",
                "name": "Josie's Cafe Oakham",
                "phone": "+44 7777 777777",
                "storeid": "08"
            }
        },
        {
            "geometry": {
                "type": "Point",
                "coordinates": [-2.477653,
                    53.735405
                ]
            },
            "type": "Feature",
            "properties": {
                "category": "cafe",
                "hours": "8am - 9:30pm",
                "description": "Enjoy freshly brewed coffe, and home baked cakes in our homely cafe. We're part of a larger chain of patisseries and cafes.",
                "name": "Josie's Cafe Blackburn",
                "phone": "+44 8888 88888",
                "storeid": "09"
            }
        },
        {
            "geometry": {
                "type": "Point",
                "coordinates": [-0.211363,
                    51.108966
                ]
            },
            "type": "Feature",
            "properties": {
                "category": "cafe",
                "hours": "8am - 9:30pm",
                "description": "A delicious array of pastries with many flavours, and fresh coffee in an snug cafe. We're part of a larger chain of patisseries and cafes.",
                "name": "Josie's Cafe Crawley",
                "phone": "+44 1010 101010",
                "storeid": "10"
            }
        },
        {
            "geometry": {
                "type": "Point",
                "coordinates": [-0.123559,
                    50.832679
                ]
            },
            "type": "Feature",
            "properties": {
                "category": "cafe",
                "hours": "8am - 9:30pm",
                "description": "Grab a freshly brewed coffee, a decadent cake and relax in our idyllic cafe. We're part of a larger chain of patisseries and cafes.",
                "name": "Josie's Cafe Brighton",
                "phone": "+44 1313 131313",
                "storeid": "11"
            }
        },
        {
            "geometry": {
                "type": "Point",
                "coordinates": [-3.319575,
                    52.517827
                ]
            },
            "type": "Feature",
            "properties": {
                "category": "cafe",
                "hours": "8am - 9:30pm",
                "description": "Come in and unwind at this idyllic cafe with fresh coffee and home made cakes. We're part of a larger chain of patisseries and cafes.",
                "name": "Josie's Cafe Newtown",
                "phone": "+44 1414 141414",
                "storeid": "12"
            }
        },
        {
            "geometry": {
                "type": "Point",
                "coordinates": [
                    1.158167,
                    52.071634
                ]
            },
            "type": "Feature",
            "properties": {
                "category": "cafe",
                "hours": "8am - 9:30pm",
                "description": "Fresh coffee and delicious cakes in an snug cafe. We're part of a larger chain of patisseries and cafes.",
                "name": "Josie's Cafe Ipswich",
                "phone": "+44 1717 17171",
                "storeid": "13"
            }
        }
    ]
}
That's a lot of data, but once you peruse it, you see it's simply the same structure repeated for each store. Each store is represented as a GeoJSON Point along with its coordinates and the extra data contained under the properties key. Interestingly, GeoJSON allows the inclusion of arbitrarily named keys under the properties key. In this codelab, those keys are category, hours, description, name, and phone.
- Now edit
app.jsso that it loads the GeoJSON instores.jsonto your map.
app.js
function initMap() {
  // Create the map.
  const map = new google.maps.Map(document.getElementById('map'), {
    zoom: 7,
    center: {lat: 52.632469, lng: -1.689423},
  });

  // Load the stores GeoJSON onto the map.
  map.data.loadGeoJson('stores.json', {idPropertyName: 'storeid'});

  const apiKey = 'YOUR_API_KEY';
  const infoWindow = new google.maps.InfoWindow();

  // Show the information for a store when its marker is clicked.
  map.data.addListener('click', (event) => {
    const category = event.feature.getProperty('category');
    const name = event.feature.getProperty('name');
    const description = event.feature.getProperty('description');
    const hours = event.feature.getProperty('hours');
    const phone = event.feature.getProperty('phone');
    const position = event.feature.getGeometry().get();
    const content = `
      <h2>${name}</h2><p>${description}</p>
      <p><b>Open:</b> ${hours}<br/><b>Phone:</b> ${phone}</p>
    `;

    infoWindow.setContent(content);
    infoWindow.setPosition(position);
    infoWindow.setOptions({pixelOffset: new google.maps.Size(0, -30)});
    infoWindow.open(map);
  });
}
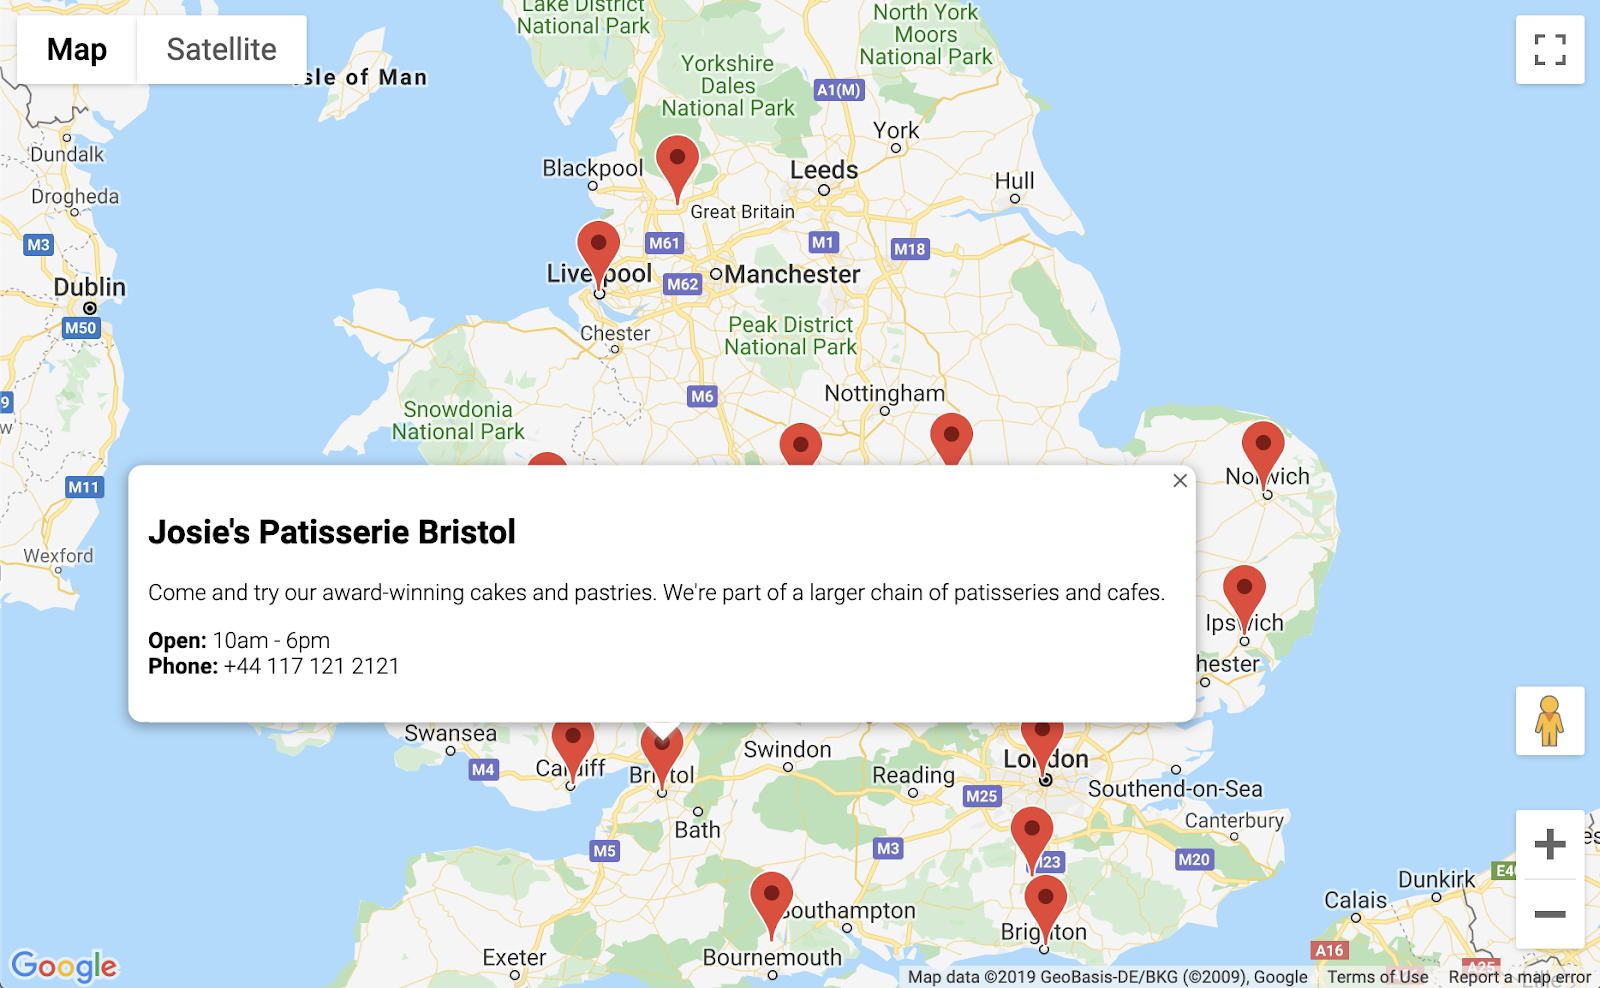
In the code example, you loaded your GeoJSON onto the map by calling loadGeoJson and passing the name of the JSON file. You also defined a function to run each time a marker is clicked. The function can then access the extra data for the store whose marker was clicked and use the information in an info window that is displayed. To test this app, you can run the simple Python HTTP server using the same command as before.
- Go back to Cloud Shell and type the following:
$ python3 -m http.server 8080
- Click Web Preview
 > Preview on port 8080 again and you should see a map full of markers that you can click to view details about each store, like the following example. Progress!
5. Customize the map
You're almost there. You have a map with all your store markers and extra information being displayed when clicked. But it looks like every other Google map out there. How dull! Spice it up with a custom map style, markers, logos, and Street View images.
Here's a new version of app.js with custom styling added:
app.js
const mapStyle = [{
  'featureType': 'administrative',
  'elementType': 'all',
  'stylers': [{
    'visibility': 'on',
  },
  {
    'lightness': 33,
  },
  ],
},
{
  'featureType': 'landscape',
  'elementType': 'all',
  'stylers': [{
    'color': '#f2e5d4',
  }],
},
{
  'featureType': 'poi.park',
  'elementType': 'geometry',
  'stylers': [{
    'color': '#c5dac6',
  }],
},
{
  'featureType': 'poi.park',
  'elementType': 'labels',
  'stylers': [{
    'visibility': 'on',
  },
  {
    'lightness': 20,
  },
  ],
},
{
  'featureType': 'road',
  'elementType': 'all',
  'stylers': [{
    'lightness': 20,
  }],
},
{
  'featureType': 'road.highway',
  'elementType': 'geometry',
  'stylers': [{
    'color': '#c5c6c6',
  }],
},
{
  'featureType': 'road.arterial',
  'elementType': 'geometry',
  'stylers': [{
    'color': '#e4d7c6',
  }],
},
{
  'featureType': 'road.local',
  'elementType': 'geometry',
  'stylers': [{
    'color': '#fbfaf7',
  }],
},
{
  'featureType': 'water',
  'elementType': 'all',
  'stylers': [{
    'visibility': 'on',
  },
  {
    'color': '#acbcc9',
  },
  ],
},
];

function initMap() {
  // Create the map.
  const map = new google.maps.Map(document.getElementById('map'), {
    zoom: 7,
    center: {lat: 52.632469, lng: -1.689423},
    styles: mapStyle,
  });

  // Load the stores GeoJSON onto the map.
  map.data.loadGeoJson('stores.json', {idPropertyName: 'storeid'});

  // Define the custom marker icons, using the store's "category".
  map.data.setStyle((feature) => {
    return {
      icon: {
        url: `img/icon_${feature.getProperty('category')}.png`,
        scaledSize: new google.maps.Size(64, 64),
      },
    };
  });

  const apiKey = 'YOUR_API_KEY';
  const infoWindow = new google.maps.InfoWindow();

  // Show the information for a store when its marker is clicked.
  map.data.addListener('click', (event) => {
    const category = event.feature.getProperty('category');
    const name = event.feature.getProperty('name');
    const description = event.feature.getProperty('description');
    const hours = event.feature.getProperty('hours');
    const phone = event.feature.getProperty('phone');
    const position = event.feature.getGeometry().get();
    const content = `
      <img style="float:left; width:200px; margin-top:30px" src="img/logo_${category}.png">
      <div style="margin-left:220px; margin-bottom:20px;">
        <h2>${name}</h2><p>${description}</p>
        <p><b>Open:</b> ${hours}<br/><b>Phone:</b> ${phone}</p>
        <p><img src="https://maps.googleapis.com/maps/api/streetview?size=350x120&location=${position.lat()},${position.lng()}&key=${apiKey}&solution_channel=GMP_codelabs_simplestorelocator_v1_a"></p>
      </div>
      `;

    infoWindow.setContent(content);
    infoWindow.setPosition(position);
    infoWindow.setOptions({pixelOffset: new google.maps.Size(0, -30)});
    infoWindow.open(map);
  });

}
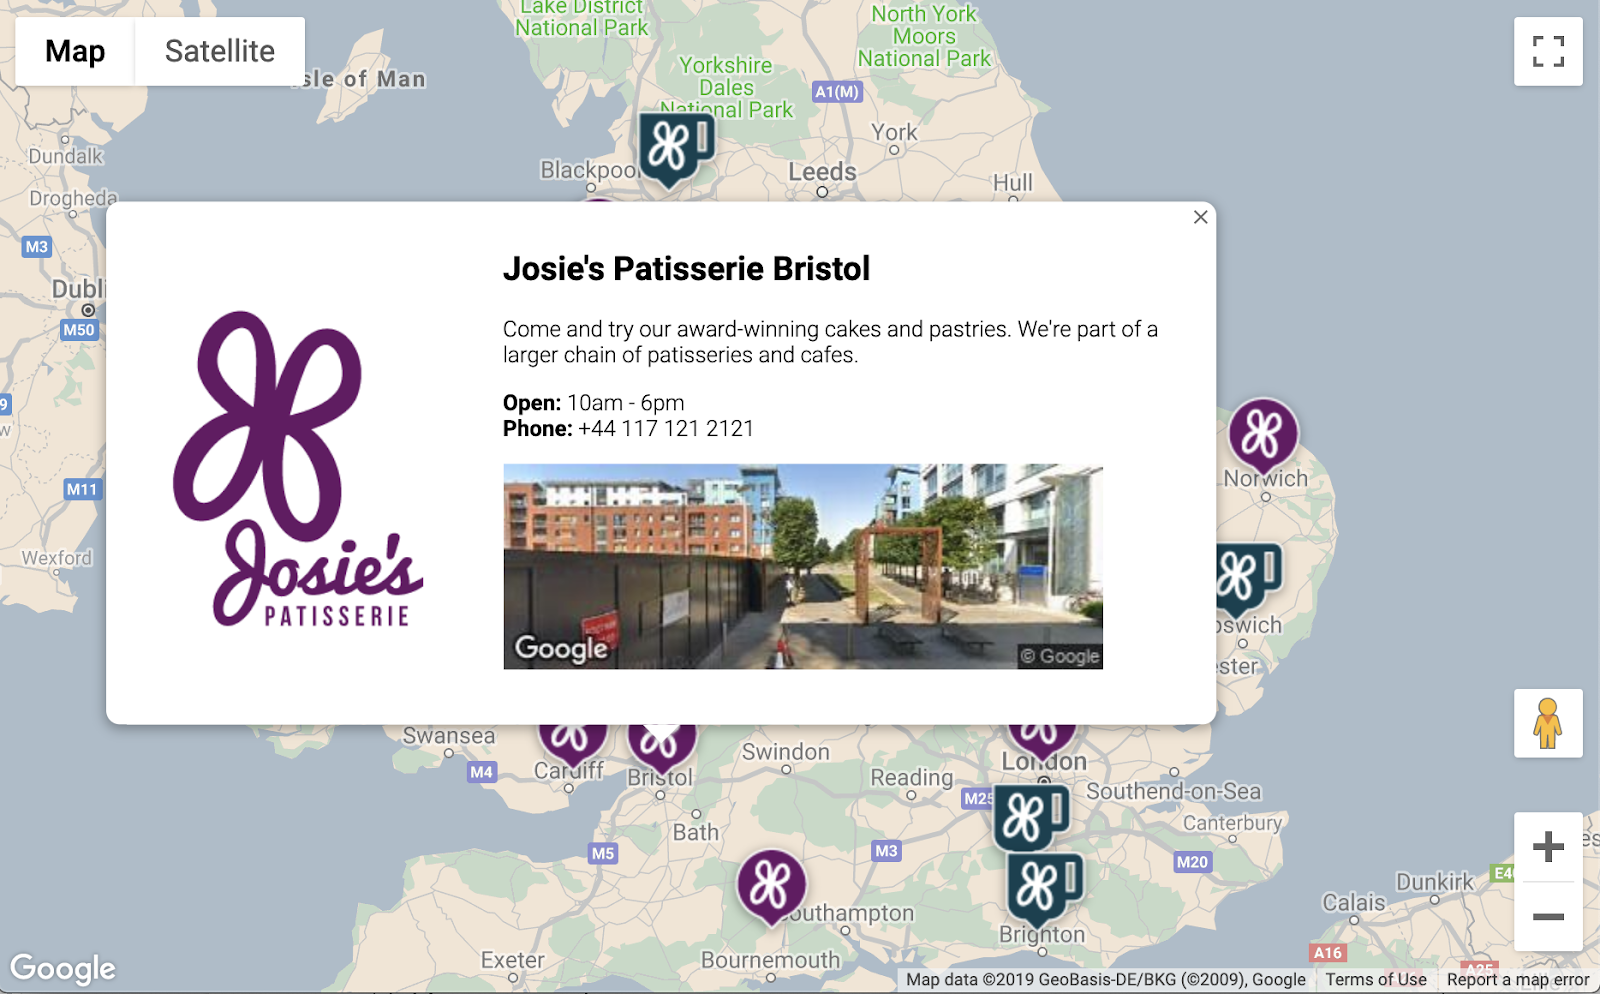
Here's what you added:
- The
mapStylevariable contains all the information for styling the map. (As an added bonus, you can even create your own style if you like.) - Using the
map.data.setStylemethod, you applied custom markers—a different one for eachcategoryfrom the GeoJSON. - You modified the
contentvariable to include a logo (again using thecategoryfrom the GeoJSON) and a Street View image for the store's location.
Before you deploy this, you need to complete a couple of steps:
- Set the correct value for the
apiKeyvariable by replacing the'YOUR_API_KEY'string inapp.jswith your own API key from earlier (the same one you pasted inindex.html, leaving the quotes intact). - Run the following commands in Cloud Shell to download the marker and logo graphics. Make sure you're in the
store-locatordirectory. UseControl+Cto stop the simple HTTP server if it's running.
$ mkdir -p img; cd img
$ wget https://github.com/googlecodelabs/google-maps-simple-store-locator/raw/master/src/img/icon_cafe.png
$ wget https://github.com/googlecodelabs/google-maps-simple-store-locator/raw/master/src/img/icon_patisserie.png
$ wget https://github.com/googlecodelabs/google-maps-simple-store-locator/raw/master/src/img/logo_cafe.png
$ wget https://github.com/googlecodelabs/google-maps-simple-store-locator/raw/master/src/img/logo_patisserie.png
- Preview the finished store locator by running the following command:.
$ python3 -m http.server 8080
When you reload the preview, you should see something like this map with custom styling, custom marker images, improved info window formatting, and a Street View image for each location:
6. Get user input
Users of store locators typically want to know which store is closest to them or an address where they plan to start their journey. Add a Place Autocomplete search bar to allow the user to easily enter a starting address. Place Autocomplete provides typeahead functionality similar to the way Autocomplete works in other Google search bars, but the predictions are all Places in Google Maps Platform.
- Go back to edit
index.htmlto add styling for the Autocomplete search bar and the associated side panel of results. Don't forget to replace your API key if you pasted over your old code.
index.html
<html>

<head>
  <title>Store Locator</title>
  <style>
    #map {
      height: 100%;
    }

    html,
    body {
      height: 100%;
      margin: 0;
      padding: 0;
    }

    /* Styling for Autocomplete search bar */
    #pac-card {
      background-color: #fff;
      border-radius: 2px 0 0 2px;
      box-shadow: 0 2px 6px rgba(0, 0, 0, 0.3);
      box-sizing: border-box;
      font-family: Roboto;
      margin: 10px 10px 0 0;
      -moz-box-sizing: border-box;
      outline: none;
    }

    #pac-container {
      padding-top: 12px;
      padding-bottom: 12px;
      margin-right: 12px;
    }

    #pac-input {
      background-color: #fff;
      font-family: Roboto;
      font-size: 15px;
      font-weight: 300;
      margin-left: 12px;
      padding: 0 11px 0 13px;
      text-overflow: ellipsis;
      width: 400px;
    }

    #pac-input:focus {
      border-color: #4d90fe;
    }

    #title {
      color: #fff;
      background-color: #acbcc9;
      font-size: 18px;
      font-weight: 400;
      padding: 6px 12px;
    }

    .hidden {
      display: none;
    }

    /* Styling for an info pane that slides out from the left.
     * Hidden by default. */
    #panel {
      height: 100%;
      width: null;
      background-color: white;
      position: fixed;
      z-index: 1;
      overflow-x: hidden;
      transition: all .2s ease-out;
    }

    .open {
      width: 250px;
    }

    .place {
      font-family: 'open sans', arial, sans-serif;
      font-size: 1.2em;
      font-weight: 500;
      margin-block-end: 0px;
      padding-left: 18px;
      padding-right: 18px;
    }

    .distanceText {
      color: silver;
      font-family: 'open sans', arial, sans-serif;
      font-size: 1em;
      font-weight: 400;
      margin-block-start: 0.25em;
      padding-left: 18px;
      padding-right: 18px;
    }
  </style>
</head>

<body>
  <!-- The div to hold the map -->
  <div id="map"></div>

  <script src="app.js"></script>
  <script async defer src="https://maps.googleapis.com/maps/api/js?key=YOUR_API_KEY&libraries=places&callback=initMap&solution_channel=GMP_codelabs_simplestorelocator_v1_a">
  </script>
</body>

</html>
Both the Autocomplete search bar and the slideout panel are initially hidden until they are needed.
- Now, add the Autocomplete widget to the map at the end of the
initMapfunction inapp.js, just before the closing curly brace.
app.js
  // Build and add the search bar
  const card = document.createElement('div');
  const titleBar = document.createElement('div');
  const title = document.createElement('div');
  const container = document.createElement('div');
  const input = document.createElement('input');
  const options = {
    types: ['address'],
    componentRestrictions: {country: 'gb'},
  };

  card.setAttribute('id', 'pac-card');
  title.setAttribute('id', 'title');
  title.textContent = 'Find the nearest store';
  titleBar.appendChild(title);
  container.setAttribute('id', 'pac-container');
  input.setAttribute('id', 'pac-input');
  input.setAttribute('type', 'text');
  input.setAttribute('placeholder', 'Enter an address');
  container.appendChild(input);
  card.appendChild(titleBar);
  card.appendChild(container);
  map.controls[google.maps.ControlPosition.TOP_RIGHT].push(card);

  // Make the search bar into a Places Autocomplete search bar and select
  // which detail fields should be returned about the place that
  // the user selects from the suggestions.
  const autocomplete = new google.maps.places.Autocomplete(input, options);

  autocomplete.setFields(
      ['address_components', 'geometry', 'name']);
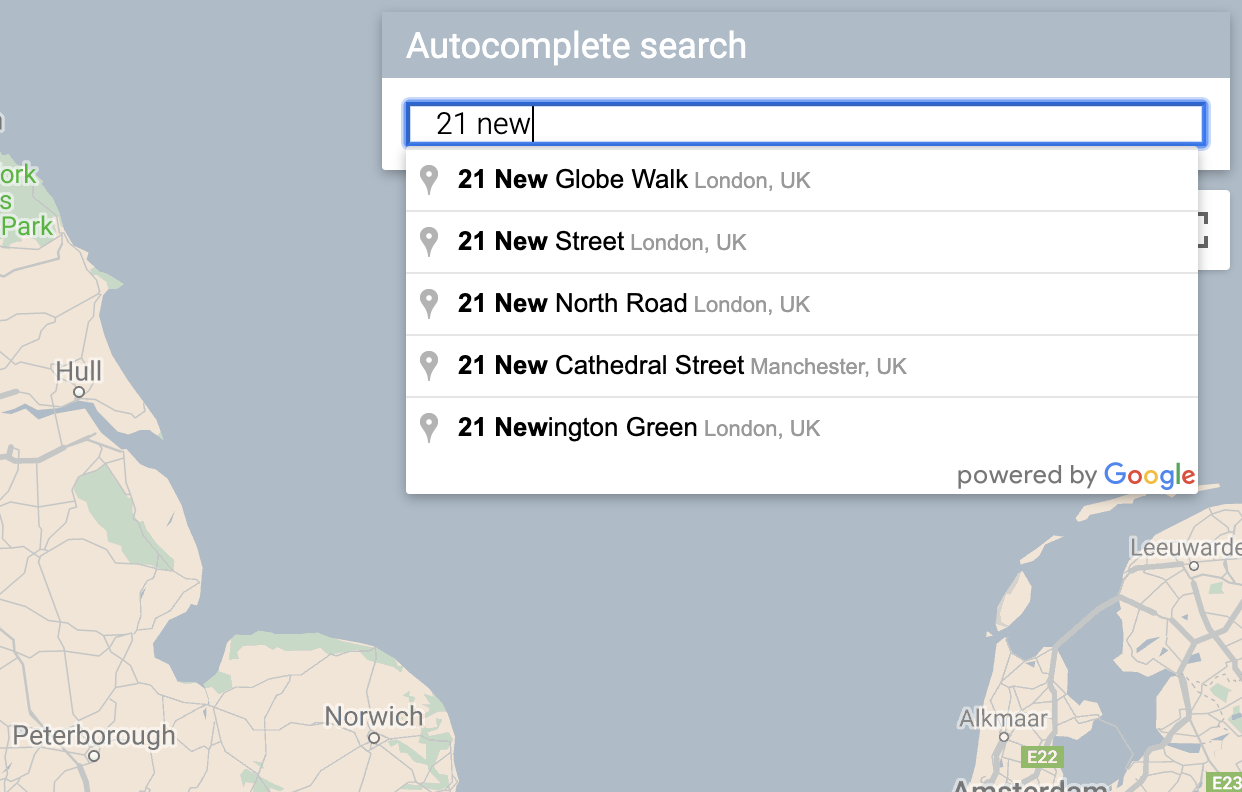
The code restricts the Autocomplete suggestions to only return addresses (because Place Autocomplete can match for establishment names and administrative locations) and limits the addresses returned to only those in the UK. Adding these optional specifications will reduce the number of characters the user needs to enter in order to narrow down the predictions to show the address they are looking for. Then, it moves the Autocomplete div you created into the top-right corner of the map and specifies which fields should be returned about each Place in the response.
- Restart your server and refresh your preview by running the following command:.
$ python3 -m http.server 8080
You should see an Autocomplete widget in the top-right corner of your map now, which shows you UK addresses matching what you type.
Now, you need to handle when the user selects a prediction from the Autocomplete widget and use that location as the basis for calculating the distances to your stores.
- Add the following code to the end of
initMapinapp.jsafter the code you just pasted.
app.js
 // Set the origin point when the user selects an address
  const originMarker = new google.maps.Marker({map: map});
  originMarker.setVisible(false);
  let originLocation = map.getCenter();

  autocomplete.addListener('place_changed', async () => {
    originMarker.setVisible(false);
    originLocation = map.getCenter();
    const place = autocomplete.getPlace();

    if (!place.geometry) {
      // User entered the name of a Place that was not suggested and
      // pressed the Enter key, or the Place Details request failed.
      window.alert('No address available for input: \'' + place.name + '\'');
      return;
    }

    // Recenter the map to the selected address
    originLocation = place.geometry.location;
    map.setCenter(originLocation);
    map.setZoom(9);
    console.log(place);

    originMarker.setPosition(originLocation);
    originMarker.setVisible(true);

    // Use the selected address as the origin to calculate distances
    // to each of the store locations
    const rankedStores = await calculateDistances(map.data, originLocation);
    showStoresList(map.data, rankedStores);

    return;
  });
The code adds a listener so that when the user clicks on one of the suggestions, the map recenters on the selected address and sets the origin as the basis for your distance calculations. You implement the distance calculations in the next step.
7. List the closest stores
The Directions API works much like the experience of requesting directions in the Google Maps app—entering a single origin and a single destination to receive a route between the two. The Distance Matrix API takes this concept further for identifying the optimal pairings between multiple possible origins and multiple possible destinations based on travel times and distances. In this case, to help the user find the nearest store to the address selected, you provide one origin and an array of store locations as the destinations.
- Add a new function to
app.jscalledcalculateDistances.
app.js
async function calculateDistances(data, origin) {
  const stores = [];
  const destinations = [];

  // Build parallel arrays for the store IDs and destinations
  data.forEach((store) => {
    const storeNum = store.getProperty('storeid');
    const storeLoc = store.getGeometry().get();

    stores.push(storeNum);
    destinations.push(storeLoc);
  });

  // Retrieve the distances of each store from the origin
  // The returned list will be in the same order as the destinations list
  const service = new google.maps.DistanceMatrixService();
  const getDistanceMatrix =
    (service, parameters) => new Promise((resolve, reject) => {
      service.getDistanceMatrix(parameters, (response, status) => {
        if (status != google.maps.DistanceMatrixStatus.OK) {
          reject(response);
        } else {
          const distances = [];
          const results = response.rows[0].elements;
          for (let j = 0; j < results.length; j++) {
            const element = results[j];
            const distanceText = element.distance.text;
            const distanceVal = element.distance.value;
            const distanceObject = {
              storeid: stores[j],
              distanceText: distanceText,
              distanceVal: distanceVal,
            };
            distances.push(distanceObject);
          }

          resolve(distances);
        }
      });
    });

  const distancesList = await getDistanceMatrix(service, {
    origins: [origin],
    destinations: destinations,
    travelMode: 'DRIVING',
    unitSystem: google.maps.UnitSystem.METRIC,
  });

  distancesList.sort((first, second) => {
    return first.distanceVal - second.distanceVal;
  });

  return distancesList;
}
The function calls the Distance Matrix API using the origin passed to it as a single origin and the store locations as an array of destinations. Then, it builds an array of objects storing the store's ID, distance expressed in a human-readable string, distance in meters as a numerical value, and sorts the array.
The user expects to see a list of the stores ordered from nearest to farthest. Populate a side-panel listing for each store using the list returned from the calculateDistances function to inform the display order of the stores.
- Add a new function to
app.jscalledshowStoresList.
app.js
function showStoresList(data, stores) {
  if (stores.length == 0) {
    console.log('empty stores');
    return;
  }

  let panel = document.createElement('div');
  // If the panel already exists, use it. Else, create it and add to the page.
  if (document.getElementById('panel')) {
    panel = document.getElementById('panel');
    // If panel is already open, close it
    if (panel.classList.contains('open')) {
      panel.classList.remove('open');
    }
  } else {
    panel.setAttribute('id', 'panel');
    const body = document.body;
    body.insertBefore(panel, body.childNodes[0]);
  }


  // Clear the previous details
  while (panel.lastChild) {
    panel.removeChild(panel.lastChild);
  }

  stores.forEach((store) => {
    // Add store details with text formatting
    const name = document.createElement('p');
    name.classList.add('place');
    const currentStore = data.getFeatureById(store.storeid);
    name.textContent = currentStore.getProperty('name');
    panel.appendChild(name);
    const distanceText = document.createElement('p');
    distanceText.classList.add('distanceText');
    distanceText.textContent = store.distanceText;
    panel.appendChild(distanceText);
  });

  // Open the panel
  panel.classList.add('open');

  return;
}
- Restart your server and refresh your preview by running the following command.
$ python3 -m http.server 8080
- Finally, enter a UK address into the Autocomplete search bar and click on one of the suggestions.
The map should center on that address and a sidebar should appear listing the store locations in order of distance from the selected address. One example is pictured as follows:

8. Optional: Host your webpage
Up to this point, you only view your map when you're actively running your Python HTTP server. To view your map beyond your active Cloud Shell session or to be able to share the URL for your map with others, look at using Cloud Storage to host your web page. Cloud Storage is an online file-storage web service for storing and accessing data on Google's infrastructure. The service combines the performance and scalability of Google Cloud with advanced security and sharing capabilities. It also offers a free tier, which makes it great for hosting your simple store locator.
With Cloud Storage, files are stored in buckets, which are similar to directories on your computer. To host your web page, you first need to create a bucket. You need to choose a unique name for your bucket, perhaps by using your name as part of the bucket name.
- Once you decide on a name, run the following command in Cloud Shell:
$ gsutil mb gs://yourname-store-locator
gsutil is the tool for interacting with Cloud Storage. The mb command creatively stands for "make bucket." For more information on all of the commands available, including the ones you use, see gsutil tool.
By default, your buckets and files hosted on Cloud Storage are private. For your store locator, however, you want all the files to be public so that they're accessible to everyone over the internet. You could make each file public after you upload it, but that would be tedious. Instead, you can simply set the default access level for the bucket that you created and all of the files you upload to it will inherit that access level.
- Run the following command, replacing
yourname-store-locatorwith the name you chose for your bucket:
$ gsutil defacl ch -u AllUsers:R gs://yourname-store-locator
- Now you can upload all your files in the current directory (currently just your
index.htmlandapp.jsfiles) with the following command:
$ gsutil -h "Cache-Control:no-cache" cp * gs://yourname-store-locator
You should now have a web page with a map online. The URL to view it will be http://storage.googleapis.com/yourname-store-locator/index.html, again with the yourname-store-locator part replaced with the bucket name you previously chose.
Cleanup
The easiest way to clean up all the resources created in this project is to shut down the Google Cloud Project that you created at the start of this tutorial:
- Open the Settings Page in the Cloud Console
- Click Select a project.
- Select the project you created at the start of this tutorial and click Open
- Enter the Project ID and click Shut down.
9. Congratulations
Congratulations! You completed this codelab.
What you learned
- Adding a custom-styled map with the Maps JavaScript API
- Loading a data layer onto a map in GeoJSON format
- Using the Street View Static API to display a Street View image in a webpage.
- Using the Places Library to add a Places Autocomplete search bar to the page
- Using the Distance Matrix service to calculate multiple distances with a single API call
- Managing and testing web development projects in Google Cloud Platform using the browser-based Cloud Shell command line interface
- Hosting a website with Cloud Storage
Learn more
- Learn another way to host your web map using Google App Engine in the codelab Mapping the NYC Subway.
- Explore more Google Maps Platform codelabs, such as Building a Nearby Business Search service.
- Help us create the content that you would find most useful by answering the question below:
What other codelabs would you like to see?
Is the codelab you want not listed above? Request it with a new issue here.
If you would like to dive into the code some more, have a look at the source code repository at https://github.com/googlecodelabs/google-maps-simple-store-locator.
