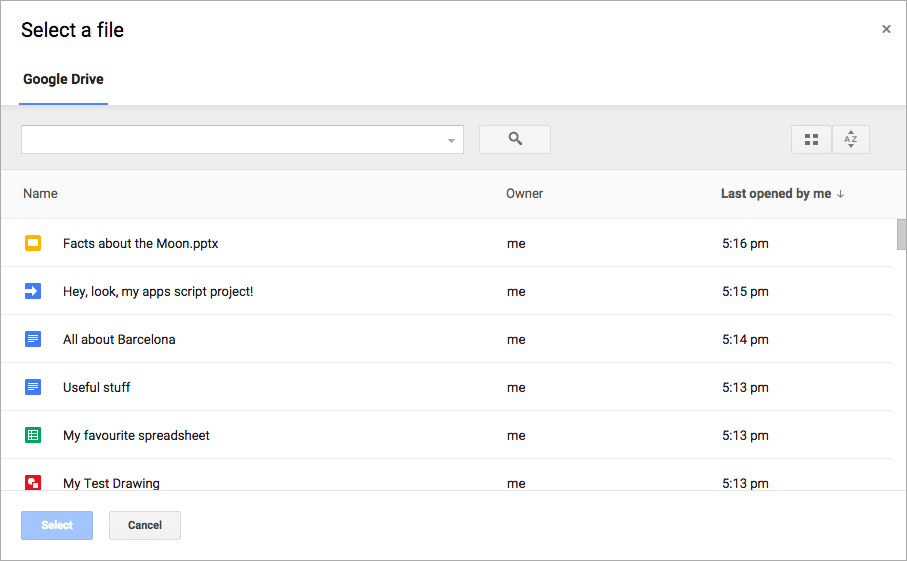
Google Picker API 是一種 JavaScript API,可讓您在網頁應用程式中讓使用者選取或上傳 Google 雲端硬碟檔案。使用者可以授權您的應用程式存取其 Google 雲端硬碟資料,以安全且經過授權的方式存取檔案。
Google Picker 會做為「File Open」對話方塊,用於儲存在 Google 雲端硬碟中的資訊,並提供以下功能:
- 與 Google 雲端硬碟 UI 類似的外觀。
- 幾種顯示雲端硬碟檔案預覽畫面和縮圖的畫面。
- 內嵌式模式視窗,使用者不會離開主要應用程式。
請注意,Google Picker 不允許使用者整理、移動或複製檔案。您可以使用 Google 雲端硬碟 API 或雲端硬碟 UI 來執行這項操作。
應用程式需求
使用 Google Picker 的應用程式必須遵守所有現行服務條款。最重要的是,您必須在要求中正確識別自己。
您也必須擁有 Google Cloud 專案。設定環境
如要開始使用 Google Picker API,您必須設定環境。
啟用 API
使用 Google API 前,您必須先在 Google Cloud 專案中啟用這些 API。您可以在單一 Google Cloud 專案中啟用一或多個 API。
在 Google Cloud 控制台中啟用 Google Picker API。
建立 API 金鑰
API 金鑰是一串長字串,包含大小寫英文字母、數字、底線和連字號,例如 AIzaSyDaGmWKa4JsXZ-HjGw7ISLn_3namBGewQe。這項驗證方法可用於匿名存取公開資料,例如使用「Anyone with this link」分享設定共用的 Google Workspace 檔案。詳情請參閱「使用 API 金鑰進行驗證」。
如要建立 API 金鑰,請按照下列步驟操作:
- 在 Google Cloud 控制台中,依序前往「Menu」 >「APIs & Services」 >「Credentials」。
- 依序按一下「建立憑證」 「API 金鑰」。
- 系統會顯示新的 API 金鑰。
- 按一下「複製」 即可複製 API 金鑰,以便在應用程式程式碼中使用。您也可以在專案憑證的「API 金鑰」部分找到 API 金鑰。
- 按一下「限制金鑰」,即可更新進階設定並限制 API 金鑰的使用方式。詳情請參閱「套用 API 金鑰限制」。
授權網頁應用程式的憑證
如要驗證使用者,並在應用程式中存取使用者資料,您需要建立一或多個 OAuth 2.0 用戶端 ID。用戶端 ID 可讓 Google 的 OAuth 伺服器識別單一應用程式。如果您的應用程式在多個平台上運作,則必須為每個平台建立專屬的用戶端 ID。
- 在 Google Cloud 控制台中,依序前往「選單」 >「」 >「Clients」。
- 按一下「Create Client」。
- 依序按一下「Application type」>「Web application」。
- 在「Name」欄位中輸入憑證名稱。這個名稱只會顯示在 Google Cloud 控制台中。
- 新增與應用程式相關的授權 URI:
- 用戶端應用程式 (JavaScript):在「已授權的 JavaScript 來源」下方,按一下「新增 URI」。接著,輸入要用於瀏覽器要求的 URI。這會識別應用程式可將 API 要求傳送至 OAuth 2.0 伺服器的網域。
- 伺服器端應用程式 (Java、Python 等):按一下「Authorized redirect URIs」下方的「Add URI」。接著,輸入 OAuth 2.0 伺服器可傳送回應的端點 URI。
- 按一下 [Create] (建立)。
新建立的憑證會顯示在「OAuth 2.0 Client IDs」下方。
請記下用戶端 ID。用戶端密鑰不適用於網頁應用程式。
Picker 物件時,應用程式必須傳送 OAuth 2.0 存取權杖,並附上可存取私人使用者資料的檢視畫面。如要要求存取權杖,請參閱「使用 OAuth 2.0 存取 Google API」。顯示 Google Picker
本指南的其餘部分將說明如何從網路應用程式載入及顯示 Google Picker。如要查看完整範例,請參閱 Google Picker 程式碼範例。載入 Google Picker 程式庫
如要載入 Google Picker 程式庫,請使用程式庫名稱和回呼函式呼叫 gapi.load(),以便在載入成功後叫用:
    <script>
      let tokenClient;
      let accessToken = null;
      let pickerInited = false;
      let gisInited = false;

      // Use the API Loader script to load google.picker
      function onApiLoad() {
        gapi.load('picker', onPickerApiLoad);
      }

      function onPickerApiLoad() {
        pickerInited = true;
      }

      function gisLoaded() {
        // TODO(developer): Replace with your client ID and required scopes.
        tokenClient = google.accounts.oauth2.initTokenClient({
          client_id: 'CLIENT_ID',
          scope: 'SCOPES',
          callback: '', // defined later
        });
        gisInited = true;
    }
    </script>
    <!-- Load the Google API Loader script. -->
    <script async defer src="https://apis.google.com/js/api.js" onload="onApiLoad()"></script>
    <script async defer src="https://accounts.google.com/gsi/client" onload="gisLoaded()"></script>
更改下列內容:
CLIENT_ID:您的網頁應用程式用戶端 ID。SCOPES:您需要要求存取 Google API 的一或多個 OAuth 2.0 範圍,具體取決於您需要的存取層級。如需更多資訊,請參閱「Google API 適用的 OAuth 2.0 範圍」。
google.accounts.oauth2 JavaScript 程式庫可協助您向使用者索取同意聲明,並取得存取權存證,以便處理使用者資料。initTokenClient() 方法會使用網頁應用程式的用戶端 ID 初始化新的權杖用戶端。詳情請參閱「使用符記模型」。
onApiLoad() 函式會載入 Google Picker 程式庫。系統會在 Google Picker 程式庫成功載入後呼叫 onPickerApiLoad() 回呼函式。
顯示 Google Picker
createPicker() 函式會檢查 Google Picker API 是否已完成載入,以及是否已建立 OAuth 權杖。請使用 PickerBuilder.setAppId 方法,以 Cloud 專案編號設定 Drive 應用程式 ID,讓應用程式存取使用者的檔案。接著,這個函式會建立 Google Picker 的例項並顯示該例項:
    // Create and render a Google Picker object for selecting from Drive.
    function createPicker() {
      const showPicker = () => {
        // TODO(developer): Replace with your API key
        const picker = new google.picker.PickerBuilder()
            .addView(google.picker.ViewId.DOCS)
            .setOAuthToken(accessToken)
            .setDeveloperKey('API_KEY')
            .setCallback(pickerCallback)
            .setAppId(APP_ID)
            .build();
        picker.setVisible(true);
      }

      // Request an access token.
      tokenClient.callback = async (response) => {
        if (response.error !== undefined) {
          throw (response);
        }
        accessToken = response.access_token;
        showPicker();
      };

      if (accessToken === null) {
        // Prompt the user to select a Google Account and ask for consent to share their data
        // when establishing a new session.
        tokenClient.requestAccessToken({prompt: 'consent'});
      } else {
        // Skip display of account chooser and consent dialog for an existing session.
        tokenClient.requestAccessToken({prompt: ''});
      }
    }
如要建立 Google Picker 例項,您必須使用 PickerBuilder 建立 Picker 物件。PickerBuilder 會使用 View、OAuth 權杖、開發人員金鑰和回呼函式,在成功時呼叫 (pickerCallback)。
Picker 物件一次會轉譯一個 View。請至少指定一個檢視畫面,方法是使用 ViewId (google.picker.ViewId.*) 或建立 DocsView 的例項,以便進一步控管檢視畫面的算繪方式。
如果 Google Picker 中有多個檢視畫面,使用者可以按一下左側的分頁,在檢視畫面之間切換。分頁可以透過 ViewGroup 物件進行邏輯分組。
實作 Google Picker 回呼
Google Picker 回呼可用於回應使用者在 Google Picker 中的互動行為,例如選取檔案或按下「取消」。ResponseObject 介面會傳達使用者所選項目的相關資訊。
    // A simple callback implementation.
    function pickerCallback(data) {
      const url = 'nothing';
      if (data[google.picker.Response.ACTION] == google.picker.Action.PICKED) {
        const doc = data[google.picker.Response.DOCUMENTS][0];
        url = doc[google.picker.Document.URL];
      }
      const message = `You picked: ${url}`;
      document.getElementById('result').textContent = message;
    }
回呼會接收 JSON 編碼的 data 物件。這個物件包含使用者透過 Google Picker (google.picker.Response.ACTION) 執行的 Action。如果使用者選取項目,google.picker.Response.DOCUMENTS 陣列也會填入。在本例中,google.picker.Document.URL 會顯示在主頁面上。如要進一步瞭解資料欄位,請參閱 ResponseObject 介面。
篩選特定檔案類型
使用 ViewGroup 篩選特定項目。以下程式碼範例說明如何讓「Google 雲端硬碟」子檢視畫面只顯示文件和簡報。
    const picker = new google.picker.PickerBuilder()
        .addViewGroup(
          new google.picker.ViewGroup(google.picker.ViewId.DOCS)
              .addView(google.picker.ViewId.DOCUMENTS)
              .addView(google.picker.ViewId.PRESENTATIONS))
        .setOAuthToken(oauthToken)
        .setDeveloperKey(developerKey)
        .setAppId(cloudProjectNumber)
        .setCallback(pickerCallback)
        .build();
ViewId。調整 Google Picker 的外觀
您可以使用 Feature 物件,為各種檢視畫面開啟或關閉功能。如要微調 Google Picker 視窗的外觀,請使用 PickerBuilder.enableFeature() 或 PickerBuilder.disableFeature() 函式。舉例來說,如果您只有一個檢視畫面,建議隱藏導覽窗格 (Feature.NAV_HIDDEN),讓使用者有更多空間查看項目。
以下程式碼範例說明如何使用這項功能,讓試算表的搜尋挑選器顯示搜尋結果:
     const picker = new google.picker.PickerBuilder()
         .addView(google.picker.ViewId.SPREADSHEETS)
         .enableFeature(google.picker.Feature.NAV_HIDDEN)
         .setDeveloperKey(developerKey)
         .setCallback(pickerCallback)
         .build();
