APIهای Google Fit، از جمله Google Fit REST API، در سال 2026 منسوخ خواهند شد . از 1 می 2024، توسعه دهندگان نمی توانند برای استفاده از این API ها ثبت نام کنند .
با مجموعهها، منظم بمانید
ذخیره و طبقهبندی محتوا براساس اولویتهای شما.
این راهنما نحوه شروع توسعه با Google Fit را در Android توضیح می دهد.
راه اندازی
قبل از شروع ساخت اپلیکیشن خود، مراحل زیر را تکمیل کنید.
یک حساب Google دریافت کنید
برای استفاده از APIهای Google Fit، به یک حساب Google نیاز دارید. می توانید یک حساب کاربری جدید ایجاد کنید یا از یک حساب موجود استفاده کنید. ممکن است بخواهید یک حساب کاربری جداگانه برای آزمایش برنامه خود از دیدگاه کاربر ایجاد کنید.
خدمات Google Play را دریافت کنید
جدیدترین کتابخانه مشتری را برای خدمات Google Play در میزبان توسعه خود دریافت کنید:
توصیه می کنیم از محیط توسعه Android Studio برای ساخت اپلیکیشن با Fitness API استفاده کنید. برای جزئیات در مورد نحوه ساخت یک پروژه جدید و پیکربندی آن در Android Studio، به ایجاد پروژه مراجعه کنید.
کتابخانه سرویس گیرنده Google Play را اضافه کنید
در Android Studio، فایل build.gradle را برای ماژول خود باز کنید و کتابخانه سرویس گیرنده Google Play را به عنوان یک وابستگی اضافه کنید:
این اطمینان حاصل می کند که Gradle به طور خودکار SDK تناسب اندام را هنگام ساخت برنامه شما دانلود می کند.
اپلیکیشن خود را بسازید و آزمایش کنید
پس از اتمام مراحل راه اندازی، می توانید شروع به ساخت برنامه خود کنید. برای شروع، با انواع دادههایی که برنامه شما میتواند ذخیره و بخواند آشنا شوید. درباره کار با داده در Google Fit بیشتر بیاموزید.
انواع داده هایی که برنامه شما اجازه دسترسی به آنها را دارد، با محدوده مجوز مطابقت دارند. برای درخواست این مجوزها، باید اضافه کنید که برنامه شما به کدام نوع داده در یک نمونه FitnessOptions نیاز به دسترسی دارد . وقتی برنامه شما درخواست استفاده از هر یک از انواع دادههای Google Fit را میدهد، Android SDK بهطور خودکار بررسی میکند که آنها به کدام حوزهها تعلق دارند و از کاربر مجوز برای آن حوزهها میخواهد.
یک کلاینت API ایجاد کنید
یک کلاینت API ایجاد کنید و انواع داده هایی را اضافه کنید که برنامه شما برای نوشتن یا خواندن داده ها باید به آنها دسترسی داشته باشد. نقاط پایانی زیر در دسترس هستند:
SensorsClient : به منابع مختلف داده های سلامت و تندرستی از حسگرهای سخت افزاری در دستگاه محلی و دستگاه های همراه دسترسی پیدا کنید.
RecordingClient : برای جمع آوری داده های حسگر پس زمینه کم مصرف و همیشه روشن.
HistoryClient : درج، حذف، و خواندن داده های تاریخی در Google Fit.
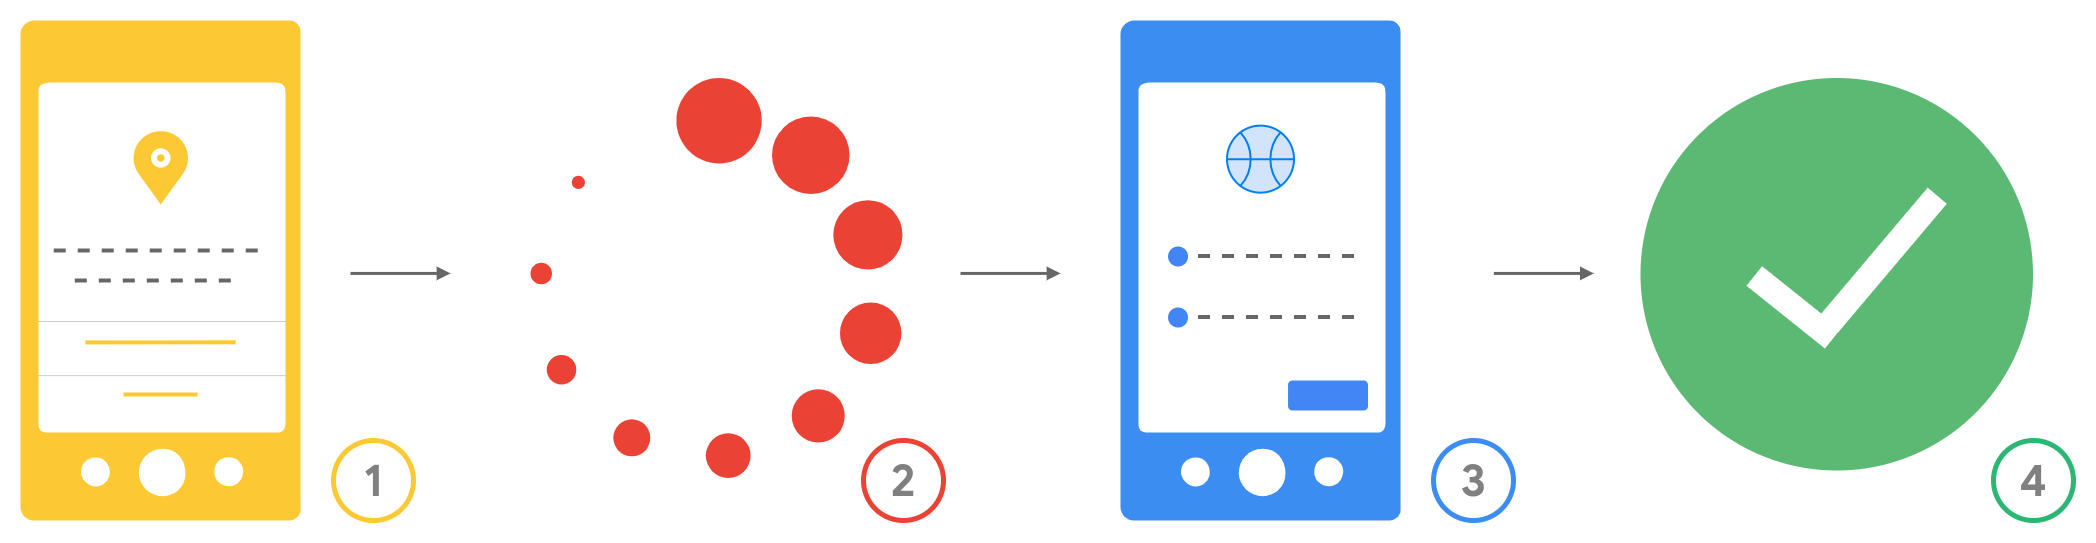
موارد زیر جریان مجوز حاصل را نشان می دهد که کاربران هنگام درخواست مجوز از آنها تجربه می کنند:
شکل 1. جریان مجوز برای کاربران.
مجوزهای Android : کاربران قبل از دانلود برنامه شما می بینند که چه مجوزهای Android درخواست کرده است. پس از اینکه برنامه شما دانلود شد، مجوزهای زمان اجرا مورد نیاز خود را درخواست می کند و کاربران این مجوزها را اعطا یا رد می کنند.
بررسی و اتصال : برنامه شما قبل از درخواست دسترسی به سایر انواع داده، بررسی میکند که آیا مجوزها اعطا شده است یا خیر.
درخواست دامنههای OAuth : Google از کاربر میخواهد به برنامه شما دامنههای OAuth مورد نیاز برای انواع دادههایی را که میخواهد به آنها دسترسی داشته باشد، اعطا کند.
دسترسی اعمال شد : پس از اینکه کاربر مجوزها را اعطا کرد، برنامه شما میتواند به انواع دادههایی که به محدودههایی که کاربر مجوز داده است دسترسی داشته باشد.
تاریخ آخرین بهروزرسانی 2025-08-29 بهوقت ساعت هماهنگ جهانی.
[null,null,["تاریخ آخرین بهروزرسانی 2025-08-29 بهوقت ساعت هماهنگ جهانی."],[[["\u003cp\u003eThis guide provides instructions for Android developers to integrate Google Fit into their applications.\u003c/p\u003e\n"],["\u003cp\u003eIt outlines the necessary setup steps, including obtaining a Google account, setting up Google Play services, and acquiring OAuth 2.0 client ID.\u003c/p\u003e\n"],["\u003cp\u003eDevelopers are guided through the process of creating an API client and implementing data access functionalities.\u003c/p\u003e\n"],["\u003cp\u003eBefore publishing, developers need to apply for verification to ensure data security and compliance.\u003c/p\u003e\n"],["\u003cp\u003eThe guide also explains the authorization flow users will experience when granting data access permissions to the app.\u003c/p\u003e\n"]]],[],null,["# Get started on Android\n\nThis guide explains how to start development with Google Fit on Android.\n| **Note:** Google Fit is part of Google Play services. [Learn about the\n| benefits your app gets from using Google Play\n| Services](/android/guides/overview).\n\nSetup\n-----\n\nBefore you start to build your app, complete the steps in the following\nsections.\n\n### Get a Google Account\n\nTo use the Google Fit APIs, you need a Google Account. You can [create a new account](https://www.google.com/accounts/NewAccount) or\nuse an existing account. You might want to create a separate account to test your app from a user's perspective.\n\n### Get Google Play services\n\nGet the latest client library for Google Play services on your development\nhost:\n\n1. Open the [Android SDK Manager](https://developer.android.com/studio/intro/update#sdk-manager).\n2. Under **SDK Tools** , find **Google Play services**.\n3. If the status for these packages isn't *Installed* , select them both and click **Install Packages**.\n\n### Get an OAuth 2.0 client ID\n\nTo enable the Fitness API, [get an OAuth 2.0 client ID](/fit/android/get-api-key).\n\n### Create and configure your project\n\nWe recommend using the [Android Studio development environment](https://developer.android.com/studio) to build an app with the Fitness API. For\ndetails on how to make a new project and configure it in Android Studio, see\n[Create a project](https://developer.android.com/studio/projects/create-project).\n\n### Add the Google Play services client library\n\nIn Android Studio, open the `build.gradle` file for your module and add the Google Play services client library as a dependency: \n\n### Kotlin DSL\n\n```kotlin\nplugin {\n id(\"com.android.application\")\n}\n\n...\n\ndependencies {\n implementation(\"com.google.android.gms:play-services-fitness:21.3.0\")\n implementation(\"com.google.android.gms:play-services-auth:21.4.0\")\n}\n```\n\n### Groovy DSL\n\n```carbon\napply plugin: 'com.android.application'\n\n...\n\ndependencies {\n implementation 'com.google.android.gms:play-services-fitness:21.3.0'\n implementation 'com.google.android.gms:play-services-auth:21.4.0'\n}\n```\n\nThis makes sure that Gradle automatically downloads the fitness SDK when it\nbuilds your app.\n\nBuild and test your app\n-----------------------\n\nAfter you finish the setup steps, you can start to build your app. To get\nstarted, learn about the [types of data](/fit/datatypes) your app can [store and\nread](/fit/datatypes#using_data_types). Learn more about [working with\ndata](/fit/android/history) in Google Fit.\n\n### Get the necessary Android permissions\n\nTo read and write [some types of data](/fit/android/authorization#data_types_that_ne\ned_android_permissions), your app needs to [request Android permissions](/fit/android/authorization#android_permission\ns).\n\n### Get OAuth permissions\n\nThe data types that your app has permission to access correspond to\n[authorization scopes](/fit/datatypes#authorization_scopes). To ask\nfor these permissions, you need to [add\nwhich data types your app needs access to in a `FitnessOptions`\ninstance](/fit/android/api-client-example). When your app asks to use any of the Google Fit data\ntypes, the Android SDK automatically checks which scopes they belong to and asks\nthe user for authorization to those scopes.\n\n### Create an API client\n\nCreate an API client and add the data types that your app needs to access to\nwrite or read data. The following endpoints are available:\n\n- [`SensorsClient`](/android/reference/com/google/android/gms/fitness/SensorsClient): Access different sources of health and wellness data from hardware sensors in the local device and in companion devices.\n- [`RecordingClient`](/android/reference/com/google/android/gms/fitness/RecordingClient): For low-power, always-on background collection of sensor data.\n- [`HistoryClient`](/android/reference/com/google/android/gms/fitness/HistoryClient): Insert, delete, and read historical data in Google Fit.\n- [`SessionsClient`](/android/reference/com/google/android/gms/fitness/SessionsClient): Create and manage [Sessions](/fit/sessions) of user activity.\n- [`GoalsClient`](/android/reference/com/google/android/gms/fitness/GoalsClient): Read Heart Point and Steps goals created by users in Google Fit.\n- [`ConfigClient`](/android/reference/com/google/android/gms/fitness/ConfigClient): Access custom data types and settings in the Google Fit platform.\n\n[See an example of how to build a Fitness API client.](/fit/android/api-client-example)\n\n### Resulting user authorization flow\n\nThe following shows the resulting authorization flow that users experience\nwhen they're asked for permissions:\n**Figure 1.**The authorization flow for users.\n\n1. **Android permissions**: Users see what Android permissions your app has requested before downloading it. After your app is downloaded, it requests any runtime permissions that it needs, and users grant or deny these permissions.\n2. **Check and connect**: Your app checks whether permissions were granted before it requests access to other data types.\n3. **OAuth scopes request**: Google prompts the user to grant your app the OAuth scopes needed for the data types that it wants to access.\n4. **Access applied**: After the user grants permissions, your app can access the data types that belong to the scopes that the user has granted permission for.\n\nApply for verification\n----------------------\n\nAfter you build and test your app, you need to [apply for\nverification](/fit/verification) with different\nlevels of justification needed for\n[sensitive and restricted scopes](/fit/datatypes#authorization_scopes)."]]