Die Google Fit APIs, einschließlich der Google Fit REST API, werden 2026 eingestellt. Ab dem 1. Mai 2024 können sich Entwickler nicht mehr für die Verwendung dieser APIs registrieren.
Mit Sammlungen den Überblick behalten
Sie können Inhalte basierend auf Ihren Einstellungen speichern und kategorisieren.
In diesem Leitfaden wird erläutert, wie Sie mit der Entwicklung mit Google Fit auf Android-Geräten beginnen.
Einrichtung
Bevor Sie mit dem Erstellen Ihrer App beginnen, führen Sie die Schritte in den folgenden Abschnitten aus.
Erstellen Sie sich ein Google-Konto
Für die Verwendung der Google Fit APIs benötigen Sie ein Google-Konto. Sie können ein neues Konto erstellen oder ein vorhandenes Konto verwenden. Sie können ein separates Konto erstellen, um Ihre App aus der Perspektive eines Nutzers zu testen.
Google Play-Dienste installieren
Rufen Sie die neueste Clientbibliothek für Google Play-Dienste auf Ihrem Entwicklungshost ab:
Wir empfehlen die Verwendung der Android Studio-Entwicklungsumgebung, um eine App mit der Fitness API zu erstellen. Weitere Informationen zum Erstellen eines neuen Projekts und zum Konfigurieren in Android Studio finden Sie unter Projekt erstellen.
Clientbibliothek für Google Play-Dienste hinzufügen
Öffnen Sie in Android Studio die Datei build.gradle für Ihr Modul und fügen Sie die Clientbibliothek der Google Play-Dienste als Abhängigkeit hinzu:
Die Datentypen, auf die Ihre App zugreifen darf, entsprechen Autorisierungsbereichen. Wenn Sie diese Berechtigungen anfordern möchten, müssen Sie in einer FitnessOptions-Instanz angeben, auf welche Datentypen Ihre App zugreifen muss. Wenn Ihre App die Verwendung eines der Google Fit-Datentypen anfordert, prüft das Android SDK automatisch, zu welchen Bereichen sie gehören, und fragt den Nutzer um Autorisierung für diese Bereiche.
API-Client erstellen
Erstellen Sie einen API-Client und fügen Sie die Datentypen hinzu, auf die Ihre App zugreifen muss, um Daten zu schreiben oder zu lesen. Folgende Endpunkte sind verfügbar:
SensorsClient: Zugriff auf verschiedene Quellen von Gesundheits- und Fitnessdaten von Hardwaresensoren auf dem lokalen Gerät und auf verbundenen Geräten.
RecordingClient: Für die ständige Erfassung von Sensordaten im Hintergrund mit geringem Energieverbrauch.
HistoryClient: Hiermit können Sie Verlaufsdaten in Google Fit einfügen, löschen und lesen.
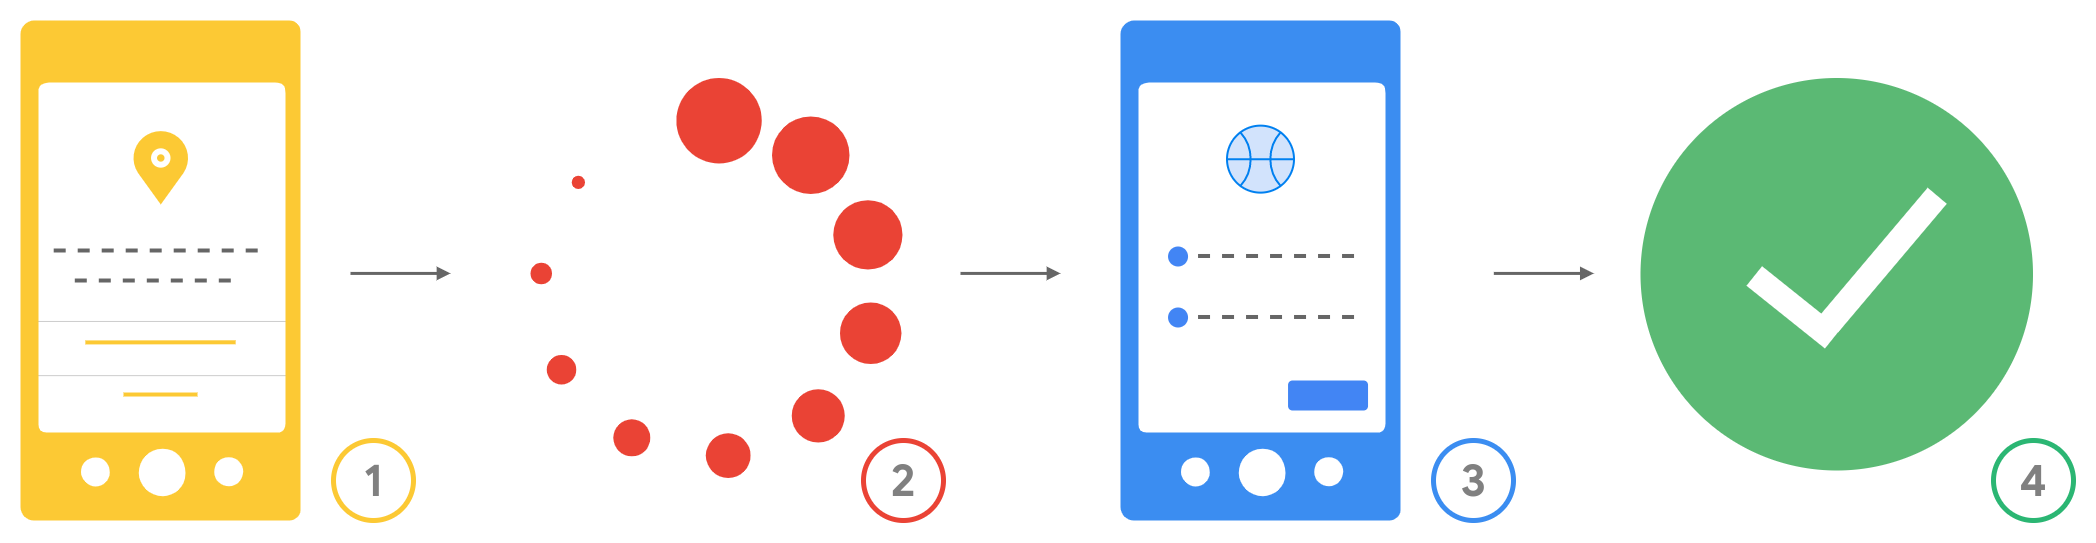
Im Folgenden sehen Sie den Autorisierungsablauf, der Nutzern angezeigt wird, wenn sie um Berechtigungen gebeten werden:
Abbildung 1: Autorisierungsablauf für Nutzer
Android-Berechtigungen: Nutzer sehen vor dem Herunterladen, welche Android-Berechtigungen Ihre App angefordert hat. Nachdem Ihre App heruntergeladen wurde, werden alle erforderlichen Laufzeitberechtigungen angefordert und die Nutzer erteilen oder verweigern diese Berechtigungen.
Prüfen und verbinden: Ihre App prüft, ob Berechtigungen erteilt wurden, bevor sie den Zugriff auf andere Datentypen anfordert.
Anfrage von OAuth-Bereichen: Google fordert den Nutzer auf, Ihrer App die OAuth-Bereiche zu gewähren, die für die Datentypen erforderlich sind, auf die sie zugreifen möchte.
Zugriff angewendet: Nachdem der Nutzer Berechtigungen erteilt hat, kann Ihre App auf die Datentypen zugreifen, die zu den Bereichen gehören, für die der Nutzer die Berechtigung erteilt hat.
[null,null,["Zuletzt aktualisiert: 2025-08-31 (UTC)."],[[["\u003cp\u003eThis guide provides instructions for Android developers to integrate Google Fit into their applications.\u003c/p\u003e\n"],["\u003cp\u003eIt outlines the necessary setup steps, including obtaining a Google account, setting up Google Play services, and acquiring OAuth 2.0 client ID.\u003c/p\u003e\n"],["\u003cp\u003eDevelopers are guided through the process of creating an API client and implementing data access functionalities.\u003c/p\u003e\n"],["\u003cp\u003eBefore publishing, developers need to apply for verification to ensure data security and compliance.\u003c/p\u003e\n"],["\u003cp\u003eThe guide also explains the authorization flow users will experience when granting data access permissions to the app.\u003c/p\u003e\n"]]],[],null,["# Get started on Android\n\nThis guide explains how to start development with Google Fit on Android.\n| **Note:** Google Fit is part of Google Play services. [Learn about the\n| benefits your app gets from using Google Play\n| Services](/android/guides/overview).\n\nSetup\n-----\n\nBefore you start to build your app, complete the steps in the following\nsections.\n\n### Get a Google Account\n\nTo use the Google Fit APIs, you need a Google Account. You can [create a new account](https://www.google.com/accounts/NewAccount) or\nuse an existing account. You might want to create a separate account to test your app from a user's perspective.\n\n### Get Google Play services\n\nGet the latest client library for Google Play services on your development\nhost:\n\n1. Open the [Android SDK Manager](https://developer.android.com/studio/intro/update#sdk-manager).\n2. Under **SDK Tools** , find **Google Play services**.\n3. If the status for these packages isn't *Installed* , select them both and click **Install Packages**.\n\n### Get an OAuth 2.0 client ID\n\nTo enable the Fitness API, [get an OAuth 2.0 client ID](/fit/android/get-api-key).\n\n### Create and configure your project\n\nWe recommend using the [Android Studio development environment](https://developer.android.com/studio) to build an app with the Fitness API. For\ndetails on how to make a new project and configure it in Android Studio, see\n[Create a project](https://developer.android.com/studio/projects/create-project).\n\n### Add the Google Play services client library\n\nIn Android Studio, open the `build.gradle` file for your module and add the Google Play services client library as a dependency: \n\n### Kotlin DSL\n\n```kotlin\nplugin {\n id(\"com.android.application\")\n}\n\n...\n\ndependencies {\n implementation(\"com.google.android.gms:play-services-fitness:21.3.0\")\n implementation(\"com.google.android.gms:play-services-auth:21.4.0\")\n}\n```\n\n### Groovy DSL\n\n```carbon\napply plugin: 'com.android.application'\n\n...\n\ndependencies {\n implementation 'com.google.android.gms:play-services-fitness:21.3.0'\n implementation 'com.google.android.gms:play-services-auth:21.4.0'\n}\n```\n\nThis makes sure that Gradle automatically downloads the fitness SDK when it\nbuilds your app.\n\nBuild and test your app\n-----------------------\n\nAfter you finish the setup steps, you can start to build your app. To get\nstarted, learn about the [types of data](/fit/datatypes) your app can [store and\nread](/fit/datatypes#using_data_types). Learn more about [working with\ndata](/fit/android/history) in Google Fit.\n\n### Get the necessary Android permissions\n\nTo read and write [some types of data](/fit/android/authorization#data_types_that_ne\ned_android_permissions), your app needs to [request Android permissions](/fit/android/authorization#android_permission\ns).\n\n### Get OAuth permissions\n\nThe data types that your app has permission to access correspond to\n[authorization scopes](/fit/datatypes#authorization_scopes). To ask\nfor these permissions, you need to [add\nwhich data types your app needs access to in a `FitnessOptions`\ninstance](/fit/android/api-client-example). When your app asks to use any of the Google Fit data\ntypes, the Android SDK automatically checks which scopes they belong to and asks\nthe user for authorization to those scopes.\n\n### Create an API client\n\nCreate an API client and add the data types that your app needs to access to\nwrite or read data. The following endpoints are available:\n\n- [`SensorsClient`](/android/reference/com/google/android/gms/fitness/SensorsClient): Access different sources of health and wellness data from hardware sensors in the local device and in companion devices.\n- [`RecordingClient`](/android/reference/com/google/android/gms/fitness/RecordingClient): For low-power, always-on background collection of sensor data.\n- [`HistoryClient`](/android/reference/com/google/android/gms/fitness/HistoryClient): Insert, delete, and read historical data in Google Fit.\n- [`SessionsClient`](/android/reference/com/google/android/gms/fitness/SessionsClient): Create and manage [Sessions](/fit/sessions) of user activity.\n- [`GoalsClient`](/android/reference/com/google/android/gms/fitness/GoalsClient): Read Heart Point and Steps goals created by users in Google Fit.\n- [`ConfigClient`](/android/reference/com/google/android/gms/fitness/ConfigClient): Access custom data types and settings in the Google Fit platform.\n\n[See an example of how to build a Fitness API client.](/fit/android/api-client-example)\n\n### Resulting user authorization flow\n\nThe following shows the resulting authorization flow that users experience\nwhen they're asked for permissions:\n**Figure 1.**The authorization flow for users.\n\n1. **Android permissions**: Users see what Android permissions your app has requested before downloading it. After your app is downloaded, it requests any runtime permissions that it needs, and users grant or deny these permissions.\n2. **Check and connect**: Your app checks whether permissions were granted before it requests access to other data types.\n3. **OAuth scopes request**: Google prompts the user to grant your app the OAuth scopes needed for the data types that it wants to access.\n4. **Access applied**: After the user grants permissions, your app can access the data types that belong to the scopes that the user has granted permission for.\n\nApply for verification\n----------------------\n\nAfter you build and test your app, you need to [apply for\nverification](/fit/verification) with different\nlevels of justification needed for\n[sensitive and restricted scopes](/fit/datatypes#authorization_scopes)."]]