קל לארגן דפים בעזרת אוספים
אפשר לשמור ולסווג תוכן על סמך ההעדפות שלך.
במדריך הזה מוסבר איך להתחיל לפתח באמצעות Google Fit ב-Android.
הגדרה
לפני שמתחילים לפתח את האפליקציה, צריך לבצע את השלבים שמפורטים בקטעים הבאים.
קבל חשבון Google
כדי להשתמש בממשקי ה-API של Google Fit, צריך חשבון Google. אתם יכולים ליצור חשבון חדש או להשתמש בחשבון קיים. כדאי ליצור חשבון נפרד כדי לבדוק את האפליקציה מנקודת המבט של המשתמש.
התקנת Google Play Services
כדי לקבל את ספריית הלקוח העדכנית של Google Play Services במארח הפיתוח:
מומלץ להשתמש בסביבת הפיתוח Android Studio כדי ליצור אפליקציה עם Fitness API. לפרטים על יצירת פרויקט חדש והגדרתו ב-Android Studio, אפשר לעיין במאמר בנושא יצירת פרויקט.
הוספה של ספריית הלקוח של Google Play Services
ב-Android Studio, פותחים את הקובץ build.gradle של המודול ומוסיפים את ספריית הלקוח של Google Play Services כתלות:
סוגי הנתונים שהאפליקציה שלכם קיבלה הרשאה לגשת אליהם תואמים להיקפי הרשאה. כדי לבקש את ההרשאות האלה, צריך להוסיף את סוגי הנתונים שהאפליקציה צריכה לגשת אליהם במופע FitnessOptions. כשהאפליקציה מבקשת להשתמש באחד מסוגי הנתונים של Google Fit, Android SDK בודק באופן אוטומטי לאילו היקפי הרשאות הם שייכים ומבקש מהמשתמש הרשאה להיקפי ההרשאות האלה.
יצירה של לקוח API
יוצרים לקוח API ומוסיפים את סוגי הנתונים שהאפליקציה צריכה לגשת אליהם כדי לכתוב או לקרוא נתונים. אלה נקודות הקצה שזמינות:
SensorsClient: גישה למקורות שונים של נתוני בריאות ורווחה מחיישני חומרה במכשיר המקומי ובמכשירים נלווים.
RecordingClient: לאיסוף נתוני חיישנים ברקע, עם צריכת חשמל נמוכה, שפועל תמיד.
HistoryClient: הוספה, מחיקה וקריאה של נתונים היסטוריים ב-Google Fit.
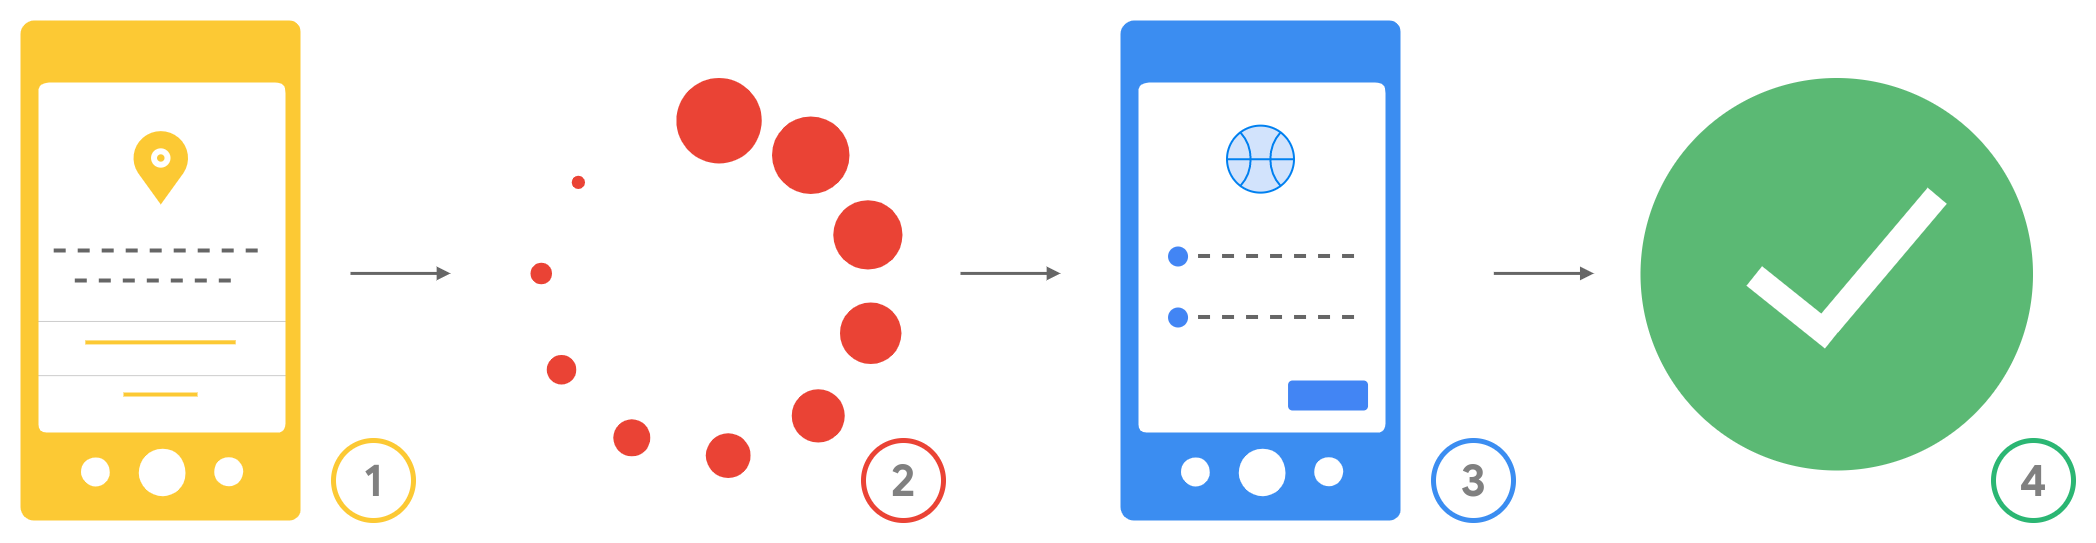
התרשים הבא מציג את תהליך ההרשאה שמוצג למשתמשים כשהם מתבקשים לתת הרשאות:
איור 1. תהליך ההרשאה למשתמשים.
הרשאות Android: המשתמשים רואים אילו הרשאות Android האפליקציה שלכם ביקשה לפני שהם מורידים אותה. אחרי שהאפליקציה מורדת, היא מבקשת הרשאות שנדרשות בזמן הריצה, והמשתמשים מאשרים או דוחים את ההרשאות האלה.
בדיקה וחיבור: האפליקציה בודקת אם ההרשאות ניתנו לפני שהיא מבקשת גישה לסוגי נתונים אחרים.
בקשת היקפי הרשאות של OAuth: Google מבקשת מהמשתמש להעניק לאפליקציה שלכם את היקפי ההרשאות של OAuth שנדרשים לסוגי הנתונים שהאפליקציה רוצה לגשת אליהם.
הגישה הוחלה: אחרי שהמשתמש מעניק הרשאות, האפליקציה יכולה לגשת לסוגי הנתונים ששייכים להיקפי ההרשאות שהמשתמש העניק להם הרשאה.
[null,null,["עדכון אחרון: 2025-09-03 (שעון UTC)."],[[["\u003cp\u003eThis guide provides instructions for Android developers to integrate Google Fit into their applications.\u003c/p\u003e\n"],["\u003cp\u003eIt outlines the necessary setup steps, including obtaining a Google account, setting up Google Play services, and acquiring OAuth 2.0 client ID.\u003c/p\u003e\n"],["\u003cp\u003eDevelopers are guided through the process of creating an API client and implementing data access functionalities.\u003c/p\u003e\n"],["\u003cp\u003eBefore publishing, developers need to apply for verification to ensure data security and compliance.\u003c/p\u003e\n"],["\u003cp\u003eThe guide also explains the authorization flow users will experience when granting data access permissions to the app.\u003c/p\u003e\n"]]],[],null,["# Get started on Android\n\nThis guide explains how to start development with Google Fit on Android.\n| **Note:** Google Fit is part of Google Play services. [Learn about the\n| benefits your app gets from using Google Play\n| Services](/android/guides/overview).\n\nSetup\n-----\n\nBefore you start to build your app, complete the steps in the following\nsections.\n\n### Get a Google Account\n\nTo use the Google Fit APIs, you need a Google Account. You can [create a new account](https://www.google.com/accounts/NewAccount) or\nuse an existing account. You might want to create a separate account to test your app from a user's perspective.\n\n### Get Google Play services\n\nGet the latest client library for Google Play services on your development\nhost:\n\n1. Open the [Android SDK Manager](https://developer.android.com/studio/intro/update#sdk-manager).\n2. Under **SDK Tools** , find **Google Play services**.\n3. If the status for these packages isn't *Installed* , select them both and click **Install Packages**.\n\n### Get an OAuth 2.0 client ID\n\nTo enable the Fitness API, [get an OAuth 2.0 client ID](/fit/android/get-api-key).\n\n### Create and configure your project\n\nWe recommend using the [Android Studio development environment](https://developer.android.com/studio) to build an app with the Fitness API. For\ndetails on how to make a new project and configure it in Android Studio, see\n[Create a project](https://developer.android.com/studio/projects/create-project).\n\n### Add the Google Play services client library\n\nIn Android Studio, open the `build.gradle` file for your module and add the Google Play services client library as a dependency: \n\n### Kotlin DSL\n\n```kotlin\nplugin {\n id(\"com.android.application\")\n}\n\n...\n\ndependencies {\n implementation(\"com.google.android.gms:play-services-fitness:21.3.0\")\n implementation(\"com.google.android.gms:play-services-auth:21.4.0\")\n}\n```\n\n### Groovy DSL\n\n```carbon\napply plugin: 'com.android.application'\n\n...\n\ndependencies {\n implementation 'com.google.android.gms:play-services-fitness:21.3.0'\n implementation 'com.google.android.gms:play-services-auth:21.4.0'\n}\n```\n\nThis makes sure that Gradle automatically downloads the fitness SDK when it\nbuilds your app.\n\nBuild and test your app\n-----------------------\n\nAfter you finish the setup steps, you can start to build your app. To get\nstarted, learn about the [types of data](/fit/datatypes) your app can [store and\nread](/fit/datatypes#using_data_types). Learn more about [working with\ndata](/fit/android/history) in Google Fit.\n\n### Get the necessary Android permissions\n\nTo read and write [some types of data](/fit/android/authorization#data_types_that_ne\ned_android_permissions), your app needs to [request Android permissions](/fit/android/authorization#android_permission\ns).\n\n### Get OAuth permissions\n\nThe data types that your app has permission to access correspond to\n[authorization scopes](/fit/datatypes#authorization_scopes). To ask\nfor these permissions, you need to [add\nwhich data types your app needs access to in a `FitnessOptions`\ninstance](/fit/android/api-client-example). When your app asks to use any of the Google Fit data\ntypes, the Android SDK automatically checks which scopes they belong to and asks\nthe user for authorization to those scopes.\n\n### Create an API client\n\nCreate an API client and add the data types that your app needs to access to\nwrite or read data. The following endpoints are available:\n\n- [`SensorsClient`](/android/reference/com/google/android/gms/fitness/SensorsClient): Access different sources of health and wellness data from hardware sensors in the local device and in companion devices.\n- [`RecordingClient`](/android/reference/com/google/android/gms/fitness/RecordingClient): For low-power, always-on background collection of sensor data.\n- [`HistoryClient`](/android/reference/com/google/android/gms/fitness/HistoryClient): Insert, delete, and read historical data in Google Fit.\n- [`SessionsClient`](/android/reference/com/google/android/gms/fitness/SessionsClient): Create and manage [Sessions](/fit/sessions) of user activity.\n- [`GoalsClient`](/android/reference/com/google/android/gms/fitness/GoalsClient): Read Heart Point and Steps goals created by users in Google Fit.\n- [`ConfigClient`](/android/reference/com/google/android/gms/fitness/ConfigClient): Access custom data types and settings in the Google Fit platform.\n\n[See an example of how to build a Fitness API client.](/fit/android/api-client-example)\n\n### Resulting user authorization flow\n\nThe following shows the resulting authorization flow that users experience\nwhen they're asked for permissions:\n**Figure 1.**The authorization flow for users.\n\n1. **Android permissions**: Users see what Android permissions your app has requested before downloading it. After your app is downloaded, it requests any runtime permissions that it needs, and users grant or deny these permissions.\n2. **Check and connect**: Your app checks whether permissions were granted before it requests access to other data types.\n3. **OAuth scopes request**: Google prompts the user to grant your app the OAuth scopes needed for the data types that it wants to access.\n4. **Access applied**: After the user grants permissions, your app can access the data types that belong to the scopes that the user has granted permission for.\n\nApply for verification\n----------------------\n\nAfter you build and test your app, you need to [apply for\nverification](/fit/verification) with different\nlevels of justification needed for\n[sensitive and restricted scopes](/fit/datatypes#authorization_scopes)."]]