Các API của Google Fit, bao gồm cả API Google Fit REST, sẽ ngừng hoạt động vào năm 2026. Kể từ ngày 1 tháng 5 năm 2024, nhà phát triển không thể đăng ký sử dụng các API này.
Sử dụng bộ sưu tập để sắp xếp ngăn nắp các trang
Lưu và phân loại nội dung dựa trên lựa chọn ưu tiên của bạn.
Hướng dẫn này giải thích cách bắt đầu phát triển bằng Google Fit trên Android.
Thiết lập
Trước khi bắt đầu tạo ứng dụng, hãy hoàn tất các bước trong các phần sau.
Tạo tài khoản Google
Để sử dụng Google Fit API, bạn cần có Tài khoản Google. Bạn có thể tạo tài khoản mới hoặc sử dụng tài khoản hiện có. Bạn nên tạo một tài khoản riêng để kiểm thử ứng dụng theo góc độ của người dùng.
Tải Dịch vụ Google Play
Tải thư viện ứng dụng mới nhất cho Dịch vụ Google Play trên máy chủ lưu trữ phát triển của bạn:
Bạn nên sử dụng môi trường phát triển Android Studio để tạo ứng dụng bằng Fitness API. Để biết thông tin chi tiết về cách tạo một dự án mới và định cấu hình dự án đó trong Android Studio, hãy xem phần Tạo dự án.
Thêm thư viện ứng dụng Dịch vụ Google Play
Trong Android Studio, hãy mở tệp build.gradle cho mô-đun của bạn rồi thêm thư viện ứng dụng Dịch vụ Google Play làm phần phụ thuộc:
Điều này đảm bảo rằng Gradle tự động tải SDK thể dục xuống khi tạo ứng dụng của bạn.
Tạo và kiểm thử ứng dụng
Sau khi hoàn tất các bước thiết lập, bạn có thể bắt đầu tạo ứng dụng. Để bắt đầu, hãy tìm hiểu về các loại dữ liệu mà ứng dụng của bạn có thể lưu trữ và đọc. Tìm hiểu thêm về cách xử lý dữ liệu trong Google Fit.
Tạo một ứng dụng API và thêm các loại dữ liệu mà ứng dụng của bạn cần truy cập để ghi hoặc đọc dữ liệu. Bạn có thể sử dụng các điểm cuối sau:
SensorsClient: Truy cập vào nhiều nguồn dữ liệu sức khoẻ và chăm sóc sức khoẻ tinh thần từ các cảm biến phần cứng trong thiết bị cục bộ và trong các thiết bị đồng hành.
RecordingClient: Để thu thập dữ liệu cảm biến ở chế độ nền, luôn bật và tiêu thụ ít năng lượng.
HistoryClient: Chèn, xoá và đọc dữ liệu trước đây trong Google Fit.
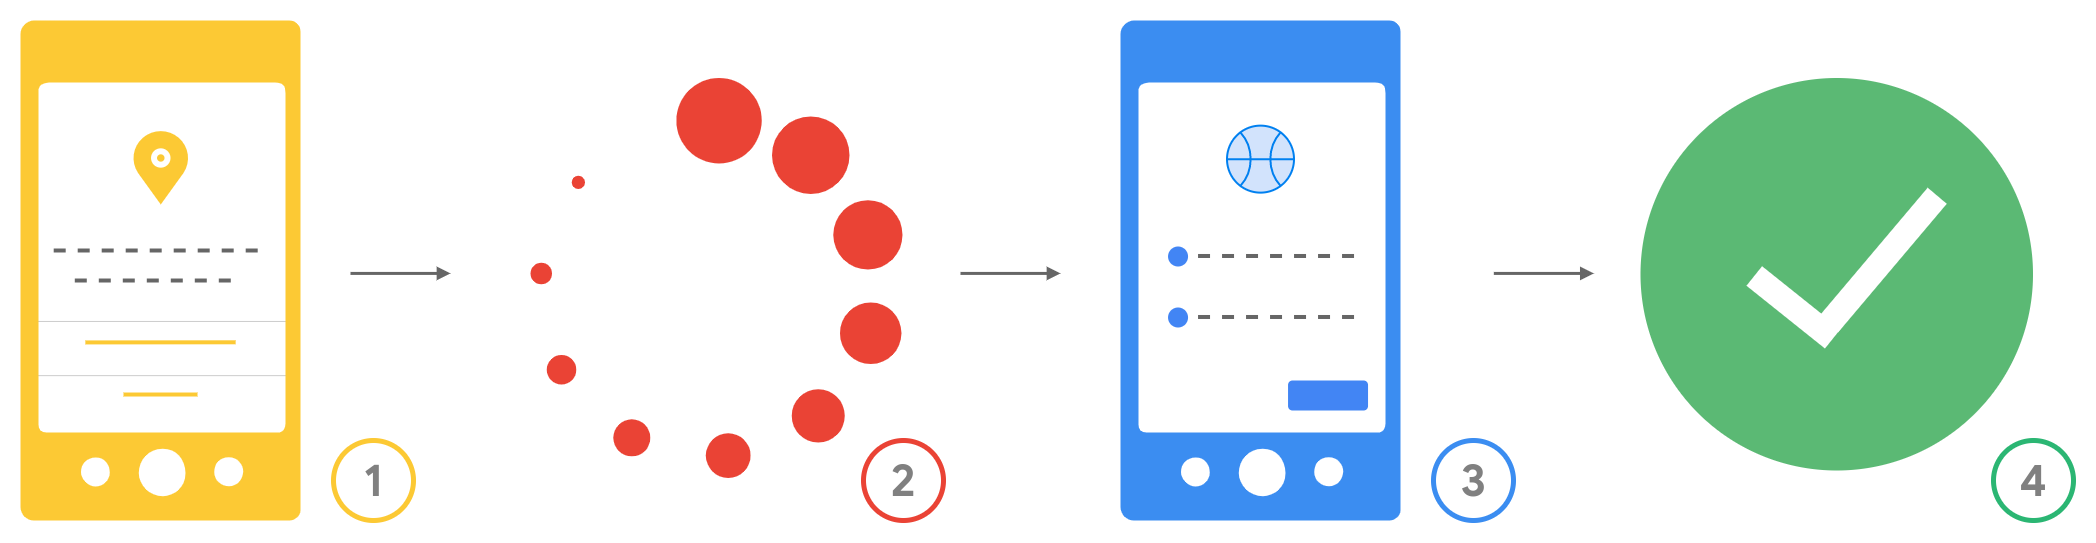
Sau đây là quy trình uỷ quyền mà người dùng sẽ trải qua khi được yêu cầu cấp quyền:
Hình 1.Quy trình uỷ quyền cho người dùng.
Các quyền trên Android: Người dùng sẽ thấy những quyền trên Android mà ứng dụng của bạn đã yêu cầu trước khi tải ứng dụng xuống. Sau khi ứng dụng của bạn được tải xuống, ứng dụng sẽ yêu cầu mọi quyền khi bắt đầu chạy cần thiết và người dùng cấp hoặc từ chối các quyền này.
Kiểm tra và kết nối: Ứng dụng của bạn kiểm tra xem các quyền đã được cấp hay chưa trước khi yêu cầu quyền truy cập vào các loại dữ liệu khác.
Yêu cầu phạm vi OAuth: Google nhắc người dùng cấp cho ứng dụng của bạn các phạm vi OAuth cần thiết cho những loại dữ liệu mà ứng dụng muốn truy cập.
Quyền truy cập được áp dụng: Sau khi người dùng cấp quyền, ứng dụng của bạn có thể truy cập vào các loại dữ liệu thuộc những phạm vi mà người dùng đã cấp quyền.
[null,null,["Cập nhật lần gần đây nhất: 2025-09-03 UTC."],[[["\u003cp\u003eThis guide provides instructions for Android developers to integrate Google Fit into their applications.\u003c/p\u003e\n"],["\u003cp\u003eIt outlines the necessary setup steps, including obtaining a Google account, setting up Google Play services, and acquiring OAuth 2.0 client ID.\u003c/p\u003e\n"],["\u003cp\u003eDevelopers are guided through the process of creating an API client and implementing data access functionalities.\u003c/p\u003e\n"],["\u003cp\u003eBefore publishing, developers need to apply for verification to ensure data security and compliance.\u003c/p\u003e\n"],["\u003cp\u003eThe guide also explains the authorization flow users will experience when granting data access permissions to the app.\u003c/p\u003e\n"]]],[],null,["# Get started on Android\n\nThis guide explains how to start development with Google Fit on Android.\n| **Note:** Google Fit is part of Google Play services. [Learn about the\n| benefits your app gets from using Google Play\n| Services](/android/guides/overview).\n\nSetup\n-----\n\nBefore you start to build your app, complete the steps in the following\nsections.\n\n### Get a Google Account\n\nTo use the Google Fit APIs, you need a Google Account. You can [create a new account](https://www.google.com/accounts/NewAccount) or\nuse an existing account. You might want to create a separate account to test your app from a user's perspective.\n\n### Get Google Play services\n\nGet the latest client library for Google Play services on your development\nhost:\n\n1. Open the [Android SDK Manager](https://developer.android.com/studio/intro/update#sdk-manager).\n2. Under **SDK Tools** , find **Google Play services**.\n3. If the status for these packages isn't *Installed* , select them both and click **Install Packages**.\n\n### Get an OAuth 2.0 client ID\n\nTo enable the Fitness API, [get an OAuth 2.0 client ID](/fit/android/get-api-key).\n\n### Create and configure your project\n\nWe recommend using the [Android Studio development environment](https://developer.android.com/studio) to build an app with the Fitness API. For\ndetails on how to make a new project and configure it in Android Studio, see\n[Create a project](https://developer.android.com/studio/projects/create-project).\n\n### Add the Google Play services client library\n\nIn Android Studio, open the `build.gradle` file for your module and add the Google Play services client library as a dependency: \n\n### Kotlin DSL\n\n```kotlin\nplugin {\n id(\"com.android.application\")\n}\n\n...\n\ndependencies {\n implementation(\"com.google.android.gms:play-services-fitness:21.3.0\")\n implementation(\"com.google.android.gms:play-services-auth:21.4.0\")\n}\n```\n\n### Groovy DSL\n\n```carbon\napply plugin: 'com.android.application'\n\n...\n\ndependencies {\n implementation 'com.google.android.gms:play-services-fitness:21.3.0'\n implementation 'com.google.android.gms:play-services-auth:21.4.0'\n}\n```\n\nThis makes sure that Gradle automatically downloads the fitness SDK when it\nbuilds your app.\n\nBuild and test your app\n-----------------------\n\nAfter you finish the setup steps, you can start to build your app. To get\nstarted, learn about the [types of data](/fit/datatypes) your app can [store and\nread](/fit/datatypes#using_data_types). Learn more about [working with\ndata](/fit/android/history) in Google Fit.\n\n### Get the necessary Android permissions\n\nTo read and write [some types of data](/fit/android/authorization#data_types_that_ne\ned_android_permissions), your app needs to [request Android permissions](/fit/android/authorization#android_permission\ns).\n\n### Get OAuth permissions\n\nThe data types that your app has permission to access correspond to\n[authorization scopes](/fit/datatypes#authorization_scopes). To ask\nfor these permissions, you need to [add\nwhich data types your app needs access to in a `FitnessOptions`\ninstance](/fit/android/api-client-example). When your app asks to use any of the Google Fit data\ntypes, the Android SDK automatically checks which scopes they belong to and asks\nthe user for authorization to those scopes.\n\n### Create an API client\n\nCreate an API client and add the data types that your app needs to access to\nwrite or read data. The following endpoints are available:\n\n- [`SensorsClient`](/android/reference/com/google/android/gms/fitness/SensorsClient): Access different sources of health and wellness data from hardware sensors in the local device and in companion devices.\n- [`RecordingClient`](/android/reference/com/google/android/gms/fitness/RecordingClient): For low-power, always-on background collection of sensor data.\n- [`HistoryClient`](/android/reference/com/google/android/gms/fitness/HistoryClient): Insert, delete, and read historical data in Google Fit.\n- [`SessionsClient`](/android/reference/com/google/android/gms/fitness/SessionsClient): Create and manage [Sessions](/fit/sessions) of user activity.\n- [`GoalsClient`](/android/reference/com/google/android/gms/fitness/GoalsClient): Read Heart Point and Steps goals created by users in Google Fit.\n- [`ConfigClient`](/android/reference/com/google/android/gms/fitness/ConfigClient): Access custom data types and settings in the Google Fit platform.\n\n[See an example of how to build a Fitness API client.](/fit/android/api-client-example)\n\n### Resulting user authorization flow\n\nThe following shows the resulting authorization flow that users experience\nwhen they're asked for permissions:\n**Figure 1.**The authorization flow for users.\n\n1. **Android permissions**: Users see what Android permissions your app has requested before downloading it. After your app is downloaded, it requests any runtime permissions that it needs, and users grant or deny these permissions.\n2. **Check and connect**: Your app checks whether permissions were granted before it requests access to other data types.\n3. **OAuth scopes request**: Google prompts the user to grant your app the OAuth scopes needed for the data types that it wants to access.\n4. **Access applied**: After the user grants permissions, your app can access the data types that belong to the scopes that the user has granted permission for.\n\nApply for verification\n----------------------\n\nAfter you build and test your app, you need to [apply for\nverification](/fit/verification) with different\nlevels of justification needed for\n[sensitive and restricted scopes](/fit/datatypes#authorization_scopes)."]]