শিল্প-মানসম্মত OAuth 2.0 ইমপ্লিসিট এবং অথরাইজেশন কোড ফ্লো ব্যবহার করে অ্যাকাউন্টগুলো লিঙ্ক করা হয়।
আপনার পরিষেবাতে অবশ্যই OAuth 2.0-সম্মত অনুমোদন এবং টোকেন বিনিময় এন্ডপয়েন্ট সমর্থন থাকতে হবে।
অন্তর্নিহিত প্রবাহে, Google ব্যবহারকারীর ব্রাউজারে আপনার অনুমোদনের শেষ পয়েন্ট খোলে। সফল সাইন ইন করার পরে, আপনি Google-এ একটি দীর্ঘস্থায়ী অ্যাক্সেস টোকেন ফেরত দেন। এই অ্যাক্সেস টোকেনটি এখন Google থেকে পাঠানো প্রতিটি অনুরোধে অন্তর্ভুক্ত করা হয়েছে।
অনুমোদন কোড প্রবাহে, আপনার দুটি শেষ পয়েন্ট প্রয়োজন:
অনুমোদন এন্ডপয়েন্ট, যা আপনার ব্যবহারকারীদের সাইন-ইন UI উপস্থাপন করে যারা ইতিমধ্যে সাইন ইন করেনি। অনুমোদনের শেষ পয়েন্টটি অনুরোধ করা অ্যাক্সেসে ব্যবহারকারীদের সম্মতি রেকর্ড করার জন্য একটি স্বল্প-কালীন অনুমোদন কোডও তৈরি করে।
টোকেন এক্সচেঞ্জ এন্ডপয়েন্ট, যা দুই ধরনের এক্সচেঞ্জের জন্য দায়ী:
- একটি দীর্ঘস্থায়ী রিফ্রেশ টোকেন এবং একটি স্বল্পকালীন অ্যাক্সেস টোকেনের জন্য একটি অনুমোদন কোড বিনিময় করে৷ এই বিনিময়টি ঘটে যখন ব্যবহারকারী অ্যাকাউন্ট লিঙ্কিং প্রবাহের মধ্য দিয়ে যায়।
- একটি স্বল্পকালীন অ্যাক্সেস টোকেনের জন্য দীর্ঘস্থায়ী রিফ্রেশ টোকেন বিনিময় করে। Google এর একটি নতুন অ্যাক্সেস টোকেনের প্রয়োজন হলে এই বিনিময়টি ঘটে কারণ এটির মেয়াদ শেষ হয়ে গেছে।
একটি OAuth 2.0 ফ্লো বেছে নিন
যদিও অন্তর্নিহিত প্রবাহটি কার্যকর করা সহজ, Google সুপারিশ করে যে অন্তর্নিহিত প্রবাহ দ্বারা জারি করা অ্যাক্সেস টোকেন কখনই মেয়াদ শেষ হবে না। এর কারণ হল একটি টোকেন অন্তর্নিহিত প্রবাহের সাথে মেয়াদ শেষ হওয়ার পরে ব্যবহারকারীকে তাদের অ্যাকাউন্ট আবার লিঙ্ক করতে বাধ্য করা হয়। নিরাপত্তার কারণে আপনার টোকেনের মেয়াদ শেষ হওয়ার প্রয়োজন হলে, আমরা দৃঢ়ভাবে সুপারিশ করছি যে আপনি পরিবর্তে অনুমোদন কোড প্রবাহ ব্যবহার করুন।
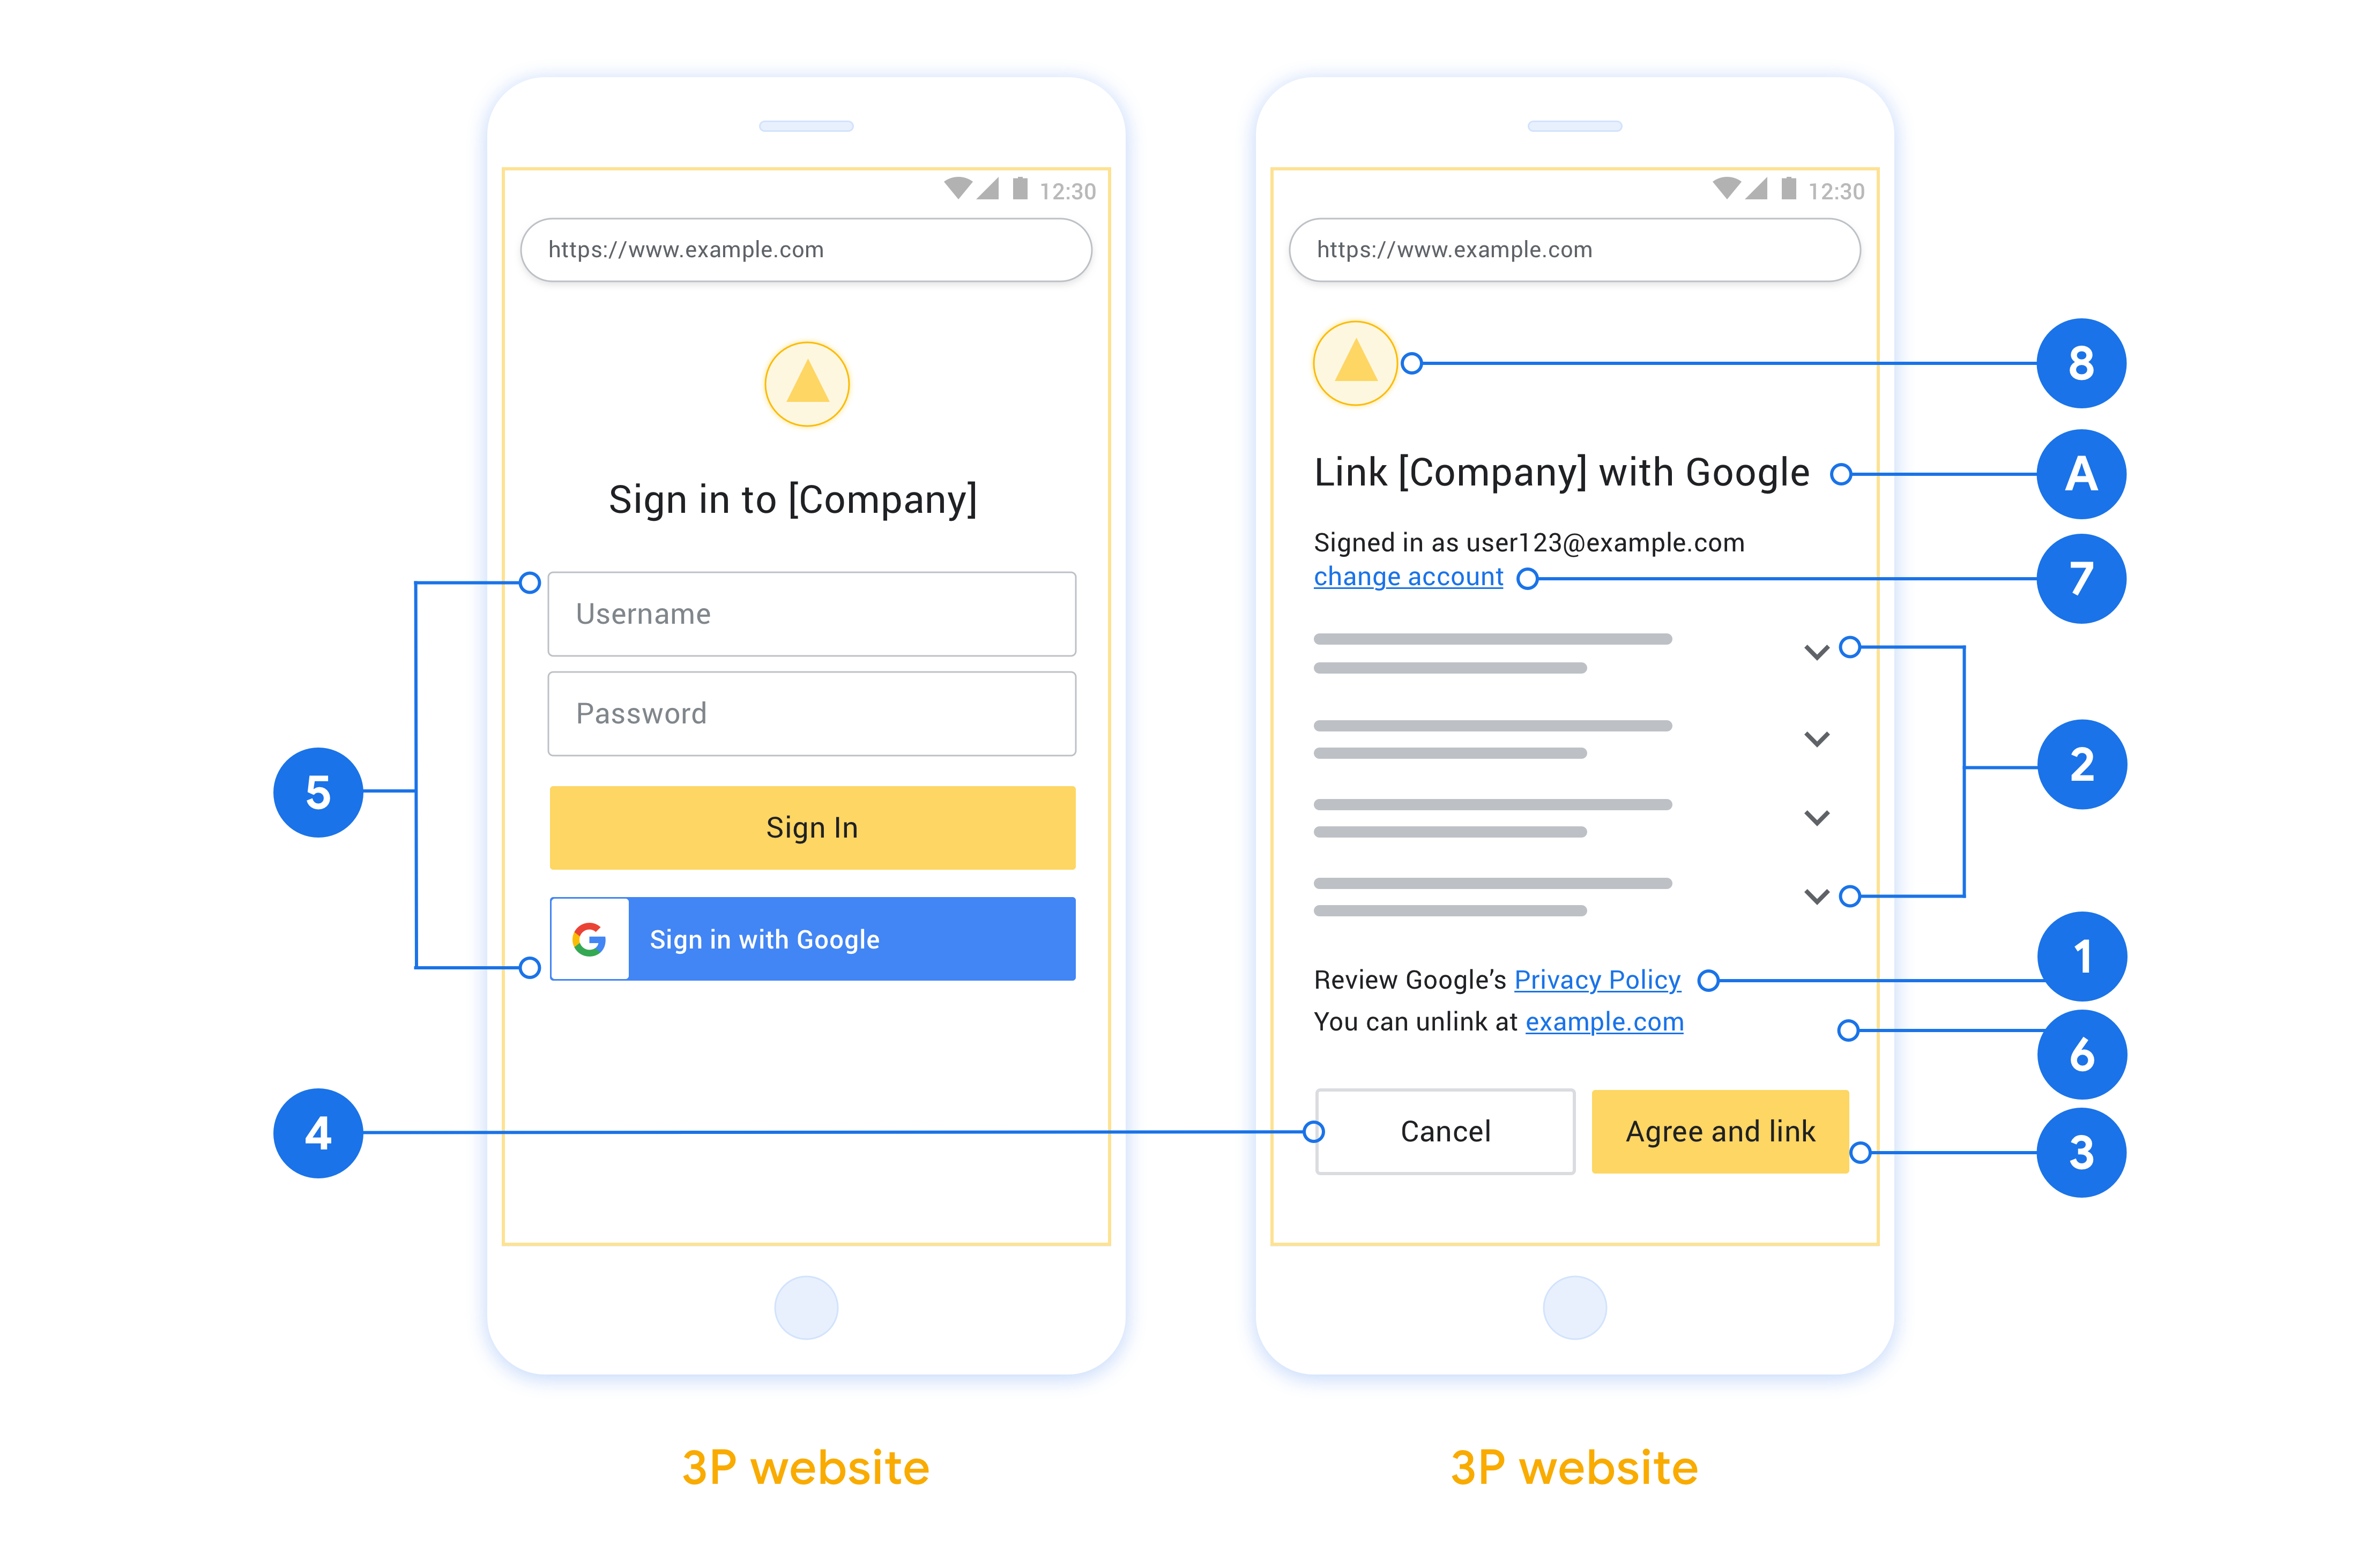
ডিজাইন নির্দেশিকা
এই বিভাগে আপনি OAuth লিঙ্কিং ফ্লোগুলির জন্য হোস্ট করা ব্যবহারকারী স্ক্রিনের জন্য ডিজাইনের প্রয়োজনীয়তা এবং সুপারিশগুলি বর্ণনা করে৷ এটি Google-এর অ্যাপ দ্বারা কল করার পরে, আপনার প্ল্যাটফর্মটি Google পৃষ্ঠায় একটি সাইন ইন এবং ব্যবহারকারীকে অ্যাকাউন্ট লিঙ্ক করার সম্মতি স্ক্রীন প্রদর্শন করে। অ্যাকাউন্ট লিঙ্ক করার সম্মতি দেওয়ার পরে ব্যবহারকারীকে Google-এর অ্যাপে ফেরত পাঠানো হয়।
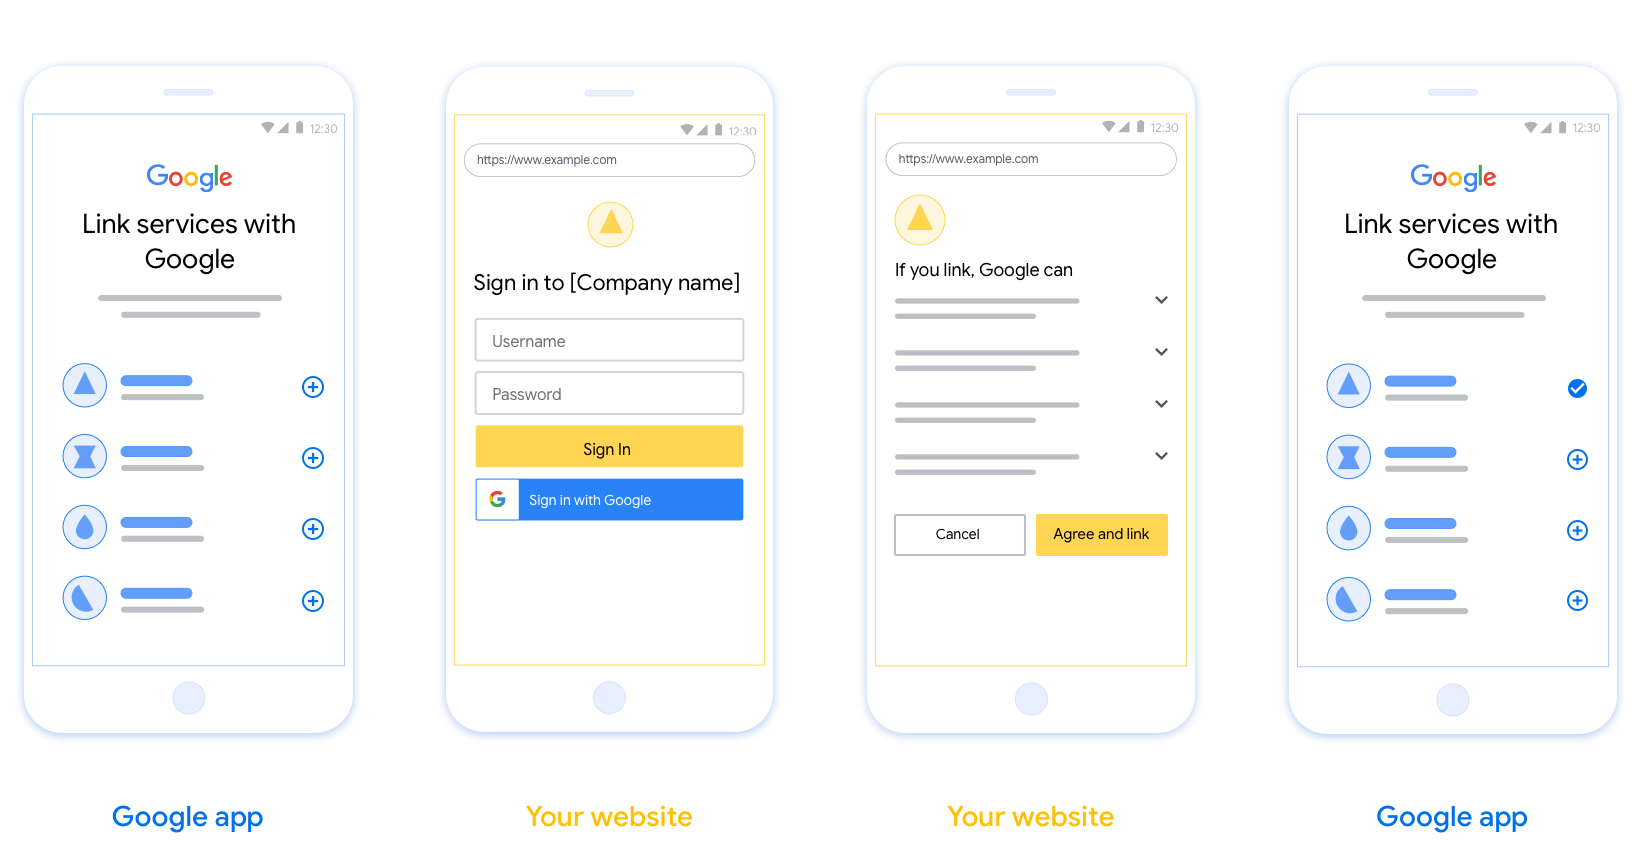
প্রয়োজনীয়তা
- আপনাকে অবশ্যই যোগাযোগ করতে হবে যে ব্যবহারকারীর অ্যাকাউন্টটি Google-এর সাথে লিঙ্ক করা হবে, Google Home বা Google Assistant-এর মতো নির্দিষ্ট Google পণ্যের সাথে নয় ।
সুপারিশ
আমরা আপনাকে নিম্নলিখিতগুলি করার পরামর্শ দিই:
Google এর গোপনীয়তা নীতি প্রদর্শন করুন। সম্মতি স্ক্রিনে Google-এর গোপনীয়তা নীতির একটি লিঙ্ক অন্তর্ভুক্ত করুন।
ডেটা শেয়ার করতে হবে। ব্যবহারকারীকে তাদের Google-এর কোন ডেটা প্রয়োজন এবং কেন তা জানাতে স্পষ্ট এবং সংক্ষিপ্ত ভাষা ব্যবহার করুন।
কল-টু-অ্যাকশন পরিষ্কার করুন। আপনার সম্মতি স্ক্রিনে একটি স্পষ্ট কল-টু-অ্যাকশন বলুন, যেমন "সম্মতি এবং লিঙ্ক"। এর কারণ হল ব্যবহারকারীদের বুঝতে হবে তাদের অ্যাকাউন্ট লিঙ্ক করার জন্য Google-এর সাথে কী ডেটা শেয়ার করতে হবে।
বাতিল করার ক্ষমতা। ব্যবহারকারীরা যদি লিঙ্ক না করতে চান তাহলে ফিরে যেতে বা বাতিল করার জন্য একটি উপায় প্রদান করুন৷
সাইন-ইন প্রক্রিয়া পরিষ্কার করুন। নিশ্চিত করুন যে ব্যবহারকারীদের তাদের Google অ্যাকাউন্টে সাইন ইন করার জন্য পরিষ্কার পদ্ধতি আছে, যেমন তাদের ব্যবহারকারীর নাম এবং পাসওয়ার্ডের জন্য ক্ষেত্র বা Google দিয়ে সাইন ইন করুন ।
লিঙ্কমুক্ত করার ক্ষমতা। ব্যবহারকারীদের আনলিঙ্ক করার জন্য একটি পদ্ধতি অফার করুন, যেমন আপনার প্ল্যাটফর্মে তাদের অ্যাকাউন্ট সেটিংসের URL। বিকল্পভাবে, আপনি Google অ্যাকাউন্টে একটি লিঙ্ক অন্তর্ভুক্ত করতে পারেন যেখানে ব্যবহারকারীরা তাদের লিঙ্ক করা অ্যাকাউন্ট পরিচালনা করতে পারে।
ব্যবহারকারীর অ্যাকাউন্ট পরিবর্তন করার ক্ষমতা। ব্যবহারকারীদের তাদের অ্যাকাউন্ট(গুলি) পরিবর্তন করার জন্য একটি পদ্ধতির পরামর্শ দিন। এটি বিশেষত উপকারী যদি ব্যবহারকারীদের একাধিক অ্যাকাউন্ট থাকে।
- যদি কোনো ব্যবহারকারীকে অ্যাকাউন্ট পাল্টানোর জন্য সম্মতি স্ক্রীন বন্ধ করতে হয়, Google-এ একটি পুনরুদ্ধারযোগ্য ত্রুটি পাঠান যাতে ব্যবহারকারী OAuth লিঙ্কিং এবং অন্তর্নিহিত প্রবাহের মাধ্যমে পছন্দসই অ্যাকাউন্টে সাইন ইন করতে পারেন।
আপনার লোগো অন্তর্ভুক্ত করুন. সম্মতি স্ক্রিনে আপনার কোম্পানির লোগো প্রদর্শন করুন। আপনার লোগো স্থাপন করতে আপনার শৈলী নির্দেশিকা ব্যবহার করুন. আপনি যদি Google এর লোগোও প্রদর্শন করতে চান তবে লোগো এবং ট্রেডমার্ক দেখুন।
অন্তর্নিহিত প্রবাহে, Google ব্যবহারকারীর ব্রাউজারে আপনার অনুমোদনের শেষ পয়েন্ট খোলে। সফল সাইন ইন করার পরে, আপনি Google-এ একটি দীর্ঘস্থায়ী অ্যাক্সেস টোকেন ফেরত দেন। এই অ্যাক্সেস টোকেনটি এখন Google থেকে পাঠানো প্রতিটি অনুরোধে অন্তর্ভুক্ত করা হয়েছে।
অনুমোদন কোড প্রবাহে, আপনার দুটি শেষ পয়েন্ট প্রয়োজন:
অনুমোদন এন্ডপয়েন্ট, যা আপনার ব্যবহারকারীদের সাইন-ইন UI উপস্থাপন করে যারা ইতিমধ্যে সাইন ইন করেনি। অনুমোদনের শেষ পয়েন্টটি অনুরোধ করা অ্যাক্সেসে ব্যবহারকারীদের সম্মতি রেকর্ড করার জন্য একটি স্বল্প-কালীন অনুমোদন কোডও তৈরি করে।
টোকেন এক্সচেঞ্জ এন্ডপয়েন্ট, যা দুই ধরনের এক্সচেঞ্জের জন্য দায়ী:
- একটি দীর্ঘস্থায়ী রিফ্রেশ টোকেন এবং একটি স্বল্পকালীন অ্যাক্সেস টোকেনের জন্য একটি অনুমোদন কোড বিনিময় করে৷ এই বিনিময়টি ঘটে যখন ব্যবহারকারী অ্যাকাউন্ট লিঙ্কিং প্রবাহের মধ্য দিয়ে যায়।
- একটি স্বল্পকালীন অ্যাক্সেস টোকেনের জন্য দীর্ঘস্থায়ী রিফ্রেশ টোকেন বিনিময় করে। এই বিনিময়টি ঘটে যখন Google এর একটি নতুন অ্যাক্সেস টোকেনের প্রয়োজন হয় কারণ এটির মেয়াদ শেষ হয়ে গেছে৷
একটি OAuth 2.0 ফ্লো বেছে নিন
যদিও অন্তর্নিহিত প্রবাহটি কার্যকর করা সহজ, Google সুপারিশ করে যে অন্তর্নিহিত প্রবাহ দ্বারা জারি করা অ্যাক্সেস টোকেন কখনই মেয়াদ শেষ হবে না। এর কারণ হল একটি টোকেন অন্তর্নিহিত প্রবাহের সাথে মেয়াদ শেষ হওয়ার পরে ব্যবহারকারীকে তাদের অ্যাকাউন্ট আবার লিঙ্ক করতে বাধ্য করা হয়। নিরাপত্তার কারণে আপনার টোকেনের মেয়াদ শেষ হওয়ার প্রয়োজন হলে, আমরা দৃঢ়ভাবে সুপারিশ করছি যে আপনি পরিবর্তে অনুমোদন কোড প্রবাহ ব্যবহার করুন।
ডিজাইন নির্দেশিকা
এই বিভাগে আপনি OAuth লিঙ্কিং ফ্লোগুলির জন্য হোস্ট করা ব্যবহারকারী স্ক্রিনের জন্য ডিজাইনের প্রয়োজনীয়তা এবং সুপারিশগুলি বর্ণনা করে৷ এটি Google-এর অ্যাপ দ্বারা কল করার পরে, আপনার প্ল্যাটফর্মটি Google পৃষ্ঠায় একটি সাইন ইন এবং ব্যবহারকারীকে অ্যাকাউন্ট লিঙ্ক করার সম্মতি স্ক্রীন প্রদর্শন করে। অ্যাকাউন্ট লিঙ্ক করার সম্মতি দেওয়ার পরে ব্যবহারকারীকে Google-এর অ্যাপে ফেরত পাঠানো হয়।
প্রয়োজনীয়তা
- আপনাকে অবশ্যই যোগাযোগ করতে হবে যে ব্যবহারকারীর অ্যাকাউন্টটি Google-এর সাথে লিঙ্ক করা হবে, Google Home বা Google Assistant-এর মতো নির্দিষ্ট Google পণ্যের সাথে নয় ।
সুপারিশ
আমরা আপনাকে নিম্নলিখিতগুলি করার পরামর্শ দিই:
Google এর গোপনীয়তা নীতি প্রদর্শন করুন। সম্মতি স্ক্রিনে Google-এর গোপনীয়তা নীতির একটি লিঙ্ক অন্তর্ভুক্ত করুন।
ডেটা শেয়ার করতে হবে। ব্যবহারকারীকে তাদের Google-এর কোন ডেটা প্রয়োজন এবং কেন তা জানাতে স্পষ্ট এবং সংক্ষিপ্ত ভাষা ব্যবহার করুন।
কল-টু-অ্যাকশন পরিষ্কার করুন। আপনার সম্মতি স্ক্রিনে একটি স্পষ্ট কল-টু-অ্যাকশন বলুন, যেমন "সম্মতি এবং লিঙ্ক"। এর কারণ হল ব্যবহারকারীদের বুঝতে হবে তাদের অ্যাকাউন্ট লিঙ্ক করার জন্য Google-এর সাথে কী ডেটা শেয়ার করতে হবে।
বাতিল করার ক্ষমতা। ব্যবহারকারীরা যদি লিঙ্ক না করতে চান তাহলে ফিরে যেতে বা বাতিল করার জন্য একটি উপায় প্রদান করুন৷
সাইন-ইন প্রক্রিয়া পরিষ্কার করুন। নিশ্চিত করুন যে ব্যবহারকারীদের তাদের Google অ্যাকাউন্টে সাইন ইন করার জন্য পরিষ্কার পদ্ধতি আছে, যেমন তাদের ব্যবহারকারীর নাম এবং পাসওয়ার্ডের জন্য ক্ষেত্র বা Google দিয়ে সাইন ইন করুন ।
লিঙ্কমুক্ত করার ক্ষমতা। ব্যবহারকারীদের আনলিঙ্ক করার জন্য একটি পদ্ধতি অফার করুন, যেমন আপনার প্ল্যাটফর্মে তাদের অ্যাকাউন্ট সেটিংসের URL। বিকল্পভাবে, আপনি Google অ্যাকাউন্টে একটি লিঙ্ক অন্তর্ভুক্ত করতে পারেন যেখানে ব্যবহারকারীরা তাদের লিঙ্ক করা অ্যাকাউন্ট পরিচালনা করতে পারে।
ব্যবহারকারীর অ্যাকাউন্ট পরিবর্তন করার ক্ষমতা। ব্যবহারকারীদের তাদের অ্যাকাউন্ট(গুলি) পরিবর্তন করার জন্য একটি পদ্ধতির পরামর্শ দিন। এটি বিশেষত উপকারী যদি ব্যবহারকারীদের একাধিক অ্যাকাউন্ট থাকে।
- যদি কোনো ব্যবহারকারীকে অ্যাকাউন্ট পাল্টানোর জন্য সম্মতি স্ক্রীন বন্ধ করতে হয়, Google-এ একটি পুনরুদ্ধারযোগ্য ত্রুটি পাঠান যাতে ব্যবহারকারী OAuth লিঙ্কিং এবং অন্তর্নিহিত প্রবাহের মাধ্যমে পছন্দসই অ্যাকাউন্টে সাইন ইন করতে পারেন।
আপনার লোগো অন্তর্ভুক্ত করুন. সম্মতি স্ক্রিনে আপনার কোম্পানির লোগো প্রদর্শন করুন। আপনার লোগো স্থাপন করতে আপনার শৈলী নির্দেশিকা ব্যবহার করুন. আপনি যদি Google এর লোগোও প্রদর্শন করতে চান তবে লোগো এবং ট্রেডমার্ক দেখুন।
অন্তর্নিহিত প্রবাহে, Google ব্যবহারকারীর ব্রাউজারে আপনার অনুমোদনের শেষ পয়েন্ট খোলে। সফল সাইন ইন করার পরে, আপনি Google-এ একটি দীর্ঘস্থায়ী অ্যাক্সেস টোকেন ফেরত দেন। এই অ্যাক্সেস টোকেনটি এখন Google থেকে পাঠানো প্রতিটি অনুরোধে অন্তর্ভুক্ত করা হয়েছে।
অনুমোদন কোড প্রবাহে, আপনার দুটি শেষ পয়েন্ট প্রয়োজন:
অনুমোদন এন্ডপয়েন্ট, যা আপনার ব্যবহারকারীদের সাইন-ইন UI উপস্থাপন করে যারা ইতিমধ্যে সাইন ইন করেনি। অনুমোদনের শেষ পয়েন্টটি অনুরোধ করা অ্যাক্সেসে ব্যবহারকারীদের সম্মতি রেকর্ড করার জন্য একটি স্বল্প-কালীন অনুমোদন কোডও তৈরি করে।
টোকেন এক্সচেঞ্জ এন্ডপয়েন্ট, যা দুই ধরনের এক্সচেঞ্জের জন্য দায়ী:
- একটি দীর্ঘস্থায়ী রিফ্রেশ টোকেন এবং একটি স্বল্পকালীন অ্যাক্সেস টোকেনের জন্য একটি অনুমোদন কোড বিনিময় করে৷ এই বিনিময়টি ঘটে যখন ব্যবহারকারী অ্যাকাউন্ট লিঙ্কিং প্রবাহের মধ্য দিয়ে যায়।
- একটি স্বল্পকালীন অ্যাক্সেস টোকেনের জন্য দীর্ঘস্থায়ী রিফ্রেশ টোকেন বিনিময় করে। Google এর একটি নতুন অ্যাক্সেস টোকেনের প্রয়োজন হলে এই বিনিময়টি ঘটে কারণ এটির মেয়াদ শেষ হয়ে গেছে।
একটি OAuth 2.0 ফ্লো বেছে নিন
যদিও অন্তর্নিহিত প্রবাহটি কার্যকর করা সহজ, Google সুপারিশ করে যে অন্তর্নিহিত প্রবাহ দ্বারা জারি করা অ্যাক্সেস টোকেন কখনই মেয়াদ শেষ হবে না। এর কারণ হল একটি টোকেন অন্তর্নিহিত প্রবাহের সাথে মেয়াদ শেষ হওয়ার পরে ব্যবহারকারীকে তাদের অ্যাকাউন্ট আবার লিঙ্ক করতে বাধ্য করা হয়। নিরাপত্তার কারণে আপনার টোকেনের মেয়াদ শেষ হওয়ার প্রয়োজন হলে, আমরা দৃঢ়ভাবে সুপারিশ করছি যে আপনি পরিবর্তে অনুমোদন কোড প্রবাহ ব্যবহার করুন।
ডিজাইন নির্দেশিকা
এই বিভাগে আপনি OAuth লিঙ্কিং ফ্লোগুলির জন্য হোস্ট করা ব্যবহারকারী স্ক্রিনের জন্য ডিজাইনের প্রয়োজনীয়তা এবং সুপারিশগুলি বর্ণনা করে৷ এটি Google-এর অ্যাপ দ্বারা কল করার পরে, আপনার প্ল্যাটফর্মটি Google পৃষ্ঠায় একটি সাইন ইন এবং ব্যবহারকারীকে অ্যাকাউন্ট লিঙ্ক করার সম্মতি স্ক্রীন প্রদর্শন করে। অ্যাকাউন্ট লিঙ্ক করার সম্মতি দেওয়ার পরে ব্যবহারকারীকে Google-এর অ্যাপে ফেরত পাঠানো হয়।
প্রয়োজনীয়তা
- আপনাকে অবশ্যই যোগাযোগ করতে হবে যে ব্যবহারকারীর অ্যাকাউন্টটি Google-এর সাথে লিঙ্ক করা হবে, Google Home বা Google Assistant-এর মতো নির্দিষ্ট Google পণ্যের সাথে নয় ।
সুপারিশ
আমরা আপনাকে নিম্নলিখিতগুলি করার পরামর্শ দিই:
Google এর গোপনীয়তা নীতি প্রদর্শন করুন। সম্মতি স্ক্রিনে Google-এর গোপনীয়তা নীতির একটি লিঙ্ক অন্তর্ভুক্ত করুন।
ডেটা শেয়ার করতে হবে। ব্যবহারকারীকে তাদের Google-এর কোন ডেটা প্রয়োজন এবং কেন তা জানাতে স্পষ্ট এবং সংক্ষিপ্ত ভাষা ব্যবহার করুন।
কল-টু-অ্যাকশন পরিষ্কার করুন। আপনার সম্মতি স্ক্রিনে একটি স্পষ্ট কল-টু-অ্যাকশন বলুন, যেমন "সম্মতি এবং লিঙ্ক"। এর কারণ হল ব্যবহারকারীদের বুঝতে হবে তাদের অ্যাকাউন্ট লিঙ্ক করার জন্য Google-এর সাথে কী ডেটা শেয়ার করতে হবে।
বাতিল করার ক্ষমতা। ব্যবহারকারীরা যদি লিঙ্ক না করতে চান তাহলে ফিরে যেতে বা বাতিল করার জন্য একটি উপায় প্রদান করুন৷
সাইন-ইন প্রক্রিয়া পরিষ্কার করুন। নিশ্চিত করুন যে ব্যবহারকারীদের তাদের Google অ্যাকাউন্টে সাইন ইন করার জন্য পরিষ্কার পদ্ধতি আছে, যেমন তাদের ব্যবহারকারীর নাম এবং পাসওয়ার্ডের জন্য ক্ষেত্র বা Google দিয়ে সাইন ইন করুন ।
লিঙ্কমুক্ত করার ক্ষমতা। ব্যবহারকারীদের আনলিঙ্ক করার জন্য একটি পদ্ধতি অফার করুন, যেমন আপনার প্ল্যাটফর্মে তাদের অ্যাকাউন্ট সেটিংসের URL। বিকল্পভাবে, আপনি Google অ্যাকাউন্টে একটি লিঙ্ক অন্তর্ভুক্ত করতে পারেন যেখানে ব্যবহারকারীরা তাদের লিঙ্ক করা অ্যাকাউন্ট পরিচালনা করতে পারে।
ব্যবহারকারীর অ্যাকাউন্ট পরিবর্তন করার ক্ষমতা। ব্যবহারকারীদের তাদের অ্যাকাউন্ট(গুলি) পরিবর্তন করার জন্য একটি পদ্ধতির পরামর্শ দিন। এটি বিশেষত উপকারী যদি ব্যবহারকারীদের একাধিক অ্যাকাউন্ট থাকে।
- যদি কোনো ব্যবহারকারীকে অ্যাকাউন্ট পাল্টানোর জন্য সম্মতি স্ক্রীন বন্ধ করতে হয়, Google-এ একটি পুনরুদ্ধারযোগ্য ত্রুটি পাঠান যাতে ব্যবহারকারী OAuth লিঙ্কিং এবং অন্তর্নিহিত প্রবাহের মাধ্যমে পছন্দসই অ্যাকাউন্টে সাইন ইন করতে পারেন।
আপনার লোগো অন্তর্ভুক্ত করুন. সম্মতি স্ক্রিনে আপনার কোম্পানির লোগো প্রদর্শন করুন। আপনার লোগো স্থাপন করতে আপনার শৈলী নির্দেশিকা ব্যবহার করুন. আপনি যদি Google এর লোগোও প্রদর্শন করতে চান তবে লোগো এবং ট্রেডমার্ক দেখুন।
প্রকল্পটি তৈরি করুন
অ্যাকাউন্ট লিঙ্কিং ব্যবহার করার জন্য আপনার প্রজেক্ট তৈরি করতে:
- গুগল এপিআই কনসোলে যান।
- প্রজেক্ট তৈরি করুন -এ ক্লিক করুন।
- একটি নাম লিখুন অথবা তৈরি হওয়া পরামর্শটি গ্রহণ করুন।
- অবশিষ্ট ক্ষেত্রগুলি নিশ্চিত করুন বা সম্পাদনা করুন।
- তৈরি করুন- এ ক্লিক করুন।
আপনার প্রজেক্ট আইডি দেখতে:
- গুগল এপিআই কনসোলে যান।
- ল্যান্ডিং পেজের টেবিলে আপনার প্রজেক্টটি খুঁজুন। প্রজেক্ট আইডিটি ' ID' কলামে দেখা যাবে।
আপনার OAuth সম্মতি স্ক্রিন কনফিগার করুন
গুগল অ্যাকাউন্ট লিঙ্ক করার প্রক্রিয়ার মধ্যে একটি সম্মতি স্ক্রিন অন্তর্ভুক্ত থাকে, যা ব্যবহারকারীদের জানিয়ে দেয় কোন অ্যাপ্লিকেশন তাদের ডেটাতে অ্যাক্সেস চাইছে, তারা কী ধরনের ডেটা চাইছে এবং কোন শর্তাবলী প্রযোজ্য। গুগল এপিআই ক্লায়েন্ট আইডি তৈরি করার আগে আপনাকে আপনার OAuth সম্মতি স্ক্রিনটি কনফিগার করতে হবে।
- গুগল এপিআই কনসোলের OAuth সম্মতি স্ক্রিন পৃষ্ঠাটি খুলুন।
- অনুরোধ করা হলে, আপনার এইমাত্র তৈরি করা প্রজেক্টটি নির্বাচন করুন।
"OAuth সম্মতি স্ক্রিন" পৃষ্ঠায়, ফর্মটি পূরণ করুন এবং "সংরক্ষণ করুন" বোতামে ক্লিক করুন।
অ্যাপ্লিকেশনের নাম: যে অ্যাপ্লিকেশনটি সম্মতি চাইছে তার নাম। নামটি আপনার অ্যাপ্লিকেশনকে সঠিকভাবে প্রতিফলিত করবে এবং ব্যবহারকারীরা অন্যত্র যে অ্যাপ্লিকেশনের নাম দেখেন তার সাথে সামঞ্জস্যপূর্ণ হবে। অ্যাকাউন্ট লিঙ্কিং সম্মতি স্ক্রিনে অ্যাপ্লিকেশনের নামটি দেখানো হবে।
অ্যাপ্লিকেশন লোগো: সম্মতি স্ক্রিনের একটি ছবি যা ব্যবহারকারীদের আপনার অ্যাপটি চিনতে সাহায্য করবে। লোগোটি অ্যাকাউন্ট লিঙ্কিং সম্মতি স্ক্রিনে এবং অ্যাকাউন্ট সেটিংসে দেখানো হয়।
সহায়তা ইমেল: ব্যবহারকারীরা তাদের সম্মতি সংক্রান্ত প্রশ্ন নিয়ে আপনার সাথে যোগাযোগ করতে পারেন।
গুগল এপিআই-এর স্কোপ: স্কোপ আপনার অ্যাপ্লিকেশনকে ব্যবহারকারীর ব্যক্তিগত গুগল ডেটা অ্যাক্সেস করার অনুমতি দেয়। গুগল অ্যাকাউন্ট লিঙ্কিং ব্যবহারের ক্ষেত্রে, ডিফল্ট স্কোপ (ইমেল, প্রোফাইল, ওপেনআইডি) যথেষ্ট, আপনার কোনো সংবেদনশীল স্কোপ যোগ করার প্রয়োজন নেই। সাধারণত, শুরুতেই অনুরোধ না করে, যখন অ্যাক্সেসের প্রয়োজন হয়, তখন পর্যায়ক্রমে স্কোপের জন্য অনুরোধ করা একটি উত্তম অভ্যাস। আরও জানুন ।
অনুমোদিত ডোমেইন: আপনাকে এবং আপনার ব্যবহারকারীদের সুরক্ষিত রাখতে, গুগল শুধুমাত্র সেইসব অ্যাপ্লিকেশনকেই অনুমোদিত ডোমেইন ব্যবহার করার অনুমতি দেয়, যেগুলো OAuth ব্যবহার করে প্রমাণীকরণ করে। আপনার অ্যাপ্লিকেশনের লিঙ্কগুলো অবশ্যই অনুমোদিত ডোমেইনে হোস্ট করা থাকতে হবে। আরও জানুন ।
অ্যাপ্লিকেশন হোমপেজ লিঙ্ক: আপনার অ্যাপ্লিকেশনের হোম পেজ। এটি অবশ্যই একটি অনুমোদিত ডোমেইনে হোস্ট করা থাকতে হবে।
অ্যাপ্লিকেশন গোপনীয়তা নীতি লিঙ্ক: গুগল অ্যাকাউন্ট লিঙ্ক করার সম্মতি স্ক্রিনে দেখানো হয়। অবশ্যই একটি অনুমোদিত ডোমেইনে হোস্ট করা থাকতে হবে।
অ্যাপ্লিকেশন পরিষেবার শর্তাবলীর লিঙ্ক (ঐচ্ছিক): অবশ্যই একটি অনুমোদিত ডোমেইনে হোস্ট করতে হবে।

চিত্র ১। Tunery নামক একটি কাল্পনিক অ্যাপ্লিকেশনের গুগল অ্যাকাউন্ট লিঙ্ক করার সম্মতি স্ক্রিন।
'ভেরিফিকেশন স্ট্যাটাস' দেখুন, যদি আপনার অ্যাপ্লিকেশনটির ভেরিফিকেশনের প্রয়োজন হয়, তাহলে ভেরিফিকেশনের জন্য আপনার অ্যাপ্লিকেশনটি জমা দিতে 'সাবমিট ফর ভেরিফিকেশন' বোতামে ক্লিক করুন। বিস্তারিত জানার জন্য OAuth ভেরিফিকেশনের প্রয়োজনীয়তাগুলো দেখুন।
আপনার OAuth সার্ভার বাস্তবায়ন করুন
অনুমোদন কোড প্রবাহের একটি OAuth 2.0 সার্ভার বাস্তবায়নে দুটি শেষ পয়েন্ট থাকে, যা আপনার পরিষেবা HTTPS দ্বারা উপলব্ধ করে। প্রথম এন্ডপয়েন্ট হল অনুমোদনের এন্ডপয়েন্ট, যা ডেটা অ্যাক্সেসের জন্য ব্যবহারকারীদের কাছ থেকে সম্মতি খোঁজার বা পাওয়ার জন্য দায়ী। অনুমোদনের শেষ পয়েন্ট আপনার ব্যবহারকারীদের কাছে একটি সাইন-ইন UI উপস্থাপন করে যেগুলি ইতিমধ্যে সাইন ইন করেনি এবং অনুরোধ করা অ্যাক্সেসের সম্মতি রেকর্ড করে৷ দ্বিতীয় এন্ডপয়েন্ট হল টোকেন এক্সচেঞ্জ এন্ডপয়েন্ট, যা এনক্রিপ্ট করা স্ট্রিং পেতে ব্যবহৃত হয়, যাকে টোকেন বলা হয়, যা একজন ব্যবহারকারীকে আপনার পরিষেবা অ্যাক্সেস করার অনুমতি দেয়।
যখন একটি Google অ্যাপ্লিকেশনকে আপনার পরিষেবার APIগুলির মধ্যে একটিতে কল করার প্রয়োজন হয়, তখন Google তাদের পক্ষে এই APIগুলিকে কল করার জন্য আপনার ব্যবহারকারীদের কাছ থেকে অনুমতি পেতে এই শেষ পয়েন্টগুলি একসাথে ব্যবহার করে৷
Google দ্বারা শুরু করা একটি OAuth 2.0 অনুমোদন কোড ফ্লো সেশনের নিম্নলিখিত প্রবাহ রয়েছে:
- Google ব্যবহারকারীর ব্রাউজারে আপনার অনুমোদনের শেষ পয়েন্ট খোলে। যদি কোনো অ্যাকশনের জন্য শুধুমাত্র ভয়েস ডিভাইসে প্রবাহ শুরু হয়, তাহলে Google এক্সিকিউশনটিকে একটি ফোনে স্থানান্তর করে।
- ব্যবহারকারী সাইন ইন করে, যদি ইতিমধ্যে সাইন ইন না করে থাকে, এবং যদি তারা ইতিমধ্যে অনুমতি না দেয় তবে আপনার API দিয়ে তাদের ডেটা অ্যাক্সেস করার জন্য Google-কে অনুমতি দেয়৷
- আপনার পরিষেবা একটি অনুমোদন কোড তৈরি করে এবং এটি Google-এ ফেরত দেয়। এটি করতে, অনুরোধের সাথে সংযুক্ত অনুমোদন কোড সহ ব্যবহারকারীর ব্রাউজারটিকে Google-এ ফেরত পাঠান৷
- Google আপনার টোকেন এক্সচেঞ্জ এন্ডপয়েন্টে অনুমোদন কোড পাঠায়, যা কোডের সত্যতা যাচাই করে এবং একটি অ্যাক্সেস টোকেন এবং একটি রিফ্রেশ টোকেন ফেরত দেয়। অ্যাক্সেস টোকেন হল একটি স্বল্পস্থায়ী টোকেন যা আপনার পরিষেবা API অ্যাক্সেস করার জন্য শংসাপত্র হিসাবে গ্রহণ করে। রিফ্রেশ টোকেন হল একটি দীর্ঘস্থায়ী টোকেন যা Google সংরক্ষণ করতে পারে এবং মেয়াদ শেষ হয়ে গেলে নতুন অ্যাক্সেস টোকেনগুলি অর্জন করতে ব্যবহার করতে পারে৷
- ব্যবহারকারী অ্যাকাউন্ট লিঙ্কিং ফ্লো সম্পূর্ণ করার পরে, Google থেকে পাঠানো প্রতিটি পরবর্তী অনুরোধে একটি অ্যাক্সেস টোকেন থাকে।
অনুমোদনের অনুরোধগুলি পরিচালনা করুন
যখন আপনাকে OAuth 2.0 অনুমোদন কোড ফ্লো ব্যবহার করে অ্যাকাউন্ট লিঙ্ক করার প্রয়োজন হয়, তখন Google নিম্নলিখিত প্যারামিটারগুলি অন্তর্ভুক্ত করে এমন একটি অনুরোধ সহ ব্যবহারকারীকে আপনার অনুমোদনের শেষ পয়েন্টে পাঠায়:
| অনুমোদনের শেষ পয়েন্ট পরামিতি | |
|---|---|
client_id | আপনি Google-এ যে ক্লায়েন্ট আইডি অ্যাসাইন করেছেন। |
redirect_uri | আপনি যে URLটিতে এই অনুরোধের প্রতিক্রিয়া পাঠান। |
state | পুনঃনির্দেশ URI-তে অপরিবর্তিত Google-এ ফেরত পাঠানো হয়। |
scope | ঐচ্ছিক: স্কোপ স্ট্রিংগুলির একটি স্পেস-ডিলিমিটেড সেট যা Google যে ডেটার জন্য অনুমোদনের অনুরোধ করছে তা নির্দিষ্ট করে৷ |
response_type | প্রতিক্রিয়াতে যে মানের প্রত্যাবর্তন করতে হবে। OAuth 2.0 অনুমোদন কোড প্রবাহের জন্য, প্রতিক্রিয়ার ধরনটি সর্বদাই code । |
user_locale | RFC5646 ফর্ম্যাটে Google অ্যাকাউন্টের ভাষা সেটিং, ব্যবহারকারীর পছন্দের ভাষায় আপনার বিষয়বস্তু স্থানীয়করণ করতে ব্যবহৃত হয়। |
উদাহরণস্বরূপ, যদি আপনার অনুমোদনের শেষ পয়েন্ট https://myservice.example.com/auth এ উপলব্ধ থাকে, তাহলে একটি অনুরোধ নিম্নলিখিতটির মতো দেখতে পারে:
GET https://myservice.example.com/auth?client_id=GOOGLE_CLIENT_ID&redirect_uri=REDIRECT_URI&state=STATE_STRING&scope=REQUESTED_SCOPES&response_type=code&user_locale=LOCALE
সাইন-ইন অনুরোধগুলি পরিচালনা করার জন্য আপনার অনুমোদনের শেষ পয়েন্টের জন্য, নিম্নলিখিত পদক্ষেপগুলি করুন:
- যাচাই করুন যে
client_idআপনার Google-এ নির্ধারিত ক্লায়েন্ট আইডির সাথে মেলে এবং আপনার পরিষেবার জন্য Google দ্বারা প্রদত্ত পুনঃনির্দেশ URL এর সাথেredirect_uriমেলে। অনাকাঙ্ক্ষিত বা ভুল কনফিগার করা ক্লায়েন্ট অ্যাপগুলিতে অ্যাক্সেস মঞ্জুর করা প্রতিরোধ করার জন্য এই চেকগুলি গুরুত্বপূর্ণ৷ আপনি যদি একাধিক OAuth 2.0 ফ্লো সমর্থন করেন, তাও নিশ্চিত করুন যেresponse_typecode। - ব্যবহারকারী আপনার পরিষেবাতে সাইন ইন করেছেন কিনা তা পরীক্ষা করুন৷ ব্যবহারকারী সাইন ইন না করলে, আপনার পরিষেবার সাইন-ইন বা সাইন-আপ প্রবাহ সম্পূর্ণ করুন৷
- আপনার API অ্যাক্সেস করার জন্য Google ব্যবহার করার জন্য একটি অনুমোদন কোড তৈরি করুন। অনুমোদন কোড যেকোন স্ট্রিং মান হতে পারে, তবে এটি অবশ্যই ব্যবহারকারীকে অনন্যভাবে উপস্থাপন করতে হবে, টোকেনটি যে ক্লায়েন্টের জন্য এবং কোডের মেয়াদ শেষ হওয়ার সময়, এবং এটি অনুমানযোগ্য হতে হবে না। আপনি সাধারণত অনুমোদন কোড ইস্যু করেন যা প্রায় 10 মিনিটের পরে মেয়াদ শেষ হয়ে যায়।
- নিশ্চিত করুন যে
redirect_uriপ্যারামিটার দ্বারা নির্দিষ্ট করা URL-এর নিম্নলিখিত ফর্ম রয়েছে:https://oauth-redirect.googleusercontent.com/r/YOUR_PROJECT_ID https://oauth-redirect-sandbox.googleusercontent.com/r/YOUR_PROJECT_ID
redirect_uriপ্যারামিটার দ্বারা নির্দিষ্ট URL-এ ব্যবহারকারীর ব্রাউজারকে পুনঃনির্দেশ করুন।codeএবংstateপ্যারামিটার যোগ করে রিডাইরেক্ট করার সময় আপনি এইমাত্র তৈরি করা অনুমোদন কোড এবং আসল, অপরিবর্তিত রাষ্ট্রীয় মান অন্তর্ভুক্ত করুন। নিম্নলিখিত ফলাফল URL এর একটি উদাহরণ:https://oauth-redirect.googleusercontent.com/r/YOUR_PROJECT_ID?code=AUTHORIZATION_CODE&state=STATE_STRING
টোকেন বিনিময় অনুরোধ হ্যান্ডেল
আপনার পরিষেবার টোকেন এক্সচেঞ্জ এন্ডপয়েন্ট দুটি ধরণের টোকেন এক্সচেঞ্জের জন্য দায়ী:
- অ্যাক্সেস টোকেন এবং রিফ্রেশ টোকেনগুলির জন্য অনুমোদনের কোডগুলি বিনিময় করুন৷
- অ্যাক্সেস টোকেনগুলির জন্য রিফ্রেশ টোকেনগুলি বিনিময় করুন৷
টোকেন বিনিময় অনুরোধ নিম্নলিখিত পরামিতি অন্তর্ভুক্ত:
| টোকেন এক্সচেঞ্জ এন্ডপয়েন্ট প্যারামিটার | |
|---|---|
client_id | একটি স্ট্রিং যা অনুরোধের উত্সটিকে Google হিসাবে চিহ্নিত করে৷ এই স্ট্রিংটি অবশ্যই আপনার সিস্টেমের মধ্যে Google এর অনন্য শনাক্তকারী হিসাবে নিবন্ধিত হতে হবে৷ |
client_secret | একটি গোপন স্ট্রিং যা আপনি আপনার পরিষেবার জন্য Google এর সাথে নিবন্ধন করেছেন৷ |
grant_type | টোকেনের ধরন বিনিময় হচ্ছে। এটি হয় authorization_code বা refresh_token । |
code | যখন grant_type=authorization_code , এই প্যারামিটারটি হল Google আপনার সাইন-ইন বা টোকেন এক্সচেঞ্জ এন্ডপয়েন্ট থেকে প্রাপ্ত কোড। |
redirect_uri | grant_type=authorization_code হলে, এই প্যারামিটারটি প্রাথমিক অনুমোদনের অনুরোধে ব্যবহৃত URL। |
refresh_token | যখন grant_type=refresh_token , এই প্যারামিটারটি হল রিফ্রেশ টোকেন Google আপনার টোকেন এক্সচেঞ্জ এন্ডপয়েন্ট থেকে প্রাপ্ত। |
অ্যাক্সেস টোকেন এবং রিফ্রেশ টোকেনগুলির জন্য অনুমোদনের কোডগুলি বিনিময় করুন৷
ব্যবহারকারী সাইন ইন করার পরে এবং আপনার অনুমোদনের এন্ডপয়েন্ট Google-কে একটি স্বল্পকালীন অনুমোদনের কোড ফেরত দেওয়ার পরে, Google আপনার টোকেন এক্সচেঞ্জ এন্ডপয়েন্টে একটি অ্যাক্সেস টোকেন এবং একটি রিফ্রেশ টোকেনের জন্য অনুমোদন কোড বিনিময় করার জন্য একটি অনুরোধ পাঠায়।
এই অনুরোধগুলির জন্য, grant_type এর মান হল authorization_code , এবং code মান হল অনুমোদন কোডের মান যা আপনি আগে Google-কে দিয়েছিলেন৷ একটি অ্যাক্সেস টোকেন এবং একটি রিফ্রেশ টোকেনের জন্য একটি অনুমোদন কোড বিনিময় করার অনুরোধের একটি উদাহরণ নিম্নলিখিত:
POST /token HTTP/1.1
Host: oauth2.example.com
Content-Type: application/x-www-form-urlencoded

client_id=GOOGLE_CLIENT_ID&client_secret=GOOGLE_CLIENT_SECRET&grant_type=authorization_code&code=AUTHORIZATION_CODE&redirect_uri=REDIRECT_URI
একটি অ্যাক্সেস টোকেন এবং একটি রিফ্রেশ টোকেনের জন্য অনুমোদনের কোডগুলি বিনিময় করতে, আপনার টোকেন এক্সচেঞ্জ এন্ডপয়েন্ট নিম্নলিখিত পদক্ষেপগুলি সম্পাদন করে POST অনুরোধে সাড়া দেয়:
- যাচাই করুন যে
client_idঅনুরোধের উত্সটিকে একটি অনুমোদিত উত্স হিসাবে চিহ্নিত করে এবংclient_secretপ্রত্যাশিত মানের সাথে মেলে৷ - যাচাই করুন যে অনুমোদন কোডটি বৈধ এবং মেয়াদ শেষ হয়নি এবং অনুরোধে উল্লেখিত ক্লায়েন্ট আইডি অনুমোদন কোডের সাথে যুক্ত ক্লায়েন্ট আইডির সাথে মেলে।
- নিশ্চিত করুন যে
redirect_uriপ্যারামিটার দ্বারা নির্দিষ্ট করা URL প্রাথমিক অনুমোদনের অনুরোধে ব্যবহৃত মানের সাথে অভিন্ন। - আপনি যদি উপরের সমস্ত মানদণ্ড যাচাই করতে না পারেন, তাহলে একটি HTTP 400 খারাপ অনুরোধের ত্রুটি
{"error": "invalid_grant"}দিয়ে বডি হিসাবে ফেরত দিন। - অন্যথায়, একটি রিফ্রেশ টোকেন এবং একটি অ্যাক্সেস টোকেন তৈরি করতে অনুমোদন কোড থেকে ব্যবহারকারী আইডি ব্যবহার করুন৷ এই টোকেনগুলি যে কোনও স্ট্রিং মান হতে পারে, তবে সেগুলি অবশ্যই ব্যবহারকারী এবং ক্লায়েন্টকে অনন্যভাবে উপস্থাপন করতে হবে যার জন্য টোকেনটি রয়েছে এবং সেগুলি অনুমানযোগ্য হতে হবে না। অ্যাক্সেস টোকেনগুলির জন্য, টোকেনের মেয়াদ শেষ হওয়ার সময়ও রেকর্ড করুন, যা সাধারণত আপনি টোকেন ইস্যু করার এক ঘন্টা পরে। রিফ্রেশ টোকেন মেয়াদ শেষ হয় না.
- HTTPS প্রতিক্রিয়ার মূল অংশে নিম্নলিখিত JSON অবজেক্টটি ফেরত দিন:
{
"token_type": "Bearer",
"access_token": "ACCESS_TOKEN",
"refresh_token": "REFRESH_TOKEN",
"expires_in": SECONDS_TO_EXPIRATION
}
Google ব্যবহারকারীর জন্য অ্যাক্সেস টোকেন এবং রিফ্রেশ টোকেন সংরক্ষণ করে এবং অ্যাক্সেস টোকেনের মেয়াদ শেষ হওয়ার রেকর্ড করে। অ্যাক্সেস টোকেনের মেয়াদ শেষ হয়ে গেলে, Google আপনার টোকেন এক্সচেঞ্জ এন্ডপয়েন্ট থেকে একটি নতুন অ্যাক্সেস টোকেন পেতে রিফ্রেশ টোকেন ব্যবহার করে।
অ্যাক্সেস টোকেনগুলির জন্য রিফ্রেশ টোকেনগুলি বিনিময় করুন৷
যখন একটি অ্যাক্সেস টোকেনের মেয়াদ শেষ হয়ে যায়, তখন Google একটি নতুন অ্যাক্সেস টোকেনের জন্য একটি রিফ্রেশ টোকেন বিনিময় করার জন্য আপনার টোকেন এক্সচেঞ্জ এন্ডপয়েন্টে একটি অনুরোধ পাঠায়।
এই অনুরোধগুলির জন্য, grant_type এর মান হল refresh_token , এবং refresh_token এর মান হল রিফ্রেশ টোকেনের মান যা আপনি আগে Google-কে দিয়েছিলেন৷ নিম্নলিখিতটি একটি অ্যাক্সেস টোকেনের জন্য একটি রিফ্রেশ টোকেন বিনিময় করার অনুরোধের একটি উদাহরণ:
POST /token HTTP/1.1
Host: oauth2.example.com
Content-Type: application/x-www-form-urlencoded

client_id=GOOGLE_CLIENT_ID&client_secret=GOOGLE_CLIENT_SECRET&grant_type=refresh_token&refresh_token=REFRESH_TOKEN
একটি অ্যাক্সেস টোকেনের জন্য একটি রিফ্রেশ টোকেন বিনিময় করতে, আপনার টোকেন এক্সচেঞ্জ এন্ডপয়েন্ট নিম্নলিখিত পদক্ষেপগুলি সম্পাদন করে POST অনুরোধে সাড়া দেয়:
- যাচাই করুন যে
client_idঅনুরোধের উৎসটিকে Google হিসাবে চিহ্নিত করে এবংclient_secretপ্রত্যাশিত মানের সাথে মেলে। - রিফ্রেশ টোকেন বৈধ কিনা যাচাই করুন এবং অনুরোধে উল্লেখিত ক্লায়েন্ট আইডি রিফ্রেশ টোকেনের সাথে যুক্ত ক্লায়েন্ট আইডির সাথে মেলে।
- আপনি যদি উপরের সমস্ত মানদণ্ড যাচাই করতে না পারেন, তাহলে একটি HTTP 400 খারাপ অনুরোধের ত্রুটি
{"error": "invalid_grant"}দিয়ে বডি হিসাবে ফেরত দিন। - অন্যথায়, একটি অ্যাক্সেস টোকেন তৈরি করতে রিফ্রেশ টোকেন থেকে ব্যবহারকারী আইডি ব্যবহার করুন। এই টোকেনগুলি যে কোনও স্ট্রিং মান হতে পারে, তবে সেগুলি অবশ্যই ব্যবহারকারী এবং ক্লায়েন্টকে অনন্যভাবে উপস্থাপন করতে হবে যার জন্য টোকেনটি রয়েছে এবং সেগুলি অনুমানযোগ্য হতে হবে না। অ্যাক্সেস টোকেনগুলির জন্য, টোকেনের মেয়াদ শেষ হওয়ার সময়ও রেকর্ড করুন, সাধারণত আপনি টোকেন ইস্যু করার এক ঘন্টা পরে।
- HTTPS প্রতিক্রিয়ার মূল অংশে নিম্নলিখিত JSON অবজেক্টটি ফেরত দিন:
{
"token_type": "Bearer",
"access_token": " ACCESS_TOKEN ",
"expires_in": SECONDS_TO_EXPIRATION
}
ব্যবহারকারীর তথ্যের অনুরোধগুলি পরিচালনা করুন
ইউজারইনফো এন্ডপয়েন্ট হল একটি OAuth 2.0 সুরক্ষিত রিসোর্স যা লিঙ্ক করা ব্যবহারকারীর বিষয়ে দাবি ফেরত দেয়। ইউজার ইনফো এন্ডপয়েন্ট বাস্তবায়ন এবং হোস্ট করা ঐচ্ছিক, নিম্নলিখিত ব্যবহারের ক্ষেত্রে ছাড়া:
- Google One ট্যাপের মাধ্যমে লিঙ্ক করা অ্যাকাউন্টে সাইন-ইন করুন ।
- AndroidTV-তে ঘর্ষণহীন সাবস্ক্রিপশন ।
আপনার টোকেন এন্ডপয়েন্ট থেকে অ্যাক্সেস টোকেন সফলভাবে পুনরুদ্ধার করার পরে, Google লিঙ্ক করা ব্যবহারকারীর সম্পর্কে প্রাথমিক প্রোফাইল তথ্য পুনরুদ্ধার করার জন্য আপনার ব্যবহারকারীর তথ্য এন্ডপয়েন্টে একটি অনুরোধ পাঠায়।
| userinfo এন্ডপয়েন্ট রিকোয়েস্ট হেডার | |
|---|---|
Authorization header | টাইপ বিয়ারারের অ্যাক্সেস টোকেন। |
উদাহরণস্বরূপ, যদি আপনার ব্যবহারকারীর তথ্যের এন্ডপয়েন্ট https://myservice.example.com/userinfo এ উপলব্ধ থাকে, তাহলে একটি অনুরোধ নিম্নলিখিতটির মতো দেখতে পারে:
GET /userinfo HTTP/1.1
Host: myservice.example.com
Authorization: Bearer ACCESS_TOKEN
অনুরোধগুলি পরিচালনা করার জন্য আপনার ব্যবহারকারীর তথ্যের শেষ পয়েন্টের জন্য, নিম্নলিখিত পদক্ষেপগুলি করুন:
- অনুমোদন শিরোনাম থেকে অ্যাক্সেস টোকেন বের করুন এবং অ্যাক্সেস টোকেনের সাথে যুক্ত ব্যবহারকারীর জন্য তথ্য ফেরত দিন।
- অ্যাক্সেস টোকেনটি অবৈধ হলে,
WWW-Authenticateপ্রতিক্রিয়া শিরোনাম ব্যবহার করে একটি HTTP 401 অননুমোদিত ত্রুটি ফেরত দিন। নীচে একটি ব্যবহারকারীর তথ্য ত্রুটি প্রতিক্রিয়ার একটি উদাহরণ:HTTP/1.1 401 Unauthorized WWW-Authenticate: error="invalid_token", error_description="The Access Token expired"
অ্যাক্সেস টোকেনটি বৈধ হলে, HTTPS প্রতিক্রিয়ার বডিতে নিম্নলিখিত JSON অবজেক্টের সাথে HTTP 200 প্রতিক্রিয়া ফেরত দিন:
{ "sub": "USER_UUID", "email": "EMAIL_ADDRESS", "given_name": "FIRST_NAME", "family_name": "LAST_NAME", "name": "FULL_NAME", "picture": "PROFILE_PICTURE", }ব্যবহারকারীর তথ্য শেষ পয়েন্ট প্রতিক্রিয়া subএকটি অনন্য আইডি যা আপনার সিস্টেমে ব্যবহারকারীকে শনাক্ত করে। emailব্যবহারকারীর ইমেল ঠিকানা। given_nameঐচ্ছিক: ব্যবহারকারীর প্রথম নাম। family_nameঐচ্ছিক: ব্যবহারকারীর শেষ নাম। nameঐচ্ছিক: ব্যবহারকারীর পুরো নাম। pictureঐচ্ছিক: ব্যবহারকারীর প্রোফাইল ছবি।
আপনার বাস্তবায়ন যাচাই করা
আপনি OAuth 2.0 প্লেগ্রাউন্ড টুলটি ব্যবহার করে আপনার বাস্তবায়ন যাচাই করতে পারেন।
টুলটিতে, নিম্নলিখিত ধাপগুলো অনুসরণ করুন:
- OAuth 2.0 কনফিগারেশন উইন্ডোটি খুলতে কনফিগারেশন ক্লিক করুন।
- OAuth ফ্লো ফিল্ডে ক্লায়েন্ট-সাইড নির্বাচন করুন।
- OAuth Endpoints ফিল্ডে Custom নির্বাচন করুন।
- আপনার OAuth 2.0 এন্ডপয়েন্ট এবং Google-কে বরাদ্দ করা ক্লায়েন্ট আইডি সংশ্লিষ্ট ফিল্ডগুলিতে উল্লেখ করুন।
- ধাপ ১ অংশে, কোনো গুগল স্কোপ নির্বাচন করবেন না। এর পরিবর্তে, এই ক্ষেত্রটি খালি রাখুন অথবা আপনার সার্ভারের জন্য বৈধ একটি স্কোপ টাইপ করুন (যদি আপনি OAuth স্কোপ ব্যবহার না করেন তবে একটি ইচ্ছামতো স্ট্রিং টাইপ করুন)। আপনার কাজ শেষ হলে, 'Authorize APIs'-এ ক্লিক করুন।
- ধাপ ২ এবং ধাপ ৩ অংশে, OAuth 2.0 ফ্লোটি অনুসরণ করুন এবং যাচাই করুন যে প্রতিটি ধাপ উদ্দেশ্য অনুযায়ী কাজ করছে।
আপনি গুগল অ্যাকাউন্ট লিঙ্কিং ডেমো টুলটি ব্যবহার করে আপনার বাস্তবায়ন যাচাই করতে পারেন।
টুলটিতে, নিম্নলিখিত ধাপগুলো অনুসরণ করুন:
- ‘Sign in with Google’ বোতামটিতে ক্লিক করুন।
- যে অ্যাকাউন্টটি লিঙ্ক করতে চান, সেটি বেছে নিন।
- সার্ভিস আইডিটি প্রবেশ করান।
- ঐচ্ছিকভাবে এক বা একাধিক স্কোপ লিখুন যেগুলোর জন্য আপনি অ্যাক্সেসের অনুরোধ করবেন।
- স্টার্ট ডেমো-তে ক্লিক করুন।
- অনুরোধ করা হলে, লিঙ্কিং অনুরোধে সম্মতি ও অস্বীকৃতি জানিয়ে তা নিশ্চিত করুন।
- আপনাকে আপনার প্ল্যাটফর্মে পুনঃনির্দেশিত করা হয়েছে কিনা তা নিশ্চিত করুন।