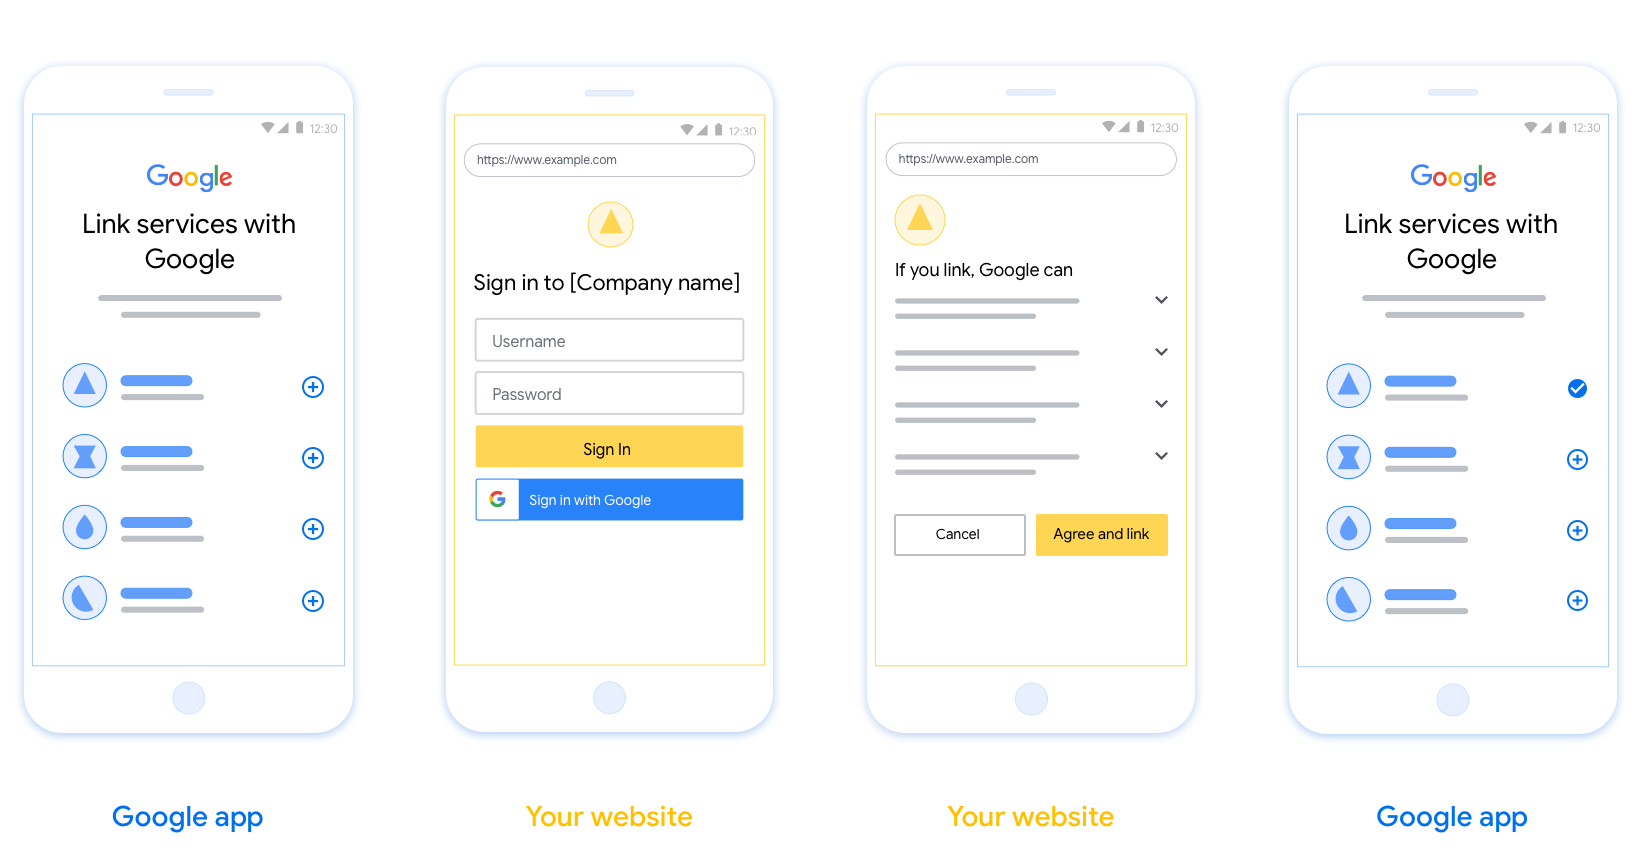
As contas são vinculadas usando os fluxos implícitos e de código de autorização do OAuth 2.0 padrão do setor. Seu serviço precisa oferecer suporte a endpoints de autorização e troca de token compatíveis com o OAuth 2.0.
No fluxo implícito, o Google abre o endpoint de autorização no navegador do usuário. Após o login, você retorna um token de acesso de longa duração para o Google. Agora, esse token de acesso está incluído em todas as solicitações enviadas pelo Google.
No fluxo do código de autorização, você precisa de dois endpoints:
O endpoint de autorização, que apresenta a interface de login aos usuários que ainda não fizeram login. O endpoint de autorização também cria um código de autorização de curta duração para registrar o consentimento dos usuários para o acesso solicitado.
O endpoint de troca de token, que é responsável por dois tipos de trocas:
- Troca um código de autorização por um token de atualização de longa duração e um de acesso de curta duração. Essa troca acontece quando o usuário passa pelo fluxo de vinculação de conta.
- Troca um token de atualização de longa duração por um de acesso de curta duração. Essa troca acontece quando o Google precisa de um novo token de acesso porque o anterior expirou.
Escolher um fluxo do OAuth 2.0
Embora o fluxo implícito seja mais simples de implementar, o Google recomenda que os tokens de acesso emitidos pelo fluxo implícito nunca expirem. Isso ocorre porque o usuário é forçado a vincular a conta novamente depois que um token expira com o fluxo implícito. Se você precisar da expiração do token por motivos de segurança, é altamente recomendável usar o fluxo de código de autorização.
Diretrizes de design
Esta seção descreve os requisitos de design e as recomendações para a tela do usuário que você hospeda para fluxos de vinculação do OAuth. Depois de ser chamada pelo app do Google, a plataforma mostra uma página de login no Google e uma tela de consentimento de vinculação de conta para o usuário. O usuário é direcionado de volta ao app do Google depois de dar consentimento para vincular contas.

Requisitos
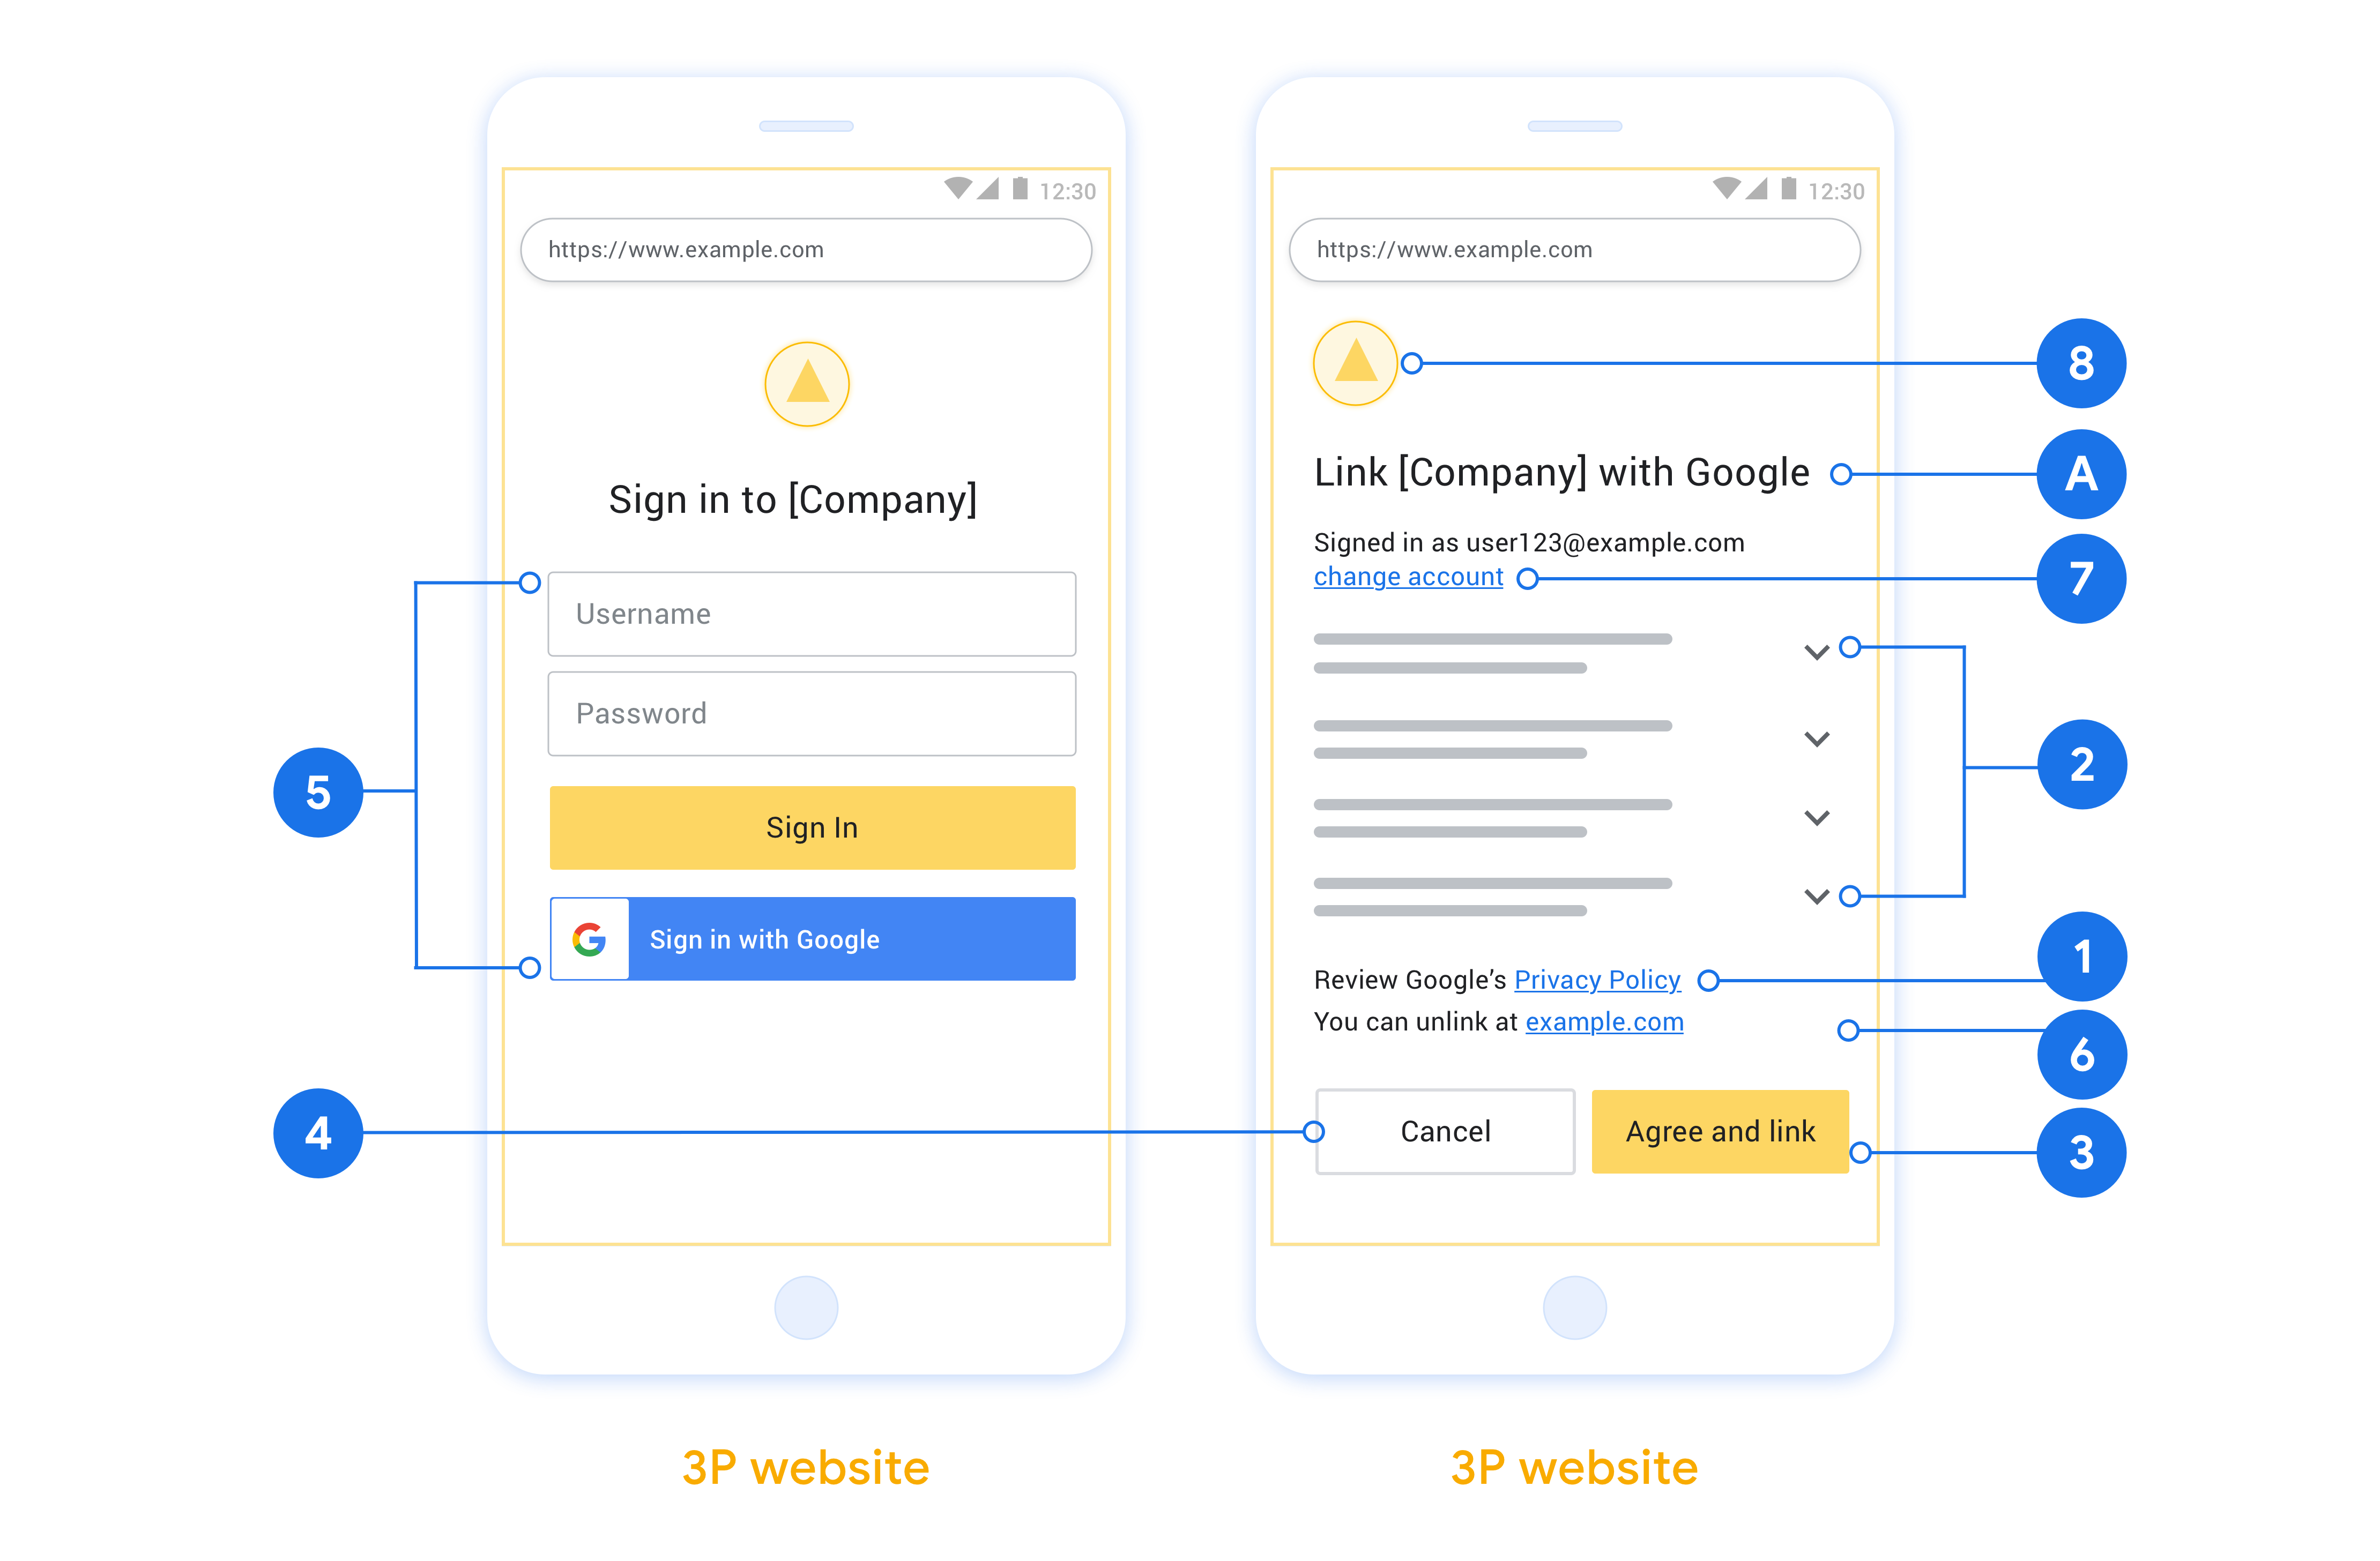
- É necessário informar que a conta do usuário será vinculada ao Google, não a um produto específico, como o Google Home ou o Google Assistente.
Recomendações
Portanto, recomendamos que você faça o seguinte:
Exibir a Política de Privacidade do Google. Incluir um link para a Política de Privacidade do Google na tela de consentimento.
Dados a serem compartilhados. Use uma linguagem clara e concisa para informar ao usuário quais dados o Google exige e por quê.
Call-to-action clara. Informe uma call-to-action clara na tela de consentimento, como "Concordar e vincular". Isso é necessário porque os usuários precisam entender quais dados eles precisam compartilhar com o Google para vincular as contas.
Possibilidade de cancelamento. Ofereça uma maneira de voltar ou cancelar, se o usuário não quiser fazer a vinculação.
Processo de login claro. Os usuários precisam ter um método claro para fazer login na Conta do Google, como campos para nome de usuário e senha ou Fazer login com o Google.
Possibilidade de desvincular. Ofereça um mecanismo para os usuários desvincularem, como um URL para as configurações da conta deles na sua plataforma. Como alternativa, é possível incluir um link para a Conta do Google, onde os usuários podem gerenciar a conta vinculada.
Capacidade de mudar a conta do usuário. Sugira um método para os usuários trocarem de conta. Isso é especialmente benéfico se os usuários tendem a ter várias contas.
- Se um usuário precisar fechar a tela de consentimento para alternar contas, envie um erro recuperável para o Google para que o usuário possa fazer login na conta desejada com a vinculação OAuth e o fluxo implícito.
Inclua seu logotipo. Mostre o logotipo da sua empresa na tela de consentimento. Use as diretrizes de estilo para posicionar o logotipo. Se você quiser mostrar também o logotipo do Google, consulte Logos e marcas registradas.

创建项目
如需创建使用账号关联的项目,请执行以下操作:
- 点击 Create project。
- 输入名称或接受生成的建议。
- 确认或修改所有剩余字段。
- 点击创建。
如需查看项目 ID,请执行以下操作:
- 在着陆页的表格中找到您的项目。项目 ID 会显示在 ID 列中。
配置 OAuth 权限请求页面
Google 账号关联流程包含一个权限请求页面,该页面会告知用户哪个应用在请求访问其数据、请求访问哪些类型的数据,以及适用的条款。您需要先配置 OAuth 权限请求页面,然后才能生成 Google API 客户端 ID。
- 打开 Google API 控制台的 OAuth 同意屏幕页面。
- 如果出现提示,请选择您刚刚创建的项目。
在“OAuth 同意屏幕”页面上,填写表单,然后点击“保存”按钮。
应用名称:征求用户同意的应用的名称。名称应准确反映您的应用,并与用户在其他位置看到的应用名称保持一致。应用名称将显示在账号关联权限请求界面上。
应用徽标:权限请求页面上显示的一张图片,用以让用户认出您的应用。徽标会显示在账号关联权限请求页面和账号设置中
支持电子邮件地址:供用户就其同意问题与您联系。
Google API 的范围:借助范围,您的应用可以访问用户的非公开 Google 数据。对于 Google 账号关联使用情形,默认范围(电子邮件地址、个人资料、openid)就足够了,您无需添加任何敏感范围。一般来说,最佳做法是在需要访问权限时逐步请求权限范围,而不是提前请求。了解详情。
已获授权的网域:为了保护您和您的用户,Google 只允许使用 OAuth 进行身份验证的应用使用已获授权的网域。应用的链接必须托管在已获授权的网域上。了解详情。
应用首页链接:应用的首页。必须托管在已获授权的网域上。
应用隐私权政策链接:显示在 Google 账号关联意见征求界面上。必须托管在已获授权的网域上。
应用服务条款链接(可选):必须托管在已获授权的网域上。

图 1. 虚构应用 Tunery 的 Google 账号关联意见征求界面
查看“验证状态”,如果您的应用需要验证,请点击“提交以供验证”按钮,提交应用以供验证。如需了解详情,请参阅 OAuth 验证要求。
Implementar seu servidor OAuth
为了支持 OAuth 2.0 隐式流,您的服务会进行授权 端点。此端点负责进行身份验证, 就数据访问征得用户同意。授权端点 向尚未登录的用户显示登录界面,并记录 同意所请求的访问。
当 Google 应用需要调用您的某项服务获得授权的 API 时, Google 使用此端点从您的用户处获取调用这些 API 的权限 。
由 Google 发起的典型 OAuth 2.0 隐式流会话具有以下特征: 以下流程:
- Google 会在用户的浏览器中打开您的授权端点。通过 如果用户尚未登录,则直接登录,然后授予 Google 以下权限: 访问您的 API 访问其数据(如果尚未授权)。
- 您的服务会创建一个访问令牌并将其返回给 Google。为此,请将用户的浏览器重定向回 Google,并提供相应的访问权限 令牌。
- Google 调用您的服务的 API,并附加带有 。您的服务会验证访问令牌是否向 Google 授予 访问 API 的授权,然后完成 API 调用。
处理授权请求
当 Google 应用需要通过 OAuth 2.0 执行账号关联时 隐式流程,Google 会通过 请求,其中包含以下参数:
| 授权端点参数 | |
|---|---|
client_id |
您分配给 Google 的客户 ID。 |
redirect_uri |
此请求的响应发送到的网址。 |
state |
将一个在 重定向 URI。 |
response_type |
要在响应中返回的值的类型。对于 OAuth 2.0 隐式
则响应类型始终为 token。 |
user_locale |
“Google 账号语言设置” RFC5646 用于将您的内容本地化为用户首选语言的格式。 |
例如,如果您的授权端点位于
https://myservice.example.com/auth 时,请求可能如下所示:
GET https://myservice.example.com/auth?client_id=GOOGLE_CLIENT_ID&redirect_uri=REDIRECT_URI&state=STATE_STRING&response_type=token&user_locale=LOCALE
为了让授权端点能够处理登录请求,请执行以下操作 步骤:
验证
client_id和redirect_uri值, 防止向意外或配置错误的客户端应用授予访问权限:- 确认
client_id是否与您的客户端 ID 匹配 分配给 Google。 - 确认
redirect_uri指定的网址 参数的格式如下:https://oauth-redirect.googleusercontent.com/r/YOUR_PROJECT_ID https://oauth-redirect-sandbox.googleusercontent.com/r/YOUR_PROJECT_ID
- 确认
检查用户是否已登录您的服务。如果用户未登录 中,完成服务的登录或注册流程。
生成访问令牌,以供 Google 用于访问您的 API。通过 访问令牌可以是任何字符串值,但必须唯一地表示 令牌对应的用户和客户端,且不得被猜到。
发送 HTTP 响应,将用户浏览器重定向到相应网址 由
redirect_uri参数指定。添加所有 以下参数:access_token:您刚刚生成的访问令牌token_type:字符串bearerstate:原始状态的未修改状态值 请求
以下是生成的网址示例:
https://oauth-redirect.googleusercontent.com/r/YOUR_PROJECT_ID#access_token=ACCESS_TOKEN&token_type=bearer&state=STATE_STRING
Google 的 OAuth 2.0 重定向处理程序收到访问令牌并确认
state 值没有更改。在 Google 获得
访问令牌,则 Google 会将该令牌附加到后续调用
服务 API
Processar solicitações userinfo
O endpoint userinfo é um recurso protegido pelo OAuth 2.0 que retorna declarações sobre o usuário vinculado. A implementação e hospedagem do endpoint userinfo é opcional, exceto nos seguintes casos de uso:
- Login da conta vinculada com o Google One Tap.
- Assinatura sem atrito no AndroidTV.
Depois que o token de acesso for recuperado do endpoint do token, o Google enviará uma solicitação ao endpoint de informações do usuário para recuperar informações básicas de perfil sobre o usuário vinculado.
| cabeçalhos de solicitação do endpoint userinfo | |
|---|---|
Authorization header |
O token de acesso do tipo Bearer. |
Por exemplo, se seu ponto de extremidade de informações do usuário estiver disponível em
https://myservice.example.com/userinfo, uma solicitação terá esta aparência:
GET /userinfo HTTP/1.1
Host: myservice.example.com
Authorization: Bearer ACCESS_TOKEN
Para que o endpoint userinfo processe solicitações, siga estas etapas:
- Extrair o token de acesso do cabeçalho "Autorização" e retornar as informações do usuário associado ao token de acesso.
- Se o token de acesso for inválido, retorne o erro "HTTP 401 Unused" ao usar o cabeçalho de resposta
WWW-Authenticate. Veja abaixo um exemplo de resposta de erro userinfo:HTTP/1.1 401 Unauthorized WWW-Authenticate: error="invalid_token", error_description="The Access Token expired"
Se o token de acesso for válido, retorne uma resposta HTTP 200 com o seguinte objeto JSON no corpo do HTTPS resposta:
{ "sub": "USER_UUID", "email": "EMAIL_ADDRESS", "given_name": "FIRST_NAME", "family_name": "LAST_NAME", "name": "FULL_NAME", "picture": "PROFILE_PICTURE", }resposta do endpoint userinfo subUm ID exclusivo que identifica o usuário no seu sistema. emailEndereço de e-mail do usuário. given_nameOpcional:nome do usuário. family_nameOpcional:sobrenome do usuário. nameOpcional:o nome completo do usuário. pictureOpcional:foto do perfil do usuário.
Como validar a implementação
É possível validar sua implementação usando a ferramenta OAuth 2.0 Playground.
Na ferramenta, siga estas etapas:
- Clique em Configuração para abrir a janela de configuração do OAuth 2.0.
- No campo Fluxo do OAuth, selecione Lado do cliente.
- No campo Endpoints OAuth, selecione Personalizado.
- Especifique o endpoint OAuth 2.0 e o ID do cliente atribuído ao Google nos campos correspondentes.
- Na seção Etapa 1, não selecione nenhum escopo do Google. Em vez disso, deixe esse campo em branco ou digite um escopo válido para seu servidor (ou uma string arbitrária se você não usar escopos do OAuth). Quando terminar, clique em Autorizar APIs.
- Nas seções Etapa 2 e Etapa 3, siga o fluxo OAuth 2.0 e verifique se cada etapa funciona conforme o esperado.
É possível validar sua implementação usando a ferramenta Demo de vinculação de Contas do Google.
Na ferramenta, siga estas etapas:
- Clique no botão Fazer login com o Google.
- Escolha a conta que você quer vincular.
- Insira o ID do serviço.
- Opcionalmente, insira um ou mais escopos para os quais você vai solicitar acesso.
- Clique em Iniciar demonstração.
- Quando solicitado, confirme que você pode consentir e negar o pedido de vinculação.
- Confirme se você foi redirecionado para a plataforma.
