يتم ربط الحسابات باستخدام التدفقات الضمنية والضمنية ورموز التفويض الخاصة ببروتوكول OAuth 2.0. يجب أن تتوافق خدمتك مع نقاط نهاية التفويض وتبادل الرموز المميّزة المتوافقة مع بروتوكول OAuth 2.0.
في عملية الموافقة الضمنية، تفتح Google نقطة نهاية التفويض في browser المستخدم. بعد تسجيل الدخول بنجاح، يمكنك إعادة رمز دخول صالح لفترة طويلة إلى Google. يتم الآن تضمين رمز الوصول هذا في كل طلب يتم إرساله من Google.
في مسار رمز التفويض، تحتاج إلى نقطتَي نهاية:
نقطة نهاية التفويض التي تعرِض واجهة مستخدم تسجيل الدخول للمستخدمين الذين لم يسجّلوا الدخول من قبل تُنشئ نقطة نهاية التفويض أيضًا код التفويض الذي ينتهي صلاحيته بعد فترة قصيرة لتسجيل موافقة المستخدمين على الوصول المطلوب.
نقطة نهاية تبادل الرمز المميز، وهي المسؤولة عن نوعين من التبادلات:
- تبديل رمز التفويض برمز مميّز طويل الأمد لإعادة التحميل ورمز مميّز قصير الأمد للدخول يحدث هذا التبادل عندما ينتقل المستخدم إلى مسار ربط الحساب.
- يتم استبدال رمز مميّز طويل الأمد لإعادة التحميل برمز دخول قصير الأمد. يحدث هذا التبادل عندما تحتاج Google إلى رمز دخول مميّز جديد لأنّه انتهت صلاحية الرمز المميّز السابق.
اختيار مسار OAuth 2.0
على الرغم من أنّ التدفق الضمني أبسط في التنفيذ، تنصح Google بعدم انتهاء صلاحية رموز الدخول الصادرة عن التدفق الضمني أبدًا. ويرجع ذلك إلى أن المستخدم يضطر إلى ربط حسابه مرة أخرى بعد انتهاء صلاحية الرمز المميز بالتدفق الضمني. إذا كنت بحاجة إلى انتهاء صلاحية الرمز المميّز لأسباب تتعلق بالأمان، ننصحك بشدة باستخدام مسار رمز التفويض بدلاً من ذلك.
إرشادات التصميم
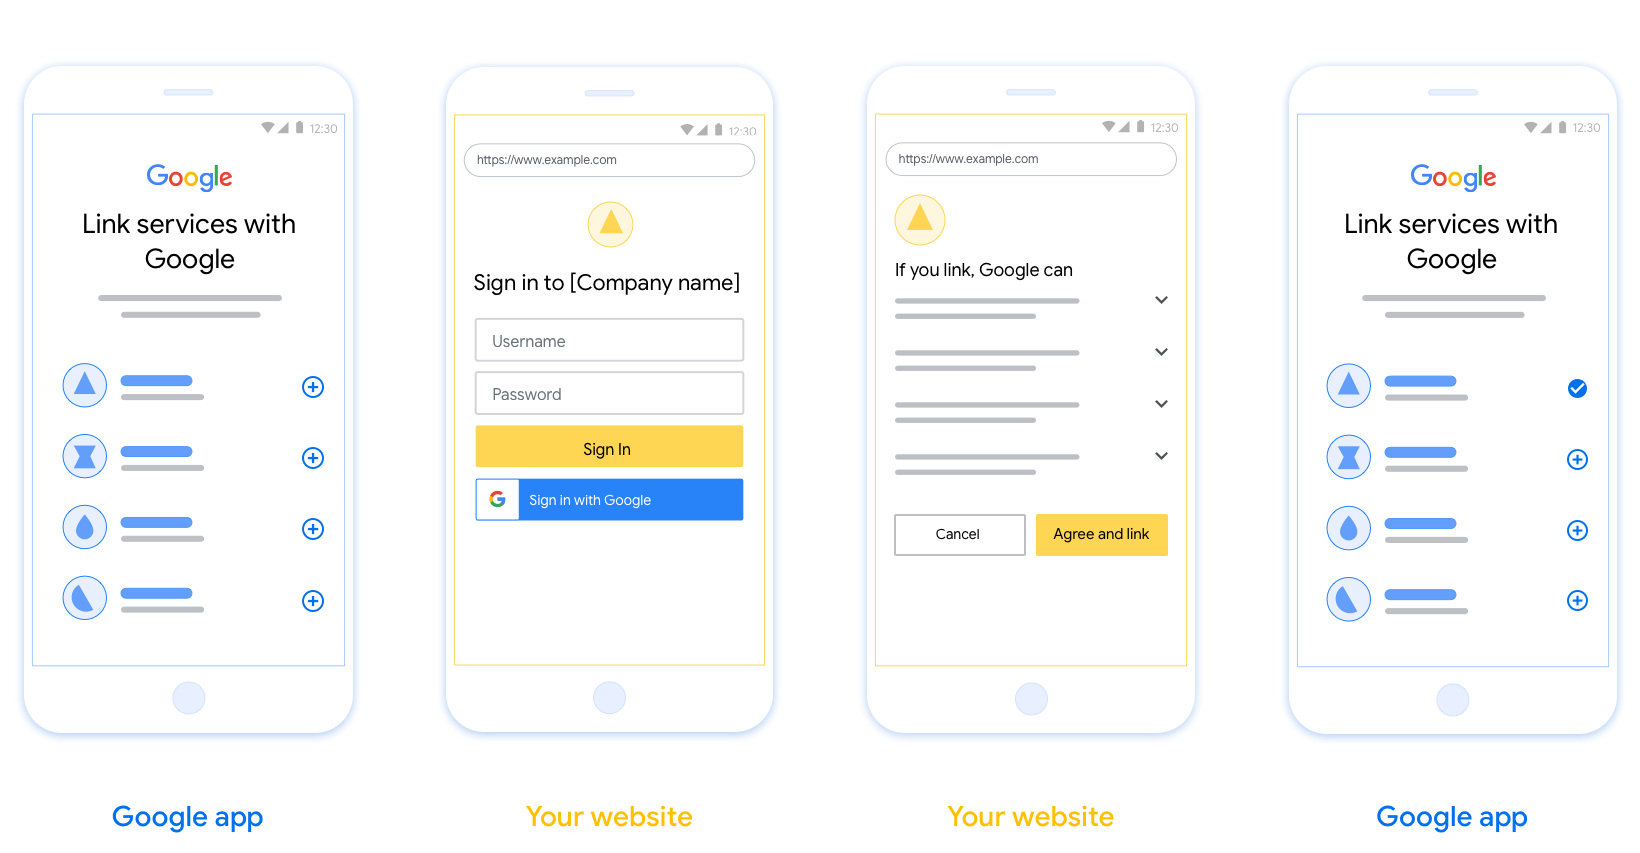
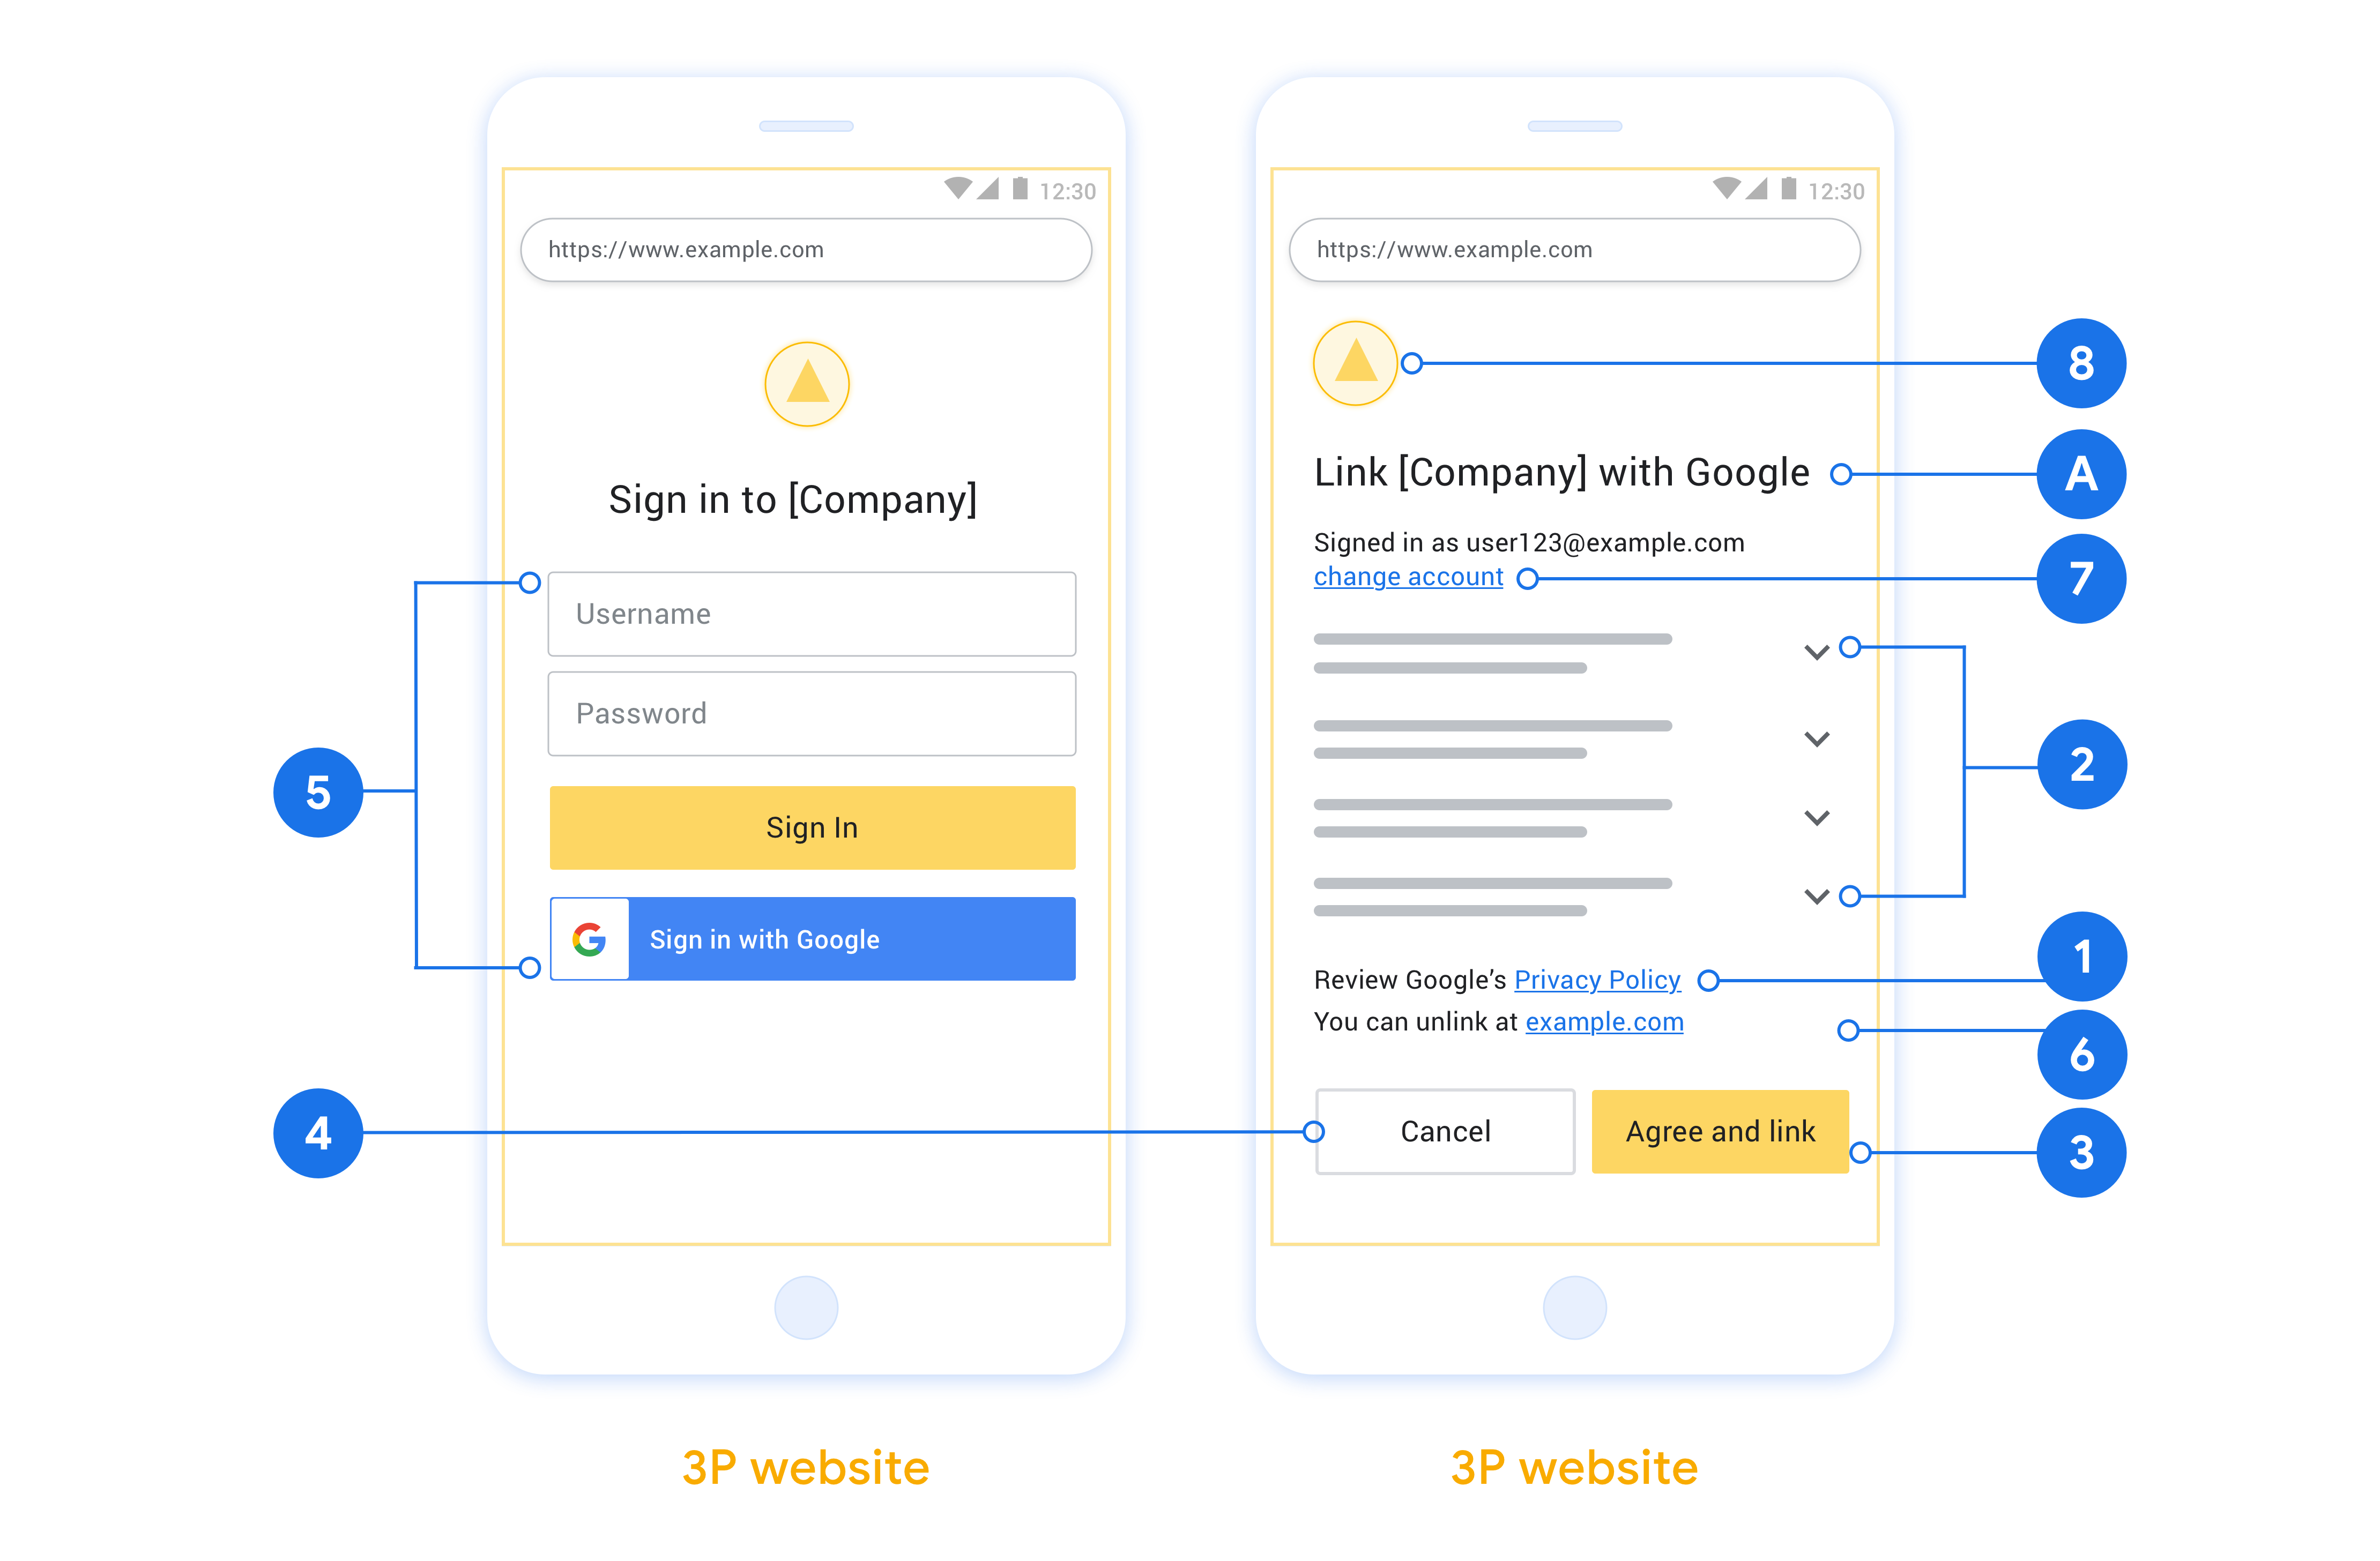
يصف هذا القسم متطلبات التصميم والاقتراحات المتعلقة بشاشة المستخدم التي تستضيفها لمسارات ربط OAuth. بعد أن يطلب تطبيق Google الحصول على هذه الخدمة، تعرض منصتك صفحة تسجيل الدخول إلى Google وشاشة موافقة ربط الحساب للمستخدم. يتم توجيه المستخدم مرة أخرى إلى تطبيق Google بعد منح الموافقة على ربط الحسابات.

المتطلبات
- عليك إبلاغنا بأنّ حساب المستخدم سيتم ربطه بخدمة Google، وليس بمنتج معيّن من Google، مثل Google Home أو "مساعد Google".
اقتراحات
ننصحك باتّباع الخطوات التالية:
عرض سياسة خصوصية Google: أدرِج رابطًا يؤدي إلى سياسة خصوصية Google على شاشة الموافقة.
البيانات التي ستتم مشاركتها: استخدِم لغة واضحة وموجزة لإعلام المستخدم بال data التي تطلبها Google منه والغرض من ذلك.
عبارة واضحة تحثّ على اتّخاذ إجراء: يجب تضمين عبارة واضحة للحث على اتّخاذ إجراء على شاشة طلب الموافقة، مثل "أوافق وأريد الربط". ويعود سبب ذلك إلى أنّ المستخدمين يحتاجون إلى معرفة البيانات التي سيُطلب منهم مشاركتها مع Google لربط حساباتهم.
إمكانية إلغاء الاشتراك: يجب توفير طريقة للمستخدمين للرجوع أو الإلغاء إذا اختَروا عدم الربط.
عملية تسجيل دخول واضحة: تأكَّد من توفُّر طريقة واضحة للمستخدمين لتسجيل الدخول إلى حساباتهم على Google، مثل حقول لاسم المستخدم وكلمة المرور أو تسجيل الدخول باستخدام حساب Google.
إمكانية إلغاء الربط: يجب توفير آلية تتيح للمستخدمين إلغاء ربط الحساب، مثل عنوان URL يؤدي إلى إعدادات حساباتهم على منصتك. بدلاً من ذلك، يمكنك تضمين رابط يؤدي إلى حساب Google حيث يمكن للمستخدمين إدارة حساباتهم المرتبطة.
القدرة على تغيير حساب المستخدم. اقترح طريقة للمستخدمين للتبديل بين حساباتهم. ويكون هذا مفيدًا بشكل خاص إذا كان المستخدمون يميلون إلى امتلاك حسابات متعددة.
- إذا كان على المستخدم إغلاق شاشة الموافقة لتبديل الحسابات، أرسِل خطأً قابلاً للاسترداد إلى Google حتى يتمكّن المستخدم من تسجيل الدخول إلى الحساب المطلوب باستخدام ربط OAuth ومسار الموافقة الضمنية.
أدرِج شعارك. عرض شعار شركتك على شاشة الموافقة استخدِم إرشادات الأنماط لوضع شعارك. إذا كنت ترغب أيضًا في عرض شعار Google، يمكنك الاطّلاع على الشعارات والعلامات التجارية.

إنشاء المشروع
لإنشاء مشروعك لاستخدام ميزة ربط الحسابات، اتّبِع الخطوات التالية:
- انقر على إنشاء مشروع.
- أدخِل اسمًا أو اقبل الاقتراح الذي تم إنشاؤه.
- أكِّد أي حقول متبقية أو عدِّلها.
- انقر على إنشاء.
للاطّلاع على رقم تعريف مشروعك، اتّبِع الخطوات التالية:
- ابحث عن مشروعك في الجدول على الصفحة المقصودة. يظهر رقم تعريف المشروع في العمود المعرّف.
ضبط شاشة طلب الموافقة المتعلّقة ببروتوكول OAuth
تتضمّن عملية ربط حساب Google شاشة موافقة تُطلع المستخدمين على التطبيق الذي يطلب الوصول إلى بياناتهم، ونوع البيانات التي يطلبها، والبنود السارية. عليك ضبط شاشة طلب الموافقة المتعلّقة ببروتوكول OAuth قبل إنشاء معرّف عميل لواجهة Google API.
- افتح صفحة شاشة طلب الموافقة المتعلّقة ببروتوكول OAuth في وحدة تحكّم Google APIs.
- إذا طُلب منك ذلك، اختَر المشروع الذي أنشأته للتو.
في صفحة "شاشة طلب الموافقة المتعلّقة ببروتوكول OAuth"، املأ النموذج وانقر على الزر "حفظ".
اسم التطبيق: اسم التطبيق الذي يطلب الموافقة. يجب أن يوضّح الاسم تطبيقك بدقة وأن يكون متوافقًا مع اسم التطبيق الذي يظهر للمستخدمين في أماكن أخرى. سيظهر اسم التطبيق على شاشة الموافقة على ربط الحساب.
شعار التطبيق: صورة تظهر على شاشة الموافقة وتساعد المستخدمين في التعرّف على تطبيقك. يظهر الشعار على شاشة الموافقة على ربط الحساب وفي إعدادات الحساب.
عنوان البريد الإلكتروني المخصّص للدعم: يمكن للمستخدمين التواصل معك من خلاله لطرح أسئلة حول موافقتهم.
نطاقات واجهات Google API: تتيح النطاقات لتطبيقك الوصول إلى بيانات Google الخاصة بالمستخدم. بالنسبة إلى حالة استخدام ربط حساب Google، يكون النطاق التلقائي (البريد الإلكتروني والملف الشخصي وopenid) كافيًا، ولا تحتاج إلى إضافة أي نطاقات حساسة. من أفضل الممارسات عمومًا طلب النطاقات بشكل تدريجي، عند الحاجة إلى إذن الوصول، بدلاً من طلبها مسبقًا. مزيد من المعلومات
النطاقات المعتمَدة: لحمايتك وحماية المستخدمين، لا تسمح Google إلا للتطبيقات التي تتم مصادقتها باستخدام OAuth باستخدام النطاقات المعتمَدة. يجب أن تكون روابط تطبيقاتك مستضافة على نطاقات معتمَدة. مزيد من المعلومات
رابط الصفحة الرئيسية للتطبيق: الصفحة الرئيسية لتطبيقك يجب أن تتم استضافته على نطاق معتمَد.
رابط سياسة الخصوصية للتطبيق: يظهر على شاشة طلب الموافقة على ربط حساب Google. يجب أن تتم استضافته على نطاق معتمَد.
رابط بنود خدمة التطبيق (اختياري): يجب أن تتم استضافته على نطاق معتمَد.

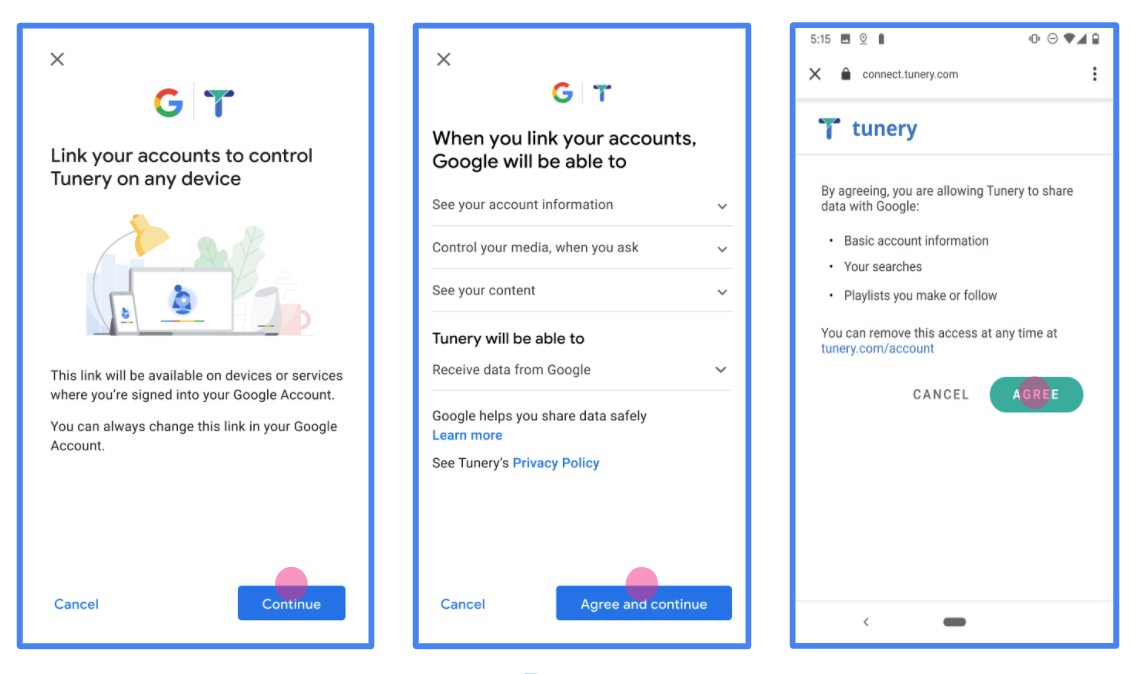
الشكل 1 شاشة الموافقة على ربط حساب Google بتطبيق وهمي، Tunery
تحقَّق من "حالة التحقّق"، وإذا كان طلبك بحاجة إلى التحقّق، انقر على الزر "إرسال طلب التحقّق" لإرسال طلبك. يُرجى الاطّلاع على متطلبات إثبات ملكية حساب OAuth للحصول على التفاصيل.
تنفيذ خادم OAuth
يتألف تنفيذ خادم OAuth 2.0 من مسار رمز التفويض من نقطتَي النهاية، اللتين تتيحهما خدمتك باستخدام بروتوكول HTTPS. نقطة النهاية الأولى هي نقطة نهاية التفويض، وهي المسئولة عن إيجاد أو الحصول على موافقة المستخدمين على الوصول إلى البيانات. تقدم نقطة نهاية التفويض واجهة المستخدم الخاصة بتسجيل الدخول للمستخدمين الذين لم يسجّلوا الدخول من قبل ويسجّلون الموافقة على الوصول المطلوب. نقطة النهاية الثانية هي نقطة نهاية تبادل الرموز، والتي للحصول على سلاسل مشفرة، تسمى الرموز المميزة، والتي تمنح المستخدم الوصول إلى خدمتك.
عندما يحتاج أحد تطبيقات Google إلى استدعاء إحدى واجهات برمجة التطبيقات الخاصة بخدمتك، تستخدم Google نقاط النهاية هذه معًا للحصول على إذن من المستخدمين بطلب واجهات برمجة التطبيقات هذه نيابةً عنه.
تتضمن جلسة تدفق رمز تفويض OAuth 2.0 التي بدأتها Google ما يلي: التدفق التالي:
- تفتح Google نقطة نهاية التفويض في متصفّح المستخدم. إذا لم يكن التدفق على جهاز الصوت فقط لتنفيذ إجراء، وتنقل Google إلى الهاتف.
- يسجِّل المستخدم الدخول، إذا لم يكن مسجّلاً الدخول، ويمنح Google الإذن الوصول إلى بياناتهم باستخدام واجهة برمجة التطبيقات إذا لم يسبق لهم منحها إذن.
- تنشئ الخدمة رمز تفويض وترسله إلى Google. للقيام بذلك، لذا، عليك إعادة توجيه متصفح المستخدم إلى Google باستخدام رمز التفويض المرفق بالطلب.
- ترسل Google رمز التفويض إلى نقطة نهاية تبادل الرموز المميّزة، يتحقق من صحة الرمز ويعرض رمز دخول الرمز المميّز لإعادة التحميل رمز الدخول هو رمز مميز طويل الأجل يمكن لخدمتك كبيانات اعتماد للوصول إلى واجهات برمجة التطبيقات. الرمز المميز لإعادة التحميل طويل الأمد هو رمز مميز يمكن أن تخزّنه Google وتستخدمه للحصول على رموز دخول جديدة عند تنتهي صلاحيته.
- بعد أن يكمل المستخدم عملية ربط الحساب، يحتوي الطلب المرسل من Google على رمز دخول.
التعامل مع طلبات التفويض
عندما تحتاج إلى ربط الحساب باستخدام رمز تفويض OAuth 2.0 ترسل Google المستخدم إلى نقطة نهاية التفويض من خلال طلب يتضمن المعلَمات التالية:
| مَعلمات نقطة نهاية التفويض | |
|---|---|
client_id |
معرِّف العميل الذي عيّنته لشركة Google. |
redirect_uri |
عنوان URL الذي ترسل إليه الرد على هذا الطلب. |
state |
يشير هذا المصطلح إلى قيمة محاسبة يتم إرسالها إلى Google بدون أي تغيير في معرّف الموارد المنتظم (URI) لإعادة التوجيه. |
scope |
اختياري: مجموعة من سلاسل النطاقات مفصولة بمسافات تحدِّد البيانات التي تطلب Google إذنًا لها. |
response_type |
نوع القيمة المطلوب عرضها في الرد. بالنسبة إلى OAuth 2.0
مسار رمز التفويض، يكون نوع الردّ دائمًا code.
|
user_locale |
إعدادات اللغة في حساب Google RFC5646 يُستخدم لترجمة المحتوى إلى اللغة المفضلة للمستخدم. |
على سبيل المثال، إذا كانت نقطة نهاية التفويض متاحة على
https://myservice.example.com/auth، قد يظهر الطلب على النحو التالي:
GET https://myservice.example.com/auth?client_id=GOOGLE_CLIENT_ID&redirect_uri=REDIRECT_URI&state=STATE_STRING&scope=REQUESTED_SCOPES&response_type=code&user_locale=LOCALE
لتتمكَّن نقطة نهاية التفويض من معالجة طلبات تسجيل الدخول، عليك إجراء ما يلي: الخطوات:
- تأكَّد من أنّ
client_idيتطابق مع معرِّف العميل الذي أرسلته إلى Google، وأنّredirect_uriيتطابق مع عنوان URL لإعادة التوجيه الذي توفّره Google لخدمتك. وتعد عمليات التحقق هذه مهمة لمنع منح الوصول إلى تطبيقات العميل غير المقصودة أو التي تم إعدادها بشكلٍ غير صحيح إذا كنت تدعم عدة مستخدمين مسارات OAuth 2.0، تأكَّد أيضًا من أنّresponse_typeهوcode. - تحقق مما إذا كان المستخدم قد سجّل الدخول إلى خدمتك. إذا لم يسجّل المستخدم الدخول، لإكمال عملية تسجيل الدخول أو الاشتراك في الخدمة.
- أنشئ رمز تفويض لتتمكّن Google من استخدامه للوصول إلى واجهة برمجة التطبيقات. يمكن أن تكون رمز التفويض أي قيمة سلسلة، ولكن يجب أن تكون التي تمثل المستخدم والعميل الذي يمثل الرمز المميز وانتهاء صلاحية الرمز الوقت، ويجب ألا يمكن تخمينه. أنت عادةً ما تصدر التفويض التي تنتهي صلاحيتها بعد 10 دقائق تقريبًا.
- تأكَّد من أنّ عنوان URL الذي تحدّده المَعلمة
redirect_uriيحتوي على النموذج التالي:https://oauth-redirect.googleusercontent.com/r/YOUR_PROJECT_ID https://oauth-redirect-sandbox.googleusercontent.com/r/YOUR_PROJECT_ID
- إعادة توجيه متصفح المستخدم إلى عنوان URL المحدد من خلال
مَعلمة
redirect_uri. قم بتضمين رمز التفويض الذي قمت التي تم إنشاؤها للتو وقيمة الحالة الأصلية غير المعدلة عند إعادة التوجيه من خلال إلحاق المعلمتَينcodeوstate. فيما يلي مثال على عنوان URL الناتج:https://oauth-redirect.googleusercontent.com/r/YOUR_PROJECT_ID?code=AUTHORIZATION_CODE&state=STATE_STRING
التعامل مع طلبات تبادل الرموز المميّزة
تكون نقطة نهاية تبادل الرموز المميّزة لخدمتك مسؤولة عن نوعَين من الرموز المميّزة التبادلات:
- استبدال رموز التفويض برموز الدخول ورموز إعادة التحميل
- الرموز المميزة لإعادة تحميل Exchange لرموز الدخول
تشمل طلبات تبادل الرموز المميّزة المَعلمات التالية:
| مَعلمات نقطة نهاية تبادل الرموز المميّزة | |
|---|---|
client_id |
سلسلة تحدِّد مصدر الطلب على أنّه Google. يجب أن تكون هذه السلسلة في نظامك كمعرّف فريد لشركة Google. |
client_secret |
سلسلة سرية سجّلتها لدى Google لخدمتك. |
grant_type |
تمثّل هذه السمة نوع الرمز المميّز الذي يتم تبادله. إنها إما
authorization_code أو refresh_token |
code |
عندما تكون grant_type=authorization_code، تكون هذه المعلمة هي
الرمز الذي تلقّته Google من عملية تسجيل الدخول أو من تبادل الرموز المميّزة
النهائية. |
redirect_uri |
عندما تكون grant_type=authorization_code، تكون هذه المعلمة هي
عنوان URL المستخدم في طلب التفويض الأولي. |
refresh_token |
عندما تكون grant_type=refresh_token، تكون هذه المعلمة هي
الرمز المميّز لإعادة التحميل الذي تلقّته Google من نقطة نهاية تبادل الرموز المميّزة |
استبدال رموز التفويض برموز الدخول ورموز إعادة التحميل
بعد أن يسجِّل المستخدم دخوله وترجع نقطة نهاية التفويض فترة قصيرة رمز التفويض إلى Google، ترسل Google طلبًا إلى عملية تبادل الرمز المميّز نقطة نهاية لاستبدال رمز التفويض برمز الدخول وإعادة التحميل الرمز المميز.
بالنسبة إلى هذه الطلبات، تكون قيمة grant_type هي authorization_code،
تشير القيمة code إلى قيمة رمز التفويض الذي منحته سابقًا.
إلى Google. فيما يلي مثال على طلب لتبادل
رمز التفويض لرمز الدخول والرمز المميز لإعادة التحميل:
POST /token HTTP/1.1
Host: oauth2.example.com
Content-Type: application/x-www-form-urlencoded

client_id=GOOGLE_CLIENT_ID&client_secret=GOOGLE_CLIENT_SECRET&grant_type=authorization_code&code=AUTHORIZATION_CODE&redirect_uri=REDIRECT_URI
لتبادل رموز التفويض لرمز دخول ورمز مميز لإعادة التحميل، يجب
تتجاوب نقطة نهاية تبادل الرموز المميّزة مع طلبات POST من خلال تنفيذ ما يلي:
الخطوات:
- تأكَّد من أنّ
client_idيحدّد مصدر الطلب على أنّه جهة معتمَدة الأصل، وأنclient_secretتتطابق مع القيمة المتوقعة. - تحقق من أن رمز التفويض صالح وليس منتهي الصلاحية، وأن معرِّف العميل المحدّد في الطلب يتطابق مع معرِّف العميل المرتبط رمز التفويض.
- تأكَّد من أنّ عنوان URL الذي تحدّده مَعلمة
redirect_uriمتطابق. إلى القيمة المستخدمة في طلب التفويض الأولي. - إذا لم تتمكن من التحقق من جميع المعايير السابقة، اعرض HTTP
400 خطأ "طلب غير صالح" مع
{"error": "invalid_grant"}كنص الرسالة. - بخلاف ذلك، يمكنك استخدام رقم تعريف المستخدم من رمز التفويض لإعادة تحميل الصفحة. ورمز الدخول. يمكن أن تكون هذه الرموز المميزة أي قيمة سلسلة، لكنها أن يمثل المستخدم والعميل الذي يستخدم الرمز المميز بشكل فريد، يجب ألا يكون قابلاً للتخمين. بالنسبة لرموز الدخول، سجل أيضًا وقت انتهاء صلاحية الرمز، والذي يكون عادةً بعد ساعة من إصدار الرمز. لا تنتهي صلاحية الرموز المميّزة لإعادة التحميل.
- عرض كائن JSON التالي في نص استجابة HTTPS:
{
"token_type": "Bearer",
"access_token": "ACCESS_TOKEN",
"refresh_token": "REFRESH_TOKEN",
"expires_in": SECONDS_TO_EXPIRATION
}
تخزِّن Google رمز الدخول والرمز المميّز لإعادة التحميل للمستخدم والسجلّات. انتهاء صلاحية رمز الدخول. وعند انتهاء صلاحية رمز الدخول، تستخدم Google الرمز المميّز لإعادة التحميل للحصول على رمز دخول جديد من نقطة نهاية تبادل الرموز المميّزة.
الرموز المميزة لإعادة تحميل Exchange لرموز الدخول
عند انتهاء صلاحية رمز الدخول، ترسل Google طلبًا إلى عملية تبادل الرمز المميّز. نقطة نهاية لاستبدال رمز تحديث مميز برمز دخول جديد.
بالنسبة إلى هذه الطلبات، تكون قيمة grant_type هي refresh_token، والقيمة
لـ refresh_token هي قيمة الرمز المميز لإعادة التحميل الذي منحته سابقًا
Google. في ما يلي مثال على طلب استبدال رمز مميّز لإعادة التحميل.
لرمز الدخول:
POST /token HTTP/1.1
Host: oauth2.example.com
Content-Type: application/x-www-form-urlencoded

client_id=GOOGLE_CLIENT_ID&client_secret=GOOGLE_CLIENT_SECRET&grant_type=refresh_token&refresh_token=REFRESH_TOKEN
لاستبدال رمز مميز لإعادة التحميل برمز دخول، يجب أن تكون نقطة نهاية تبادل الرموز المميّزة
يستجيب لطلبات POST من خلال تنفيذ الخطوات التالية:
- تأكَّد من أنّ
client_idيحدّد مصدر الطلب على أنّه Google أنclient_secretتتطابق مع القيمة المتوقعة. - تأكَّد من صلاحية الرمز المميّز لإعادة التحميل ومن أنّ معرِّف العميل المحدَّد في يتطابق الطلب مع معرِّف العميل المرتبط بالرمز المميّز لإعادة التحميل.
- إذا لم تتمكن من التحقق من جميع المعايير السابقة، اعرض HTTP 400
حدث خطأ في الطلب غير صالح مع
{"error": "invalid_grant"}كنص أساسي. - بخلاف ذلك، يمكنك استخدام رقم تعريف المستخدم من الرمز المميّز لإعادة التحميل لإنشاء إذن وصول. الرمز المميز. يمكن أن تكون هذه الرموز المميزة أي قيمة سلسلة، ولكن يجب أن يمثل المستخدم والعميل الذي يمثله الرمز المميز، ويجب ألا يمكن تخمينه. بالنسبة لرموز الدخول، سجّل أيضًا وقت انتهاء صلاحية الرمز، عادةً بعد ساعة من إصدار الرمز المميّز.
- عرض كائن JSON التالي في نص HTTPS
الرد:
{
"token_type": "Bearer",
"access_token": "ACCESS_TOKEN",
"expires_in": SECONDS_TO_EXPIRATION
}
التعامل مع طلبات معلومات المستخدم
نقطة نهاية userinfo هي مورد OAuth 2.0 محمي يعرض مطالبات بشأن المستخدم المرتبط. يُعد تنفيذ نقطة نهاية userinfo واستضافتها اختياريًا، باستثناء حالات الاستخدام التالية:
- تسجيل الدخول إلى حساب مرتبط باستخدام Google One Tap.
- اشتراك سلس على AndroidTV.
بعد استرداد رمز الدخول بنجاح من نقطة نهاية الرمز المميّز، ترسل Google طلبًا إلى نقطة نهاية معلومات المستخدم لاسترداد معلومات الملف الشخصي الأساسية عن المستخدم المرتبط.
| عناوين طلبات نقطة نهاية userinfo | |
|---|---|
Authorization header |
رمز الدخول من النوع "الحامل". |
على سبيل المثال، إذا كانت نقطة نهاية userinfo متاحة على
https://myservice.example.com/userinfo، قد يظهر الطلب على النحو التالي:
GET /userinfo HTTP/1.1
Host: myservice.example.com
Authorization: Bearer ACCESS_TOKEN
لتتمكّن نقطة نهاية معلومات المستخدم من معالجة الطلبات، عليك اتّباع الخطوات التالية:
- يمكنك استخراج رمز الدخول من عنوان التفويض ومعلومات الإرجاع للمستخدم المرتبط برمز الدخول.
- إذا كان رمز الدخول غير صالح، يمكنك عرض الخطأ HTTP 401 "غير مصرح به" مع استخدام عنوان الاستجابة
WWW-Authenticate. في ما يلي مثال على استجابة خطأ في معلومات المستخدم:HTTP/1.1 401 Unauthorized WWW-Authenticate: error="invalid_token", error_description="The Access Token expired"
إذا كان رمز الدخول صالحًا، يتم عرض الاستجابة HTTP 200 مع كائن JSON التالي في نص HTTPS. الرد:
{ "sub": "USER_UUID", "email": "EMAIL_ADDRESS", "given_name": "FIRST_NAME", "family_name": "LAST_NAME", "name": "FULL_NAME", "picture": "PROFILE_PICTURE", }استجابة نقطة نهاية لمعلومات المستخدم subمعرّف فريد يعرّف المستخدِم في نظامك. emailعنوان البريد الإلكتروني للمستخدم. given_nameاختياري: الاسم الأول للمستخدم. family_nameاختياري: اسم العائلة للمستخدم. nameاختياري: اسم المستخدم الكامل. pictureاختياري: صورة الملف الشخصي للمستخدم.
التحقّق من صحة عملية التنفيذ
يمكنك التحقّق من صحة التنفيذ باستخدام أداة ساحة اختبار OAuth 2.0.
في الأداة، اتّبِع الخطوات التالية:
- انقر على رمز الإعدادات لفتح نافذة ضبط OAuth 2.0.
- في حقل مسار OAuth، اختَر جانب العميل.
- في الحقل نقاط نهاية OAuth، اختَر مخصّص.
- حدِّد نقطة نهاية OAuth 2.0 ومعرّف العميل الذي عيّنته لخدمة Google في الحقول المقابلة.
- في قسم الخطوة 1، لا تختَر أيّ نطاقات Google. بدلاً من ذلك، اترك هذا الحقل فارغًا أو اكتب نطاقًا صالحًا لخادمك (أو سلسلة عشوائية إذا كنت لا تستخدم نطاقات OAuth). عند الانتهاء، انقر على تفويض واجهات برمجة التطبيقات.
- في القسمَين الخطوة 2 والخطوة 3، انتقِل إلى مسار OAuth 2.0 وتحقَّق من أنّ كل خطوة تعمل على النحو المطلوب.
يمكنك التحقّق من صحة عملية التنفيذ باستخدام أداة العرض التوضيحي لربط حساب Google.
في الأداة، اتّبِع الخطوات التالية:
- انقر على الزر تسجيل الدخول باستخدام حساب Google.
- اختَر الحساب الذي تريد ربطه.
- أدخِل رقم تعريف الخدمة.
- يمكنك اختياريًا إدخال نطاق واحد أو أكثر لطلب الوصول إليه.
- انقر على بدء العرض التجريبي.
- أكِّد أنّه يمكنك الموافقة على طلب ربط الحساب ورفضه عندما يُطلب منك ذلك.
- تأكَّد من إعادة توجيهك إلى منصّتك.
