I collegamenti degli account vengono eseguiti utilizzando i flussi implicito e codice di autorizzazione OAuth 2.0 standard del settore.
Il tuo servizio deve supportare gli endpoint di autorizzazione e scambio di token conformi a OAuth 2.0.In the implicit flow, Google opens your authorization endpoint in the user's browser. After successful sign in, you return a long-lived access token to Google. This access token is now included in every request sent from Google.
In the authorization code flow, you need two endpoints:
The authorization endpoint, which presents the sign-in UI to your users that aren't already signed in. The authorization endpoint also creates a short-lived authorization code to record users' consent to the requested access.
The token exchange endpoint, which is responsible for two types of exchanges:
- Exchanges an authorization code for a long-lived refresh token and a short-lived access token. This exchange happens when the user goes through the account linking flow.
- Exchanges a long-lived refresh token for a short-lived access token. This exchange happens when Google needs a new access token because the one it had expired.
Choose an OAuth 2.0 flow
Although the implicit flow is simpler to implement, Google recommends that access tokens issued by the implicit flow never expire. This is because the user is forced to link their account again after a token expires with the implicit flow. If you need token expiration for security reasons, we strongly recommend that you use the authorization code flow instead.
Design guidelines
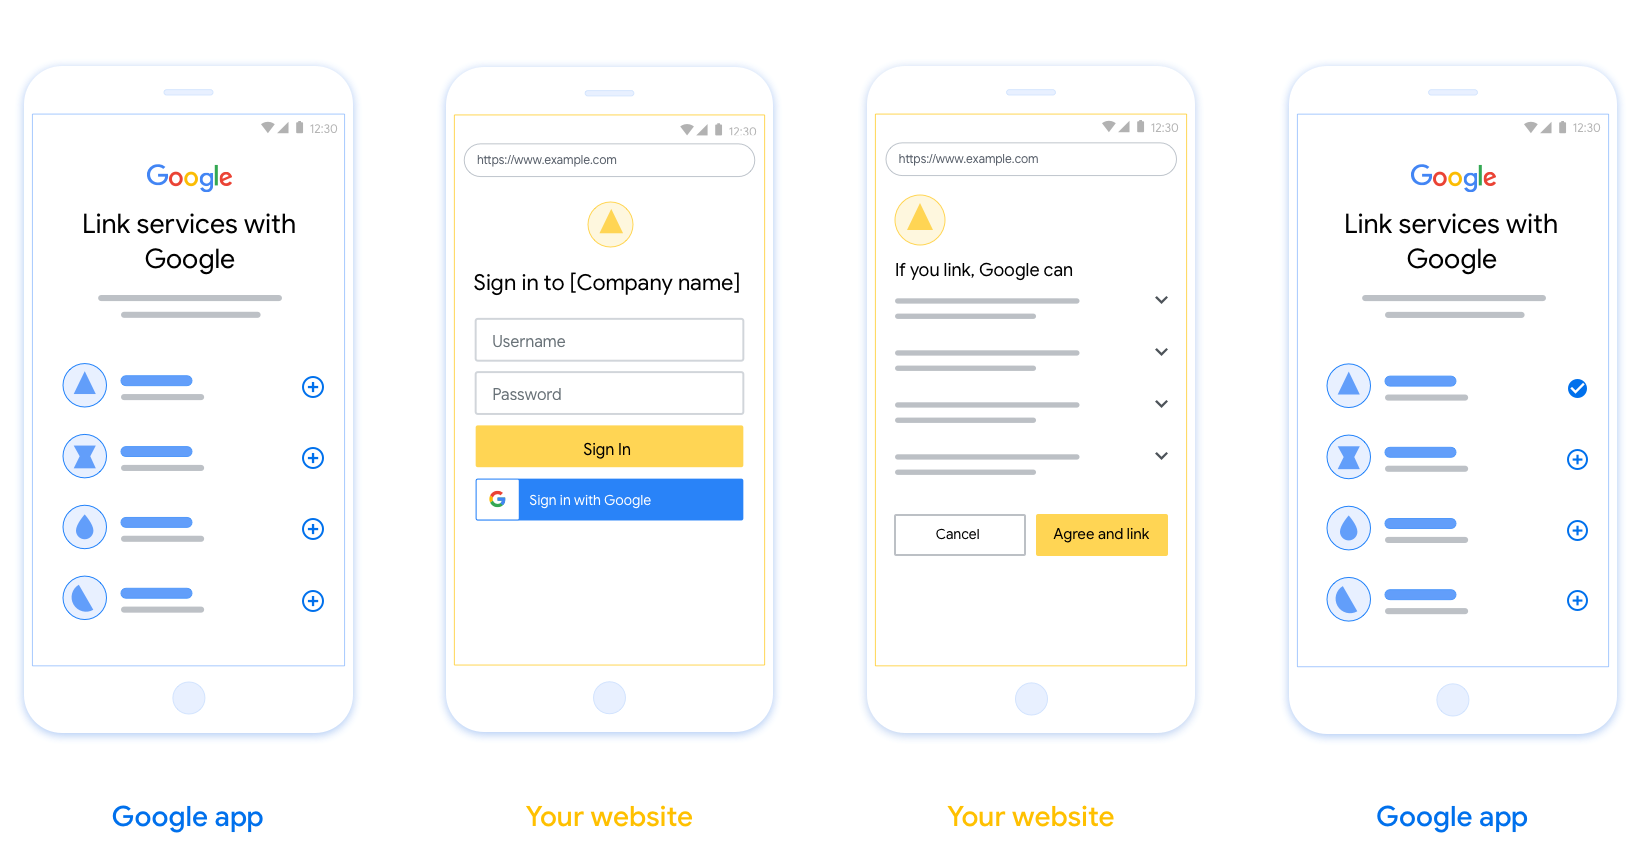
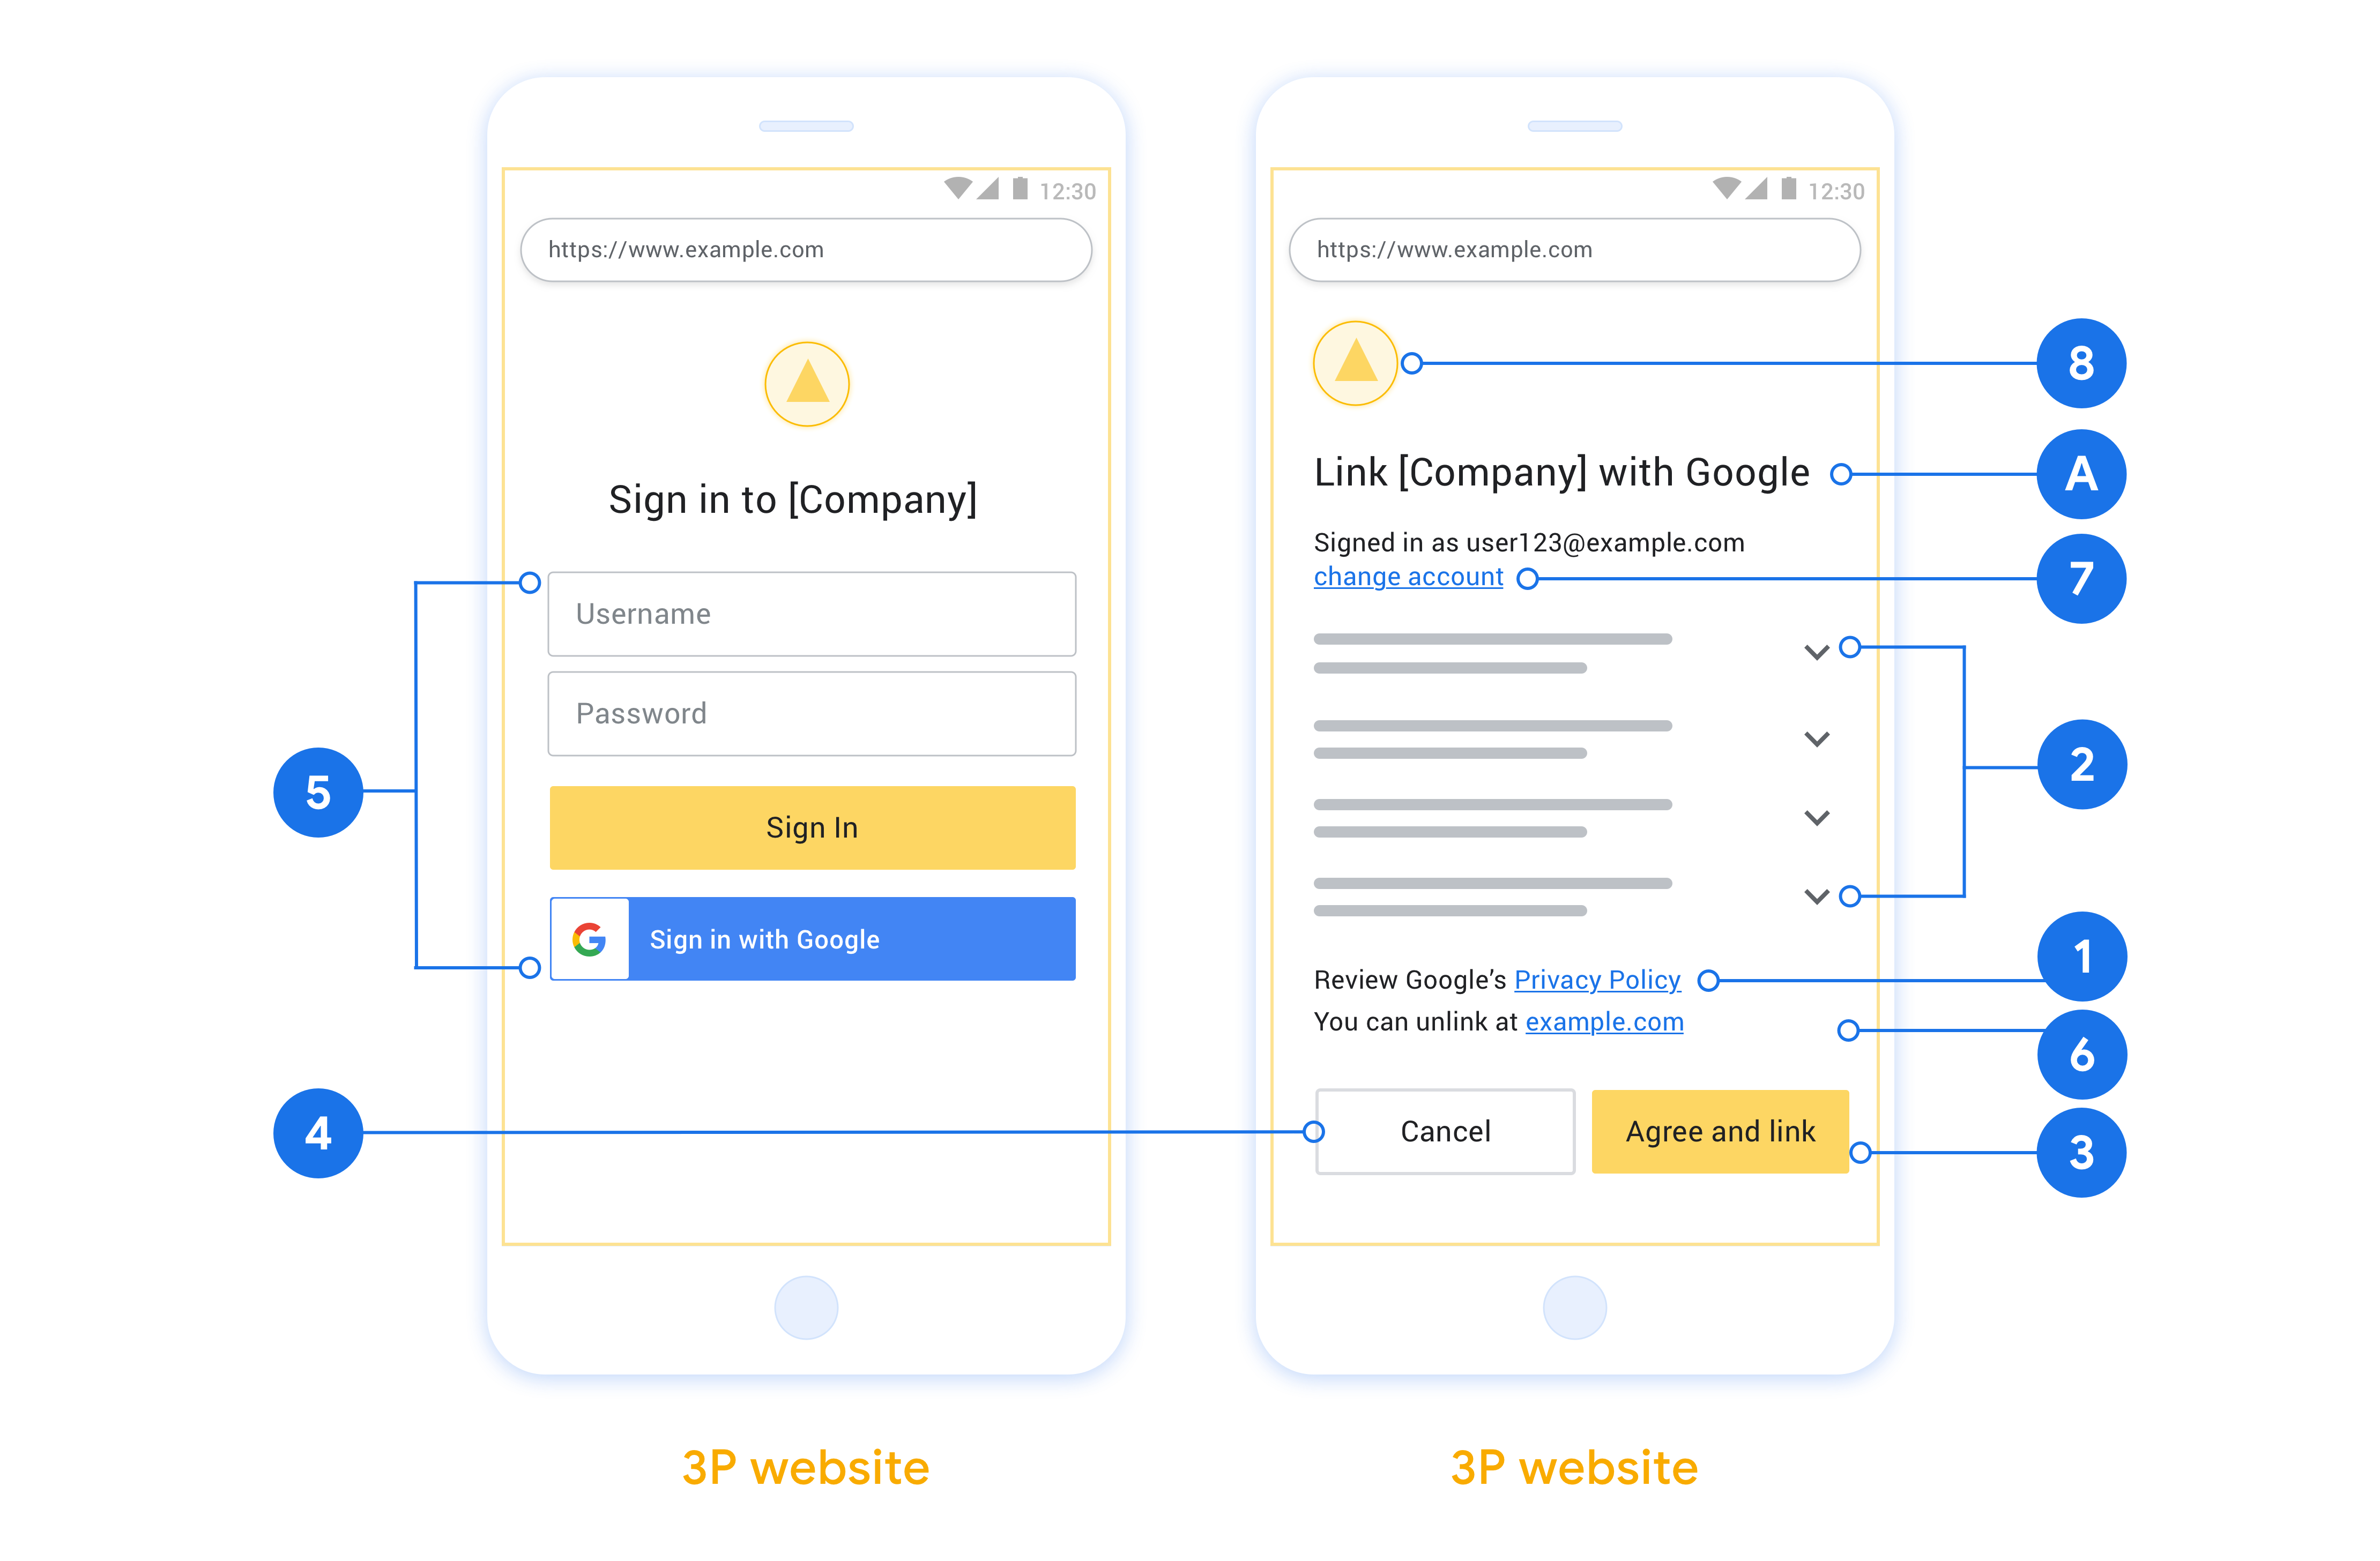
This section describes the design requirements and recommendations for the user screen that you host for OAuth linking flows. After it's called by Google's app, your platform displays a sign in to Google page and account linking consent screen to the user. The user is directed back to Google's app after giving their consent to link accounts.
Requirements
- You must communicate that the user’s account will be linked to Google, not a specific Google product like Google Home or Google Assistant.
Recommendations
We recommend that you do the following:
Display Google's Privacy Policy. Include a link to Google’s Privacy Policy on the consent screen.
Data to be shared. Use clear and concise language to tell the user what data of theirs Google requires and why.
Clear call-to-action. State a clear call-to-action on your consent screen, such as “Agree and link.” This is because users need to understand what data they're required to share with Google to link their accounts.
Ability to cancel. Provide a way for users to go back or cancel, if they choose not to link.
Clear sign-in process. Ensure that users have clear method for signing in to their Google account, such as fields for their username and password or Sign in with Google.
Ability to unlink. Offer a mechanism for users to unlink, such as a URL to their account settings on your platform. Alternatively, you can include a link to Google Account where users can manage their linked account.
Ability to change user account. Suggest a method for users to switch their account(s). This is especially beneficial if users tend to have multiple accounts.
- If a user must close the consent screen to switch accounts, send a recoverable error to Google so the user can sign in to the desired account with OAuth linking and the implicit flow.
Include your logo. Display your company logo on the consent screen. Use your style guidelines to place your logo. If you wish to also display Google's logo, see Logos and trademarks.
创建项目
如需创建项目以使用账号关联,请执行以下操作:
- 前往 Google API 控制台。
- 点击 Create project 。
- 输入名称或接受生成的建议。
- 确认或修改任何剩余字段。
- 点击创建 。
如需查看项目 ID,请执行以下操作:
- 前往 Google API 控制台。
- 在着陆页的表格中找到您的项目。项目 ID 会显示在 ID 列中。
配置 OAuth 权限请求页面
Google 账号关联过程包含一个权限请求页面,该页面会告知用户请求访问其数据的应用、应用请求的数据类型以及适用的条款。您需要先配置 OAuth 权限请求页面,然后才能生成 Google API 客户端 ID。
- 打开 Google API 控制台的 OAuth 权限请求页面 页面。
- 如果系统提示您选择项目,请选择您刚刚创建的项目。
在“OAuth 权限请求页面”上,填写表单,然后点击“保存”按钮。
应用名称 :向用户征求同意的应用的名称。该名称应准确反映您的应用,并且与用户在其他位置看到的应用名称保持一致。应用名称将显示在账号关联权限请求页面上。
应用徽标:权限请求页面上显示的一张图片,用以让用户认出您的应用。徽标会显示在账号关联权限请求页面和账号设置中
支持邮箱 :用户用于针对其同意问题与您联系的邮箱。
Google API 的范围 :范围允许您的应用访问用户的私有 Google 数据。对于 Google 账号关联用例,默认范围(邮箱、个人资料、openid)就足够了,您无需添加任何敏感范围。通常,最佳做法是在需要访问权限时逐步请求范围,而不是提前请求。了解详情。
已获授权的网域 :为了保护您和您的用户,Google 只允许使用 OAuth 进行身份验证的应用使用已获授权的网域。您应用的链接必须托管在已获授权的网域上。了解详情。
应用首页链接 :应用的首页。必须托管在已获授权的网域上。
应用隐私权政策链接 :显示在 Google 账号关联权限请求页面上。必须托管在已获授权的网域上。
应用服务条款链接(可选) :必须托管在已获授权的网域上。
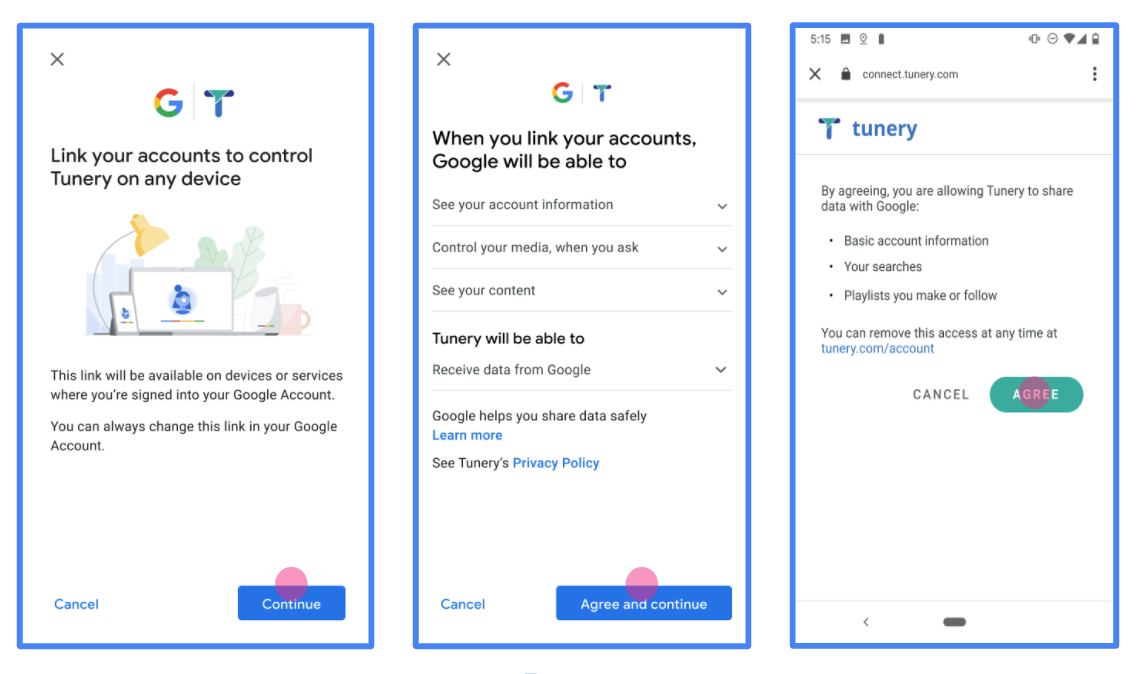
图 1. 虚构应用 Tunery 的 Google 账号关联权限请求页面
查看“验证状态”,如果您的应用需要验证,请点击“提交以进行验证”按钮,提交应用以进行验证。如需了解详情,请参阅 OAuth 验证要求。
Implementare il server OAuth
n
为了支持 OAuth 2.0 隐式流程,您的服务通过 HTTPS 提供授权端点。此端点负责身份验证和征得用户同意以获取数据访问权限。授权端点会向尚未登录的用户显示登录界面,并记录用户对所请求访问权限的同意情况。
当 Google 应用需要调用您服务的某个已获授权的 API 时,Google 会使用此端点来征得用户同意,以便代表用户调用这些 API。
由 Google 发起的典型 OAuth 2.0 隐式流程会话具有以下流程:
- Google 会在用户的浏览器中打开您的授权端点。用户登录(如果尚未登录),并授予 Google 权限以通过您的 API 访问其数据(如果尚未授予权限)。
- 您的服务会创建访问令牌并将其返回给 Google。为此,请将用户的浏览器重定向回 Google,并将访问令牌附加到请求中。
- Google 会调用您服务的 API,并在每个请求中附加访问令牌。您的服务会验证该访问令牌是否授予了 Google 访问相应 API 的授权,然后完成 API 调用。
处理授权请求
当 Google 应用需要通过 OAuth 2.0 隐式流程执行账号关联时,Google 会将用户发送到您的授权端点,并发送包含以下参数的请求:
| 授权端点参数 | |
|---|---|
client_id |
您分配给 Google 的客户 ID。 |
redirect_uri |
您将对此请求的响应发送到的网址。 |
state |
一种簿记值,在重定向 URI 中原封不动地传递回 Google。 |
response_type |
要在响应中返回的值的类型。对于 OAuth 2.0 隐式流程,响应类型始终为 token。 |
user_locale |
Google 账号语言设置(采用 RFC5646 格式),用于以用户的首选语言本地化您的内容。 |
例如,如果您的授权端点位于 https://myservice.example.com/auth,则请求可能如下所示:
GET https://myservice.example.com/auth?client_id=GOOGLE_CLIENT_ID&redirect_uri=REDIRECT_URI&state=STATE_STRING&response_type=token&user_locale=LOCALE
如需让授权端点处理登录请求,请执行以下步骤:
验证
client_id和redirect_uri值,以防止向意外或配置错误的客户端应用授予访问权限:- 确认
client_id与您分配给 Google 的客户端 ID 相一致。 - 确认
redirect_uri参数指定的网址具有以下格式:https://oauth-redirect.googleusercontent.com/r/YOUR_PROJECT_ID https://oauth-redirect-sandbox.googleusercontent.com/r/YOUR_PROJECT_ID
- 确认
检查用户是否已登录您的服务。如果用户未登录,请完成服务的登录或注册流程。
生成供 Google 用于访问您的 API 的访问令牌。访问令牌可以是任何字符串值,但必须唯一表示用户和令牌所针对的客户端,并且不得是可猜测的值。
发送 HTTP 响应,将用户的浏览器重定向到
redirect_uri参数指定的网址。在网址片段中包含以下所有参数:access_token:您刚刚生成的访问令牌token_type:字符串bearerstate:原始请求中的未修改状态值
以下是生成的网址示例:
https://oauth-redirect.googleusercontent.com/r/YOUR_PROJECT_ID#access_token=ACCESS_TOKEN&token_type=bearer&state=STATE_STRING
Google 的 OAuth 2.0 重定向处理程序会接收访问令牌,并确认 state 值未发生变化。在 Google 为您的服务获取访问令牌后,Google 会将该令牌附加到后续对您的服务 API 的调用中。
Gestire le richieste di informazioni utente
L'endpoint userinfo è una risorsa protetta da OAuth 2.0 che restituisce attestazioni sull'utente collegato. L'implementazione e l'hosting dell'endpoint userinfo sono facoltative, ad eccezione dei seguenti casi d'uso:
- Accesso a un account collegato con Google One Tap.
- Abbonamento senza problemi su AndroidTV.
Dopo che il token di accesso è stato recuperato correttamente dall'endpoint del token, Google invia una richiesta all'endpoint userinfo per recuperare le informazioni di base del profilo dell'utente collegato.
| intestazioni delle richieste endpoint userinfo | |
|---|---|
Authorization header |
Il token di accesso di tipo Bearer. |
Ad esempio, se l'endpoint userinfo è disponibile su
https://myservice.example.com/userinfo, una richiesta potrebbe avere il seguente aspetto:
GET /userinfo HTTP/1.1
Host: myservice.example.com
Authorization: Bearer ACCESS_TOKEN
Affinché l'endpoint userinfo possa gestire le richieste, segui questi passaggi:
- Estrai il token di accesso dall'intestazione Autorizzazione e restituisci le informazioni per l'utente associato al token di accesso.
- Se il token di accesso non è valido, restituisce un errore HTTP 401 Autorizzazione non autorizzata utilizzando l'intestazione della risposta
WWW-Authenticate. Di seguito è riportato un esempio di risposta di errore userinfo:HTTP/1.1 401 Unauthorized WWW-Authenticate: error="invalid_token", error_description="The Access Token expired"
Se il token di accesso è valido, restituisce e invia una risposta HTTP 200 con il seguente oggetto JSON nel corpo dell'HTTPS risposta:
{ "sub": "USER_UUID", "email": "EMAIL_ADDRESS", "given_name": "FIRST_NAME", "family_name": "LAST_NAME", "name": "FULL_NAME", "picture": "PROFILE_PICTURE", }risposta endpoint userinfo subUn ID univoco che identifica l'utente nel sistema. emailIndirizzo email dell'utente. given_nameFacoltativo:nome dell'utente. family_nameFacoltativo:il cognome dell'utente. nameFacoltativo:nome completo dell'utente. picture(Facoltativo) Immagine del profilo dell'utente.
Convalidare l'implementazione
您可以使用 OAuth 2.0 Playground 工具验证您的实现。
在该工具中,执行以下步骤:
- 点击配置 以打开“OAuth 2.0 配置”窗口。
- 在 OAuth flow(OAuth 流程)字段中,选择 Client-side(客户端)。
- 在 OAuth Endpoints 字段中,选择 Custom。
- 在相应字段中指定您的 OAuth 2.0 端点以及您分配给 Google 的客户端 ID。
- 在第 1 步部分中,请勿选择任何 Google 范围。请将此字段留空,或输入适用于您服务器的范围(如果您不使用 OAuth 范围,则输入任意字符串)。完成后,点击 Authorize APIs。
- 在第 2 步和第 3 步部分中,完成 OAuth 2.0 流程,并验证每个步骤是否按预期运行。
您可以使用 Google 账号关联演示工具验证您的实现。
在该工具中,执行以下步骤:
- 点击使用 Google 账号登录按钮。
- 选择您要关联的账号。
- 输入服务 ID。
- (可选)输入您将请求访问的一个或多个范围。
- 点击开始演示。
- 当系统提示时,请确认您可以同意或拒绝关联请求。
- 确认您已重定向到相应平台。