アカウントは、業界標準の OAuth 2.0 の インプリシット フローと 認可コード フローを使用してリンクされます。
サービスは、OAuth 2.0 準拠の 認可 エンドポイントと トークン交換 エンドポイントをサポートする必要があります。In the implicit flow, Google opens your authorization endpoint in the user's browser. After successful sign in, you return a long-lived access token to Google. This access token is now included in every request sent from Google.
In the authorization code flow, you need two endpoints:
The authorization endpoint, which presents the sign-in UI to your users that aren't already signed in. The authorization endpoint also creates a short-lived authorization code to record users' consent to the requested access.
The token exchange endpoint, which is responsible for two types of exchanges:
- Exchanges an authorization code for a long-lived refresh token and a short-lived access token. This exchange happens when the user goes through the account linking flow.
- Exchanges a long-lived refresh token for a short-lived access token. This exchange happens when Google needs a new access token because the one it had expired.
Choose an OAuth 2.0 flow
Although the implicit flow is simpler to implement, Google recommends that access tokens issued by the implicit flow never expire. This is because the user is forced to link their account again after a token expires with the implicit flow. If you need token expiration for security reasons, we strongly recommend that you use the authorization code flow instead.
Design guidelines
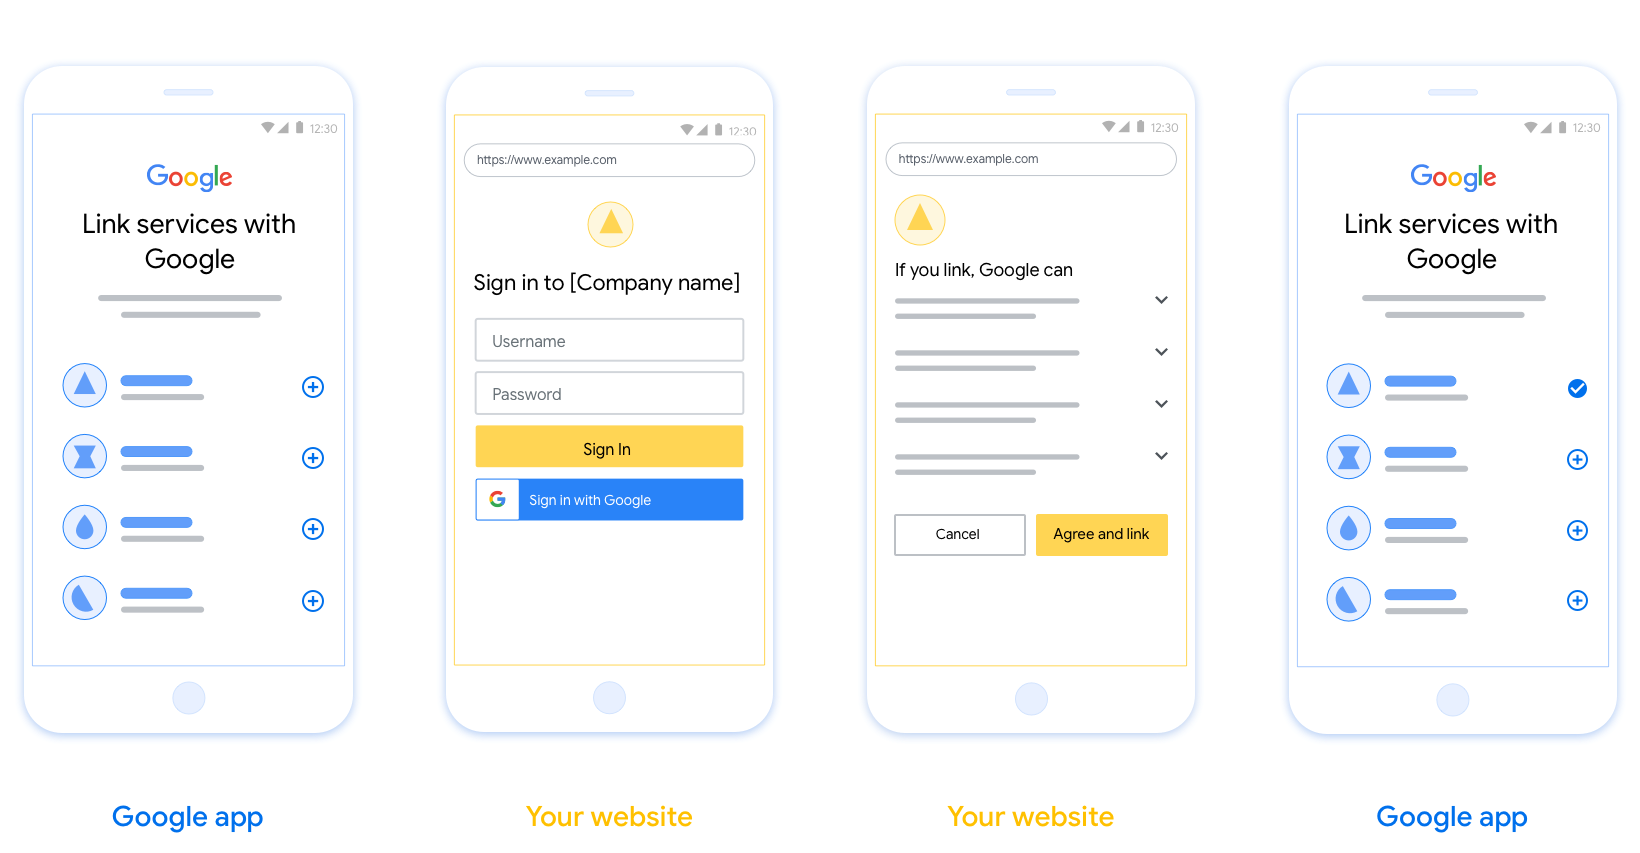
This section describes the design requirements and recommendations for the user screen that you host for OAuth linking flows. After it's called by Google's app, your platform displays a sign in to Google page and account linking consent screen to the user. The user is directed back to Google's app after giving their consent to link accounts.
Requirements
- You must communicate that the user’s account will be linked to Google, not a specific Google product like Google Home or Google Assistant.
Recommendations
We recommend that you do the following:
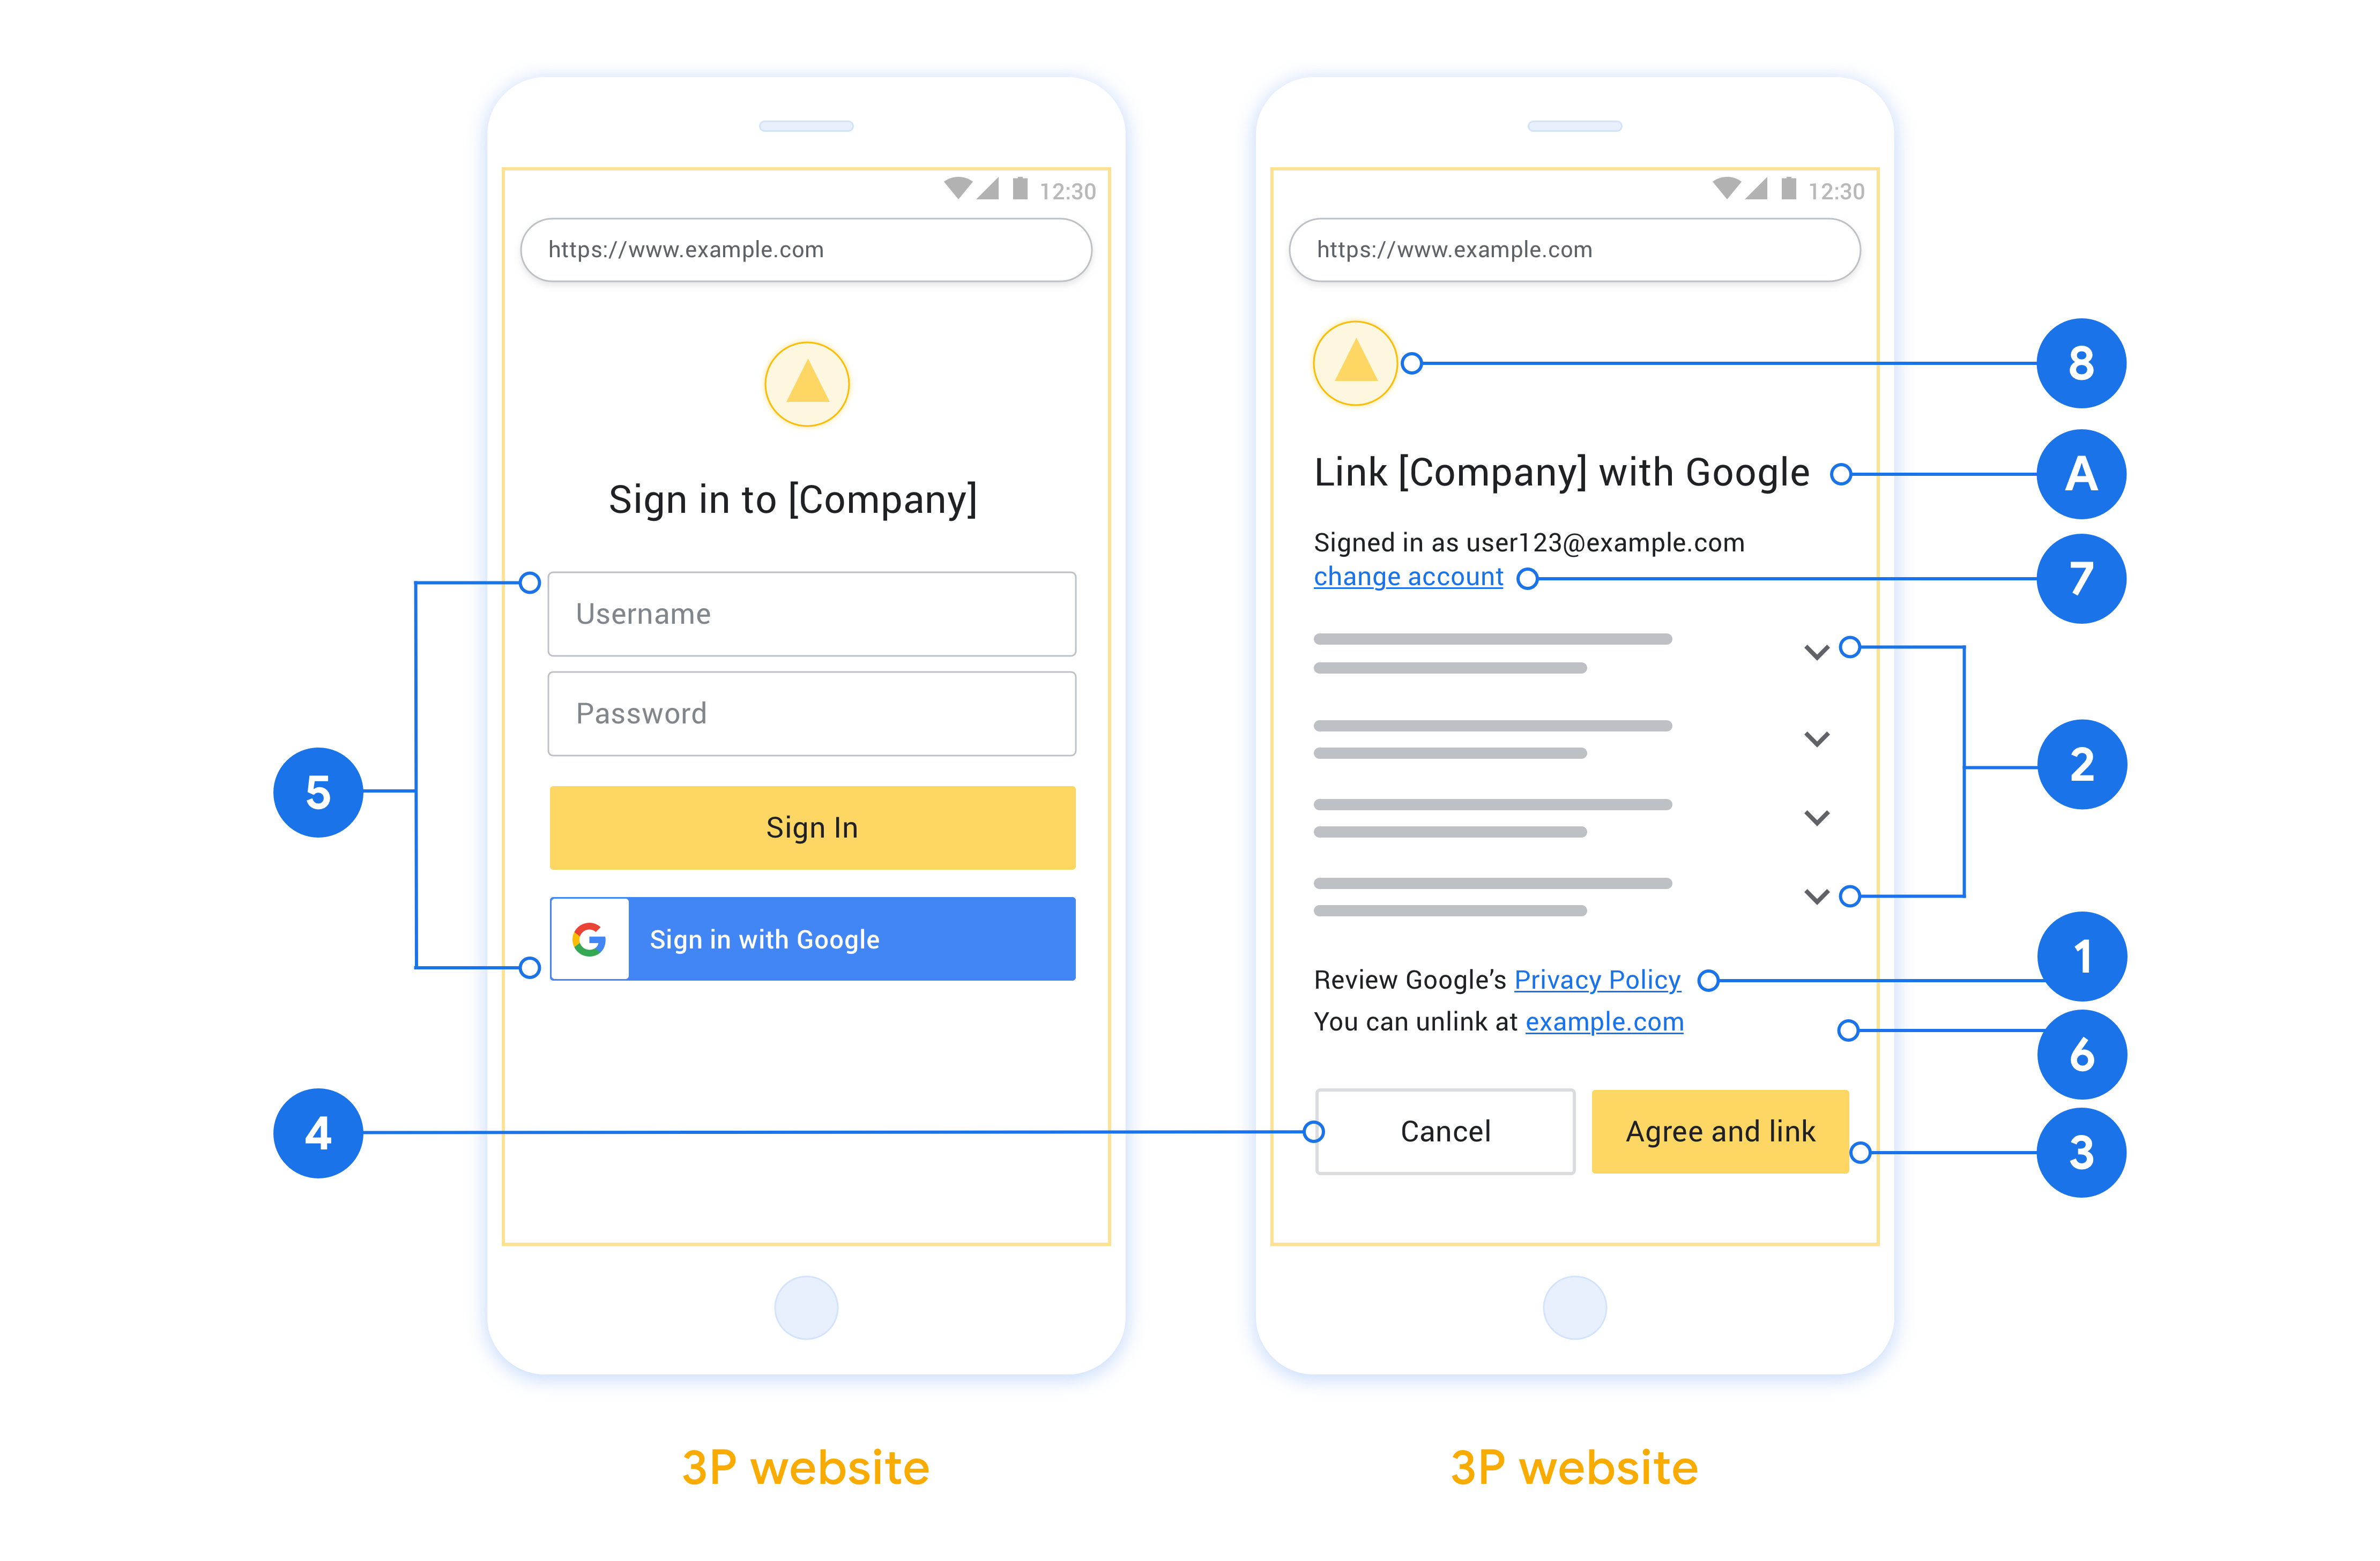
Display Google's Privacy Policy. Include a link to Google’s Privacy Policy on the consent screen.
Data to be shared. Use clear and concise language to tell the user what data of theirs Google requires and why.
Clear call-to-action. State a clear call-to-action on your consent screen, such as “Agree and link.” This is because users need to understand what data they're required to share with Google to link their accounts.
Ability to cancel. Provide a way for users to go back or cancel, if they choose not to link.
Clear sign-in process. Ensure that users have clear method for signing in to their Google account, such as fields for their username and password or Sign in with Google.
Ability to unlink. Offer a mechanism for users to unlink, such as a URL to their account settings on your platform. Alternatively, you can include a link to Google Account where users can manage their linked account.
Ability to change user account. Suggest a method for users to switch their account(s). This is especially beneficial if users tend to have multiple accounts.
- If a user must close the consent screen to switch accounts, send a recoverable error to Google so the user can sign in to the desired account with OAuth linking and the implicit flow.
Include your logo. Display your company logo on the consent screen. Use your style guidelines to place your logo. If you wish to also display Google's logo, see Logos and trademarks.
创建项目
如需创建项目以使用账号关联,请执行以下操作:
- 前往 Google API 控制台。
- 点击 Create project 。
- 输入名称或接受生成的建议。
- 确认或修改任何剩余字段。
- 点击创建 。
如需查看项目 ID,请执行以下操作:
- 前往 Google API 控制台。
- 在着陆页的表格中找到您的项目。项目 ID 会显示在 ID 列中。
配置 OAuth 权限请求页面
Google 账号关联过程包含一个权限请求页面,该页面会告知用户请求访问其数据的应用、应用请求的数据类型以及适用的条款。您需要先配置 OAuth 权限请求页面,然后才能生成 Google API 客户端 ID。
- 打开 Google API 控制台的 OAuth 权限请求页面 页面。
- 如果系统提示您选择项目,请选择您刚刚创建的项目。
在“OAuth 权限请求页面”上,填写表单,然后点击“保存”按钮。
应用名称 :向用户征求同意的应用的名称。该名称应准确反映您的应用,并且与用户在其他位置看到的应用名称保持一致。应用名称将显示在账号关联权限请求页面上。
应用徽标:权限请求页面上显示的一张图片,用以让用户认出您的应用。徽标会显示在账号关联权限请求页面和账号设置中
支持邮箱 :用户用于针对其同意问题与您联系的邮箱。
Google API 的范围 :范围允许您的应用访问用户的私有 Google 数据。对于 Google 账号关联用例,默认范围(邮箱、个人资料、openid)就足够了,您无需添加任何敏感范围。通常,最佳做法是在需要访问权限时逐步请求范围,而不是提前请求。了解详情。
已获授权的网域 :为了保护您和您的用户,Google 只允许使用 OAuth 进行身份验证的应用使用已获授权的网域。您应用的链接必须托管在已获授权的网域上。了解详情。
应用首页链接 :应用的首页。必须托管在已获授权的网域上。
应用隐私权政策链接 :显示在 Google 账号关联权限请求页面上。必须托管在已获授权的网域上。
应用服务条款链接(可选) :必须托管在已获授权的网域上。
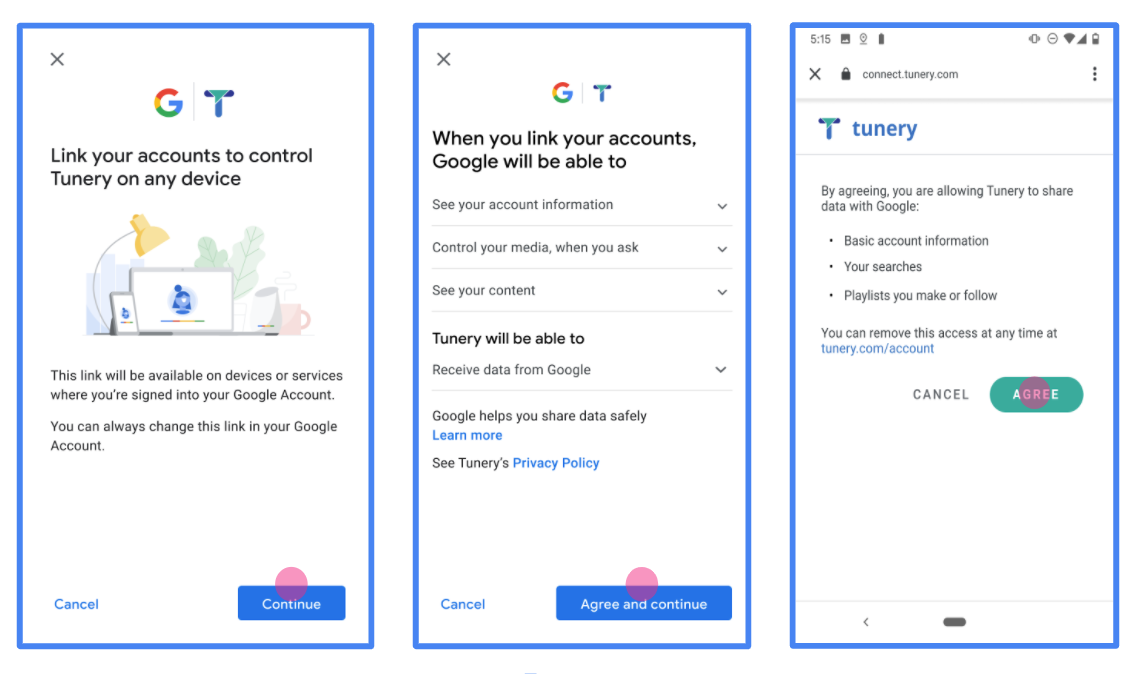
图 1. 虚构应用 Tunery 的 Google 账号关联权限请求页面
查看“验证状态”,如果您的应用需要验证,请点击“提交以进行验证”按钮,提交应用以进行验证。如需了解详情,请参阅 OAuth 验证要求。
OAuth サーバーを実装する
n
サービスで OAuth 2.0 インプリシット フローをサポートするには、HTTPS 経由で認可エンドポイントにアクセスできるようにする必要があります。このエンドポイントは、ユーザーの認証を行い、ユーザーからデータアクセスへの同意を取得します。認可エンドポイントは、ログインしていないユーザーにログイン用の UI を表示し、リクエストされたアクセスへの同意を記録します。
Google アプリケーションからサービスの API を呼び出す必要がある場合、Google はこのエンドポイントを使用して、API の呼び出し許可をユーザーから取得します。
通常、Google が開始する OAuth 2.0 インプリシット フローのセッションは次のような流れになります。
- Google がユーザーのブラウザで認可エンドポイントを開きます。ユーザーがログインし(ログインしていない場合)、Google が API を使用してデータにアクセスすることを承諾します(まだ許可していない場合)。
- サービスがアクセス トークンを作成し、Google に返します。そのためには、アクセス トークンをリクエストに付加して、ユーザーのブラウザを Google にリダイレクトします。
- Google がサービスの API を呼び出し、リクエストごとにアクセス トークンを関連付けます。サービスは、アクセス トークンによって API へのアクセスが Google に許可されていることを確認し、API 呼び出しを完了します。
認可リクエストの処理
Google アプリケーションで OAuth 2.0 暗黙的フローを介してアカウント リンクを行う必要がある場合、Google は、次のパラメータを含むリクエストを使用して、ユーザーを認可エンドポイントに送信します。
| 認可エンドポイントのパラメータ | |
|---|---|
client_id |
Google に割り当てたクライアント ID。 |
redirect_uri |
このリクエストに対するレスポンスを送信する URL。 |
state |
リダイレクト URL で変更されずに Google に返される会計上の値。 |
response_type |
レスポンスで返される値のタイプ。OAuth 2.0 インプリシット フローの場合、レスポンス タイプは常に token です。 |
user_locale |
ユーザーの優先言語でコンテンツをローカライズするために使用される、RFC5646 形式の Google アカウントの言語設定。 |
たとえば、認可エンドポイントが https://myservice.example.com/auth の場合、リクエストは次のようになります。
GET https://myservice.example.com/auth?client_id=GOOGLE_CLIENT_ID&redirect_uri=REDIRECT_URI&state=STATE_STRING&response_type=token&user_locale=LOCALE
認可エンドポイントでログイン リクエストを処理する場合は、次の手順に従います。
意図しないクライアント アプリや誤って構成されたクライアント アプリにアクセスを許可しないように、
client_idとredirect_uriの値を確認します。client_idが Google に割り当てたクライアント ID と一致することを確認します。redirect_uriパラメータで指定された URL が次の形式になっていることを確認します。https://oauth-redirect.googleusercontent.com/r/YOUR_PROJECT_ID https://oauth-redirect-sandbox.googleusercontent.com/r/YOUR_PROJECT_ID
ユーザーがサービスにログインしているかどうか確認します。ユーザーがログインしていない場合は、サービスのログインまたは登録フローを完了します。
Google が API にアクセスするために使用するアクセス トークンを生成します。アクセス トークンには任意の文字列値を設定できますが、トークンを使用するユーザーとクライアントを一意に表し、簡単に推測されない文字列にする必要があります。
ユーザーのブラウザを
redirect_uriパラメータで指定された URL にリダイレクトする HTTP レスポンスを送信します。URL フラグメントに次のパラメータをすべて含めます。access_token: 先ほど生成したアクセス トークンtoken_type: 文字列bearerstate: 元のリクエストから変更されていない state 値
結果の URL の例を次に示します。
https://oauth-redirect.googleusercontent.com/r/YOUR_PROJECT_ID#access_token=ACCESS_TOKEN&token_type=bearer&state=STATE_STRING
Google の OAuth 2.0 リダイレクト ハンドラがアクセス トークンを受け取り、state 値が変更されていないことを確認します。サービスのアクセス トークンを取得した後は、サービス API に対する以降の呼び出しで、このトークンが使用されます。
Handle userinfo requests
The userinfo endpoint is an OAuth 2.0 protected resource that return claims about the linked user. Implementing and hosting the userinfo endpoint is optional, except for the following use cases:
- Linked Account Sign-In with Google One Tap.
- Frictionless subscription on AndroidTV.
After the access token has been successfully retrieved from your token endpoint, Google sends a request to your userinfo endpoint to retrieve basic profile information about the linked user.
| userinfo endpoint request headers | |
|---|---|
Authorization header |
The access token of type Bearer. |
For example, if your userinfo endpoint is available at
https://myservice.example.com/userinfo, a request might look like the following:
GET /userinfo HTTP/1.1
Host: myservice.example.com
Authorization: Bearer ACCESS_TOKEN
For your userinfo endpoint to handle requests, do the following steps:
- Extract access token from the Authorization header and return information for the user associated with the access token.
- If the access token is invalid, return an HTTP 401 Unauthorized error with using the
WWW-AuthenticateResponse Header. Below is an example of a userinfo error response:HTTP/1.1 401 Unauthorized WWW-Authenticate: error="invalid_token", error_description="The Access Token expired"
If the access token is valid, return and HTTP 200 response with the following JSON object in the body of the HTTPS response:
{ "sub": "USER_UUID", "email": "EMAIL_ADDRESS", "given_name": "FIRST_NAME", "family_name": "LAST_NAME", "name": "FULL_NAME", "picture": "PROFILE_PICTURE", }userinfo endpoint response subA unique ID that identifies the user in your system. emailEmail address of the user. given_nameOptional: First name of the user. family_nameOptional: Last name of the user. nameOptional: Full name of the user. pictureOptional: Profile picture of the user.
実装の検証
OAuth 2.0 Playground ツールを使用して、実装を検証できます。
このツールで、次の手順を行います。
- [構成] 設定をクリックして、[OAuth 2.0 構成] ウィンドウを開きます。
- [OAuth flow] フィールドで、[クライアントサイド] を選択します。
- [OAuth Endpoints] フィールドで、[Custom] を選択します。
- 対応するフィールドに、OAuth 2.0 エンドポイントと Google に割り当てたクライアント ID を指定します。
- [Step 1] セクションで、Google スコープを選択しないでください。代わりに、このフィールドを空白のままにするか、サーバーで有効なスコープを入力します(OAuth スコープを使用しない場合は任意の文字列を入力します)。完了したら、[Authorize APIs] をクリックします。
- [Step 2] セクションと [Step 3] セクションで、OAuth 2.0 フローを確認し、各ステップが意図したとおりに動作することを確認します。
Google アカウント リンク デモツールを使用して、実装を検証できます。
このツールで、次の手順を行います。
- [Google でログイン] ボタンをクリックします。
- リンクするアカウントを選択します。
- サービス ID を入力します。
- 必要に応じて、アクセスをリクエストするスコープを 1 つ以上入力します。
- [Start Demo] をクリックします。
- 確認のメッセージが表示されたら、リンク リクエストに同意または拒否できることを確認します。
- プラットフォームにリダイレクトされることを確認します。