アカウントは、業界標準の OAuth 2.0 の インプリシット フローと 認可コード フローを使用してリンクされます。
サービスは、OAuth 2.0 準拠の 認可 エンドポイントと トークン交換 エンドポイントをサポートする必要があります。インプリシット フローでは、Google がユーザーのブラウザで認可エンドポイントを開きます。ログインに成功したら、認可エンドポイントから長期のアクセス トークンを Google に返します。このアクセス トークンは、Google から送信されるすべてのリクエストに含まれます。
認証コードフローでは、次の 2 つのエンドポイントが必要になります。
認可エンドポイント。ログインしていないユーザーにログイン用の UI を表示します。認可エンドポイントは、リクエストされたアクセスに対するユーザーの同意を記録するための短期間の認証コードも作成します。
トークン交換エンドポイント。次の 2 種類の交換を処理します。
- 長期の更新トークンと短期のアクセス トークンの認可コードを交換します。この処理は、ユーザーがアカウントのリンクフローを行ったときに発生します。
- 長期の更新トークンを短期のアクセス トークンと交換します。この処理は、トークンが期限切れになり、新しいアクセス トークンが必要になった場合に発生します。
OAuth 2.0 フローを選択する
暗黙的フロー は実装が簡単ですが、暗黙的フローで発行されたアクセス トークンには有効期限を設定しないことをおすすめします。これは、インプリシット フローでトークンの有効期限が切れると、ユーザーがアカウントを再度リンクしなければならなくなるためです。セキュリティ上の理由からトークンに有効期限を設定する必要がある場合は、代わりに認可コードフローを使用することを強くおすすめします。
設計ガイドライン
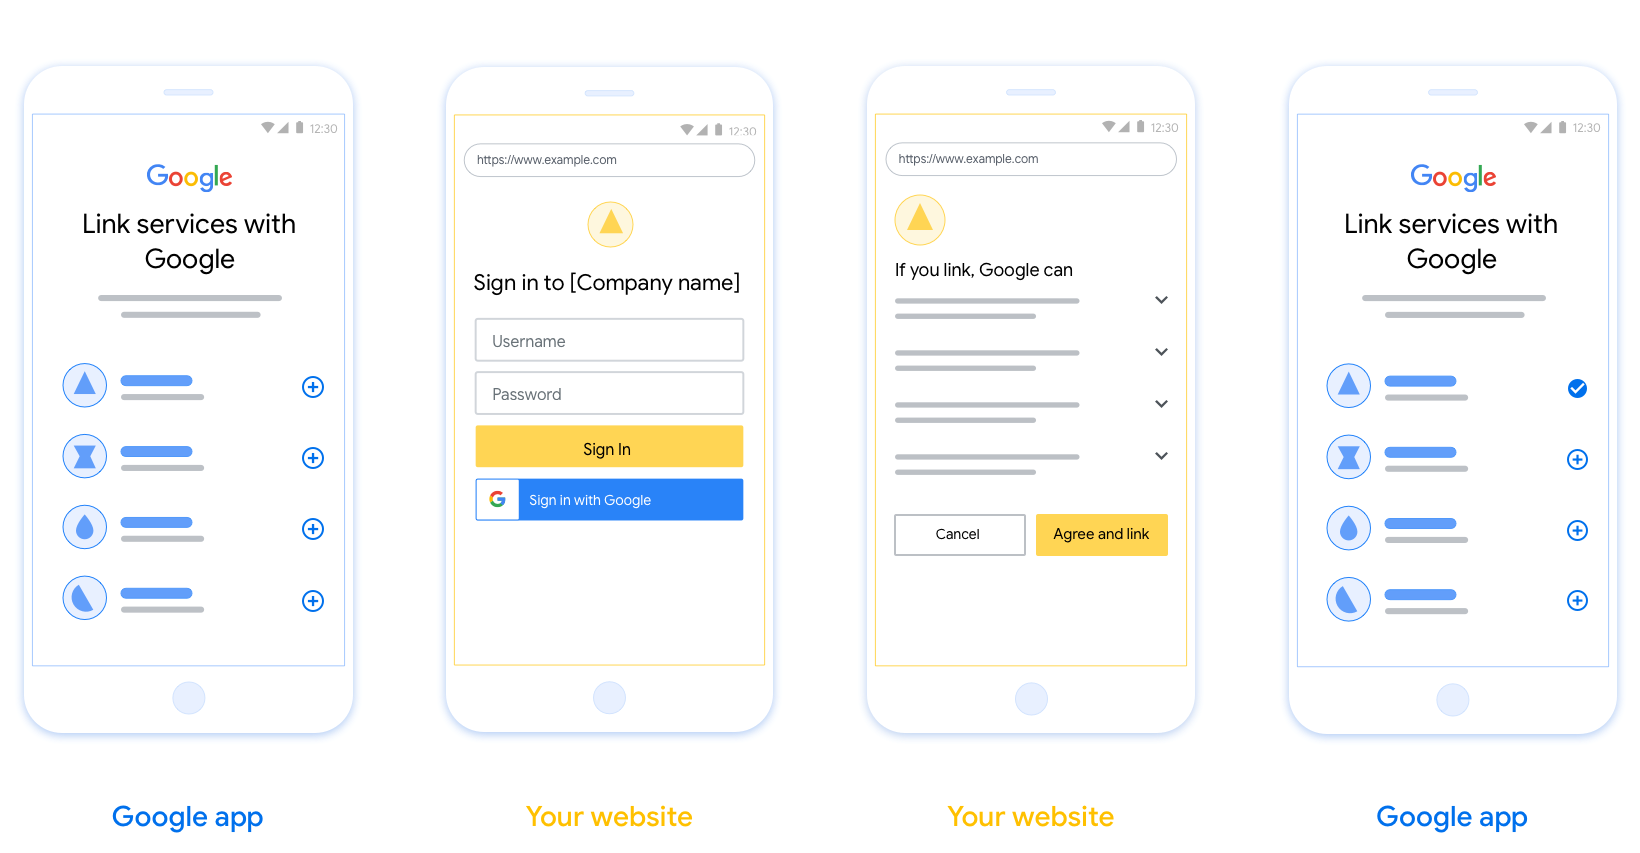
このセクションでは、OAuth リンクフロー用にホストするユーザー画面の設計要件と推奨事項について説明します。Google のアプリから呼び出されると、プラットフォームは Google へのログインページとアカウントのリンクに関する同意画面をユーザーに表示します。ユーザーがアカウントのリンクに同意すると、Google のアプリにリダイレクトされます。
要件
- ユーザーのアカウントは Google にリンクされ、Google Home や Google アシスタントなどの特定の Google サービスにはリンクされないことを伝える必要があります。
推奨事項
次のことをおすすめします。
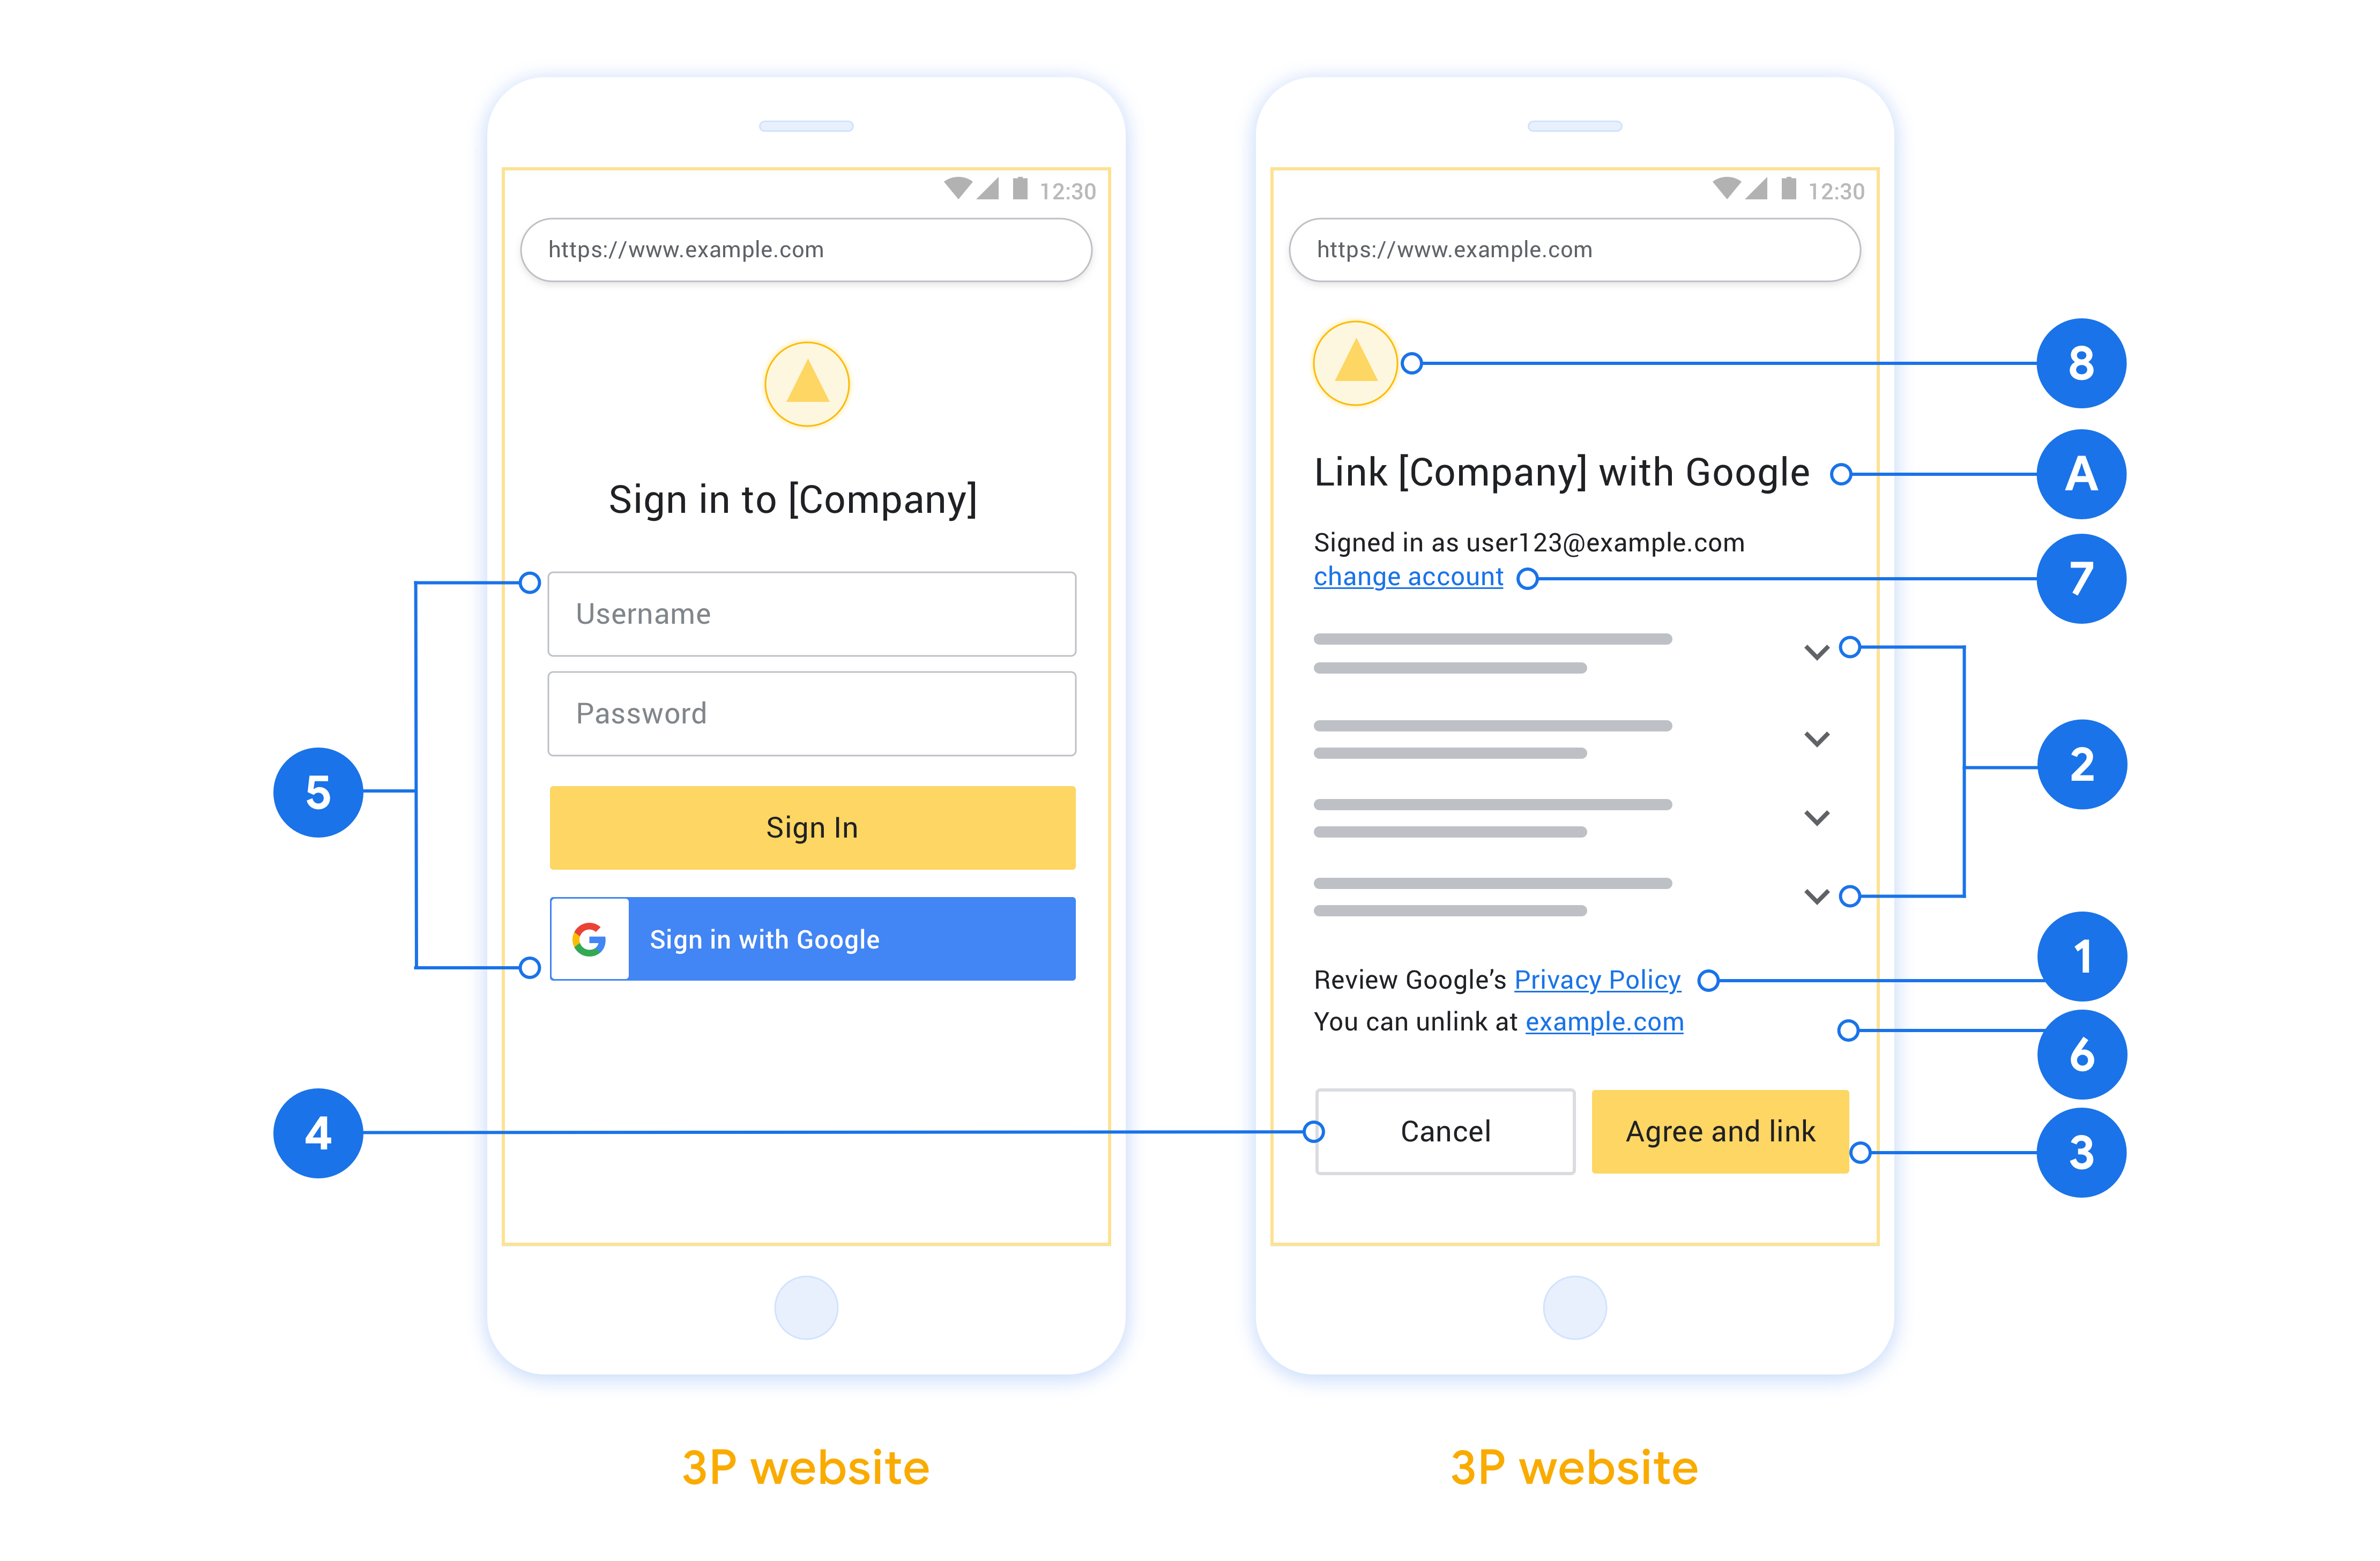
Google のプライバシー ポリシーを表示します。同意画面に Google のプライバシー ポリシーへのリンクを含めます。
共有されるデータ。Google がユーザーのどのデータを必要とし、なぜ必要とするのかを、明確かつ簡潔な表現でユーザーに伝えます。
行動を促す明確なフレーズがある。同意画面に「同意してリンク」などの明確な行動を促すフレーズを記載します。これは、ユーザーがアカウントをリンクするために Google と共有する必要があるデータを理解する必要があるためです。
解約できること。リンクしないことを選択した場合に、ユーザーが戻るかキャンセルできる方法を提供します。
明確なログイン プロセス。ユーザーが Google アカウントにログインするための明確な方法(ユーザー名とパスワードの入力欄や [Google でログイン] など)を用意します。
リンクを解除できること。ユーザーがリンクを解除できる仕組み(プラットフォームのアカウント設定への URL など)を提供します。または、ユーザーがリンクされたアカウントを管理できる Google アカウントへのリンクを含めることもできます。
ユーザー アカウントを変更する機能。ユーザーがアカウントを切り替える方法を提案します。これは、ユーザーが複数のアカウントを持っている場合に特に便利です。
- アカウントを切り替えるために同意画面を閉じる必要がある場合は、回復可能なエラーを Google に送信して、ユーザーが OAuth リンクとインプリシット フローを使用して目的のアカウントにログインできるようにします。
ロゴを含めます。同意画面に会社のロゴを表示します。スタイル ガイドラインに沿ってロゴを配置します。Google のロゴも表示する場合は、ロゴと商標をご覧ください。
Create the project
To create your project to use account linking:
- Go to the Google API Console.
- Click Create project.
- Enter a name or accept the generated suggestion.
- Confirm or edit any remaining fields.
- Click Create.
To view your project ID:
- Go to the Google API Console.
- Find your project in the table on the landing page. The project ID appears in the ID column.
Configure your OAuth Consent Screen
The Google Account Linking process includes a consent screen which tells users the application requesting access to their data, what kind of data they are asking for and the terms that apply. You will need to configure your OAuth consent screen before generating a Google API client ID.
- Open the OAuth consent screen page of the Google APIs console.
- If prompted, select the project you just created.
On the "OAuth consent screen" page, fill out the form and click the “Save” button.
Application name: The name of the application asking for consent. The name should accurately reflect your application and be consistent with the application name users see elsewhere. The application name will be shown on the Account Linking consent screen.
Application logo: An image on the consent screen that will help users recognize your app. The logo is shown on Account linking consent screen and on account settings
Support email: For users to contact you with questions about their consent.
Scopes for Google APIs: Scopes allow your application to access your user's private Google data. For the Google Account Linking use case, default scope (email, profile, openid) is sufficient, you don’t need to add any sensitive scopes. It is generally a best practice to request scopes incrementally, at the time access is required, rather than up front. Learn more.
Authorized domains: To protect you and your users, Google only allows applications that authenticate using OAuth to use Authorized Domains. Your applications' links must be hosted on Authorized Domains. Learn more.
Application Homepage link: Home page for your application. Must be hosted on an Authorized Domain.
Application Privacy Policy link: Shown on Google Account Linking consent screen. Must be hosted on an Authorized Domain.
Application Terms of Service link (Optional): Must be hosted on an Authorized Domain.
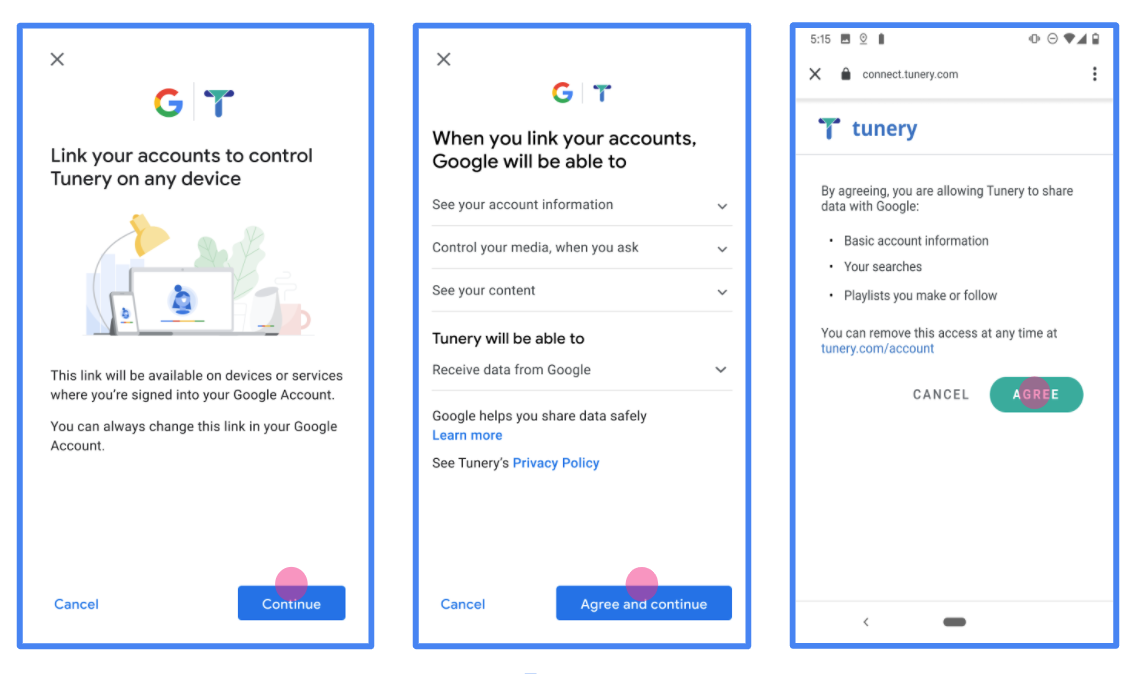
Figure 1. Google Account Linking Consent Screen for a fictitious Application, Tunery
Check "Verification Status", if your application needs verification then click the "Submit For Verification" button to submit your application for verification. Refer to OAuth verification requirements for details.
OAuth サーバーを実装する
n
サービスで OAuth 2.0 インプリシット フローをサポートするには、HTTPS 経由で認可エンドポイントにアクセスできるようにする必要があります。このエンドポイントは、ユーザーの認証を行い、ユーザーからデータアクセスへの同意を取得します。認可エンドポイントは、ログインしていないユーザーにログイン用の UI を表示し、リクエストされたアクセスへの同意を記録します。
Google アプリケーションからサービスの API を呼び出す必要がある場合、Google はこのエンドポイントを使用して、API の呼び出し許可をユーザーから取得します。
Google アカウントのリンク: OAuth 暗黙的フロー
次のシーケンス図は、ユーザー、Google、サービスの各エンドポイント間のインタラクションの詳細を示しています。
役割と責任
次の表に、Google アカウントのリンク(GAL)OAuth 暗黙的フローにおけるアクターの役割と責任を示します。GAL では、Google は OAuth クライアントとして機能し、サービスはID/サービス プロバイダとして機能します。
| アクター / コンポーネント | GAL ロール | 責任 |
|---|---|---|
| Google アプリ / サーバー | OAuth クライアント | フローを開始し、ブラウザのリダイレクトを使用してアクセス トークンを受け取り、サービス API にアクセスするために安全に保存します。 |
| 認可エンドポイント | 認可サーバー | ユーザーを認証し、ユーザーの同意を取得して、有効期間の長いアクセス トークンを Google に直接発行します。 |
| Google リダイレクト URI | コールバック エンドポイント | URL フラグメントに access_token 値と state 値を含む、認証サービスからのユーザー リダイレクトを受け取ります。 |
通常、Google が開始する OAuth 2.0 インプリシット フローのセッションは次のような流れになります。
- Google がユーザーのブラウザで認可エンドポイントを開きます。ユーザーがログインし(ログインしていない場合)、Google が API を使用してデータにアクセスすることを承諾します(まだ許可していない場合)。
- サービスがアクセス トークンを作成し、Google に返します。そのためには、アクセス トークンをリクエストに付加して、ユーザーのブラウザを Google にリダイレクトします。
- Google がサービスの API を呼び出し、リクエストごとにアクセス トークンを関連付けます。サービスは、アクセス トークンによって API へのアクセスが Google に許可されていることを確認し、API 呼び出しを完了します。
認可リクエストの処理
Google アプリケーションで OAuth 2.0 暗黙的フローを使用してアカウント リンクを行う必要がある場合、Google は、次のパラメータを含むリクエストを使用して、ユーザーを認可エンドポイントに送信します。
| 認可エンドポイントのパラメータ | |
|---|---|
client_id |
Google に割り当てたクライアント ID。 |
redirect_uri |
このリクエストに対するレスポンスを送信する URL。 |
state |
リダイレクト URL で変更されずに Google に返される会計上の値。 |
response_type |
レスポンスで返される値のタイプ。OAuth 2.0 インプリシット フローの場合、レスポンス タイプは常に token です。 |
user_locale |
ユーザーの優先言語でコンテンツをローカライズするために使用される、RFC5646 形式の Google アカウントの言語設定。 |
たとえば、認可エンドポイントが https://myservice.example.com/auth の場合、リクエストは次のようになります。
GET https://myservice.example.com/auth?client_id=GOOGLE_CLIENT_ID&redirect_uri=REDIRECT_URI&state=STATE_STRING&response_type=token&user_locale=LOCALE
認可エンドポイントでログイン リクエストを処理する場合は、次の手順に従います。
意図しないクライアント アプリや誤って構成されたクライアント アプリにアクセスを許可しないように、
client_idとredirect_uriの値を確認します。client_idが Google に割り当てたクライアント ID と一致することを確認します。redirect_uriパラメータで指定された URL が次の形式になっていることを確認します。https://oauth-redirect.googleusercontent.com/r/YOUR_PROJECT_ID https://oauth-redirect-sandbox.googleusercontent.com/r/YOUR_PROJECT_ID
ユーザーがサービスにログインしているかどうか確認します。ユーザーがログインしていない場合は、サービスのログインまたは登録フローを完了します。
Google が API にアクセスするために使用するアクセス トークンを生成します。アクセス トークンには任意の文字列値を設定できますが、トークンを使用するユーザーとクライアントを一意に表し、簡単に推測されない文字列にする必要があります。
ユーザーのブラウザを
redirect_uriパラメータで指定された URL にリダイレクトする HTTP レスポンスを送信します。URL フラグメントに次のパラメータをすべて含めます。access_token: 先ほど生成したアクセス トークンtoken_type: 文字列bearerstate: 元のリクエストから変更されていない state 値
結果の URL の例を次に示します。
https://oauth-redirect.googleusercontent.com/r/YOUR_PROJECT_ID#access_token=ACCESS_TOKEN&token_type=bearer&state=STATE_STRING
Google の OAuth 2.0 リダイレクト ハンドラがアクセス トークンを受け取り、state 値が変更されていないことを確認します。サービスのアクセス トークンを取得した後は、サービス API に対する以降の呼び出しで、このトークンが使用されます。
Handle userinfo requests
The userinfo endpoint is an OAuth 2.0 protected resource that return claims about the linked user. Implementing and hosting the userinfo endpoint is optional, except for the following use cases:
- Linked Account Sign-In with Google One Tap.
- Frictionless subscription on AndroidTV.
After the access token has been successfully retrieved from your token endpoint, Google sends a request to your userinfo endpoint to retrieve basic profile information about the linked user.
| userinfo endpoint request headers | |
|---|---|
Authorization header |
The access token of type Bearer. |
For example, if your userinfo endpoint is available at
https://myservice.example.com/userinfo, a request might look like the following:
GET /userinfo HTTP/1.1
Host: myservice.example.com
Authorization: Bearer ACCESS_TOKEN
For your userinfo endpoint to handle requests, do the following steps:
- Extract access token from the Authorization header and return information for the user associated with the access token.
- If the access token is invalid, return an HTTP 401 Unauthorized error with using the
WWW-AuthenticateResponse Header. Below is an example of a userinfo error response:HTTP/1.1 401 Unauthorized WWW-Authenticate: error="invalid_token", error_description="The Access Token expired"
If the access token is valid, return and HTTP 200 response with the following JSON object in the body of the HTTPS response:
{ "sub": "USER_UUID", "email": "EMAIL_ADDRESS", "given_name": "FIRST_NAME", "family_name": "LAST_NAME", "name": "FULL_NAME", "picture": "PROFILE_PICTURE", }userinfo endpoint response subA unique ID that identifies the user in your system. emailEmail address of the user. given_nameOptional: First name of the user. family_nameOptional: Last name of the user. nameOptional: Full name of the user. pictureOptional: Profile picture of the user.
実装の検証
OAuth 2.0 Playground ツールを使用して、実装を検証できます。
このツールで、次の手順を行います。
- [構成] 設定をクリックして、[OAuth 2.0 構成] ウィンドウを開きます。
- [OAuth flow] フィールドで、[クライアントサイド] を選択します。
- [OAuth Endpoints] フィールドで、[Custom] を選択します。
- 対応するフィールドに、OAuth 2.0 エンドポイントと Google に割り当てたクライアント ID を指定します。
- [Step 1] セクションで、Google スコープを選択しないでください。代わりに、このフィールドを空白のままにするか、サーバーで有効なスコープを入力します(OAuth スコープを使用しない場合は任意の文字列を入力します)。完了したら、[Authorize APIs] をクリックします。
- [Step 2] セクションと [Step 3] セクションで、OAuth 2.0 フローを確認し、各ステップが意図したとおりに動作することを確認します。
Google アカウント リンク デモツールを使用して、実装を検証できます。
このツールで、次の手順を行います。
- [Google でログイン] ボタンをクリックします。
- リンクするアカウントを選択します。
- サービス ID を入力します。
- 必要に応じて、アクセスをリクエストするスコープを 1 つ以上入力します。
- [Start Demo] をクリックします。
- 確認のメッセージが表示されたら、リンク リクエストに同意または拒否できることを確認します。
- プラットフォームにリダイレクトされることを確認します。