حسابها با استفاده از استاندارد صنعتی OAuth 2.0 ضمنی و جریانهای کد مجوز مرتبط هستند. سرویس شما باید از مجوز سازگار با OAuth 2.0 و نقاط پایانی تبادل رمز پشتیبانی کند.
In the implicit flow, Google opens your authorization endpoint in the user's browser. After successful sign in, you return a long-lived access token to Google. This access token is now included in every request sent from Google.
In the authorization code flow, you need two endpoints:
The authorization endpoint, which presents the sign-in UI to your users that aren't already signed in. The authorization endpoint also creates a short-lived authorization code to record users' consent to the requested access.
The token exchange endpoint, which is responsible for two types of exchanges:
- Exchanges an authorization code for a long-lived refresh token and a short-lived access token. This exchange happens when the user goes through the account linking flow.
- Exchanges a long-lived refresh token for a short-lived access token. This exchange happens when Google needs a new access token because the one it had expired.
Choose an OAuth 2.0 flow
Although the implicit flow is simpler to implement, Google recommends that access tokens issued by the implicit flow never expire. This is because the user is forced to link their account again after a token expires with the implicit flow. If you need token expiration for security reasons, we strongly recommend that you use the authorization code flow instead.
Design guidelines
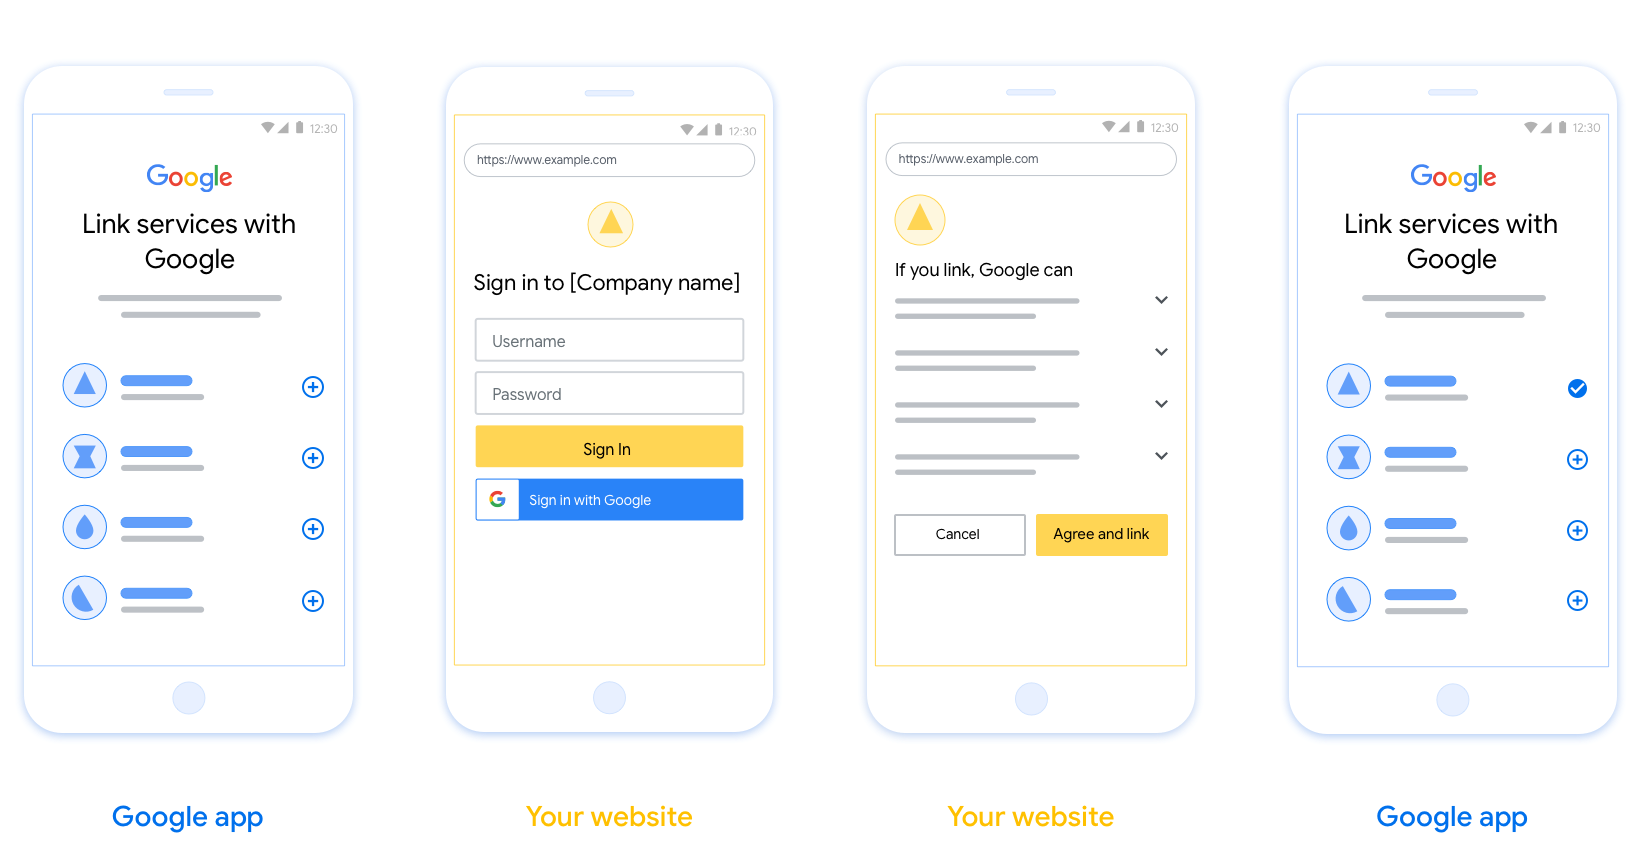
This section describes the design requirements and recommendations for the user screen that you host for OAuth linking flows. After it's called by Google's app, your platform displays a sign in to Google page and account linking consent screen to the user. The user is directed back to Google's app after giving their consent to link accounts.
Requirements
- You must communicate that the user’s account will be linked to Google, not a specific Google product like Google Home or Google Assistant.
Recommendations
We recommend that you do the following:
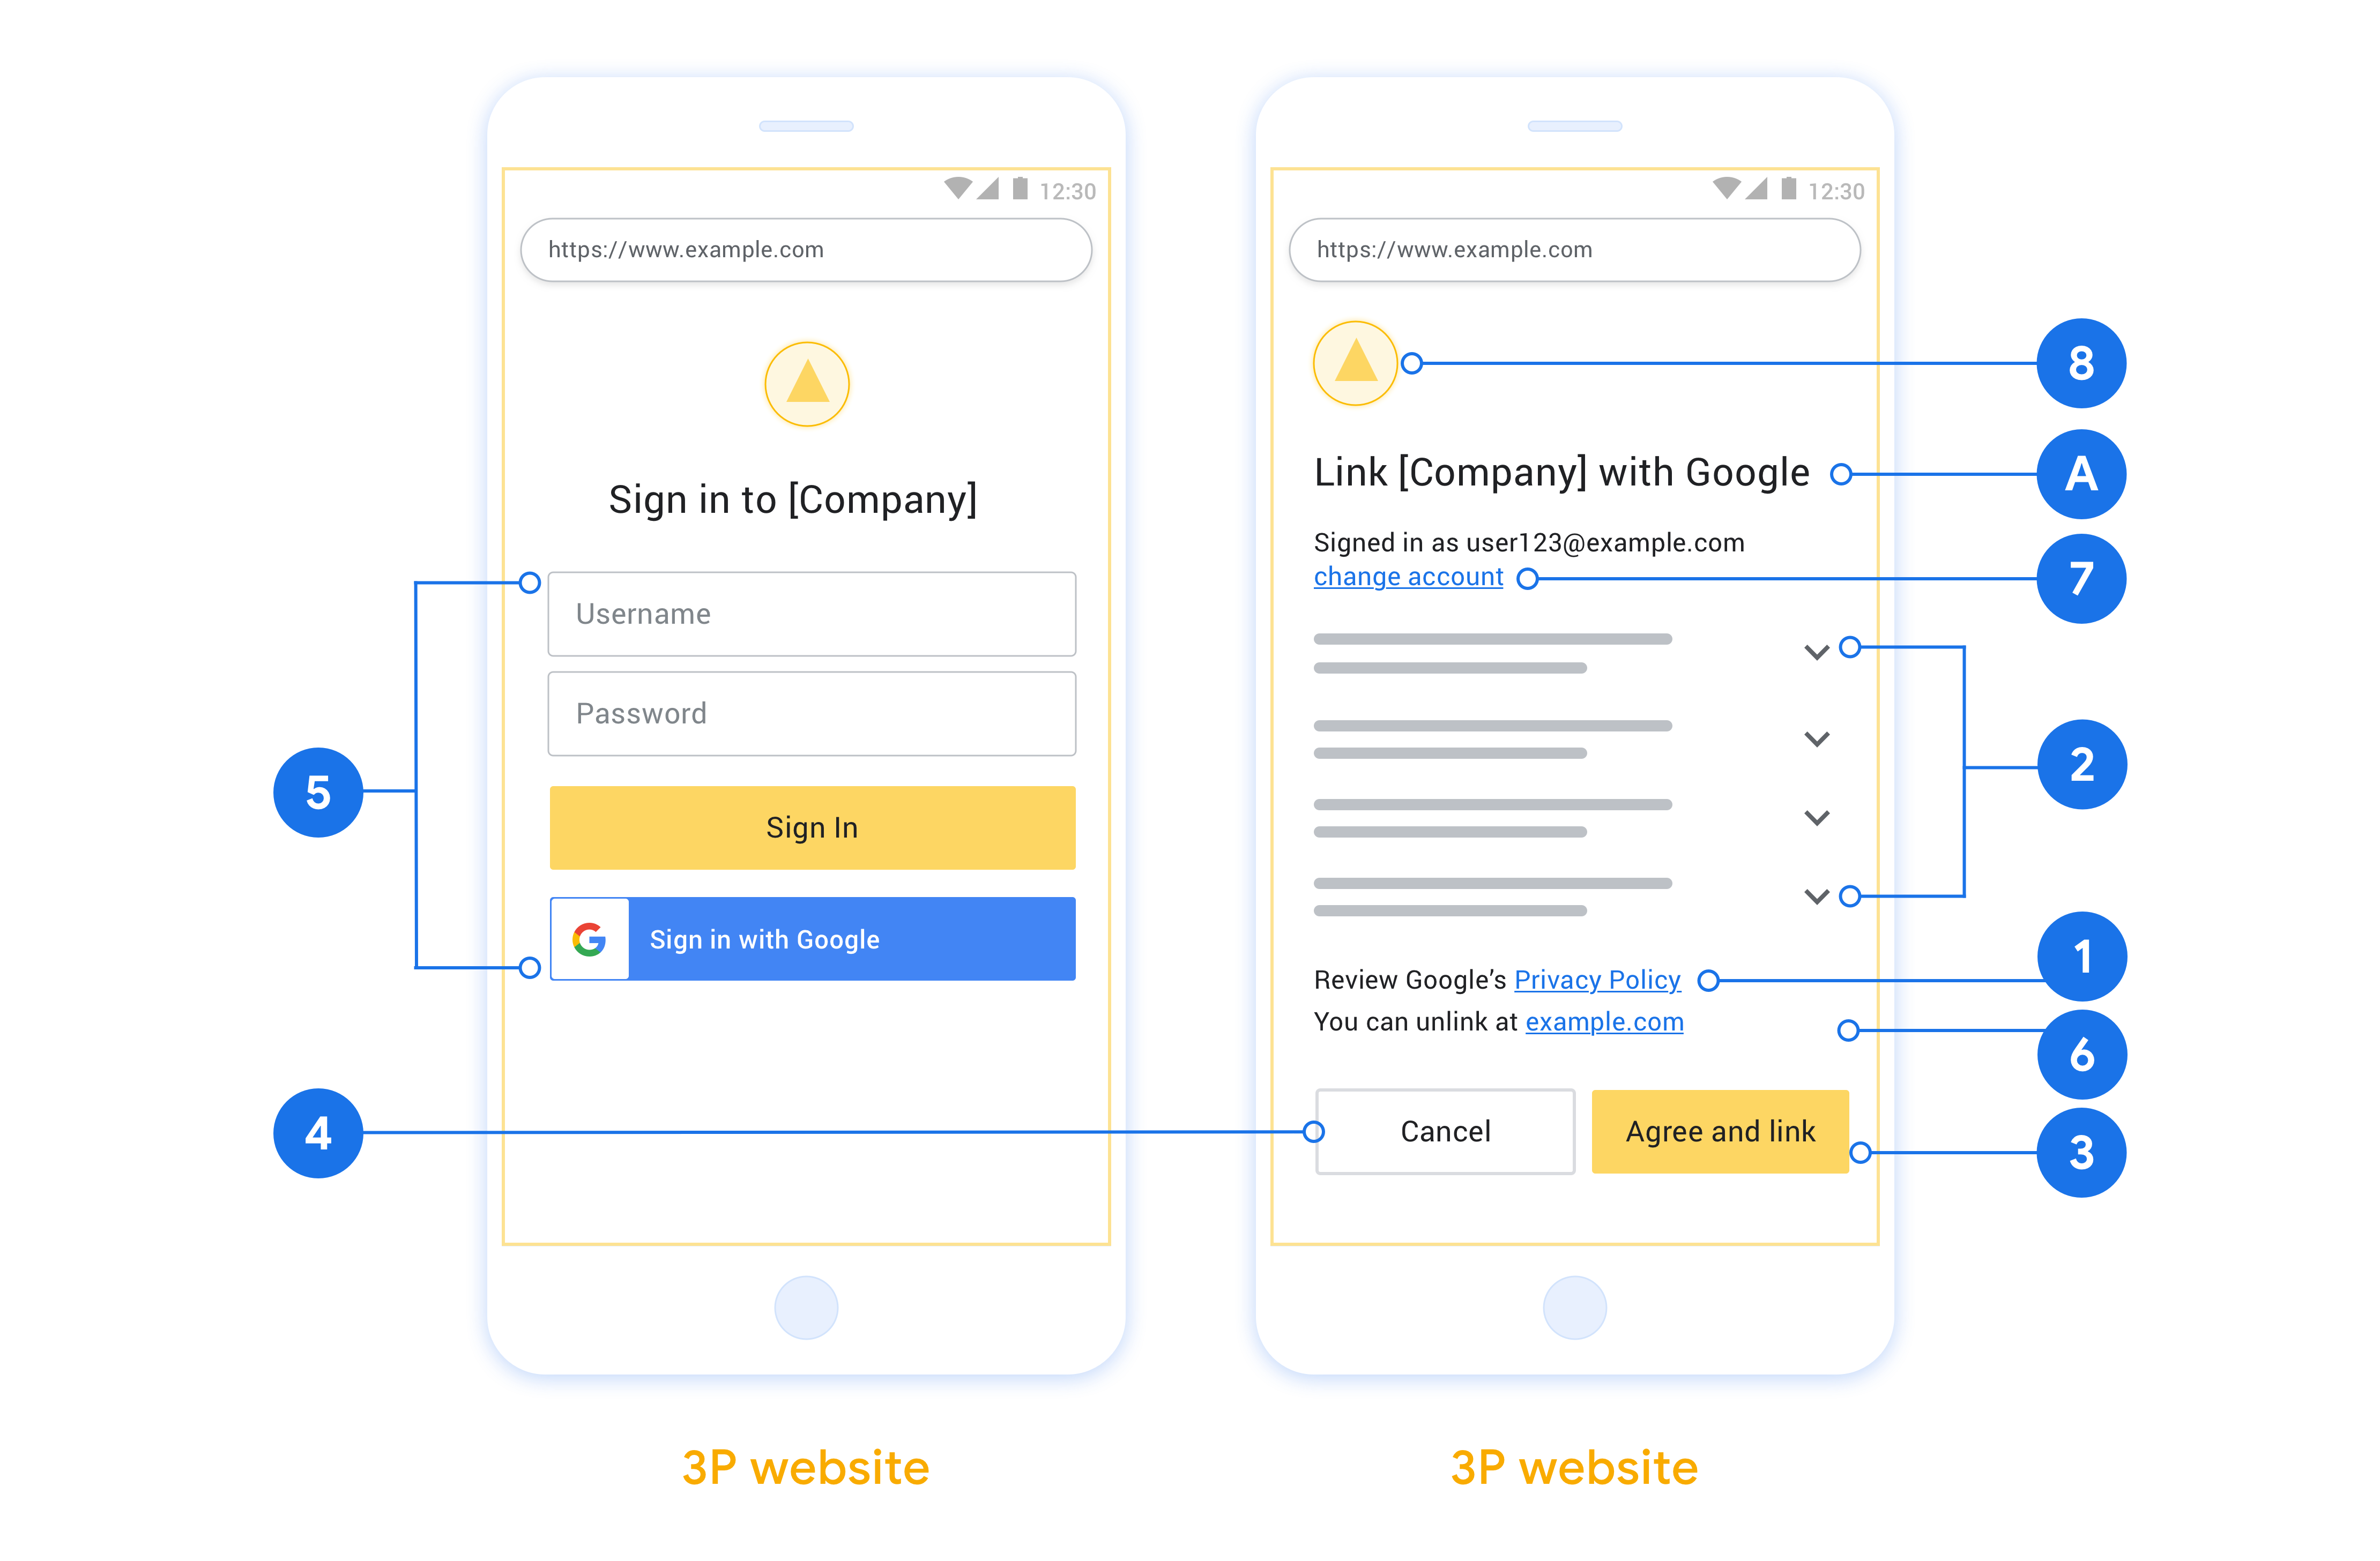
Display Google's Privacy Policy. Include a link to Google’s Privacy Policy on the consent screen.
Data to be shared. Use clear and concise language to tell the user what data of theirs Google requires and why.
Clear call-to-action. State a clear call-to-action on your consent screen, such as “Agree and link.” This is because users need to understand what data they're required to share with Google to link their accounts.
Ability to cancel. Provide a way for users to go back or cancel, if they choose not to link.
Clear sign-in process. Ensure that users have clear method for signing in to their Google account, such as fields for their username and password or Sign in with Google.
Ability to unlink. Offer a mechanism for users to unlink, such as a URL to their account settings on your platform. Alternatively, you can include a link to Google Account where users can manage their linked account.
Ability to change user account. Suggest a method for users to switch their account(s). This is especially beneficial if users tend to have multiple accounts.
- If a user must close the consent screen to switch accounts, send a recoverable error to Google so the user can sign in to the desired account with OAuth linking and the implicit flow.
Include your logo. Display your company logo on the consent screen. Use your style guidelines to place your logo. If you wish to also display Google's logo, see Logos and trademarks.
پروژه را ایجاد کنید
برای ایجاد پروژه خود با استفاده از پیوند حساب:
- به کنسول API گوگل بروید.
- روی ایجاد پروژه کلیک کنید.
- یک نام وارد کنید یا پیشنهاد تولید شده را بپذیرید.
- فیلدهای باقی مانده را تأیید یا ویرایش کنید.
- روی ایجاد کلیک کنید.
برای مشاهده شناسه پروژه خود:
- به کنسول API گوگل بروید.
- پروژه خود را در جدول صفحه اصلی پیدا کنید. شناسه پروژه در ستون شناسه نمایش داده میشود.
صفحه رضایت OAuth خود را پیکربندی کنید
فرآیند پیوند حساب گوگل شامل یک صفحه رضایتنامه است که به کاربران میگوید برنامهای که درخواست دسترسی به دادههای آنها را دارد، چه نوع دادههایی را درخواست میکند و شرایط اعمال آن چیست. قبل از ایجاد شناسه کلاینت Google API، باید صفحه رضایتنامه OAuth خود را پیکربندی کنید.
- صفحهی رضایتنامهی OAuth را در کنسول Google APIs باز کنید.
- در صورت درخواست، پروژهای را که تازه ایجاد کردهاید انتخاب کنید.
در صفحه «صفحه رضایت OAuth»، فرم را پر کنید و روی دکمه «ذخیره» کلیک کنید.
نام برنامه: نام برنامهای که درخواست رضایت میکند. این نام باید دقیقاً منعکسکننده برنامه شما باشد و با نام برنامهای که کاربران در جاهای دیگر میبینند، مطابقت داشته باشد. نام برنامه در صفحه رضایتنامه پیوند حساب نمایش داده خواهد شد.
لوگوی برنامه: تصویری در صفحه رضایتنامه که به کاربران کمک میکند برنامه شما را بشناسند. این لوگو در صفحه رضایتنامه پیوند حساب و در تنظیمات حساب نمایش داده میشود.
ایمیل پشتیبانی: برای اینکه کاربران بتوانند در مورد رضایت خود با شما تماس بگیرند.
حوزههای دسترسی برای APIهای گوگل: حوزهها به برنامه شما اجازه میدهند تا به دادههای خصوصی گوگل کاربر دسترسی داشته باشد. برای مورد استفاده اتصال حساب گوگل، حوزه پیشفرض (ایمیل، نمایه، شناسه باز) کافی است، نیازی به اضافه کردن هیچ حوزه حساسی ندارید. به طور کلی، بهترین روش این است که حوزهها را به صورت تدریجی، در زمانی که دسترسی مورد نیاز است، درخواست کنید، نه اینکه از ابتدا درخواست دهید. اطلاعات بیشتر .
دامنههای مجاز: برای محافظت از شما و کاربرانتان، گوگل فقط به برنامههایی که با استفاده از OAuth احراز هویت میشوند، اجازه استفاده از دامنههای مجاز را میدهد. لینکهای برنامههای شما باید در دامنههای مجاز میزبانی شوند. اطلاعات بیشتر .
لینک صفحه اصلی برنامه: صفحه اصلی برنامه شما. باید روی یک دامنه مجاز میزبانی شود.
پیوند سیاست حفظ حریم خصوصی برنامه: در صفحه رضایتنامه پیوند حساب گوگل نشان داده میشود. باید در یک دامنه مجاز میزبانی شود.
لینک شرایط خدمات برنامه (اختیاری): باید روی یک دامنه مجاز میزبانی شود.
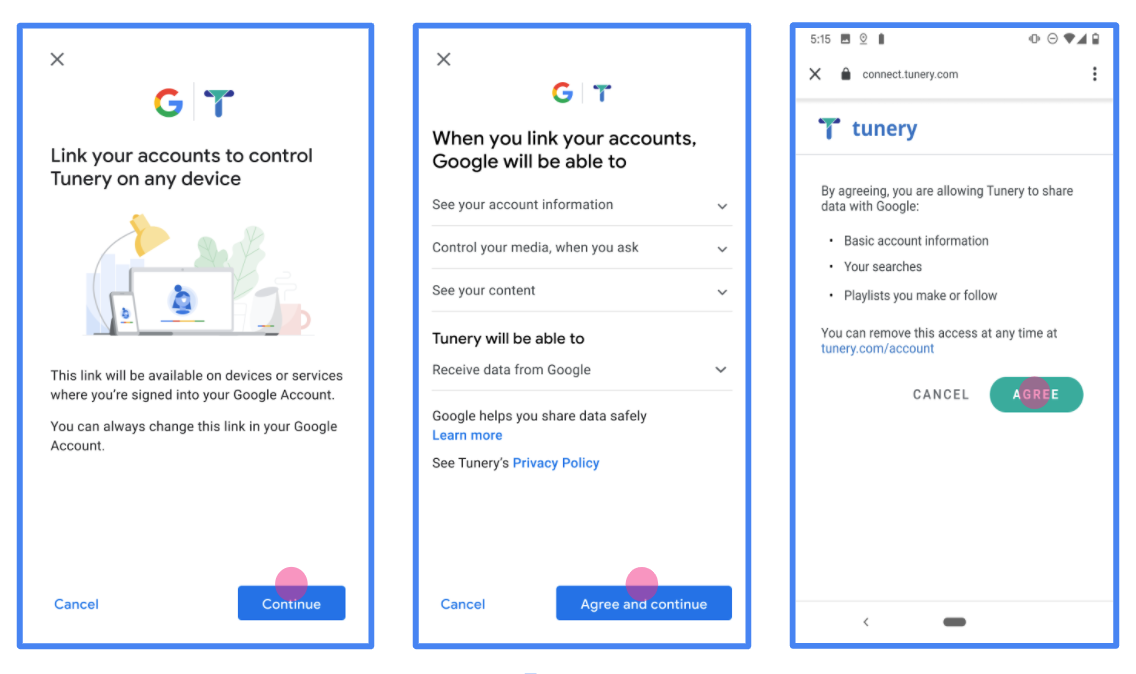
شکل ۱. صفحه رضایتنامه اتصال حساب گوگل برای یک برنامه جعلی، Tunery
«وضعیت تأیید» را بررسی کنید، اگر درخواست شما نیاز به تأیید دارد، روی دکمه «ارسال برای تأیید» کلیک کنید تا درخواست شما برای تأیید ارسال شود. برای جزئیات بیشتر به الزامات تأیید OAuth مراجعه کنید.
سرور OAuth خود را پیاده سازی کنید
An OAuth 2.0 server implementation of the authorization code flow consists of two endpoints, which your service makes available by HTTPS. The first endpoint is the authorization endpoint, which is responsible for finding or obtaining consent from users for data access. The authorization endpoint presents a sign-in UI to your users that aren't already signed in and records consent to the requested access. The second endpoint is the token exchange endpoint, which is used to obtain encrypted strings, called tokens, that authorize a user to access your service.
When a Google application needs to call one of your service's APIs, Google uses these endpoints together to get permission from your users to call these APIs on their behalf.
An OAuth 2.0 authorization code flow session initiated by Google has the following flow:
- Google opens your authorization endpoint in the user's browser. If the flow started on a voice-only device for an Action, Google transfers the execution to a phone.
- The user signs in, if not signed in already, and grants Google permission to access their data with your API, if they haven't already granted permission.
- Your service creates an authorization code and returns it to Google. To do so, redirect the user's browser back to Google with the authorization code attached to the request.
- Google sends the authorization code to your token exchange endpoint, which verifies the authenticity of the code and returns an access token and a refresh token. The access token is a short-lived token that your service accepts as credentials to access APIs. The refresh token is a long-lived token that Google can store and use to acquire new access tokens when they expire.
- After the user has completed the account linking flow, every subsequent request sent from Google contains an access token.
Handle authorization requests
When you need to perform account linking using the OAuth 2.0 authorization code flow, Google sends the user to your authorization endpoint with a request that includes the following parameters:
| Authorization endpoint parameters | |
|---|---|
client_id |
The Client ID you assigned to Google. |
redirect_uri |
The URL to which you send the response to this request. |
state |
A bookkeeping value that is passed back to Google unchanged in the redirect URI. |
scope |
Optional: A space-delimited set of scope strings that specify the data Google is requesting authorization for. |
response_type |
The type of value to return in the response. For the OAuth 2.0
authorization code flow, the response type is always code.
|
user_locale |
The Google Account language setting in RFC5646 format, used to localize your content in the user's preferred language. |
For example, if your authorization endpoint is available at
https://myservice.example.com/auth, a request might look like the following:
GET https://myservice.example.com/auth?client_id=GOOGLE_CLIENT_ID&redirect_uri=REDIRECT_URI&state=STATE_STRING&scope=REQUESTED_SCOPES&response_type=code&user_locale=LOCALE
For your authorization endpoint to handle sign-in requests, do the following steps:
- Verify that the
client_idmatches the Client ID you assigned to Google, and that theredirect_urimatches the redirect URL provided by Google for your service. These checks are important to prevent granting access to unintended or misconfigured client apps. If you support multiple OAuth 2.0 flows, also confirm that theresponse_typeiscode. - Check if the user is signed in to your service. If the user isn't signed in, complete your service's sign-in or sign-up flow.
- Generate an authorization code for Google to use to access your API. The authorization code can be any string value, but it must uniquely represent the user, the client the token is for, and the code's expiration time, and it must not be guessable. You typically issue authorization codes that expire after approximately 10 minutes.
- Confirm that the URL specified by the
redirect_uriparameter has the following form:https://oauth-redirect.googleusercontent.com/r/YOUR_PROJECT_ID https://oauth-redirect-sandbox.googleusercontent.com/r/YOUR_PROJECT_ID
- Redirect the user's browser to the URL specified by the
redirect_uriparameter. Include the authorization code you just generated and the original, unmodified state value when you redirect by appending thecodeandstateparameters. The following is an example of the resulting URL:https://oauth-redirect.googleusercontent.com/r/YOUR_PROJECT_ID?code=AUTHORIZATION_CODE&state=STATE_STRING
Handle token exchange requests
Your service's token exchange endpoint is responsible for two kinds of token exchanges:
- Exchange authorization codes for access tokens and refresh tokens
- Exchange refresh tokens for access tokens
Token exchange requests include the following parameters:
| Token exchange endpoint parameters | |
|---|---|
client_id |
A string that identifies the request origin as Google. This string must be registered within your system as Google's unique identifier. |
client_secret |
A secret string that you registered with Google for your service. |
grant_type |
The type of token being exchanged. It's either
authorization_code or refresh_token. |
code |
When grant_type=authorization_code, this parameter is the
code Google received from either your sign-in or token exchange
endpoint. |
redirect_uri |
When grant_type=authorization_code, this parameter is the
URL used in the initial authorization request. |
refresh_token |
When grant_type=refresh_token, this parameter is the
refresh token Google received from your token exchange endpoint. |
Exchange authorization codes for access tokens and refresh tokens
After the user signs in and your authorization endpoint returns a short-lived authorization code to Google, Google sends a request to your token exchange endpoint to exchange the authorization code for an access token and a refresh token.
For these requests, the value of grant_type is authorization_code, and the
value of code is the value of the authorization code you previously granted
to Google. The following is an example of a request to exchange an
authorization code for an access token and a refresh token:
POST /token HTTP/1.1
Host: oauth2.example.com
Content-Type: application/x-www-form-urlencoded

client_id=GOOGLE_CLIENT_ID&client_secret=GOOGLE_CLIENT_SECRET&grant_type=authorization_code&code=AUTHORIZATION_CODE&redirect_uri=REDIRECT_URI
To exchange authorization codes for an access token and a refresh token, your
token exchange endpoint responds to POST requests by executing the following
steps:
- Verify that the
client_ididentifies the request origin as an authorized origin, and that theclient_secretmatches the expected value. - Verify that the authorization code is valid and not expired, and that the client ID specified in the request matches the client ID associated with the authorization code.
- Confirm that the URL specified by the
redirect_uriparameter is identical to the value used in the initial authorization request. - If you can't verify all of the above criteria, return an HTTP
400 Bad Request error with
{"error": "invalid_grant"}as the body. - Otherwise, use the user ID from the authorization code to generate a refresh token and an access token. These tokens can be any string value, but they must uniquely represent the user and the client the token is for, and they must not be guessable. For access tokens, also record the expiration time of the token, which is typically an hour after you issue the token. Refresh tokens don't expire.
- Return the following JSON object in the body of the HTTPS response:
{
"token_type": "Bearer",
"access_token": "ACCESS_TOKEN",
"refresh_token": "REFRESH_TOKEN",
"expires_in": SECONDS_TO_EXPIRATION
}
Google stores the access token and the refresh token for the user and records the expiration of the access token. When the access token expires, Google uses the refresh token to get a new access token from your token exchange endpoint.
Exchange refresh tokens for access tokens
When an access token expires, Google sends a request to your token exchange endpoint to exchange a refresh token for a new access token.
For these requests, the value of grant_type is refresh_token, and the value
of refresh_token is the value of the refresh token you previously granted to
Google. The following is an example of a request to exchange a refresh token
for an access token:
POST /token HTTP/1.1
Host: oauth2.example.com
Content-Type: application/x-www-form-urlencoded

client_id=GOOGLE_CLIENT_ID&client_secret=GOOGLE_CLIENT_SECRET&grant_type=refresh_token&refresh_token=REFRESH_TOKEN
To exchange a refresh token for an access token, your token exchange endpoint
responds to POST requests by executing the following steps:
- Verify that the
client_ididentifies the request origin as Google, and that theclient_secretmatches the expected value. - Verify that the refresh token is valid, and that the client ID specified in the request matches the client ID associated with the refresh token.
- If you can't verify all of the above criteria, return an HTTP 400
Bad Request error with
{"error": "invalid_grant"}as the body. - Otherwise, use the user ID from the refresh token to generate an access token. These tokens can be any string value, but they must uniquely represent the user and the client the token is for, and they must not be guessable. For access tokens, also record the expiration time of the token, typically an hour after you issue the token.
- Return the following JSON object in the body of the HTTPS
response:
{
"token_type": "Bearer",
"access_token": "ACCESS_TOKEN",
"expires_in": SECONDS_TO_EXPIRATION
}
رسیدگی به درخواست های اطلاعات کاربر
نقطه پایانی userinfo یک منبع محافظت شده OAuth 2.0 است که ادعاهای مربوط به کاربر پیوند شده را برمیگرداند. پیاده سازی و میزبانی نقطه پایانی اطلاعات کاربر اختیاری است، به جز موارد استفاده زیر:
- ورود به سیستم حساب پیوندی با Google One Tap.
- اشتراک بدون اصطکاک در AndroidTV.
پس از اینکه رمز دسترسی با موفقیت از نقطه پایانی نشانه شما بازیابی شد، Google درخواستی را به نقطه پایانی اطلاعات کاربری شما ارسال می کند تا اطلاعات نمایه اولیه کاربر پیوند داده شده را بازیابی کند.
| سرصفحه های درخواست نقطه پایانی کاربر | |
|---|---|
Authorization header | نشانه دسترسی از نوع Bearer. |
به عنوان مثال، اگر نقطه پایانی اطلاعات کاربری شما در https://myservice.example.com/userinfo در دسترس باشد، ممکن است یک درخواست به شکل زیر باشد:
GET /userinfo HTTP/1.1
Host: myservice.example.com
Authorization: Bearer ACCESS_TOKEN
برای اینکه نقطه پایانی اطلاعات کاربری شما به درخواستها رسیدگی کند، مراحل زیر را انجام دهید:
- رمز دسترسی را از سربرگ Authorization استخراج کنید و اطلاعات کاربر مرتبط با نشانه دسترسی را برگردانید.
- اگر رمز دسترسی نامعتبر است، با استفاده از سربرگ پاسخ
WWW-Authenticateخطای غیرمجاز HTTP 401 را برگردانید. در زیر نمونه ای از پاسخ خطای userinfo آورده شده است:HTTP/1.1 401 Unauthorized WWW-Authenticate: error="invalid_token", error_description="The Access Token expired"
اگر نشانه دسترسی معتبر است، پاسخ HTTP 200 را با شی JSON زیر در بدنه پاسخ HTTPS برگردانید:
{ "sub": "USER_UUID", "email": "EMAIL_ADDRESS", "given_name": "FIRST_NAME", "family_name": "LAST_NAME", "name": "FULL_NAME", "picture": "PROFILE_PICTURE", }پاسخ نقطه پایانی اطلاعات کاربر subیک شناسه منحصر به فرد که کاربر را در سیستم شما شناسایی می کند. emailآدرس ایمیل کاربر. given_nameاختیاری: نام کاربر. family_nameاختیاری: نام خانوادگی کاربر. nameاختیاری: نام کامل کاربر. pictureاختیاری: تصویر نمایه کاربر.
اعتبار بخشیدن به اجرای شما
您可以使用 OAuth 2.0 Playground 工具验证您的实现。
在该工具中,执行以下步骤:
- 点击配置 以打开“OAuth 2.0 配置”窗口。
- 在 OAuth flow(OAuth 流程)字段中,选择 Client-side(客户端)。
- 在 OAuth Endpoints 字段中,选择 Custom。
- 在相应字段中指定您的 OAuth 2.0 端点以及您分配给 Google 的客户端 ID。
- 在第 1 步部分中,请勿选择任何 Google 范围。请将此字段留空,或输入适用于您服务器的范围(如果您不使用 OAuth 范围,则输入任意字符串)。完成后,点击 Authorize APIs。
- 在第 2 步和第 3 步部分中,完成 OAuth 2.0 流程,并验证每个步骤是否按预期运行。
您可以使用 Google 账号关联演示工具验证您的实现。
在该工具中,执行以下步骤:
- 点击使用 Google 账号登录按钮。
- 选择您要关联的账号。
- 输入服务 ID。
- (可选)输入您将请求访问的一个或多个范围。
- 点击开始演示。
- 当系统提示时,请确认您可以同意或拒绝关联请求。
- 确认您已重定向到相应平台。
حسابها با استفاده از استاندارد صنعتی OAuth 2.0 ضمنی و جریانهای کد مجوز مرتبط هستند. سرویس شما باید از مجوز سازگار با OAuth 2.0 و نقاط پایانی تبادل رمز پشتیبانی کند.
In the implicit flow, Google opens your authorization endpoint in the user's browser. After successful sign in, you return a long-lived access token to Google. This access token is now included in every request sent from Google.
In the authorization code flow, you need two endpoints:
The authorization endpoint, which presents the sign-in UI to your users that aren't already signed in. The authorization endpoint also creates a short-lived authorization code to record users' consent to the requested access.
The token exchange endpoint, which is responsible for two types of exchanges:
- Exchanges an authorization code for a long-lived refresh token and a short-lived access token. This exchange happens when the user goes through the account linking flow.
- Exchanges a long-lived refresh token for a short-lived access token. This exchange happens when Google needs a new access token because the one it had expired.
Choose an OAuth 2.0 flow
Although the implicit flow is simpler to implement, Google recommends that access tokens issued by the implicit flow never expire. This is because the user is forced to link their account again after a token expires with the implicit flow. If you need token expiration for security reasons, we strongly recommend that you use the authorization code flow instead.
Design guidelines
This section describes the design requirements and recommendations for the user screen that you host for OAuth linking flows. After it's called by Google's app, your platform displays a sign in to Google page and account linking consent screen to the user. The user is directed back to Google's app after giving their consent to link accounts.
Requirements
- You must communicate that the user’s account will be linked to Google, not a specific Google product like Google Home or Google Assistant.
Recommendations
We recommend that you do the following:
Display Google's Privacy Policy. Include a link to Google’s Privacy Policy on the consent screen.
Data to be shared. Use clear and concise language to tell the user what data of theirs Google requires and why.
Clear call-to-action. State a clear call-to-action on your consent screen, such as “Agree and link.” This is because users need to understand what data they're required to share with Google to link their accounts.
Ability to cancel. Provide a way for users to go back or cancel, if they choose not to link.
Clear sign-in process. Ensure that users have clear method for signing in to their Google account, such as fields for their username and password or Sign in with Google.
Ability to unlink. Offer a mechanism for users to unlink, such as a URL to their account settings on your platform. Alternatively, you can include a link to Google Account where users can manage their linked account.
Ability to change user account. Suggest a method for users to switch their account(s). This is especially beneficial if users tend to have multiple accounts.
- If a user must close the consent screen to switch accounts, send a recoverable error to Google so the user can sign in to the desired account with OAuth linking and the implicit flow.
Include your logo. Display your company logo on the consent screen. Use your style guidelines to place your logo. If you wish to also display Google's logo, see Logos and trademarks.
پروژه را ایجاد کنید
برای ایجاد پروژه خود با استفاده از پیوند حساب:
- به کنسول API گوگل بروید.
- روی ایجاد پروژه کلیک کنید.
- یک نام وارد کنید یا پیشنهاد تولید شده را بپذیرید.
- فیلدهای باقی مانده را تأیید یا ویرایش کنید.
- روی ایجاد کلیک کنید.
برای مشاهده شناسه پروژه خود:
- به کنسول API گوگل بروید.
- پروژه خود را در جدول صفحه اصلی پیدا کنید. شناسه پروژه در ستون شناسه نمایش داده میشود.
صفحه رضایت OAuth خود را پیکربندی کنید
فرآیند پیوند حساب گوگل شامل یک صفحه رضایتنامه است که به کاربران میگوید برنامهای که درخواست دسترسی به دادههای آنها را دارد، چه نوع دادههایی را درخواست میکند و شرایط اعمال آن چیست. قبل از ایجاد شناسه کلاینت Google API، باید صفحه رضایتنامه OAuth خود را پیکربندی کنید.
- صفحهی رضایتنامهی OAuth را در کنسول Google APIs باز کنید.
- در صورت درخواست، پروژهای را که تازه ایجاد کردهاید انتخاب کنید.
در صفحه «صفحه رضایت OAuth»، فرم را پر کنید و روی دکمه «ذخیره» کلیک کنید.
نام برنامه: نام برنامهای که درخواست رضایت میکند. این نام باید دقیقاً منعکسکننده برنامه شما باشد و با نام برنامهای که کاربران در جاهای دیگر میبینند، مطابقت داشته باشد. نام برنامه در صفحه رضایتنامه پیوند حساب نمایش داده خواهد شد.
لوگوی برنامه: تصویری در صفحه رضایتنامه که به کاربران کمک میکند برنامه شما را بشناسند. این لوگو در صفحه رضایتنامه پیوند حساب و در تنظیمات حساب نمایش داده میشود.
ایمیل پشتیبانی: برای اینکه کاربران بتوانند در مورد رضایت خود با شما تماس بگیرند.
حوزههای دسترسی برای APIهای گوگل: حوزهها به برنامه شما اجازه میدهند تا به دادههای خصوصی گوگل کاربر دسترسی داشته باشد. برای مورد استفاده اتصال حساب گوگل، حوزه پیشفرض (ایمیل، نمایه، شناسه باز) کافی است، نیازی به اضافه کردن هیچ حوزه حساسی ندارید. به طور کلی، بهترین روش این است که حوزهها را به صورت تدریجی، در زمانی که دسترسی مورد نیاز است، درخواست کنید، نه اینکه از ابتدا درخواست دهید. اطلاعات بیشتر .
دامنههای مجاز: برای محافظت از شما و کاربرانتان، گوگل فقط به برنامههایی که با استفاده از OAuth احراز هویت میشوند، اجازه استفاده از دامنههای مجاز را میدهد. لینکهای برنامههای شما باید در دامنههای مجاز میزبانی شوند. اطلاعات بیشتر .
لینک صفحه اصلی برنامه: صفحه اصلی برنامه شما. باید روی یک دامنه مجاز میزبانی شود.
پیوند سیاست حفظ حریم خصوصی برنامه: در صفحه رضایتنامه پیوند حساب گوگل نشان داده میشود. باید در یک دامنه مجاز میزبانی شود.
لینک شرایط خدمات برنامه (اختیاری): باید روی یک دامنه مجاز میزبانی شود.
شکل ۱. صفحه رضایتنامه اتصال حساب گوگل برای یک برنامه جعلی، Tunery
«وضعیت تأیید» را بررسی کنید، اگر درخواست شما نیاز به تأیید دارد، روی دکمه «ارسال برای تأیید» کلیک کنید تا درخواست شما برای تأیید ارسال شود. برای جزئیات بیشتر به الزامات تأیید OAuth مراجعه کنید.
سرور OAuth خود را پیاده سازی کنید
An OAuth 2.0 server implementation of the authorization code flow consists of two endpoints, which your service makes available by HTTPS. The first endpoint is the authorization endpoint, which is responsible for finding or obtaining consent from users for data access. The authorization endpoint presents a sign-in UI to your users that aren't already signed in and records consent to the requested access. The second endpoint is the token exchange endpoint, which is used to obtain encrypted strings, called tokens, that authorize a user to access your service.
When a Google application needs to call one of your service's APIs, Google uses these endpoints together to get permission from your users to call these APIs on their behalf.
An OAuth 2.0 authorization code flow session initiated by Google has the following flow:
- Google opens your authorization endpoint in the user's browser. If the flow started on a voice-only device for an Action, Google transfers the execution to a phone.
- The user signs in, if not signed in already, and grants Google permission to access their data with your API, if they haven't already granted permission.
- Your service creates an authorization code and returns it to Google. To do so, redirect the user's browser back to Google with the authorization code attached to the request.
- Google sends the authorization code to your token exchange endpoint, which verifies the authenticity of the code and returns an access token and a refresh token. The access token is a short-lived token that your service accepts as credentials to access APIs. The refresh token is a long-lived token that Google can store and use to acquire new access tokens when they expire.
- After the user has completed the account linking flow, every subsequent request sent from Google contains an access token.
Handle authorization requests
When you need to perform account linking using the OAuth 2.0 authorization code flow, Google sends the user to your authorization endpoint with a request that includes the following parameters:
| Authorization endpoint parameters | |
|---|---|
client_id |
The Client ID you assigned to Google. |
redirect_uri |
The URL to which you send the response to this request. |
state |
A bookkeeping value that is passed back to Google unchanged in the redirect URI. |
scope |
Optional: A space-delimited set of scope strings that specify the data Google is requesting authorization for. |
response_type |
The type of value to return in the response. For the OAuth 2.0
authorization code flow, the response type is always code.
|
user_locale |
The Google Account language setting in RFC5646 format, used to localize your content in the user's preferred language. |
For example, if your authorization endpoint is available at
https://myservice.example.com/auth, a request might look like the following:
GET https://myservice.example.com/auth?client_id=GOOGLE_CLIENT_ID&redirect_uri=REDIRECT_URI&state=STATE_STRING&scope=REQUESTED_SCOPES&response_type=code&user_locale=LOCALE
For your authorization endpoint to handle sign-in requests, do the following steps:
- Verify that the
client_idmatches the Client ID you assigned to Google, and that theredirect_urimatches the redirect URL provided by Google for your service. These checks are important to prevent granting access to unintended or misconfigured client apps. If you support multiple OAuth 2.0 flows, also confirm that theresponse_typeiscode. - Check if the user is signed in to your service. If the user isn't signed in, complete your service's sign-in or sign-up flow.
- Generate an authorization code for Google to use to access your API. The authorization code can be any string value, but it must uniquely represent the user, the client the token is for, and the code's expiration time, and it must not be guessable. You typically issue authorization codes that expire after approximately 10 minutes.
- Confirm that the URL specified by the
redirect_uriparameter has the following form:https://oauth-redirect.googleusercontent.com/r/YOUR_PROJECT_ID https://oauth-redirect-sandbox.googleusercontent.com/r/YOUR_PROJECT_ID
- Redirect the user's browser to the URL specified by the
redirect_uriparameter. Include the authorization code you just generated and the original, unmodified state value when you redirect by appending thecodeandstateparameters. The following is an example of the resulting URL:https://oauth-redirect.googleusercontent.com/r/YOUR_PROJECT_ID?code=AUTHORIZATION_CODE&state=STATE_STRING
Handle token exchange requests
Your service's token exchange endpoint is responsible for two kinds of token exchanges:
- Exchange authorization codes for access tokens and refresh tokens
- Exchange refresh tokens for access tokens
Token exchange requests include the following parameters:
| Token exchange endpoint parameters | |
|---|---|
client_id |
A string that identifies the request origin as Google. This string must be registered within your system as Google's unique identifier. |
client_secret |
A secret string that you registered with Google for your service. |
grant_type |
The type of token being exchanged. It's either
authorization_code or refresh_token. |
code |
When grant_type=authorization_code, this parameter is the
code Google received from either your sign-in or token exchange
endpoint. |
redirect_uri |
When grant_type=authorization_code, this parameter is the
URL used in the initial authorization request. |
refresh_token |
When grant_type=refresh_token, this parameter is the
refresh token Google received from your token exchange endpoint. |
Exchange authorization codes for access tokens and refresh tokens
After the user signs in and your authorization endpoint returns a short-lived authorization code to Google, Google sends a request to your token exchange endpoint to exchange the authorization code for an access token and a refresh token.
For these requests, the value of grant_type is authorization_code, and the
value of code is the value of the authorization code you previously granted
to Google. The following is an example of a request to exchange an
authorization code for an access token and a refresh token:
POST /token HTTP/1.1
Host: oauth2.example.com
Content-Type: application/x-www-form-urlencoded

client_id=GOOGLE_CLIENT_ID&client_secret=GOOGLE_CLIENT_SECRET&grant_type=authorization_code&code=AUTHORIZATION_CODE&redirect_uri=REDIRECT_URI
To exchange authorization codes for an access token and a refresh token, your
token exchange endpoint responds to POST requests by executing the following
steps:
- Verify that the
client_ididentifies the request origin as an authorized origin, and that theclient_secretmatches the expected value. - Verify that the authorization code is valid and not expired, and that the client ID specified in the request matches the client ID associated with the authorization code.
- Confirm that the URL specified by the
redirect_uriparameter is identical to the value used in the initial authorization request. - If you can't verify all of the above criteria, return an HTTP
400 Bad Request error with
{"error": "invalid_grant"}as the body. - Otherwise, use the user ID from the authorization code to generate a refresh token and an access token. These tokens can be any string value, but they must uniquely represent the user and the client the token is for, and they must not be guessable. For access tokens, also record the expiration time of the token, which is typically an hour after you issue the token. Refresh tokens don't expire.
- Return the following JSON object in the body of the HTTPS response:
{
"token_type": "Bearer",
"access_token": "ACCESS_TOKEN",
"refresh_token": "REFRESH_TOKEN",
"expires_in": SECONDS_TO_EXPIRATION
}
Google stores the access token and the refresh token for the user and records the expiration of the access token. When the access token expires, Google uses the refresh token to get a new access token from your token exchange endpoint.
Exchange refresh tokens for access tokens
When an access token expires, Google sends a request to your token exchange endpoint to exchange a refresh token for a new access token.
For these requests, the value of grant_type is refresh_token, and the value
of refresh_token is the value of the refresh token you previously granted to
Google. The following is an example of a request to exchange a refresh token
for an access token:
POST /token HTTP/1.1
Host: oauth2.example.com
Content-Type: application/x-www-form-urlencoded

client_id=GOOGLE_CLIENT_ID&client_secret=GOOGLE_CLIENT_SECRET&grant_type=refresh_token&refresh_token=REFRESH_TOKEN
To exchange a refresh token for an access token, your token exchange endpoint
responds to POST requests by executing the following steps:
- Verify that the
client_ididentifies the request origin as Google, and that theclient_secretmatches the expected value. - Verify that the refresh token is valid, and that the client ID specified in the request matches the client ID associated with the refresh token.
- If you can't verify all of the above criteria, return an HTTP 400
Bad Request error with
{"error": "invalid_grant"}as the body. - Otherwise, use the user ID from the refresh token to generate an access token. These tokens can be any string value, but they must uniquely represent the user and the client the token is for, and they must not be guessable. For access tokens, also record the expiration time of the token, typically an hour after you issue the token.
- Return the following JSON object in the body of the HTTPS
response:
{
"token_type": "Bearer",
"access_token": "ACCESS_TOKEN",
"expires_in": SECONDS_TO_EXPIRATION
}
رسیدگی به درخواست های اطلاعات کاربر
نقطه پایانی userinfo یک منبع محافظت شده OAuth 2.0 است که ادعاهای مربوط به کاربر پیوند شده را برمیگرداند. پیاده سازی و میزبانی نقطه پایانی اطلاعات کاربر اختیاری است، به جز موارد استفاده زیر:
- ورود به سیستم حساب پیوندی با Google One Tap.
- اشتراک بدون اصطکاک در AndroidTV.
پس از اینکه رمز دسترسی با موفقیت از نقطه پایانی نشانه شما بازیابی شد، Google درخواستی را به نقطه پایانی اطلاعات کاربری شما ارسال می کند تا اطلاعات نمایه اولیه کاربر پیوند داده شده را بازیابی کند.
| سرصفحه های درخواست نقطه پایانی کاربر | |
|---|---|
Authorization header | نشانه دسترسی از نوع Bearer. |
به عنوان مثال، اگر نقطه پایانی اطلاعات کاربری شما در https://myservice.example.com/userinfo در دسترس باشد، ممکن است یک درخواست به شکل زیر باشد:
GET /userinfo HTTP/1.1
Host: myservice.example.com
Authorization: Bearer ACCESS_TOKEN
برای اینکه نقطه پایانی اطلاعات کاربری شما به درخواستها رسیدگی کند، مراحل زیر را انجام دهید:
- رمز دسترسی را از سربرگ Authorization استخراج کنید و اطلاعات کاربر مرتبط با نشانه دسترسی را برگردانید.
- اگر رمز دسترسی نامعتبر است، با استفاده از سربرگ پاسخ
WWW-Authenticateخطای غیرمجاز HTTP 401 را برگردانید. در زیر نمونه ای از پاسخ خطای userinfo آورده شده است:HTTP/1.1 401 Unauthorized WWW-Authenticate: error="invalid_token", error_description="The Access Token expired"
اگر نشانه دسترسی معتبر است، پاسخ HTTP 200 را با شی JSON زیر در بدنه پاسخ HTTPS برگردانید:
{ "sub": "USER_UUID", "email": "EMAIL_ADDRESS", "given_name": "FIRST_NAME", "family_name": "LAST_NAME", "name": "FULL_NAME", "picture": "PROFILE_PICTURE", }پاسخ نقطه پایانی اطلاعات کاربر subیک شناسه منحصر به فرد که کاربر را در سیستم شما شناسایی می کند. emailآدرس ایمیل کاربر. given_nameاختیاری: نام کاربر. family_nameاختیاری: نام خانوادگی کاربر. nameاختیاری: نام کامل کاربر. pictureاختیاری: تصویر نمایه کاربر.
اعتبار بخشیدن به اجرای شما
您可以使用 OAuth 2.0 Playground 工具验证您的实现。
在该工具中,执行以下步骤:
- 点击配置 以打开“OAuth 2.0 配置”窗口。
- 在 OAuth flow(OAuth 流程)字段中,选择 Client-side(客户端)。
- 在 OAuth Endpoints 字段中,选择 Custom。
- 在相应字段中指定您的 OAuth 2.0 端点以及您分配给 Google 的客户端 ID。
- 在第 1 步部分中,请勿选择任何 Google 范围。请将此字段留空,或输入适用于您服务器的范围(如果您不使用 OAuth 范围,则输入任意字符串)。完成后,点击 Authorize APIs。
- 在第 2 步和第 3 步部分中,完成 OAuth 2.0 流程,并验证每个步骤是否按预期运行。
您可以使用 Google 账号关联演示工具验证您的实现。
在该工具中,执行以下步骤:
- 点击使用 Google 账号登录按钮。
- 选择您要关联的账号。
- 输入服务 ID。
- (可选)输入您将请求访问的一个或多个范围。
- 点击开始演示。
- 当系统提示时,请确认您可以同意或拒绝关联请求。
- 确认您已重定向到相应平台。