Page Summary
-
OAuth-based Google Sign-In Streamlined linking enhances OAuth linking by adding Google Sign-In for a seamless user experience and enabling account creation using Google accounts.
-
The general steps for streamlined linking involve obtaining user consent for Google profile access, checking for existing accounts based on profile info, linking accounts for existing users, and validating ID tokens for creating new accounts when no match is found.
-
Requirements for streamlined linking include implementing basic web OAuth linking with compliant authorization and token exchange endpoints that support JWT assertions and the
check,create, andgetintents. -
The token exchange endpoint must handle
checkintent requests by validating a JWT assertion containing user identity information and checking if the Google account ID or email exists in your system, responding withaccount_found=trueoraccount_found=false(with a 404 error). -
The token exchange endpoint must handle
getintent requests by validating a JWT assertion, checking for an existing account, and issuing a token if found, or returning alinking_error(with a 401 error) if not found. -
The token exchange endpoint must handle
createintent requests by validating a JWT assertion, validating user information, creating a new account if no match is found, and issuing a token upon successful creation, or returning alinking_error(with a 401 error) if a matching account is found. -
To implement streamlined linking, you need to obtain your Google API Client ID from the Google Cloud Console and ensure your OAuth server supports the required intents and JWT handling.
-
You can validate your streamlined linking implementation using tools like the OAuth 2.0 Playground and the Google Account Linking Demo.
Overview
OAuth-based Sign in with Google Streamlined linking adds Sign in with Google on top of OAuth linking. This provides a seamless linking experience for Google users, and it also enables account creation, which allows the user to create a new account on your service using their Google Account.
To perform account linking with OAuth and Sign in with Google, follow these general steps:
- First, ask the user to give consent to access their Google profile.
- Use the information in their profile to check if the user account exists.
- For existing users, link the accounts.
- If you can't find a match for the Google user in your authentication system, validate the ID token received from Google. You can then create a user based on the profile information contained in the ID token.
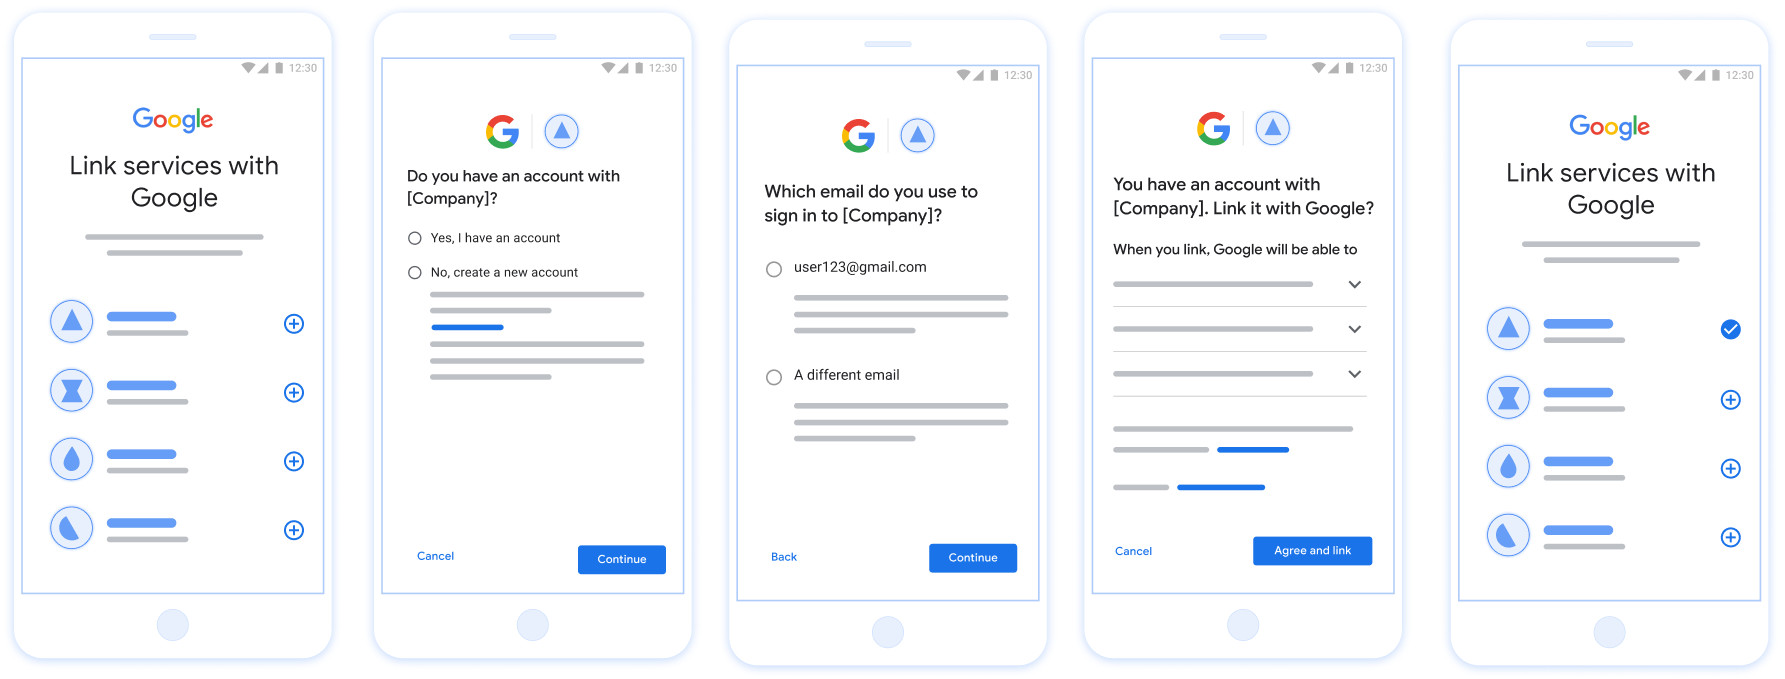
Figure 1. Account Linking on a user's phone with Streamlined Linking
Streamlined Linking: OAuth + Sign in with Google Flow
The following sequence diagram details interactions between the User, Google, and your token exchange endpoint for Streamlined Linking.
Roles and responsibilities
The following table defines the roles and responsibilities of the actors in the Streamlined Linking flow.
| Actor / Component | GAL Role | Responsibilities |
|---|---|---|
| Google App / Server | OAuth Client | Obtains user consent for Sign in with Google, passes identity assertions (JWT) to your server, and securely stores the resulting tokens. |
| Your Token Exchange Endpoint | Identity Provider / Authorization Server | Validates identity assertions, checks for existing accounts, handles
the account linking intents (check, get,
create), and issues tokens based on the requested
intents. |
| Your Service API | Resource Server | Provides access to user data when presented with a valid access token. |
Requirements for Streamlined Linking
- Implement the basic OAuth linking flow. Your service must support OAuth 2.0-compliant authorization and token exchange endpoints.
- Your token exchange endpoint must support
JSON Web Token (JWT)
assertions and implement the
check,create, andgetintents.
Decision Logic for Streamlined Linking
The following logic determines how intents are called during the Streamlined Linking flow:
- Does the user have an account in your authentication system? (User decides by selecting YES or NO)
- YES : Does the user use the email associated with their Google Account to sign into your platform? (User decides by selecting YES or NO)
- YES : Does the user have a matching account in your authentication system? (
check intentis called to confirm)- YES :
get intentis called and the account is linked if get intent returns successfully. - NO : Create New Account? (User decides by selecting YES or NO)
- YES :
create intentis called and the account is linked if create intent returns successfully. - NO : The OAuth linking flow is triggered, the user is directed to their browser, and the user is given the option to link with a different email.
- YES :
- YES :
- NO : The OAuth linking flow is triggered, the user is directed to their browser, and the user is given the option to link with a different email.
- YES : Does the user have a matching account in your authentication system? (
- NO : Does the user have a matching account in your authentication system? (
check intentis called to confirm)- YES :
get intentis called and the account is linked if get intent returns successfully. - NO :
create intentis called and the account is linked if create intent returns successfully.
- YES :
- YES : Does the user use the email associated with their Google Account to sign into your platform? (User decides by selecting YES or NO)
Implementation Recipe
Your token exchange endpoint must implement the check, get, and create intents to support Streamlined Linking.
Follow these steps to handle the different intents:
Check for an existing user account (check intent)
Google calls your token exchange endpoint to verify if the Google user exists in your system. For parameter details, see Streamlined Linking Intents.
Implementation Recipe
To handle the check intent, perform the following actions:
Validate the request:
- Verify
client_id,client_secret, andgrant_type(must beurn:ietf:params:oauth:grant-type:jwt-bearer). - Validate the
assertion(JWT) using the criteria in JWT Validation.
- Verify
Lookup user:
- Check if the Google Account ID (
sub) or email address in the JWT matches a user in your database.
- Check if the Google Account ID (
Respond:
- If found: Return HTTP
200 OKwith{"account_found": "true"}. - If not found: Return HTTP
404 Not Foundwith{"account_found": "false"}.
- If found: Return HTTP
Handle automatic linking (get intent)
If the account exists, Google calls your endpoint with intent=get to retrieve tokens. For parameter details, see Streamlined Linking Intents.
Implementation Recipe
To handle the get intent, perform the following actions:
Validate the request:
- Verify
client_id,client_secret, andgrant_type. - Validate the
assertion(JWT).
- Verify
Lookup user:
- Verify the user exists using the
suboremailclaim.
- Verify the user exists using the
Respond:
- If successful: Generate and return
access_token,refresh_token, andexpires_inin a JSON response (HTTP200 OK). - If linking fails: Return HTTP
401 Unauthorizedwith{"error": "linking_error"}and an optionallogin_hintto fall back to standard OAuth linking.
- If successful: Generate and return
Handle account creation using Sign in with Google (create intent)
If no account exists, Google calls your endpoint with intent=create to create a new user. For parameter details, see Streamlined Linking Intents.
Implementation Recipe
To handle the create intent, perform the following actions:
Validate the request:
- Verify
client_id,client_secret, andgrant_type. - Validate the
assertion(JWT).
- Verify
Verify user does not exist:
- Check if the
suboremailis already in your database. - If the user does exist: Return HTTP
401 Unauthorizedwith{"error": "linking_error", "login_hint": "USER_EMAIL"}to force fallback to OAuth linking.
- Check if the
Create account:
- Use the
sub,email,name, andpictureclaims from the JWT to create a new user record.
- Use the
Respond:
- Generate and return tokens in a JSON response (HTTP
200 OK).
- Generate and return tokens in a JSON response (HTTP
Get your Google API Client ID
You will be required to provide your Google API Client ID during the Account Linking registration process. To get your API Client ID using the project you created while completing the OAuth linking steps. To do so, complete the following steps:
- Go to the Clients page.
Create or select a Google APIs project.
If your project doesn't have a Client ID for the Web application Type, click Create Client to create one. Be sure to include your site's domain in the Authorized JavaScript origins box. When you perform local tests or development, you must add both
http://localhostandhttp://localhost:<port_number>to the Authorized JavaScript origins field.
Validate your implementation
You can validate your implementation by using the OAuth 2.0 Playground tool.
In the tool, do the following steps:
- Click Configuration to open the OAuth 2.0 Configuration window.
- In the OAuth flow field, select Client-side.
- In the OAuth Endpoints field, select Custom.
- Specify your OAuth 2.0 endpoint and the client ID you assigned to Google in the corresponding fields.
- In the Step 1 section, don't select any Google scopes. Instead, leave this field blank or type a scope valid for your server (or an arbitrary string if you don't use OAuth scopes). When you're done, click Authorize APIs.
- In the Step 2 and Step 3 sections, go through the OAuth 2.0 flow and verify that each step works as intended.
You can validate your implementation by using the Google Account Linking Demo tool.
In the tool, do the following steps:
- Click the Sign in with Google button.
- Choose the account you'd like to link.
- Enter the service ID.
- Optionally enter one or more scopes that you will request access for.
- Click Start Demo.
- When prompted, confirm that you may consent and deny the linking request.
- Confirm that you are redirected to your platform.