Descripción general
La vinculación optimizada basada en OAuth de Acceder con Google agrega Acceder con Google a la vinculación de OAuth. Esto proporciona una experiencia de vinculación fluida para los usuarios de Google y también permite la creación de cuentas, lo que permite que el usuario cree una cuenta nueva en tu servicio con su Cuenta de Google.
Para vincular cuentas con OAuth y Acceder con Google, sigue estos pasos generales:
- Primero, pídele al usuario que otorgue su consentimiento para acceder a su perfil de Google.
- Usa la información de su perfil para verificar si existe la cuenta de usuario.
- En el caso de los usuarios existentes, vincula las cuentas.
- Si no encuentras una coincidencia para el usuario de Google en tu sistema de autenticación, valida el token de ID que recibiste de Google. Luego, puedes crear un usuario en función de la información del perfil que contiene el token de ID.
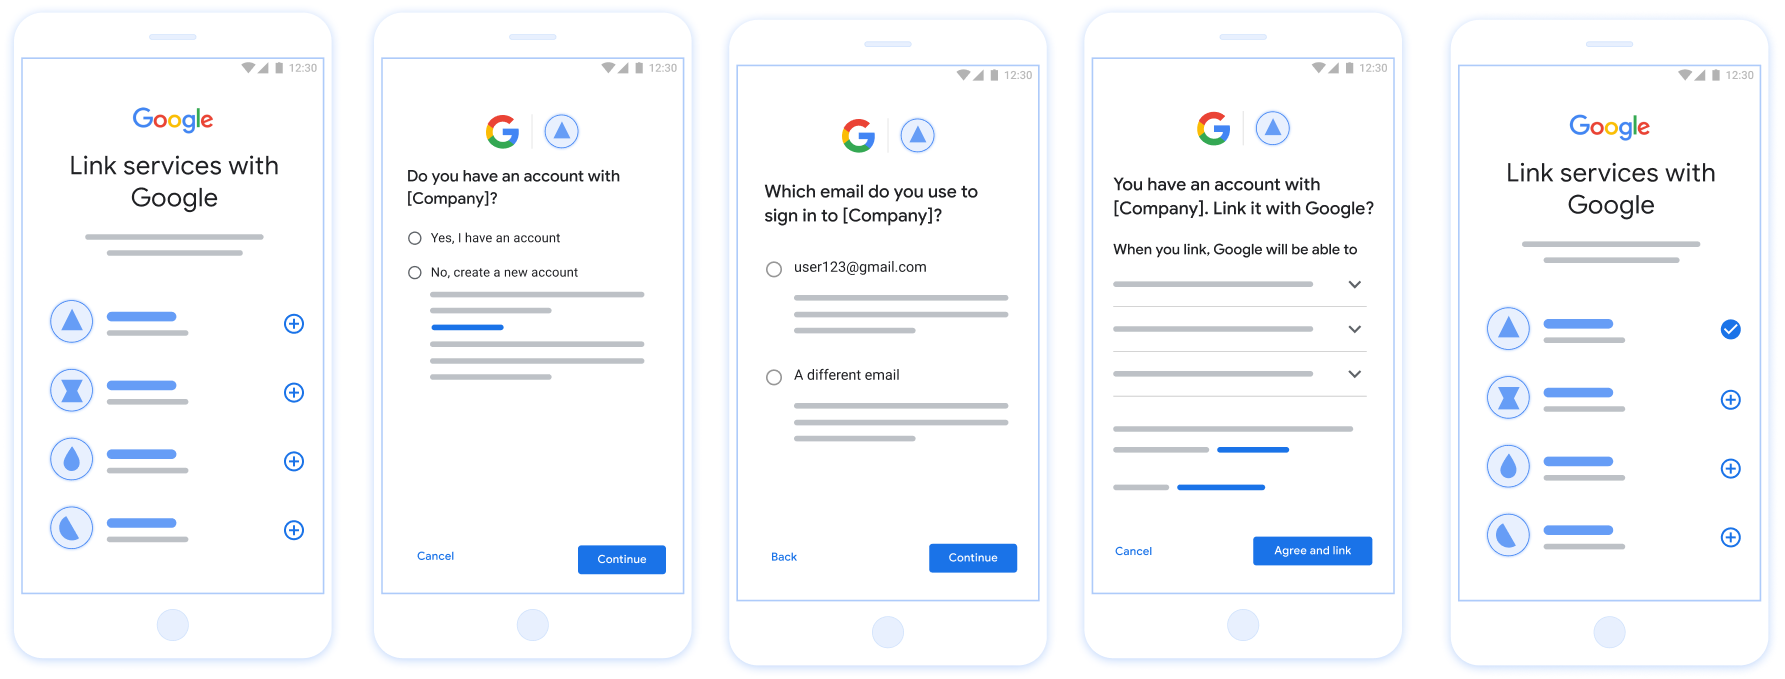
Figura 1. Vinculación de cuentas en el teléfono de un usuario con la vinculación optimizada
Requisitos para la vinculación simplificada
- Implementa el flujo de vinculación básica de OAuth web. Tu servicio debe admitir extremos de autorización y de intercambio de tokens que cumplan con OAuth 2.0.
- Tu extremo de intercambio de tokens debe admitir aserciones de tokens web JSON (JWT) y, además, implementar las intenciones
check,createyget.
Implementa tu servidor de OAuth
Tu extremo de intercambio de tokens debe admitir las intenciones check, create y get.
Sigue estos pasos para completar el flujo de vinculación de cuentas y saber cuándo se usan los diferentes intents:
- ¿El usuario tiene una cuenta en tu sistema de autenticación? (El usuario decide seleccionando SÍ o NO)
- SÍ: ¿El usuario usa el correo electrónico asociado a su Cuenta de Google para acceder a tu plataforma? (El usuario decide seleccionando SÍ o NO)
- SÍ: ¿El usuario tiene una cuenta coincidente en tu sistema de autenticación? (Se llama a
check intentpara confirmar).- SÍ : Se llama a
get intenty se vincula la cuenta si el intent de obtención se devuelve correctamente. - NO: ¿Crear una cuenta nueva? (El usuario decide seleccionando SÍ o NO)
- SÍ : Se llama a
create intenty se vincula la cuenta si la intención de creación se devuelve correctamente. - NO : Se activa el flujo de OAuth web, se dirige al usuario a su navegador y se le da la opción de vincularse con un correo electrónico diferente.
- SÍ : Se llama a
- SÍ : Se llama a
- NO : Se activa el flujo de OAuth web, se dirige al usuario a su navegador y se le da la opción de vincularse con un correo electrónico diferente.
- SÍ: ¿El usuario tiene una cuenta coincidente en tu sistema de autenticación? (Se llama a
- NO: ¿El usuario tiene una cuenta coincidente en tu sistema de autenticación? (Se llama a
check intentpara confirmar).- SÍ : Se llama a
get intenty se vincula la cuenta si el intent de obtención se devuelve correctamente. - NO : Se llama a
create intenty se vincula la cuenta si el intent de creación se devuelve correctamente.
- SÍ : Se llama a
- SÍ: ¿El usuario usa el correo electrónico asociado a su Cuenta de Google para acceder a tu plataforma? (El usuario decide seleccionando SÍ o NO)
Cómo comprobar si hay una cuenta de usuario existente (verificar intención)
Una vez que el usuario da su consentimiento para acceder a su perfil de Google, Google envía un solicitud que incluya una aserción firmada de la identidad del usuario de Google. El contiene información que incluye el ID de la Cuenta de Google del usuario, y tu dirección de correo electrónico. El extremo de intercambio de tokens configurado para tu el proyecto se encargará de esa solicitud.
Si la Cuenta de Google correspondiente ya está presente en tu autenticación
de intercambio de tokens, tu extremo de intercambio de tokens responde con account_found=true. Si el botón
La Cuenta de Google no coincide con un usuario existente, tu extremo de intercambio de token
muestra un error HTTP 404 No encontrado con account_found=false.
La solicitud tiene el siguiente formato:
POST /token HTTP/1.1
Host: oauth2.example.com
Content-Type: application/x-www-form-urlencoded

grant_type=urn:ietf:params:oauth:grant-type:jwt-bearer&intent=check&assertion=JWT&scope=SCOPES&client_id=GOOGLE_CLIENT_ID&client_secret=GOOGLE_CLIENT_SECRET
El extremo de intercambio de tokens debe ser capaz de controlar los siguientes parámetros:
| Parámetros de extremo del token | |
|---|---|
intent |
Para estas solicitudes, el valor de este parámetro es
check |
grant_type |
El tipo de token que se intercambia. Para estas solicitudes, este
tiene el valor urn:ietf:params:oauth:grant-type:jwt-bearer. |
assertion |
Un token web JSON (JWT) que proporciona una aserción firmada del token de Google la identidad del usuario. El JWT contiene información que incluye los datos ID, nombre y dirección de correo electrónico de la Cuenta de Google. |
client_id |
El ID de cliente que le asignaste a Google |
client_secret |
El secreto de cliente que asignaste a Google. |
Para responder a las solicitudes de intent check, el extremo de intercambio de tokens debe realizar los siguientes pasos:
- Valida y decodifica la aserción de JWT.
- Verifica si la Cuenta de Google ya está presente en tu sistema de autenticación.
Valida y decodifica la aserción de JWT
Puedes validar y decodificar la aserción de JWT con un Biblioteca de decodificación JWT para tu lenguaje. Usa las claves públicas de Google, disponibles en JWK o PEM para verificar la firma del token.
Cuando se decodifica, la aserción de JWT luce como el siguiente ejemplo:
{
  "sub": "1234567890",      // The unique ID of the user's Google Account
  "iss": "https://accounts.google.com",        // The assertion's issuer
  "aud": "123-abc.apps.googleusercontent.com", // Your server's client ID
  "iat": 233366400,         // Unix timestamp of the assertion's creation time
  "exp": 233370000,         // Unix timestamp of the assertion's expiration time
  "name": "Jan Jansen",
  "given_name": "Jan",
  "family_name": "Jansen",
  "email": "jan@gmail.com", // If present, the user's email address
  "email_verified": true,   // true, if Google has verified the email address
  "hd": "example.com",      // If present, the host domain of the user's GSuite email address
                            // If present, a URL to user's profile picture
  "picture": "https://lh3.googleusercontent.com/a-/AOh14GjlTnZKHAeb94A-FmEbwZv7uJD986VOF1mJGb2YYQ",
  "locale": "en_US"         // User's locale, from browser or phone settings
}
Además de verificar la firma del token, comprueba que el token de la aserción
entidad emisora (campo iss) es https://accounts.google.com, que el público
(campo aud) es tu ID de cliente asignado y que el token no haya vencido.
(Campo exp).
Usa los campos email, email_verified y hd para determinar si
Google aloja una dirección de correo electrónico y tiene la autoridad para hacerlo. En los casos en que Google sea
autorizado, se sabe que el usuario actualmente es el propietario legítimo de la cuenta
y puedes omitir la contraseña y otros métodos de verificación de identidad. De lo contrario, estos métodos
se puede usar para verificar la cuenta antes de realizar la vinculación.
Casos en los que Google es confiable:
emailtiene el sufijo@gmail.com; esta es una cuenta de Gmail.email_verifiedes verdadero yhdestá configurado. Esta es una cuenta de G Suite.
Los usuarios pueden registrarse en Cuentas de Google sin usar Gmail ni G Suite. Cuándo
email no contiene un sufijo @gmail.com ni hd, ni tampoco
se recomienda verificar con métodos de verificación, tanto confiables como con contraseñas
del usuario. email_verified también puede ser verdadero, ya que Google verificó inicialmente el
usuario cuando se creó la cuenta de Google, sin embargo, la propiedad del tercero
de correo electrónico puede haber cambiado desde entonces.
Verifica si la Cuenta de Google ya está presente en tu sistema de autenticación
Verifica si se cumple alguna de las siguientes condiciones:
- El ID de la Cuenta de Google, que se encuentra en el campo
subde la aserción, está en tu usuario en la base de datos. - La dirección de correo electrónico en la aserción coincide con un usuario de tu base de datos de usuarios.
Si se cumple alguna de estas condiciones, el usuario ya se registró. En ese caso, devolver una respuesta como la siguiente:
HTTP/1.1 200 Success
Content-Type: application/json;charset=UTF-8

{
  "account_found":"true",
}
Si no se especifica el ID de la Cuenta de Google ni la dirección de correo electrónico
coincide con un usuario de tu base de datos, el usuario aún no se registró. En
en este caso, el extremo de intercambio de tokens debe responder con un error HTTP 404
que especifique "account_found": "false", como en el siguiente ejemplo:
HTTP/1.1 404 Not found
Content-Type: application/json;charset=UTF-8

{
  "account_found":"false",
}
Cómo controlar la vinculación automática (obtener intent)
Una vez que el usuario da su consentimiento para acceder a su perfil de Google, Google envía un solicitud que incluya una aserción firmada de la identidad del usuario de Google. El contiene información que incluye el ID de la Cuenta de Google del usuario, y tu dirección de correo electrónico. El extremo de intercambio de tokens configurado para tu el proyecto se encargará de esa solicitud.
Si la Cuenta de Google correspondiente ya está presente en tu autenticación
tu extremo de intercambio de tokens devuelve un token al usuario. Si el botón
La Cuenta de Google no coincide con un usuario existente, tu extremo de intercambio de token
muestra un error linking_error y un login_hint opcional.
La solicitud tiene el siguiente formato:
POST /token HTTP/1.1
Host: oauth2.example.com
Content-Type: application/x-www-form-urlencoded

grant_type=urn:ietf:params:oauth:grant-type:jwt-bearer&intent=get&assertion=JWT&scope=SCOPES&client_id=GOOGLE_CLIENT_ID&client_secret=GOOGLE_CLIENT_SECRET
El extremo de intercambio de tokens debe ser capaz de controlar los siguientes parámetros:
| Parámetros de extremo del token | |
|---|---|
intent |
Para estas solicitudes, el valor de este parámetro es get. |
grant_type |
El tipo de token que se intercambia. Para estas solicitudes, este
tiene el valor urn:ietf:params:oauth:grant-type:jwt-bearer. |
assertion |
Un token web JSON (JWT) que proporciona una aserción firmada del token de Google la identidad del usuario. El JWT contiene información que incluye los datos ID, nombre y dirección de correo electrónico de la Cuenta de Google. |
scope |
Opcional: Cualquier alcance que hayas configurado Google para que solicite solicitudes usuarios. |
client_id |
El ID de cliente que le asignaste a Google |
client_secret |
El secreto de cliente que asignaste a Google. |
Para responder a las solicitudes de intent get, el extremo de intercambio de tokens debe realizar los siguientes pasos:
- Valida y decodifica la aserción de JWT.
- Verifica si la Cuenta de Google ya está presente en tu sistema de autenticación.
Valida y decodifica la aserción de JWT
Puedes validar y decodificar la aserción de JWT con un Biblioteca de decodificación JWT para tu lenguaje. Usa las claves públicas de Google, disponibles en JWK o PEM para verificar la firma del token.
Cuando se decodifica, la aserción de JWT luce como el siguiente ejemplo:
{
  "sub": "1234567890",      // The unique ID of the user's Google Account
  "iss": "https://accounts.google.com",        // The assertion's issuer
  "aud": "123-abc.apps.googleusercontent.com", // Your server's client ID
  "iat": 233366400,         // Unix timestamp of the assertion's creation time
  "exp": 233370000,         // Unix timestamp of the assertion's expiration time
  "name": "Jan Jansen",
  "given_name": "Jan",
  "family_name": "Jansen",
  "email": "jan@gmail.com", // If present, the user's email address
  "email_verified": true,   // true, if Google has verified the email address
  "hd": "example.com",      // If present, the host domain of the user's GSuite email address
                            // If present, a URL to user's profile picture
  "picture": "https://lh3.googleusercontent.com/a-/AOh14GjlTnZKHAeb94A-FmEbwZv7uJD986VOF1mJGb2YYQ",
  "locale": "en_US"         // User's locale, from browser or phone settings
}
Además de verificar la firma del token, comprueba que el token de la aserción
entidad emisora (campo iss) es https://accounts.google.com, que el público
(campo aud) es tu ID de cliente asignado y que el token no haya vencido.
(Campo exp).
Usa los campos email, email_verified y hd para determinar si
Google aloja una dirección de correo electrónico y tiene la autoridad para hacerlo. En los casos en que Google sea
autorizado, se sabe que el usuario actualmente es el propietario legítimo de la cuenta
y puedes omitir la contraseña y otros métodos de verificación de identidad. De lo contrario, estos métodos
se puede usar para verificar la cuenta antes de realizar la vinculación.
Casos en los que Google es confiable:
emailtiene el sufijo@gmail.com; esta es una cuenta de Gmail.email_verifiedes verdadero yhdestá configurado. Esta es una cuenta de G Suite.
Los usuarios pueden registrarse en Cuentas de Google sin usar Gmail ni G Suite. Cuándo
email no contiene un sufijo @gmail.com ni hd, ni tampoco
se recomienda verificar con métodos de verificación, tanto confiables como con contraseñas
del usuario. email_verified también puede ser verdadero, ya que Google verificó inicialmente el
usuario cuando se creó la cuenta de Google, sin embargo, la propiedad del tercero
de correo electrónico puede haber cambiado desde entonces.
Verifica si la Cuenta de Google ya está presente en tu sistema de autenticación
Verifica si se cumple alguna de las siguientes condiciones:
- El ID de la Cuenta de Google, que se encuentra en el campo
subde la aserción, está en tu usuario en la base de datos. - La dirección de correo electrónico en la aserción coincide con un usuario de tu base de datos de usuarios.
Si se encuentra una cuenta para el usuario, emite un token de acceso y muestra los valores en un objeto JSON en el cuerpo de la respuesta HTTPS, como en el siguiente ejemplo:
{
  "token_type": "Bearer",
  "access_token": "ACCESS_TOKEN",
  "refresh_token": "REFRESH_TOKEN",
  "expires_in": SECONDS_TO_EXPIRATION
}
En algunos casos, la vinculación de cuentas basada en un token de ID podría fallar para el usuario. Si
lo hace por alguna razón, tu extremo de intercambio de token debe responder con un
401 que especifica error=linking_error, como se muestra en el siguiente ejemplo:
HTTP/1.1 401 Unauthorized
Content-Type: application/json;charset=UTF-8

{
  "error":"linking_error",
  "login_hint":"foo@bar.com"
}
Cuando Google recibe una respuesta de error 401 con linking_error, Google envía
al usuario al extremo de autorización con login_hint como parámetro. El
El usuario completa la vinculación de la cuenta con el flujo de vinculación de OAuth en su navegador.
Cómo controlar la creación de cuentas con Acceder con Google (intent de creación)
Cuando un usuario necesita crear una cuenta en tu servicio, Google envía una solicitud a tu extremo de intercambio de tokens que especifica intent=create.
La solicitud tiene el siguiente formato:
POST /token HTTP/1.1
Host: oauth2.example.com
Content-Type: application/x-www-form-urlencoded

response_type=token&grant_type=urn:ietf:params:oauth:grant-type:jwt-bearer&scope=SCOPES&intent=create&assertion=JWT&client_id=GOOGLE_CLIENT_ID&client_secret=GOOGLE_CLIENT_SECRET
Tu extremo de intercambio de tokens debe poder controlar los siguientes parámetros:
| Parámetros del extremo de token | |
|---|---|
intent |
Para estas solicitudes, el valor de este parámetro es create. |
grant_type |
El tipo de token que se intercambia. Para estas solicitudes, este
parámetro tiene el valor urn:ietf:params:oauth:grant-type:jwt-bearer. |
assertion |
Un token web JSON (JWT) que proporciona una aserción firmada de la identidad del usuario de Google El JWT contiene información que incluye el ID, el nombre y la dirección de correo electrónico de la Cuenta de Google del usuario. |
client_id |
El ID de cliente que le asignaste a Google. |
client_secret |
El secreto de cliente que le asignaste a Google. |
El JWT dentro del parámetro assertion contiene el ID, el nombre y la dirección de correo electrónico de la Cuenta de Google del usuario, que puedes usar para crear una cuenta nueva en tu servicio.
Para responder a las solicitudes de intent create, tu extremo de intercambio de tokens debe realizar los siguientes pasos:
- Valida y decodifica la aserción de JWT.
- Valida la información del usuario y crea una cuenta nueva.
Valida y decodifica la aserción de JWT
Puedes validar y decodificar la aserción de JWT con un Biblioteca de decodificación JWT para tu lenguaje. Usa las claves públicas de Google, disponibles en JWK o PEM para verificar la firma del token.
Cuando se decodifica, la aserción de JWT luce como el siguiente ejemplo:
{
  "sub": "1234567890",      // The unique ID of the user's Google Account
  "iss": "https://accounts.google.com",        // The assertion's issuer
  "aud": "123-abc.apps.googleusercontent.com", // Your server's client ID
  "iat": 233366400,         // Unix timestamp of the assertion's creation time
  "exp": 233370000,         // Unix timestamp of the assertion's expiration time
  "name": "Jan Jansen",
  "given_name": "Jan",
  "family_name": "Jansen",
  "email": "jan@gmail.com", // If present, the user's email address
  "email_verified": true,   // true, if Google has verified the email address
  "hd": "example.com",      // If present, the host domain of the user's GSuite email address
                            // If present, a URL to user's profile picture
  "picture": "https://lh3.googleusercontent.com/a-/AOh14GjlTnZKHAeb94A-FmEbwZv7uJD986VOF1mJGb2YYQ",
  "locale": "en_US"         // User's locale, from browser or phone settings
}
Además de verificar la firma del token, comprueba que el token de la aserción
entidad emisora (campo iss) es https://accounts.google.com, que el público
(campo aud) es tu ID de cliente asignado y que el token no haya vencido.
(Campo exp).
Usa los campos email, email_verified y hd para determinar si
Google aloja una dirección de correo electrónico y tiene la autoridad para hacerlo. En los casos en que Google sea
autorizado, se sabe que el usuario actualmente es el propietario legítimo de la cuenta
y puedes omitir la contraseña y otros métodos de verificación de identidad. De lo contrario, estos métodos
se puede usar para verificar la cuenta antes de realizar la vinculación.
Casos en los que Google es confiable:
emailtiene el sufijo@gmail.com; esta es una cuenta de Gmail.email_verifiedes verdadero yhdestá configurado. Esta es una cuenta de G Suite.
Los usuarios pueden registrarse en Cuentas de Google sin usar Gmail ni G Suite. Cuándo
email no contiene un sufijo @gmail.com ni hd, ni tampoco
se recomienda verificar con métodos de verificación, tanto confiables como con contraseñas
del usuario. email_verified también puede ser verdadero, ya que Google verificó inicialmente el
usuario cuando se creó la cuenta de Google, sin embargo, la propiedad del tercero
de correo electrónico puede haber cambiado desde entonces.
Valida la información del usuario y crea una cuenta nueva
Verifica si se cumple alguna de las siguientes condiciones:
- El ID de la Cuenta de Google, que se encuentra en el campo
subde la aserción, está en tu base de datos de usuarios. - La dirección de correo electrónico de la aserción coincide con un usuario de tu base de datos de usuarios.
Si se cumple alguna de las condiciones, pídele al usuario que vincule su cuenta existente con su Cuenta de Google. Para ello, responde a la solicitud con un error HTTP 401 que especifique error=linking_error y proporcione la dirección de correo electrónico del usuario como login_hint. A continuación, se muestra una respuesta de ejemplo:
HTTP/1.1 401 Unauthorized
Content-Type: application/json;charset=UTF-8

{
  "error":"linking_error",
  "login_hint":"foo@bar.com"
}
Cuando Google recibe una respuesta de error 401 con linking_error, envía al usuario a tu extremo de autorización con login_hint como parámetro. El usuario completa la vinculación de la cuenta con el flujo de vinculación de OAuth en su navegador.
Si no se cumple ninguna de las condiciones, crea una cuenta de usuario nueva con la información proporcionada en el JWT. Por lo general, las cuentas nuevas no tienen una contraseña establecida. Te recomendamos que agregues Acceder con Google a otras plataformas para permitir que los usuarios accedan con Google en las plataformas de tu aplicación. Como alternativa, puedes enviarle al usuario un correo electrónico con un vínculo que inicie el flujo de recuperación de contraseña para permitirle establecer una contraseña para acceder en otras plataformas.
Cuando se complete la creación, emite un token de acceso y un token de actualización y muestra los valores en un objeto JSON en el cuerpo de tu respuesta HTTPS, como en el siguiente ejemplo:
{
  "token_type": "Bearer",
  "access_token": "ACCESS_TOKEN",
  "refresh_token": "REFRESH_TOKEN",
  "expires_in": SECONDS_TO_EXPIRATION
}
Obtén tu ID de cliente de la API de Google
Deberás proporcionar tu ID de cliente de la API de Google durante el proceso de registro de la vinculación de la cuenta.
Obtener tu ID de cliente de API con el proyecto que creaste mientras completabas los pasos de Vinculación de OAuth Para ello, completa los siguientes pasos:
- Ve a la página Clientes.
Crea o selecciona un proyecto de las APIs de Google.
Si tu proyecto no tiene un ID de cliente para el tipo de aplicación web, haz clic en Crear cliente para crear uno. Asegúrate de incluir el dominio de tu sitio en el cuadro Orígenes autorizados de JavaScript. Cuando realices pruebas o desarrollos locales, debes agregar
http://localhostyhttp://localhost:<port_number>al campo Orígenes de JavaScript autorizados.
Valida la implementación
Puedes validar tu implementación con la herramienta OAuth 2.0 Playground.
En la herramienta, sigue estos pasos:
- Haz clic en Configuración para abrir la ventana Configuración de OAuth 2.0.
- En el campo Flujo de OAuth, selecciona Del cliente.
- En el campo Extremos de OAuth, selecciona Personalizado.
- Especifica tu extremo de OAuth 2.0 y el ID de cliente que le asignaste a Google en los campos correspondientes.
- En la sección Paso 1, no selecciones ningún alcance de Google. En su lugar, deja este campo en blanco o escribe un alcance válido para tu servidor (o una cadena arbitraria si no usas alcances de OAuth). Cuando termines, haz clic en Autorizar APIs.
- En las secciones Paso 2 y Paso 3, sigue el flujo de OAuth 2.0 y verifica que cada paso funcione según lo previsto.
Puedes validar tu implementación con la herramienta de demostración de vinculación de Cuentas de Google.
En la herramienta, sigue estos pasos:
- Haz clic en el botón Acceder con Google.
- Elige la cuenta que quieras vincular.
- Ingresa el ID de servicio.
- De manera opcional, ingresa uno o más alcances para los que solicitarás acceso.
- Haz clic en Iniciar demostración.
- Cuando se te solicite, confirma que puedes dar tu consentimiento y rechazar la solicitud de vinculación.
- Confirma que se te redirecciona a tu plataforma.