Обзор
Упрощенная функция входа через Google с использованием OAuth добавляет функцию входа через Google поверх существующей функции OAuth . Это обеспечивает удобную связь для пользователей Google, а также позволяет создавать учетные записи, что дает пользователю возможность создать новую учетную запись в вашем сервисе, используя свою учетную запись Google.
Для привязки учетной записи к OAuth и входа через Google выполните следующие общие шаги:
- Сначала попросите пользователя дать согласие на доступ к его профилю Google.
- Используйте информацию из их профиля, чтобы проверить, существует ли учетная запись пользователя.
- Для существующих пользователей необходимо связать учетные записи.
- Если вы не можете найти пользователя Google в своей системе аутентификации, проверьте токен идентификации, полученный от Google. Затем вы можете создать пользователя на основе информации профиля, содержащейся в токене идентификации.
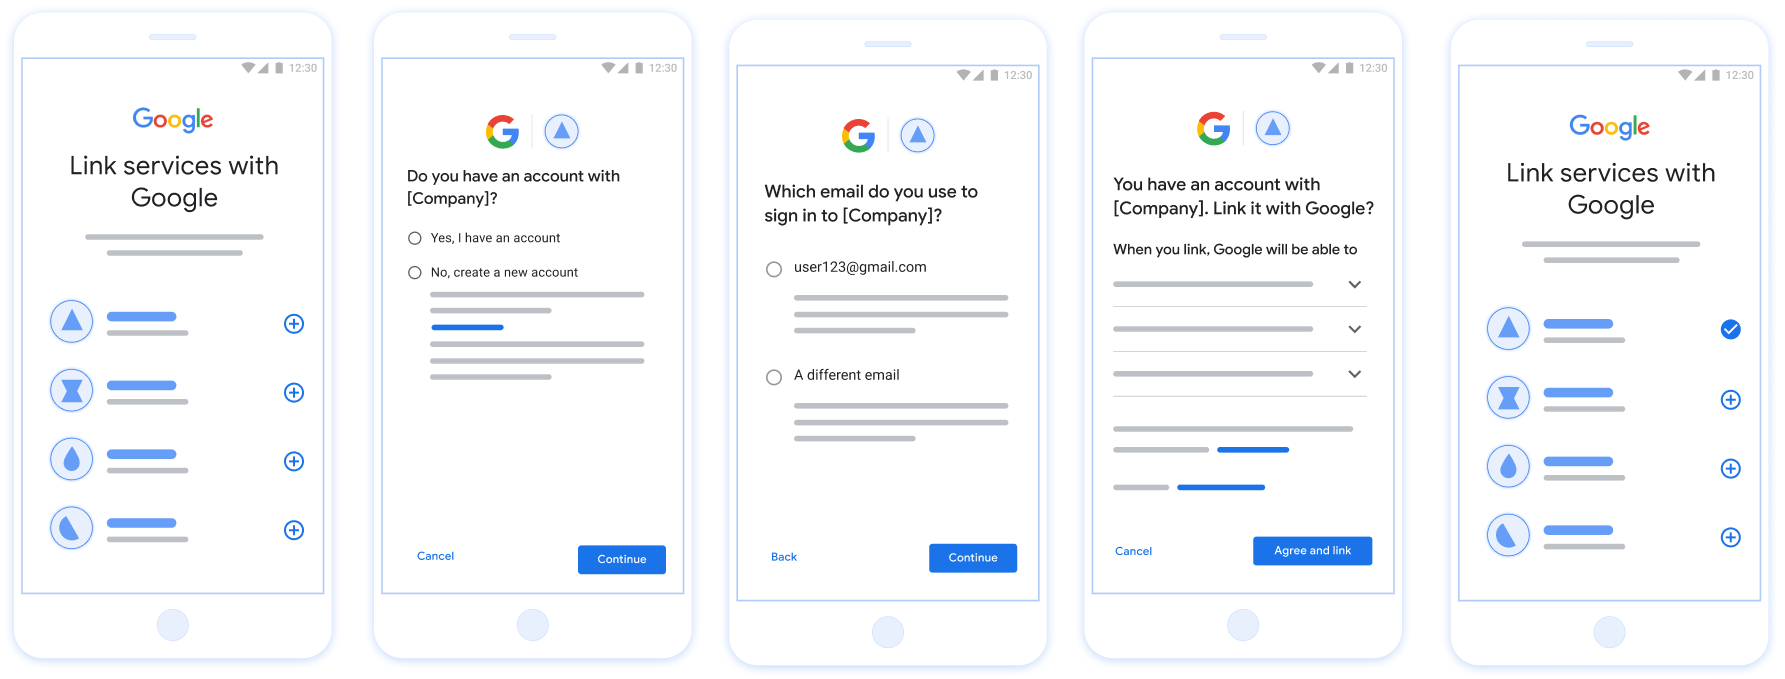
Рисунок 1. Привязка учетной записи на телефоне пользователя с помощью упрощенной привязки.
Упрощенная интеграция: OAuth + вход через Google Flow
На следующей диаграмме подробно описаны взаимодействия между пользователем, Google и вашей конечной точкой обмена токенами для упрощенной системы ссылок.
Роли и обязанности
В приведенной ниже таблице определены роли и обязанности участников процесса упрощенного связывания.
| Актер / Компонент | GAL Role | Обязанности |
|---|---|---|
| Приложение/сервер Google | Клиент OAuth | Получает согласие пользователя на вход через Google, передает подтверждения личности (JWT) на ваш сервер и надежно хранит полученные токены. |
| Ваша конечная точка обмена токенов | Поставщик идентификационных данных / Сервер авторизации | Проверяет подлинность учетных записей, проверяет наличие существующих учетных записей, обрабатывает намерения привязки учетных записей ( check , get , create ) и выдает токены на основе запрошенных намерений. |
| Ваш API сервиса | Сервер ресурсов | Предоставляет доступ к пользовательским данным при предъявлении действительного токена доступа. |
Требования к упрощенной системе ссылок
- Реализуйте базовый процесс привязки OAuth . Ваш сервис должен поддерживать конечные точки авторизации и обмена токенами , соответствующие стандарту OAuth 2.0.
- Ваша конечная точка обмена токенами должна поддерживать утверждения JSON Web Token (JWT) и реализовывать намерения
check,createиget.
Логика принятия решений для упрощения процесса связывания
Следующая логика определяет, как вызываются интенты в процессе упрощенной интеграции ссылок:
- Есть ли у пользователя учетная запись в вашей системе аутентификации? (Пользователь принимает решение, выбирая «ДА» или «НЕТ»)
- ДА: Использует ли пользователь адрес электронной почты, связанный с его учетной записью Google, для входа на вашу платформу? (Пользователь принимает решение, выбирая ДА или НЕТ)
- ДА: Есть ли у пользователя соответствующая учетная запись в вашей системе аутентификации? (для подтверждения вызывается
check intent)- ДА: если запрос
get intentintent успешно завершается, то вызывается метод getIntent, и учетная запись связывается. - НЕТ: Создать новую учетную запись? (Пользователь принимает решение, выбирая ДА или НЕТ)
- ДА: если функция создания
create intentуспешно завершается, вызывается метод createint, и учетная запись связывается. - НЕТ: Запускается процесс авторизации OAuth, пользователь перенаправляется в свой браузер, и ему предоставляется возможность связаться с помощью другого адреса электронной почты.
- ДА: если функция создания
- ДА: если запрос
- NO : The OAuth linking flow is triggered, the user is directed to their browser, and the user is given the option to link with a different email.
- ДА: Есть ли у пользователя соответствующая учетная запись в вашей системе аутентификации? (для подтверждения вызывается
- НЕТ: Есть ли у пользователя соответствующая учетная запись в вашей системе аутентификации? (для подтверждения вызывается
check intent)- ДА: если запрос
get intentintent успешно завершается, то вызывается метод getIntent, и учетная запись связывается. - НЕТ: если функция создания намерения успешно завершается, вызывается метод
create intent, и учетная запись связывается.
- ДА: если запрос
- ДА: Использует ли пользователь адрес электронной почты, связанный с его учетной записью Google, для входа на вашу платформу? (Пользователь принимает решение, выбирая ДА или НЕТ)
Рецепт реализации
Для поддержки упрощенной привязки (Streamlined Linking) ваша конечная точка обмена токенов должна реализовывать интенты check , get и create токенов.
Выполните следующие шаги для обработки различных намерений:
Проверьте наличие существующей учетной записи пользователя (проверьте намерения).
Google обращается к вашей конечной точке обмена токенами, чтобы проверить, существует ли пользователь Google в вашей системе. Подробную информацию о параметрах см. в разделе «Упрощенные намерения связывания» .
Рецепт реализации
Для обработки запроса check выполните следующие действия:
Подтвердите запрос :
- Проверьте
client_id,client_secretиgrant_type(должен бытьurn:ietf:params:oauth:grant-type:jwt-bearer). - Проверьте
assertion(JWT), используя критерии, описанные в разделе «Проверка JWT» .
- Проверьте
Найти пользователя :
- Проверьте, совпадает ли идентификатор учетной записи Google (
sub) или адрес электронной почты в JWT с именем пользователя в вашей базе данных.
- Проверьте, совпадает ли идентификатор учетной записи Google (
Отвечать :
- Если найдено: вернуть HTTP
200 OKс{"account_found": "true"}. - Если не найдено: вернуть HTTP
404 Not Foundс{"account_found": "false"}.
- Если найдено: вернуть HTTP
Обработка автоматической привязки (получение намерений)
Если учетная запись существует, Google вызывает вашу конечную точку с intent=get для получения токенов. Подробную информацию о параметрах см. в разделе «Упрощенные намерения для создания ссылок» .
Рецепт реализации
Для обработки запроса get выполните следующие действия:
Подтвердите запрос :
- Проверьте значения
client_id,client_secretиgrant_type. - Проверьте
assertion(JWT).
- Проверьте значения
Найти пользователя :
- Проверьте существование пользователя, используя поле
subилиemail.
- Проверьте существование пользователя, используя поле
Отвечать :
- В случае успеха: сгенерировать и вернуть
access_token,refresh_tokenиexpires_inв JSON-ответе (HTTP200 OK). - Если связывание не удалось: вернуть HTTP
401 Unauthorizedс{"error": "linking_error"}и необязательнымlogin_hintдля возврата к стандартному связыванию OAuth.
- В случае успеха: сгенерировать и вернуть
Создание учетной записи с использованием функции «Вход через Google» (создание намерения).
Если учетная запись отсутствует, Google вызывает вашу конечную точку с intent=create для создания нового пользователя. Подробную информацию о параметрах см. в разделе «Упрощенные намерения для создания ссылок» .
Рецепт реализации
Для обработки намерения create выполните следующие действия:
Подтвердите запрос :
- Проверьте значения
client_id,client_secretиgrant_type. - Проверьте
assertion(JWT).
- Проверьте значения
Проверьте, не существует ли пользователь :
- Проверьте, есть ли уже в вашей базе данных
subилиemail. - Если пользователь существует : вернуть HTTP
401 Unauthorizedс{"error": "linking_error", "login_hint": "USER_EMAIL"}для принудительного переключения на OAuth-аутентификацию.
- Проверьте, есть ли уже в вашей базе данных
Зарегистрироваться :
- Используйте поля
sub,email,nameиpictureиз JWT для создания новой записи пользователя.
- Используйте поля
Отвечать :
- Сгенерировать и вернуть токены в JSON-ответе (HTTP
200 OK).
- Сгенерировать и вернуть токены в JSON-ответе (HTTP
Получите свой идентификатор клиента Google API.
В процессе регистрации привязки учетной записи вам потребуется указать свой идентификатор клиента Google API. Чтобы получить свой идентификатор клиента API, используя проект, созданный вами при выполнении шагов по привязке OAuth , выполните следующие действия:
- Перейдите на страницу «Клиенты» .
Создайте или выберите проект Google API.
Если для вашего проекта отсутствует идентификатор клиента (Client ID) для типа веб-приложения, нажмите «Создать клиент» (Create Client) , чтобы его создать. Обязательно укажите домен вашего сайта в поле «Разрешенные источники JavaScript» . При локальном тестировании или разработке необходимо добавить в поле «Разрешенные источники JavaScript» как
http://localhostтак иhttp://localhost:<port_number>.
Проверьте правильность вашей реализации.
Вы можете проверить свою реализацию, используя инструмент OAuth 2.0 Playground .
В инструменте выполните следующие действия:
- Нажмите конфигурации », чтобы открыть окно «Конфигурация OAuth 2.0».
- В поле «Процесс аутентификации OAuth» выберите «На стороне клиента» .
- В поле «Конечные точки OAuth» выберите «Пользовательские» .
- Укажите в соответствующих полях вашу конечную точку OAuth 2.0 и идентификатор клиента, который вы присвоили Google.
- В разделе «Шаг 1» не выбирайте никаких областей действия Google. Вместо этого оставьте это поле пустым или введите область действия, действительную для вашего сервера (или произвольную строку, если вы не используете области действия OAuth). После завершения нажмите «Авторизовать API» .
- В разделах «Шаг 2» и «Шаг 3» пройдите весь процесс аутентификации OAuth 2.0 и убедитесь, что каждый шаг работает должным образом.
Вы можете проверить работоспособность своей реализации, используя демонстрационный инструмент для привязки учетных записей Google .
В инструменте выполните следующие действия:
- Нажмите кнопку « Войти через Google» .
- Выберите учетную запись, которую хотите связать.
- Введите идентификатор службы.
- При желании укажите одну или несколько областей доступа, к которым вы запрашиваете доступ.
- Нажмите «Начать демонстрацию» .
- При появлении запроса подтвердите свое согласие и отклоните запрос на привязку.
- Убедитесь, что вас перенаправили на вашу платформу.