概览
基于 OAuth 的“使用 Google 账号登录”简化版关联在 OAuth 关联的基础上添加了“使用 Google 账号登录”。这样一来,Google 用户便可顺畅地关联账号,同时还能创建账号,让用户可以使用自己的 Google 账号在您的服务中创建新账号。
如需使用 OAuth 和“使用 Google 账号登录”功能执行账号关联,请按以下常规步骤操作:
- 首先,征求用户同意以访问其 Google 个人资料。
- 使用用户个人资料中的信息检查用户账号是否存在。
- 对于现有用户,请关联账号。
- 如果您在身份验证系统中找不到与 Google 用户匹配的用户,请验证从 Google 收到的 ID 令牌。然后,您可以根据 ID 令牌中包含的个人资料信息创建用户。
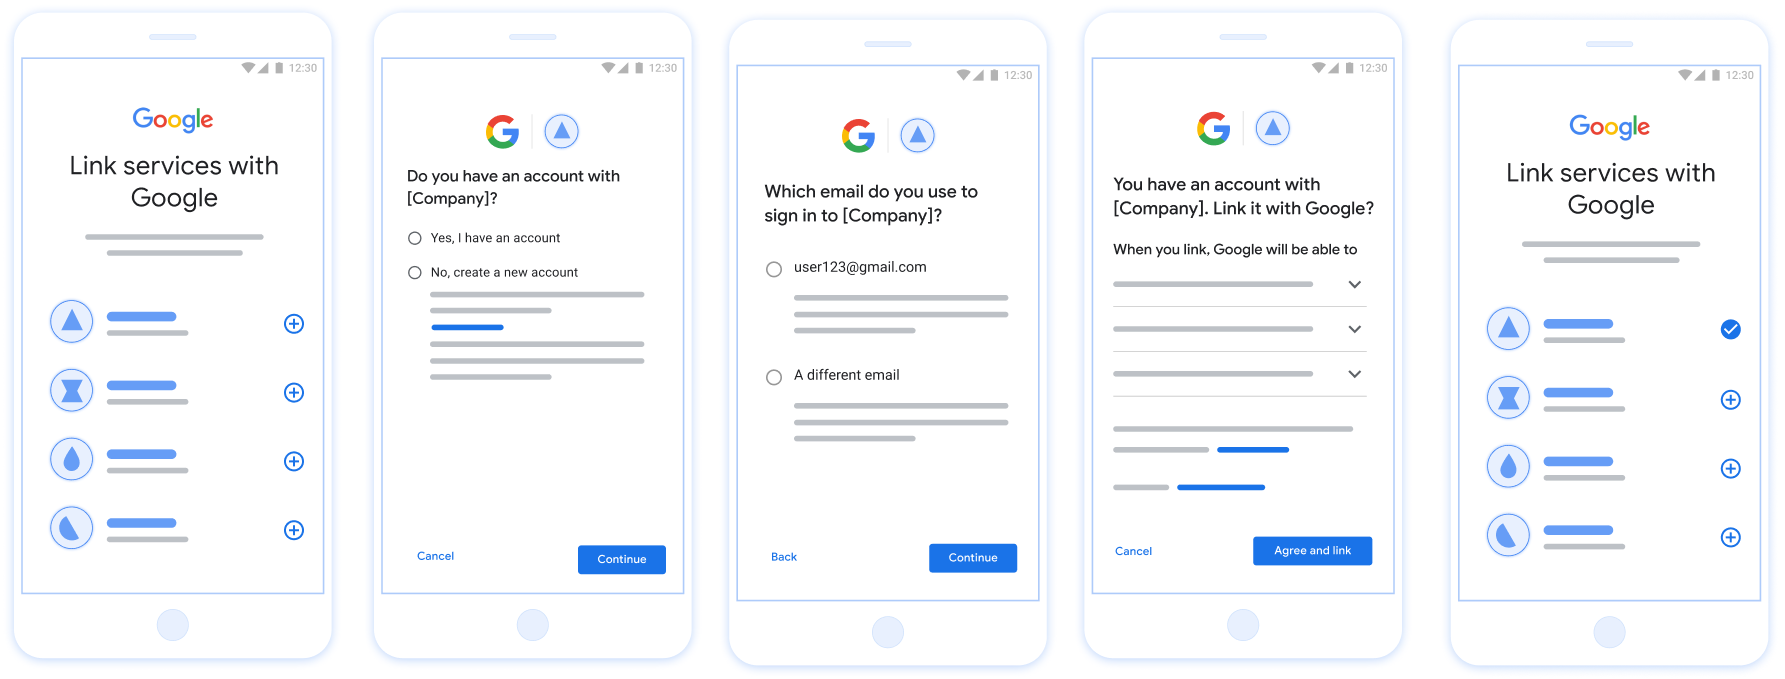
图 1. 在用户手机上使用精简的关联方式进行账号关联
简化的关联:OAuth +“使用 Google 账号登录”流程
以下序列图详细说明了用户、Google 和您的令牌交换端点之间针对简化关联的互动。
角色和职责
下表定义了简化版关联流程中各个参与者的角色和职责。
| 执行者 / 组件 | GAL 角色 | 职责 |
|---|---|---|
| Google 应用 / 服务器 | OAuth 客户端 | 获取用户对“使用 Google 账号登录”的同意情况,将身份断言 (JWT) 传递给您的服务器,并安全地存储生成的令牌。 |
| 您的令牌交换端点 | 身份提供方 / 授权服务器 | 验证身份断言,检查是否存在现有账号,处理账号关联 intent(check、get、create),并根据请求的 intent 签发令牌。 |
| 您的服务 API | 资源服务器 | 在提供有效的访问令牌时,提供对用户数据的访问权限。 |
简化版关联的要求
- 实现基本 OAuth 关联流程。您的服务必须支持符合 OAuth 2.0 标准的授权和令牌交换端点。
- 您的令牌交换端点必须支持 JSON Web 令牌 (JWT) 断言,并实现
check、create和getintent。
简化关联的决策逻辑
以下逻辑决定了在简化的关联流程中如何调用 intent:
- 用户在您的身份验证系统中是否有账号?(用户通过选择“是”或“否”来决定)
- 是:用户是否使用与 Google 账号关联的电子邮件地址登录您的平台?(用户通过选择“是”或“否”来决定)
- 是:用户在您的身份验证系统中是否有匹配的账号?(调用
check intent以进行确认)- YES:调用
get intent,如果获取 intent 成功返回,则关联账号。 - 否:创建新账号?(用户通过选择“是”或“否”来决定)
- 是:调用
create intent,如果创建 intent 成功返回,则关联账号。 - 否:系统会触发 OAuth 关联流程,将用户定向到其浏览器,并为用户提供与其他电子邮件地址关联的选项。
- 是:调用
- YES:调用
- 否:系统会触发 OAuth 关联流程,将用户定向到其浏览器,并让用户选择是否关联其他电子邮件地址。
- 是:用户在您的身份验证系统中是否有匹配的账号?(调用
- 否:用户在您的身份验证系统中是否有匹配的账号?(调用
check intent以进行确认)- YES:调用
get intent,如果获取 intent 成功返回,则关联账号。 - 否:如果创建 intent 成功返回,则会调用
create intent并关联账号。
- YES:调用
- 是:用户是否使用与 Google 账号关联的电子邮件地址登录您的平台?(用户通过选择“是”或“否”来决定)
实施方案
您的令牌交换端点必须实现 check、get 和 create intent,才能支持精简关联。
请按照以下步骤处理不同的 intent:
检查现有用户账号(检查 intent)
Google 会调用您的令牌交换端点,以验证 Google 用户是否存在于您的系统中。如需了解参数详情,请参阅简化的关联 intent。
实现方案
如需处理 check intent,请执行以下操作:
验证请求:
- 验证
client_id、client_secret和grant_type(必须为urn:ietf:params:oauth:grant-type:jwt-bearer)。 - 使用 JWT 验证 中的条件验证
assertion(JWT)。
- 验证
查找用户:
- 检查 JWT 中的 Google 账号 ID (
sub) 或电子邮件地址是否与数据库中的用户匹配。
- 检查 JWT 中的 Google 账号 ID (
回应:
- 如果找到:返回 HTTP
200 OK,并附带{"account_found": "true"}。 - 如果未找到:返回 HTTP
404 Not Found,并附带{"account_found": "false"}。
- 如果找到:返回 HTTP
处理自动关联(获取 intent)
如果该账号存在,Google 会使用 intent=get 调用您的端点以检索令牌。如需了解参数详情,请参阅简化的关联 intent。
实施方案
如需处理 get intent,请执行以下操作:
验证请求:
- 验证
client_id、client_secret和grant_type。 - 验证
assertion(JWT)。
- 验证
查找用户:
- 使用
sub或email声明验证用户是否存在。
- 使用
回应:
- 如果成功:在 JSON 响应 (HTTP
200 OK) 中生成并返回access_token、refresh_token和expires_in。 - 如果关联失败:返回 HTTP
401 Unauthorized,其中包含{"error": "linking_error"}和可选的login_hint,以便回退到标准 OAuth 关联。
- 如果成功:在 JSON 响应 (HTTP
使用“使用 Google 账号登录”功能处理账号创建事宜(创建 intent)
如果不存在任何账号,Google 会使用 intent=create 调用您的端点,以创建新用户。如需了解参数详情,请参阅 Streamlined Linking Intents。
实现方案
如需处理 create intent,请执行以下操作:
验证请求:
- 验证
client_id、client_secret和grant_type。 - 验证
assertion(JWT)。
- 验证
验证用户不存在:
- 检查您的数据库中是否已存在
sub或email。 - 如果用户 存在,请返回 HTTP
401 Unauthorized,并使用{"error": "linking_error", "login_hint": "USER_EMAIL"}强制回退到 OAuth 关联。
- 检查您的数据库中是否已存在
创建账号:
- 使用 JWT 中的
sub、email、name和picture声明创建新的用户记录。
- 使用 JWT 中的
回应:
- 在 JSON 响应 (HTTP
200 OK) 中生成并返回令牌。
- 在 JSON 响应 (HTTP
获取 Google API 客户端 ID
在账号关联注册过程中,您需要提供 Google API 客户端 ID。使用您在完成 OAuth 关联步骤时创建的项目获取 API 客户端 ID。为此,请完成以下步骤:
- 前往“客户”页面。
创建或选择 Google APIs 项目。
如果您的项目没有 Web 应用类型的客户端 ID,请点击创建客户端进行创建。请务必在已获授权的 JavaScript 来源框中添加您网站的域名。在执行本地测试或开发时,您必须将
http://localhost和http://localhost:<port_number>都添加到已获授权的 JavaScript 来源字段中。
验证您的实现效果
您可以使用 OAuth 2.0 Playground 工具验证您的实现。
在该工具中,执行以下步骤:
- 点击配置 以打开“OAuth 2.0 配置”窗口。
- 在 OAuth flow(OAuth 流程)字段中,选择 Client-side(客户端)。
- 在 OAuth Endpoints 字段中,选择 Custom。
- 在相应字段中指定您的 OAuth 2.0 端点以及您分配给 Google 的客户端 ID。
- 在第 1 步部分中,请勿选择任何 Google 范围。请将此字段留空,或输入适用于您服务器的范围(如果您不使用 OAuth 范围,则输入任意字符串)。完成后,点击 Authorize APIs。
- 在第 2 步和第 3 步部分中,完成 OAuth 2.0 流程,并验证每个步骤是否按预期运行。
您可以使用 Google 账号关联演示工具验证您的实现。
在该工具中,执行以下步骤:
- 点击使用 Google 账号登录按钮。
- 选择您要关联的账号。
- 输入服务 ID。
- (可选)输入您将请求访问的一个或多个范围。
- 点击开始演示。
- 当系统提示时,请确认您可以同意或拒绝关联请求。
- 确认您已重定向到相应平台。