Übersicht
OAuth-basierte optimierte Verknüpfung für die Google-Anmeldung fügt die Google-Anmeldung zusätzlich zur OAuth-Verknüpfung hinzu. So können Google-Nutzer ihre Konten nahtlos verknüpfen. Außerdem wird die Kontoerstellung ermöglicht, sodass Nutzer mit ihrem Google-Konto ein neues Konto für Ihren Dienst erstellen können.
So verknüpfst du Konten mit OAuth und „Über Google anmelden“:
- Bitten Sie den Nutzer zuerst um die Einwilligung, auf sein Google-Profil zuzugreifen.
- Prüfen Sie anhand der Informationen im Profil, ob das Nutzerkonto vorhanden ist.
- Verknüpfen Sie die Konten für bestehende Nutzer.
- Wenn Sie in Ihrem Authentifizierungssystem keine Übereinstimmung für den Google-Nutzer finden, validieren Sie das von Google empfangene ID-Token. Anschließend können Sie einen Nutzer basierend auf den Profilinformationen im ID-Token erstellen.
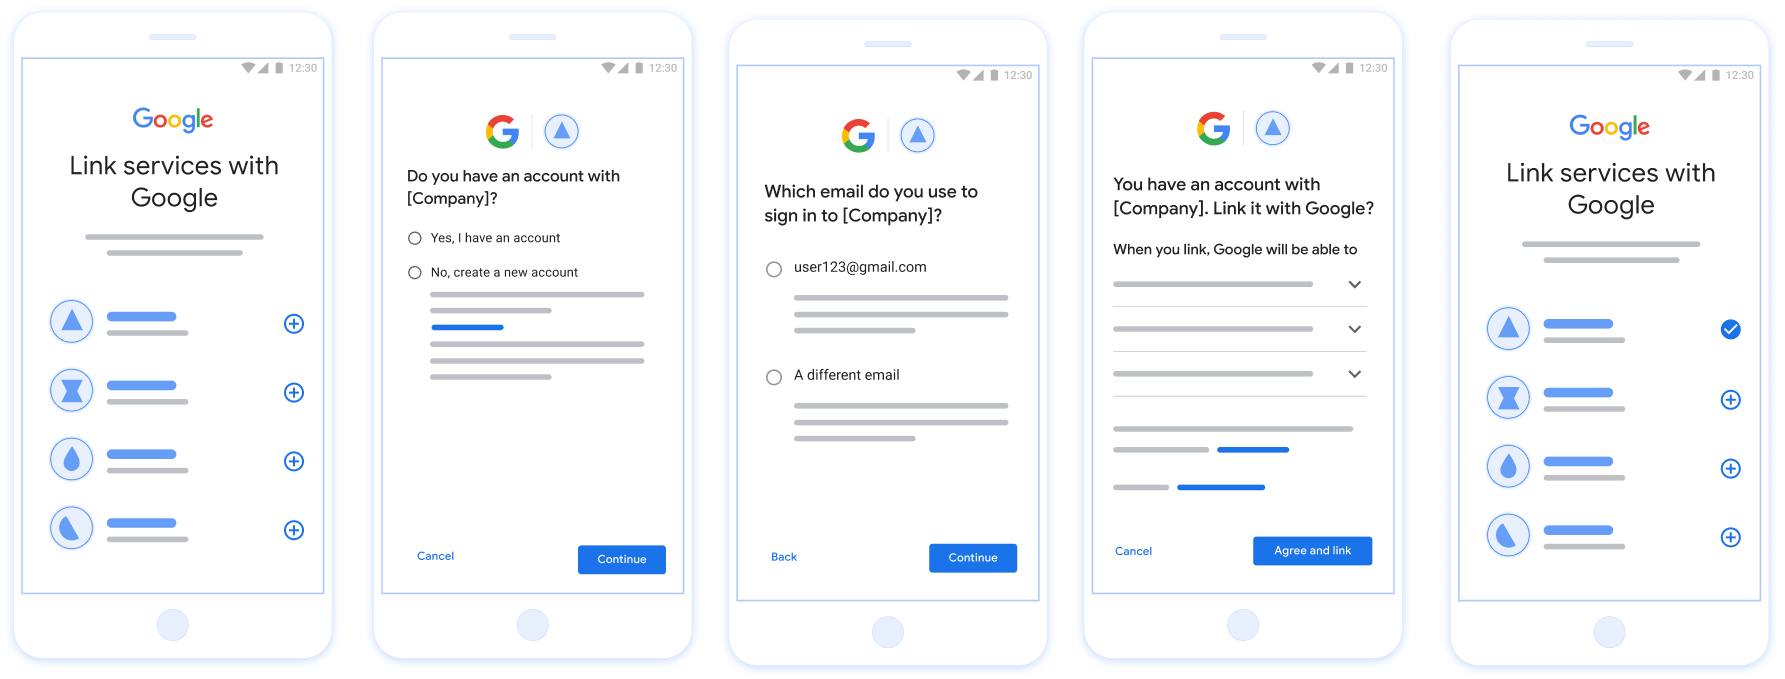
Abbildung 1. Kontoverknüpfung auf dem Smartphone eines Nutzers mit Streamlined Linking
Vereinfachte Verknüpfung: OAuth + „Über Google anmelden“-Ablauf
Das folgende Sequenzdiagramm zeigt die Interaktionen zwischen dem Nutzer, Google und Ihrem Token-Austausch-Endpunkt für die vereinfachte Verknüpfung.
Rollen und Verantwortlichkeiten
In der folgenden Tabelle werden die Rollen und Verantwortlichkeiten der Akteure im vereinfachten Verknüpfungsprozess definiert.
| Akteur / Komponente | GAL-Rolle | Zuständigkeiten |
|---|---|---|
| Google App / Server | OAuth-Client | Ruft die Nutzereinwilligung für „Über Google anmelden“ ein, übergibt Identitätszusicherungen (JWT) an Ihren Server und speichert die resultierenden Tokens sicher. |
| Ihr Token-Austausch-Endpunkt | Identitätsanbieter / Autorisierungsserver | Validiert Identitätsbehauptungen, prüft auf vorhandene Konten, verarbeitet die Intents zur Kontoverknüpfung (check, get, create) und stellt Tokens basierend auf den angeforderten Intents aus. |
| Ihre Service-API | Ressourcenserver | Bietet Zugriff auf Nutzerdaten, wenn ein gültiges Zugriffstoken vorgelegt wird. |
Voraussetzungen für die vereinfachte Verknüpfung
- Implementiere den grundlegenden OAuth-Verknüpfungsvorgang. Ihr Dienst muss OAuth 2.0-kompatible Autorisierungs- und Tokenaustausch-Endpunkte unterstützen.
- Ihr Token-Austausch-Endpunkt muss JSON Web Token (JWT)-Assertions unterstützen und die Intents
check,createundgetimplementieren.
Entscheidungslogik für die vereinfachte Verknüpfung
Die folgende Logik bestimmt, wie Intents während des vereinfachten Verknüpfungsvorgangs aufgerufen werden:
- Hat der Nutzer ein Konto in Ihrem Authentifizierungssystem? (Der Nutzer entscheidet, indem er JA oder NEIN auswählt)
- JA : Verwendet der Nutzer die mit seinem Google-Konto verknüpfte E-Mail-Adresse, um sich auf Ihrer Plattform anzumelden? (Der Nutzer entscheidet, indem er JA oder NEIN auswählt)
- JA : Hat der Nutzer ein entsprechendes Konto in Ihrem Authentifizierungssystem? (
check intentwird zur Bestätigung aufgerufen)- JA :
get intentwird aufgerufen und das Konto wird verknüpft, wenn „get intent“ erfolgreich zurückgegeben wird. - NEIN : Neues Konto erstellen? (Der Nutzer entscheidet, indem er JA oder NEIN auswählt)
- JA :
create intentwird aufgerufen und das Konto wird verknüpft, wenn der Intent zum Erstellen erfolgreich zurückgegeben wird. - NEIN : Der OAuth-Verknüpfungsvorgang wird ausgelöst, der Nutzer wird zu seinem Browser weitergeleitet und hat die Möglichkeit, eine Verknüpfung mit einer anderen E‑Mail-Adresse herzustellen.
- JA :
- JA :
- NEIN : Der OAuth-Verknüpfungsvorgang wird ausgelöst, der Nutzer wird zu seinem Browser weitergeleitet und hat die Möglichkeit, eine Verknüpfung mit einer anderen E‑Mail-Adresse herzustellen.
- JA : Hat der Nutzer ein entsprechendes Konto in Ihrem Authentifizierungssystem? (
- NEIN : Hat der Nutzer ein entsprechendes Konto in Ihrem Authentifizierungssystem? (
check intentwird zur Bestätigung aufgerufen)- JA :
get intentwird aufgerufen und das Konto wird verknüpft, wenn „get intent“ erfolgreich zurückgegeben wird. - NEIN :
create intentwird aufgerufen und das Konto wird verknüpft, wenn der Intent zum Erstellen erfolgreich zurückgegeben wird.
- JA :
- JA : Verwendet der Nutzer die mit seinem Google-Konto verknüpfte E-Mail-Adresse, um sich auf Ihrer Plattform anzumelden? (Der Nutzer entscheidet, indem er JA oder NEIN auswählt)
Implementierungsanleitung
Ihr Endpunkt für den Tokenaustausch muss die Intents check, get und create implementieren, um die vereinfachte Kontoverknüpfung zu unterstützen.
So gehen Sie mit den verschiedenen Intents um:
Nach einem bestehenden Nutzerkonto suchen (check-Intent)
Google ruft Ihren Token-Austausch-Endpunkt auf, um zu prüfen, ob der Google-Nutzer in Ihrem System vorhanden ist. Details zu den Parametern finden Sie unter Streamlined Linking Intents.
Implementierungsrezept
So verarbeiten Sie den check-Intent:
Anfrage validieren:
client_id,client_secretundgrant_typeprüfen (mussurn:ietf:params:oauth:grant-type:jwt-bearersein).- Die
assertion(JWT) anhand der Kriterien unter JWT-Validierung validieren.
Nutzer suchen:
- Prüfen, ob die Google-Konto-ID (
sub) oder die E-Mail-Adresse im JWT mit einem Nutzer in Ihrer Datenbank übereinstimmt.
- Prüfen, ob die Google-Konto-ID (
Reagieren:
- Wenn gefunden: HTTP
200 OKmit{"account_found": "true"}zurückgeben. - Wenn nicht gefunden: HTTP
404 Not Foundmit{"account_found": "false"}zurückgeben.
- Wenn gefunden: HTTP
Automatische Verknüpfung verarbeiten (Intent abrufen)
Wenn das Konto vorhanden ist, ruft Google Ihren Endpunkt mit intent=get auf, um Tokens abzurufen. Weitere Informationen zu den Parametern finden Sie unter Streamlined Linking Intents.
Implementierungsanleitung
So verarbeiten Sie den Intent get:
Anfrage validieren:
- Bestätigen Sie
client_id,client_secretundgrant_type. - Validieren Sie das
assertion(JWT).
- Bestätigen Sie
Nutzer suchen:
- Prüfen Sie anhand des
sub- oderemail-Claims, ob der Nutzer vorhanden ist.
- Prüfen Sie anhand des
Antworten:
- Bei Erfolg: Generieren Sie
access_token,refresh_tokenundexpires_inund geben Sie sie in einer JSON-Antwort zurück (HTTP200 OK). - Wenn die Verknüpfung fehlschlägt: Gib HTTP
401 Unauthorizedmit{"error": "linking_error"}und optionallogin_hintzurück, um auf die standardmäßige OAuth-Verknüpfung zurückzugreifen.
- Bei Erfolg: Generieren Sie
Kontoerstellung mit „Über Google anmelden“ verarbeiten (Intent „create“)
Wenn kein Konto vorhanden ist, ruft Google Ihren Endpunkt mit
intent=create auf, um einen neuen Nutzer zu erstellen. Weitere Informationen zu Parametern finden Sie unter Streamlined Linking Intents.
Implementierungsrezept
So verarbeiten Sie das Intent create:
Anfrage validieren:
client_id,client_secretundgrant_typeüberprüfen.- Die
assertion(JWT) validieren.
Prüfen, ob der Nutzer nicht vorhanden ist:
- Prüfen, ob
suboderemailbereits in Ihrer Datenbank vorhanden ist. - Wenn der Nutzer vorhanden ist: HTTP
401 Unauthorizedmit{"error": "linking_error", "login_hint": "USER_EMAIL"}zurückgeben, um ein Fallback auf die OAuth-Verknüpfung zu erzwingen.
- Prüfen, ob
Konto erstellen:
- Mit den Ansprüchen
sub,email,nameundpictureaus dem JWT einen neuen Nutzereintrag erstellen.
- Mit den Ansprüchen
Antworten:
- Tokens generieren und in einer JSON-Antwort zurückgeben (HTTP
200 OK).
- Tokens generieren und in einer JSON-Antwort zurückgeben (HTTP
Google API-Client-ID abrufen
Sie müssen Ihre Google API-Client-ID während der Registrierung für die Kontoverknüpfung angeben. So rufen Sie Ihre API-Client-ID mit dem Projekt ab, das Sie beim Ausführen der Schritte zur OAuth-Verknüpfung erstellt haben: Führen Sie dazu die folgenden Schritte aus:
- Rufen Sie die Seite „Clients“ auf.
Erstellen oder wählen Sie ein Google APIs-Projekt aus.
Wenn Ihr Projekt keine Client-ID für den Webanwendungstyp hat, klicken Sie auf Client erstellen, um eine zu erstellen. Achten Sie darauf, die Domain Ihrer Website im Feld Autorisierte JavaScript-Quellen anzugeben. Wenn Sie lokale Tests oder Entwicklungsarbeiten durchführen, müssen Sie sowohl
http://localhostals auchhttp://localhost:<port_number>dem Feld Autorisierte JavaScript-Quellen hinzufügen.
Implementierung validieren
Sie können Ihre Implementierung mit dem OAuth 2.0 Playground Tool validieren.
Führen Sie im Tool die folgenden Schritte aus:
- Klicken Sie auf die Konfigurationseinstellungen , um das Fenster „OAuth 2.0-Konfiguration“ zu öffnen.
- Wählen Sie im Feld OAuth-Ablauf die Option Clientseitig aus.
- Wählen Sie im Feld OAuth-Endpunkte die Option Benutzerdefiniert aus.
- Geben Sie in den entsprechenden Feldern Ihren OAuth 2.0-Endpunkt und die Client-ID an, die Sie Google zugewiesen haben.
- Wählen Sie im Abschnitt Schritt 1 keine Google-Bereiche aus. Lassen Sie dieses Feld stattdessen leer oder geben Sie einen für Ihren Server gültigen Bereich ein (oder eine beliebige Zeichenfolge, wenn Sie keine OAuth-Bereiche verwenden). Klicken Sie anschließend auf APIs autorisieren.
- Führen Sie in den Abschnitten Schritt 2 und Schritt 3 den OAuth 2.0-Ablauf durch und prüfen Sie, ob jeder Schritt wie vorgesehen funktioniert.
Sie können Ihre Implementierung mit dem Tool „Google-Kontoverknüpfung – Demo“ validieren.
Führen Sie im Tool die folgenden Schritte aus:
- Klicken Sie auf die Schaltfläche Mit Google anmelden.
- Wählen Sie das Konto aus, das Sie verknüpfen möchten.
- Geben Sie die Dienst-ID ein.
- Optional können Sie einen oder mehrere Bereiche eingeben, für die Sie Zugriff anfordern möchten.
- Klicken Sie auf Demo starten.
- Bestätigen Sie bei Aufforderung, dass Sie der Verknüpfungsanfrage zustimmen und sie ablehnen können.
- Bestätigen Sie, dass Sie zu Ihrer Plattform weitergeleitet werden.