웹사이트에 Google 계정으로 로그인 버튼 또는 원탭 및 자동 로그인 프롬프트를 추가하려면 먼저 다음 단계를 완료해야 합니다.
- OAuth 2.0 클라이언트 ID를 가져옵니다.
- OAuth 브랜딩 및 설정을 구성합니다.
- Google ID 서비스 클라이언트 라이브러리를 로드합니다.
- 선택적으로 콘텐츠 보안 정책을 설정하고
- 교차 출처 오프너 정책을 업데이트합니다.
Google API 클라이언트 ID 가져오기
웹사이트에서 Google ID 서비스를 사용 설정하려면 먼저 Google API 클라이언트 ID를 설정해야 합니다. 그러려면 다음 단계를 완료하세요.
- Google Cloud 콘솔의 클라이언트 페이지 를 엽니다.
- Cloud 콘솔 프로젝트를 만들거나 선택합니다. Google 계정으로 로그인 버튼 또는 Google 원탭용 프로젝트가 이미 있는 경우 기존 프로젝트와 웹 클라이언트 ID를 사용합니다. 프로덕션 애플리케이션을 만들 때는 여러 프로젝트가 필요할 수 있습니다. 관리하는 각 프로젝트에 대해 이 섹션의 나머지 단계를 반복합니다.
- 클라이언트 만들기 를 클릭하고 애플리케이션 유형 으로 웹 애플리케이션 을 선택하여 새 클라이언트 ID를 만듭니다. 기존 클라이언트 ID를 사용하려면 웹 애플리케이션 유형 중 하나를 선택합니다.
웹사이트의 URI를 승인된 JavaScript 원본 에 추가합니다. URI에는 스키마와 정규화된 호스트 이름만 포함됩니다. 예를 들면
https://www.example.com입니다.선택적으로 사용자 인증 정보는 JavaScript 콜백을 통해 반환되는 대신 호스팅하는 엔드포인트로 리디렉션을 사용하여 반환될 수 있습니다. 이 경우 리디렉션 URI를 승인된 리디렉션 URI 에 추가합니다. 리디렉션 URI에는 스키마, 정규화된 호스트 이름, 경로가 포함되며 리디렉션 URI 유효성 검사 규칙을 준수해야 합니다. 예를 들면
https://www.example.com/auth-receiver입니다.
data-client_id 또는 client_id 필드를 사용하여 웹 앱에 클라이언트 ID를 포함합니다.
OAuth 동의 화면 구성
Google 계정으로 로그인 및 원탭 인증에는 사용자에게 데이터 액세스를 요청하는 애플리케이션, 요청되는 데이터의 종류, 적용되는 약관을 알려주는 동의 화면이 포함됩니다.
- Cloud 콘솔의 Google 인증 플랫폼 섹션에 있는 브랜딩 페이지를 엽니다.
- 메시지가 표시되면 방금 만든 프로젝트를 선택합니다.
브랜딩 페이지에서 양식을 작성하고 "저장" 버튼을 클릭합니다.
애플리케이션 이름: 동의를 요청하는 애플리케이션의 이름입니다. 이름은 애플리케이션을 정확하게 반영해야 하며 사용자가 다른 곳에서 보는 애플리케이션 이름과 일관되어야 합니다.
애플리케이션 로고: 이 이미지는 사용자가 앱을 인식할 수 있도록 동의 화면에 표시됩니다. 로고는 Google 계정으로 로그인 동의 화면과 계정 설정에 표시되지만 원탭 대화상자에는 표시되지 않습니다.
지원 이메일: 사용자 지원을 위해 동의 화면에 표시되며 Google Workspace 관리자가 사용자에게 애플리케이션 액세스 권한을 부여할지 평가할 때도 표시됩니다. 이 이메일 주소는 사용자가 애플리케이션 이름을 클릭할 때 Google 계정으로 로그인 동의 화면에 표시됩니다.
승인된 도메인: 나와 내 사용자를 보호하기 위해 Google에서는 OAuth를 사용하여 인증하는 애플리케이션만 승인된 도메인을 이용할 수 있도록 허용합니다. 애플리케이션의 링크는 승인된 도메인에서 호스팅되어야 합니다. 자세히 알아보기.
애플리케이션 홈페이지 링크: Google 계정으로 로그인 동의 화면과 '계속' 버튼 아래에 있는 One-Tap GDPR 준수 고지사항 정보에 표시됩니다. 승인된 도메인에서 호스팅되어야 합니다.
애플리케이션 개인정보처리방침 링크: Google 계정으로 로그인 동의 화면과 '계속' 버튼 아래에 있는 One-Tap GDPR 준수 고지사항 정보에 표시됩니다. 승인된 도메인에서 호스팅되어야 합니다.
애플리케이션 서비스 약관 링크 (선택사항): Google 계정으로 로그인 동의 화면과 '계속' 버튼 아래에 있는 One-Tap GDPR 준수 고지사항 정보에 표시됩니다. 승인된 도메인에서 호스팅되어야 합니다.
데이터 액세스 페이지로 이동하여 앱의 범위를 구성합니다.
- Google API 범위: 범위를 사용하면 애플리케이션이 사용자의 비공개 데이터에 액세스할 수 있습니다. 인증의 경우 기본 범위 (이메일, 프로필, OpenID)로 충분하며 민감한 범위를 추가할 필요가 없습니다. 일반적으로 액세스가 필요한 시점에 범위를 점진적으로 요청하는 것이 좋습니다.
'인증 상태'를 확인합니다. 애플리케이션에 인증이 필요한 경우 '인증을 위해 제출' 버튼을 클릭하여 인증을 위해 애플리케이션을 제출합니다. 자세한 내용은 OAuth 인증 요구사항 을 참고하세요.
로그인 중 OAuth 설정 표시
FedCM을 사용하는 원탭

최상위 승인된 도메인 은 Chrome에서 사용자 동의 중에 표시됩니다. 교차 출처이지만 동일한 사이트 iframe에서만 원탭을 사용하는 것이 지원되는 방법입니다.
FedCM이 없는 원탭
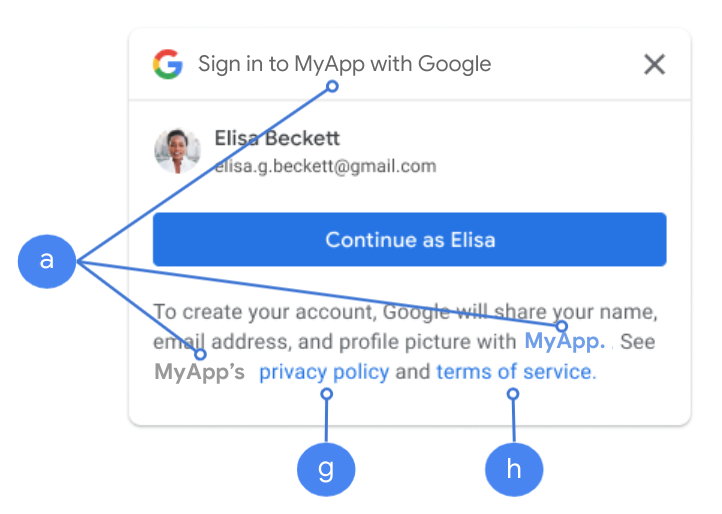
애플리케이션 이름 은 사용자 동의 중에 표시됩니다.
그림 1. Chrome의 원탭에서 표시되는 OAuth 동의 설정
클라이언트 라이브러리 로드
사용자가 로그인할 수 있는 모든 페이지에서 Google ID 서비스 클라이언트 라이브러리를 로드해야 합니다. 다음 코드 스니펫을 사용합니다.
<script src="https://accounts.google.com/gsi/client" async></script>
async 속성으로 스크립트를 로드하면 페이지 로드 속도를 최적화할 수 있습니다.
라이브러리에서 지원하는 메서드 및 속성 목록은 HTML 및 JavaScript API 참조를 참고하세요.
콘텐츠 보안 정책
선택사항이지만 콘텐츠 보안 정책 을 사용하면 앱을 보호하고 교차 사이트 스크립팅 (XSS) 공격을 방지할 수 있습니다. 자세히 알아보려면 CSP 소개 및 CSP 및 XSS를 참고하세요.
콘텐츠 보안 정책에는 connect-src, frame-src, script-src, style-src 또는 default-src와 같은 하나 이상의 지시어가 포함될 수 있습니다.
CSP에 다음이 포함된 경우
connect-src지시어: 페이지에서 Google ID 서비스 서버 측 엔드포인트의 상위 URL을 로드할 수 있도록https://accounts.google.com/gsi/를 추가합니다.frame-src지시어: One Tap 및 Google 계정으로 로그인 버튼 iframe의 상위 URL을 허용하도록https://accounts.google.com/gsi/를 추가합니다.script-src지시어: Google ID 서비스 JavaScript 라이브러리의 URL을 허용하도록https://accounts.google.com/gsi/client를 추가합니다.style-src지시어: Google ID 서비스 스타일시트의 URL을 허용하도록https://accounts.google.com/gsi/style를 추가합니다.default-src지시어: 사용되는 경우 이전 지시어 (connect-src,frame-src,script-src또는style-src)가 지정되지 않은 경우 대체로 사용됩니다. 페이지에서 Google ID 서비스 서버 측 엔드포인트의 상위 URL을 로드할 수 있도록https://accounts.google.com/gsi/를 추가합니다.
connect-src를 사용할 때는 개별 GIS URL을 나열하지 마세요. 이렇게 하면 GIS가 업데이트될 때 오류를 최소화할 수 있습니다. 예를 들어
https://accounts.google.com/gsi/status를 추가하는 대신 GIS 상위 URL
https://accounts.google.com/gsi/를 사용합니다.
이 응답 헤더 예시를 사용하면 Google ID 서비스를 로드하고 실행할 수 있습니다.
Content-Security-Policy-Report-Only: script-src
https://accounts.google.com/gsi/client; frame-src
https://accounts.google.com/gsi/; connect-src https://accounts.google.com/gsi/;
교차 출처 오프너 정책
Google 계정으로 로그인 버튼과 Google 원탭을 사용하려면 팝업을 만들 수 있도록
Cross-Origin-Opener-Policy (COOP)를 변경해야 할 수 있습니다.
FedCM이 사용 설정되면 브라우저에서 팝업을 직접 렌더링하므로 변경 할 필요가 없습니다.
하지만 FedCM이 사용 중지된 경우 COOP 헤더를 설정합니다.
same-origin으로 설정하고same-origin-allow-popups를 포함합니다.
적절한 헤더를 설정하지 않으면 창 간 통신이 중단되어 빈 팝업 창 또는 유사한 버그가 발생합니다.