Zadbaj o dobrą organizację dzięki kolekcji
Zapisuj i kategoryzuj treści zgodnie ze swoimi preferencjami.
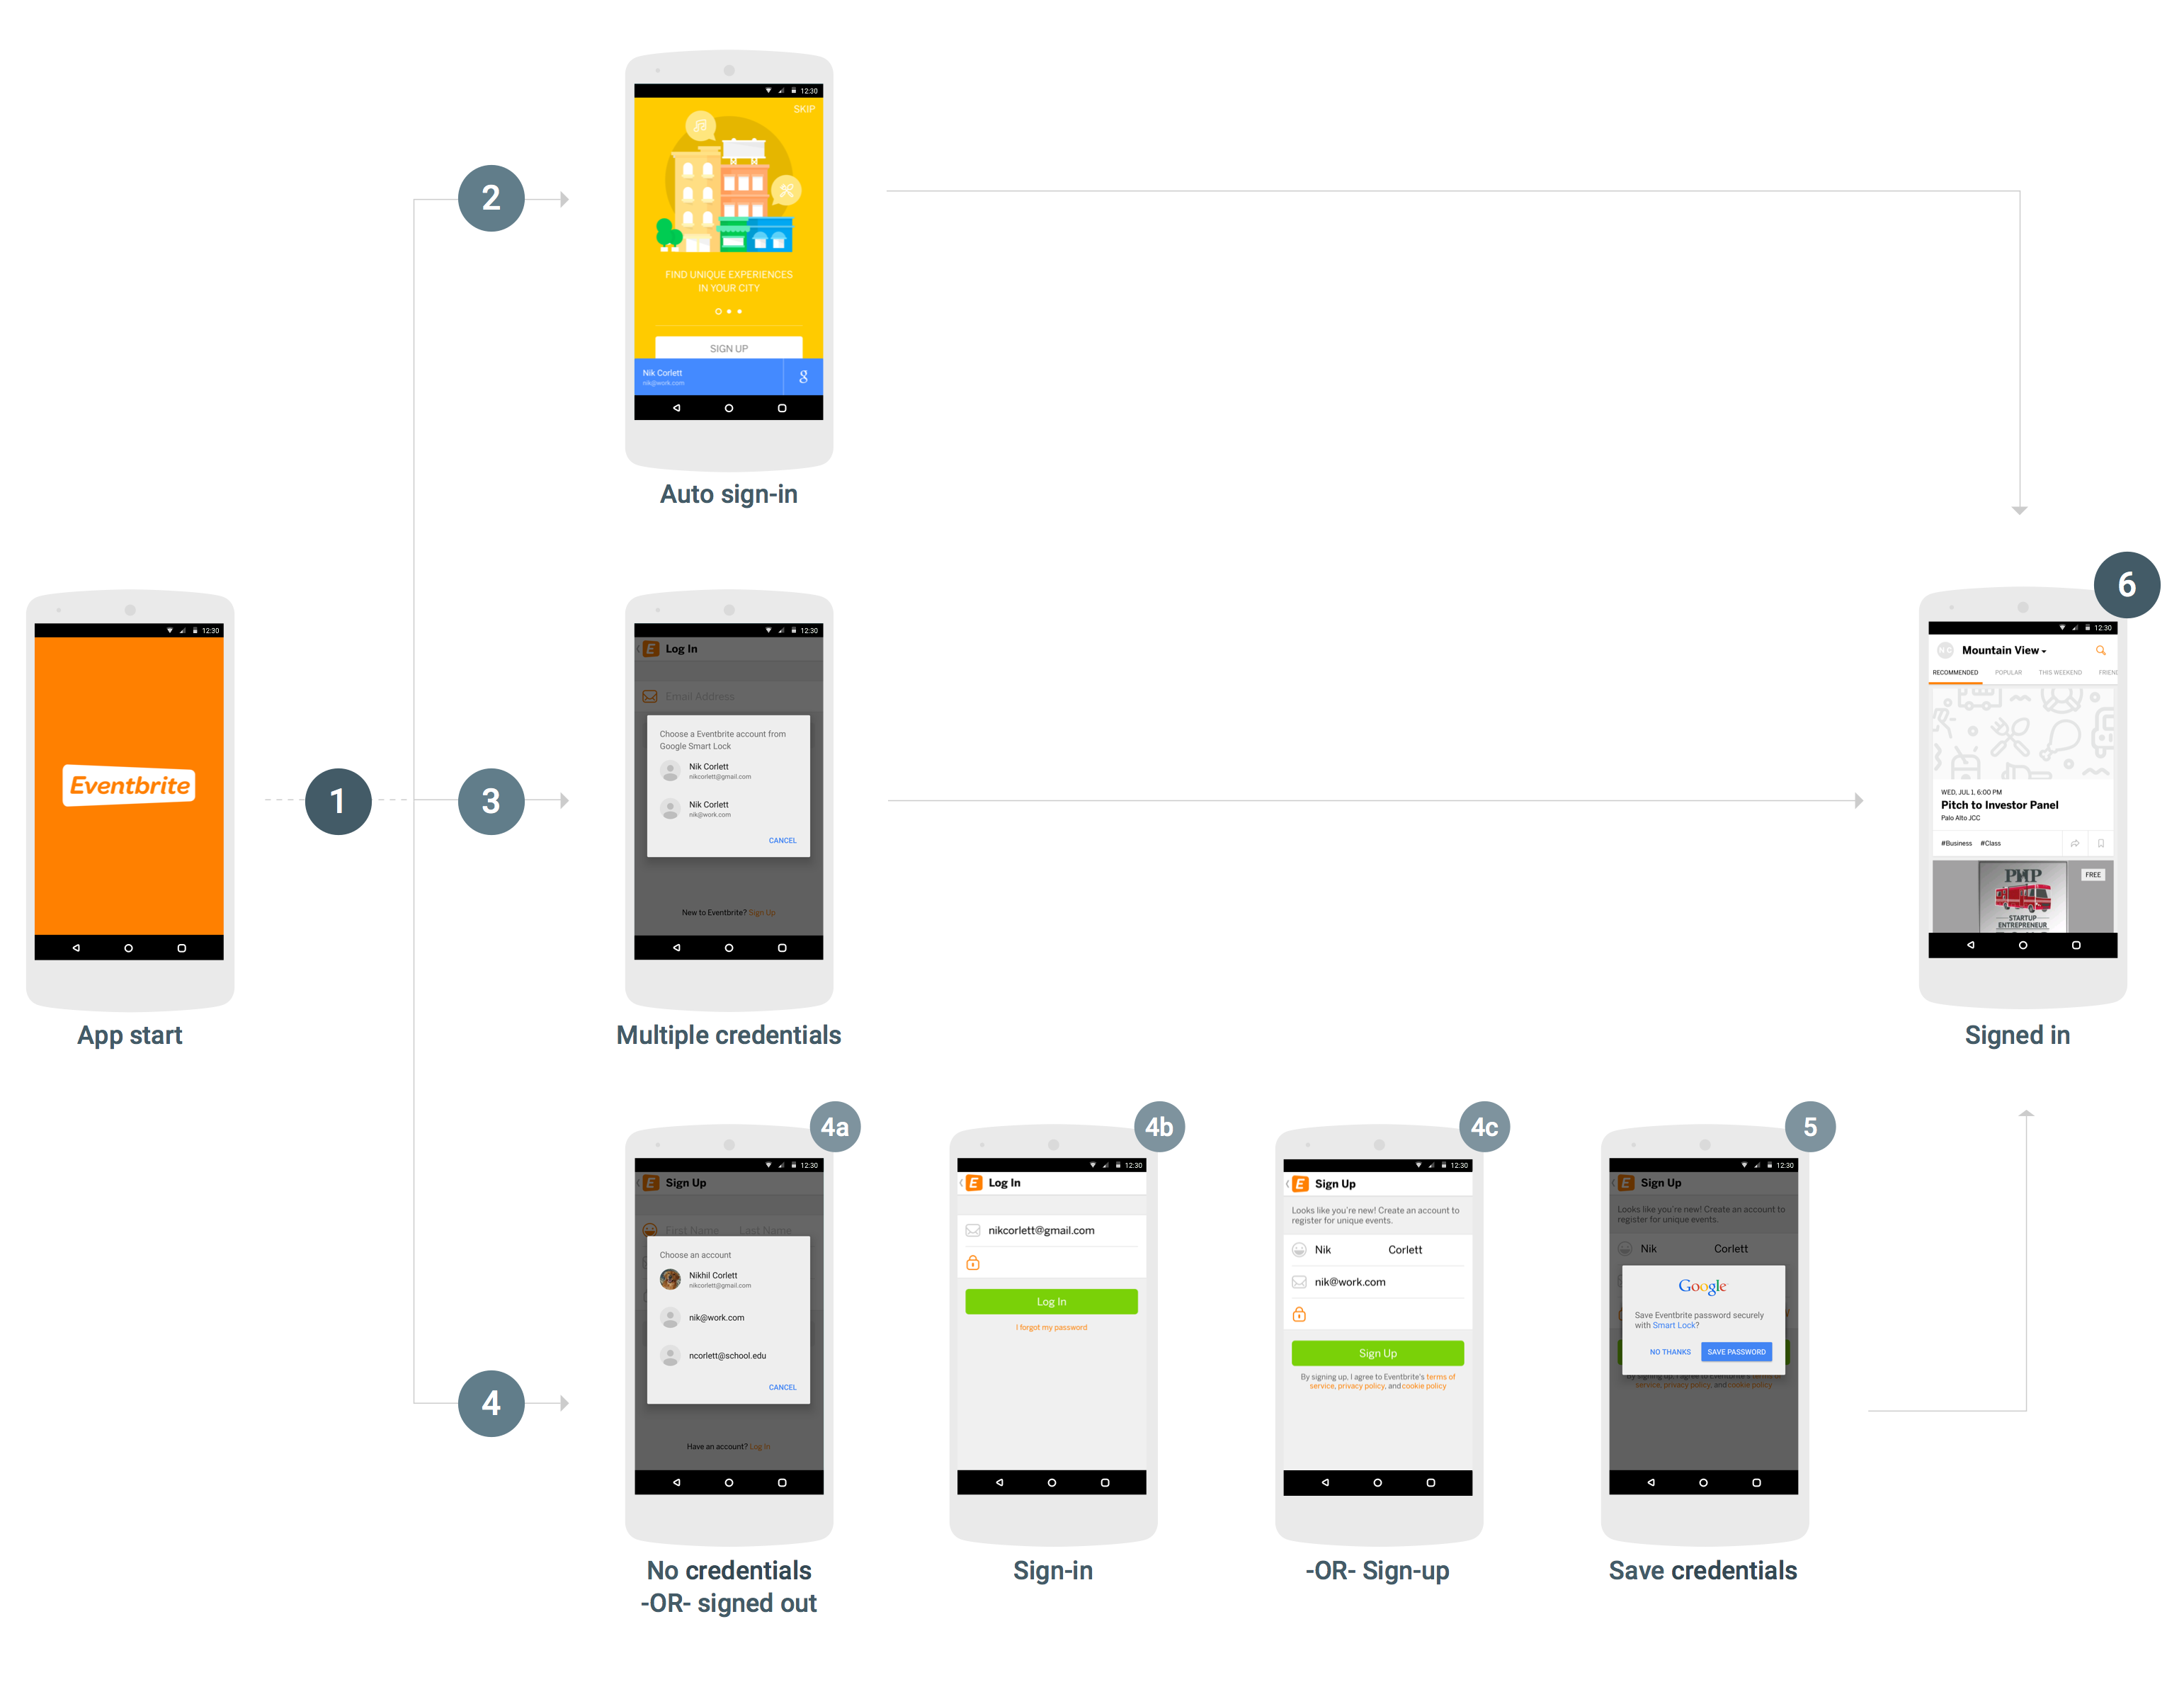
Aby zintegrować funkcję Smart Lock na hasła z aplikacją na Androida, podczas uruchamiania i logowania się musisz dodać wywołania interfejsu Credentials API. Poniższy diagram przedstawia przepływ typowej aplikacji na Androida, która korzysta z funkcji Smart Lock na hasła.
Istnieje wiele sposobów integracji funkcji Smart Lock na hasła, a jej działanie zależy od struktury i wygody użytkowników aplikacji, w przypadku większości aplikacji zalecamy wykonanie poniższego procesu. Aplikacje korzystające z tego procesu mają następujące zalety:
Obecni użytkownicy usługi, którzy mają zapisane pojedyncze dane logowania, zostaną natychmiast zalogowani i po otwarciu aplikacji zostaną przekierowani bezpośrednio do widoku danych zalogowanych użytkowników.
Użytkownicy, którzy mają zapisanych wiele danych logowania lub mają wyłączone automatyczne logowanie, muszą odpowiedzieć tylko na jedno okno, zanim przejdą do widoku logowania w aplikacji.
Użytkownicy, którzy nie mają zapisanych danych logowania lub jeszcze się nie zarejestrowali, mogą za pomocą jednego kliknięcia wybrać imię i nazwisko oraz adres e-mail. Te informacje zostaną uzupełnione w widoku danych logowania lub rejestracji.
Aplikacja sprawia, że gdy użytkownik się wyloguje, nie jest zalogowany automatycznie.
Pobieranie danych logowania
Jeśli żaden użytkownik nie jest zalogowany, po uruchomieniu aplikacji wywołaj CredentialsClient.request().
Jeśli Task zadziała, uzyskaj dane logowania użytkownika za pomocą getResult().getCredential() i użyj ich do zalogowania się.
Jeśli Task kończy się niepowodzeniem, a wyjątkiem jest wystąpienie ResolvableApiException, a getStatusCode() zwraca RESOLUTION_REQUIRED, do wyboru danych logowania wymagane są dane wejściowe użytkownika. Wywołaj startResolutionForResult(), aby poprosić użytkownika o wybranie zapisanego konta, a następnie getParcelableExtra(Credential.EXTRA_KEY), aby uzyskać dane logowania użytkownika i użyć ich do zalogowania się.
Zapisz dane logowania
Jeśli Task zakończy się niepowodzeniem za pomocą ApiException, a getStatusCode() zwróci SIGN_IN_REQUIRED, użytkownik nie będzie miał zapisanych danych logowania i będzie musiał zalogować się albo zarejestrować ręcznie, korzystając z obecnego procesu logowania lub rejestracji. Gdy użytkownik się zaloguje, możesz mu umożliwić zapisanie danych logowania, aby mógł odzyskać dostęp do niego w przyszłości (krok 5).
Możesz ułatwić i przyspieszyć logowanie lub rejestrację użytkownika, pobierając wskazówki dotyczące logowania, takie jak adres e-mail użytkownika. Użytkownik może wybrać podpowiedź i pominąć wpisywanie danych logowania. Jeśli Twoja aplikacja wymaga od użytkowników logowania się, możesz pobrać wskazówki natychmiast po tym, gdy nie uda się zrealizować wstępnego żądania danych logowania (w przeciwnym razie możesz zaczekać, aż użytkownik rozpocznie proces logowania lub rejestracji).
Wywołaj metodę CredentialsClient.getHintPickerIntent() i rozpocznij intencję, aby zachęcić użytkownika do wybrania konta, a następnie wywołaj getParcelableExtra(Credential.EXTRA_KEY), aby uzyskać wskazówkę dotyczącą logowania.
Jeśli identyfikator użytkownika wskazywany przez wskazówkę jest taki sam jak identyfikator istniejącego użytkownika, wypełnij wstępnie formularz logowania i pozwól mu wpisać hasło, aby się zalogować.
Jeśli identyfikator użytkownika wskazywany przez wskazówkę nie jest zgodny z istniejącym użytkownikiem, wypełnij wstępnie formularz rejestracyjny identyfikatorem i nazwą użytkownika, a następnie pozwól mu utworzyć nowe konto.
Gdy użytkownik zaloguje się lub utworzy konto, zapisz jego identyfikator i hasło w CredentialsClient.save().
Jeśli użytkownik zalogował się przy użyciu sfederowanego dostawcy tożsamości, takiego jak Logowanie przez Google, utwórz obiekt Credential z adresem e-mail użytkownika jako identyfikatorem i określ dostawcę tożsamości za pomocą setAccountType.
Wyloguj się
Gdy użytkownik się wyloguje, wywołaj CredentialsClient.disableAutoSignIn(), aby zapobiec ponownemu zalogowaniu się użytkownika. Wyłączenie automatycznego logowania umożliwia też użytkownikom łatwe przełączanie się między kontami – na przykład między kontami służbowymi i osobistymi oraz między kontami na współdzielonych urządzeniach – bez konieczności ponownego wpisywania danych logowania.
Chcesz zintegrować Smart Lock na hasła ze swoją aplikacją?
W takim razie zaczynajmy.
[null,null,["Ostatnia aktualizacja: 2025-07-25 UTC."],[[["\u003cp\u003eSmart Lock for Passwords is deprecated; migrate to Credential Manager for enhanced security and user experience with passkeys, passwords, and federated identities.\u003c/p\u003e\n"],["\u003cp\u003eSmart Lock for Passwords integration involves adding the Credentials API to your app's startup and sign-in flow to retrieve and save user credentials.\u003c/p\u003e\n"],["\u003cp\u003eExisting users with saved credentials can experience automatic sign-in, while new users can benefit from pre-filled forms using sign-in hints.\u003c/p\u003e\n"],["\u003cp\u003eEnsure to disable auto-sign-in upon user sign-out to prevent immediate re-authentication and facilitate account switching.\u003c/p\u003e\n"]]],[],null,["# Android integration flow\n\n| **Deprecated:** Smart Lock for Passwords is deprecated. To ensure the continued security and usability of your app, [migrate to\n| Credential Manager](https://developer.android.com/training/sign-in/passkeys/) today. Credential Manager supports passkey, password, and federated identity authentication (such as Sign-in with Google), stronger security, and a more consistent user experience.\n\nTo integrate Smart Lock for Passwords into your Android app, you must add calls\nto the [Credentials API](/android/reference/com/google/android/gms/auth/api/credentials/package-summary)\nto your app's start-up and sign-in flow. The following diagram shows the flow of\na typical Android app that uses Smart Lock for Passwords.\n\nWhile there are many ways to successfully integrate Smart Lock for Passwords,\nand the specifics of an integration depend on the structure and user experience\nof the app, the following flow is recommended for most apps. Apps that use this\nflow have these user experience advantages:\n\n- Existing users of your service that have a single credential saved are immediately signed in, and they will go directly to the signed-in view when they open the app.\n- Users that have multiple credentials saved or that have disabled automatic sign-in need to respond to only one dialog before they go to the app's signed-in view.\n- Users that have no saved credentials or haven't signed up yet can pick their name and email with a single tap and be intelligently sent to either the sign-in or sign-up view, with this information pre-filled.\n- When users sign out, the app ensures they are not automatically signed back in.\n\n[](/static/identity/smartlock-passwords/android/images/smartlock-passwords-flow.png)\n\n### Retrieve credentials\n\n1. When the app starts, if no user is already signed in, call `CredentialsClient.request()`.\n2. If the `Task` is successful, get the user's credentials with `getResult().getCredential()` and use them to sign in.\n3. If the `Task` fails and the exception is an instance of `ResolvableApiException` and `getStatusCode()` returns `RESOLUTION_REQUIRED`, user input is required to pick a credential. Call `startResolutionForResult()` to prompt the user to select a saved account, then call `getParcelableExtra(Credential.EXTRA_KEY)` to get the user's credentials and use them to sign in. If signing in with the retrieved credentials fails because the password is incorrect or the account doesn't exist, delete the credentials from Smart Lock with `CredentialsClient.delete()`.\n\n### Save credentials\n\n4. If the `Task` fails with an `ApiException` and\n `getStatusCode()` returns `SIGN_IN_REQUIRED`, the\n user has no saved credentials and must sign in or sign up manually using\n your current sign-in or sign-up flow. After the user successfully\n completes sign in, you can provide an opportunity for the user to save\n their credentials for future retrieval (step 5).\n\n You can help the user sign in or sign up faster and more\n easily by retrieving sign-in hints, such as the user's email address. The\n user can select the hint and skip typing their credentials. If your app\n requires users to sign in, you might choose to retrieve hints immediately\n after the initial credentials request fails (otherwise, you can wait until\n the user starts the sign-in or sign-up flow).\n 1. Call `CredentialsClient.getHintPickerIntent()` and start the intent to prompt the user to select an account, then call `getParcelableExtra(Credential.EXTRA_KEY)` to get the sign-in hint.\n 2. If the user ID of the hint matches an existing user, pre-fill the sign-in form with it and let the user enter the password to sign in.\n 3. If the user ID of the hint doesn't match an existing user, pre-fill the sign-up form with the user's ID and name, and let the user create a new account.\n5. After the user successfully signs in or creates an account, save the user\n ID and password with `CredentialsClient.save()`.\n\n If the user signed in with a federated identity provider such as Google\n Sign-In, create the `Credential` object with the user's email\n address as the ID and specify the identity provider with\n `setAccountType`.\n\n### Sign out\n\n6. When the user signs out, call `CredentialsClient.disableAutoSignIn()` to prevent the user from being immediately signed back in. Disabling auto-sign-in also enables users to switch between accounts easily---for example, between work and personal accounts, or between accounts on shared devices---without having to re-enter their sign-in information.\n\nReady to integrate Smart Lock for Passwords into your app?\n[Get started](/identity/smartlock-passwords/android/get-started)."]]