Sử dụng bộ sưu tập để sắp xếp ngăn nắp các trang
Lưu và phân loại nội dung dựa trên lựa chọn ưu tiên của bạn.
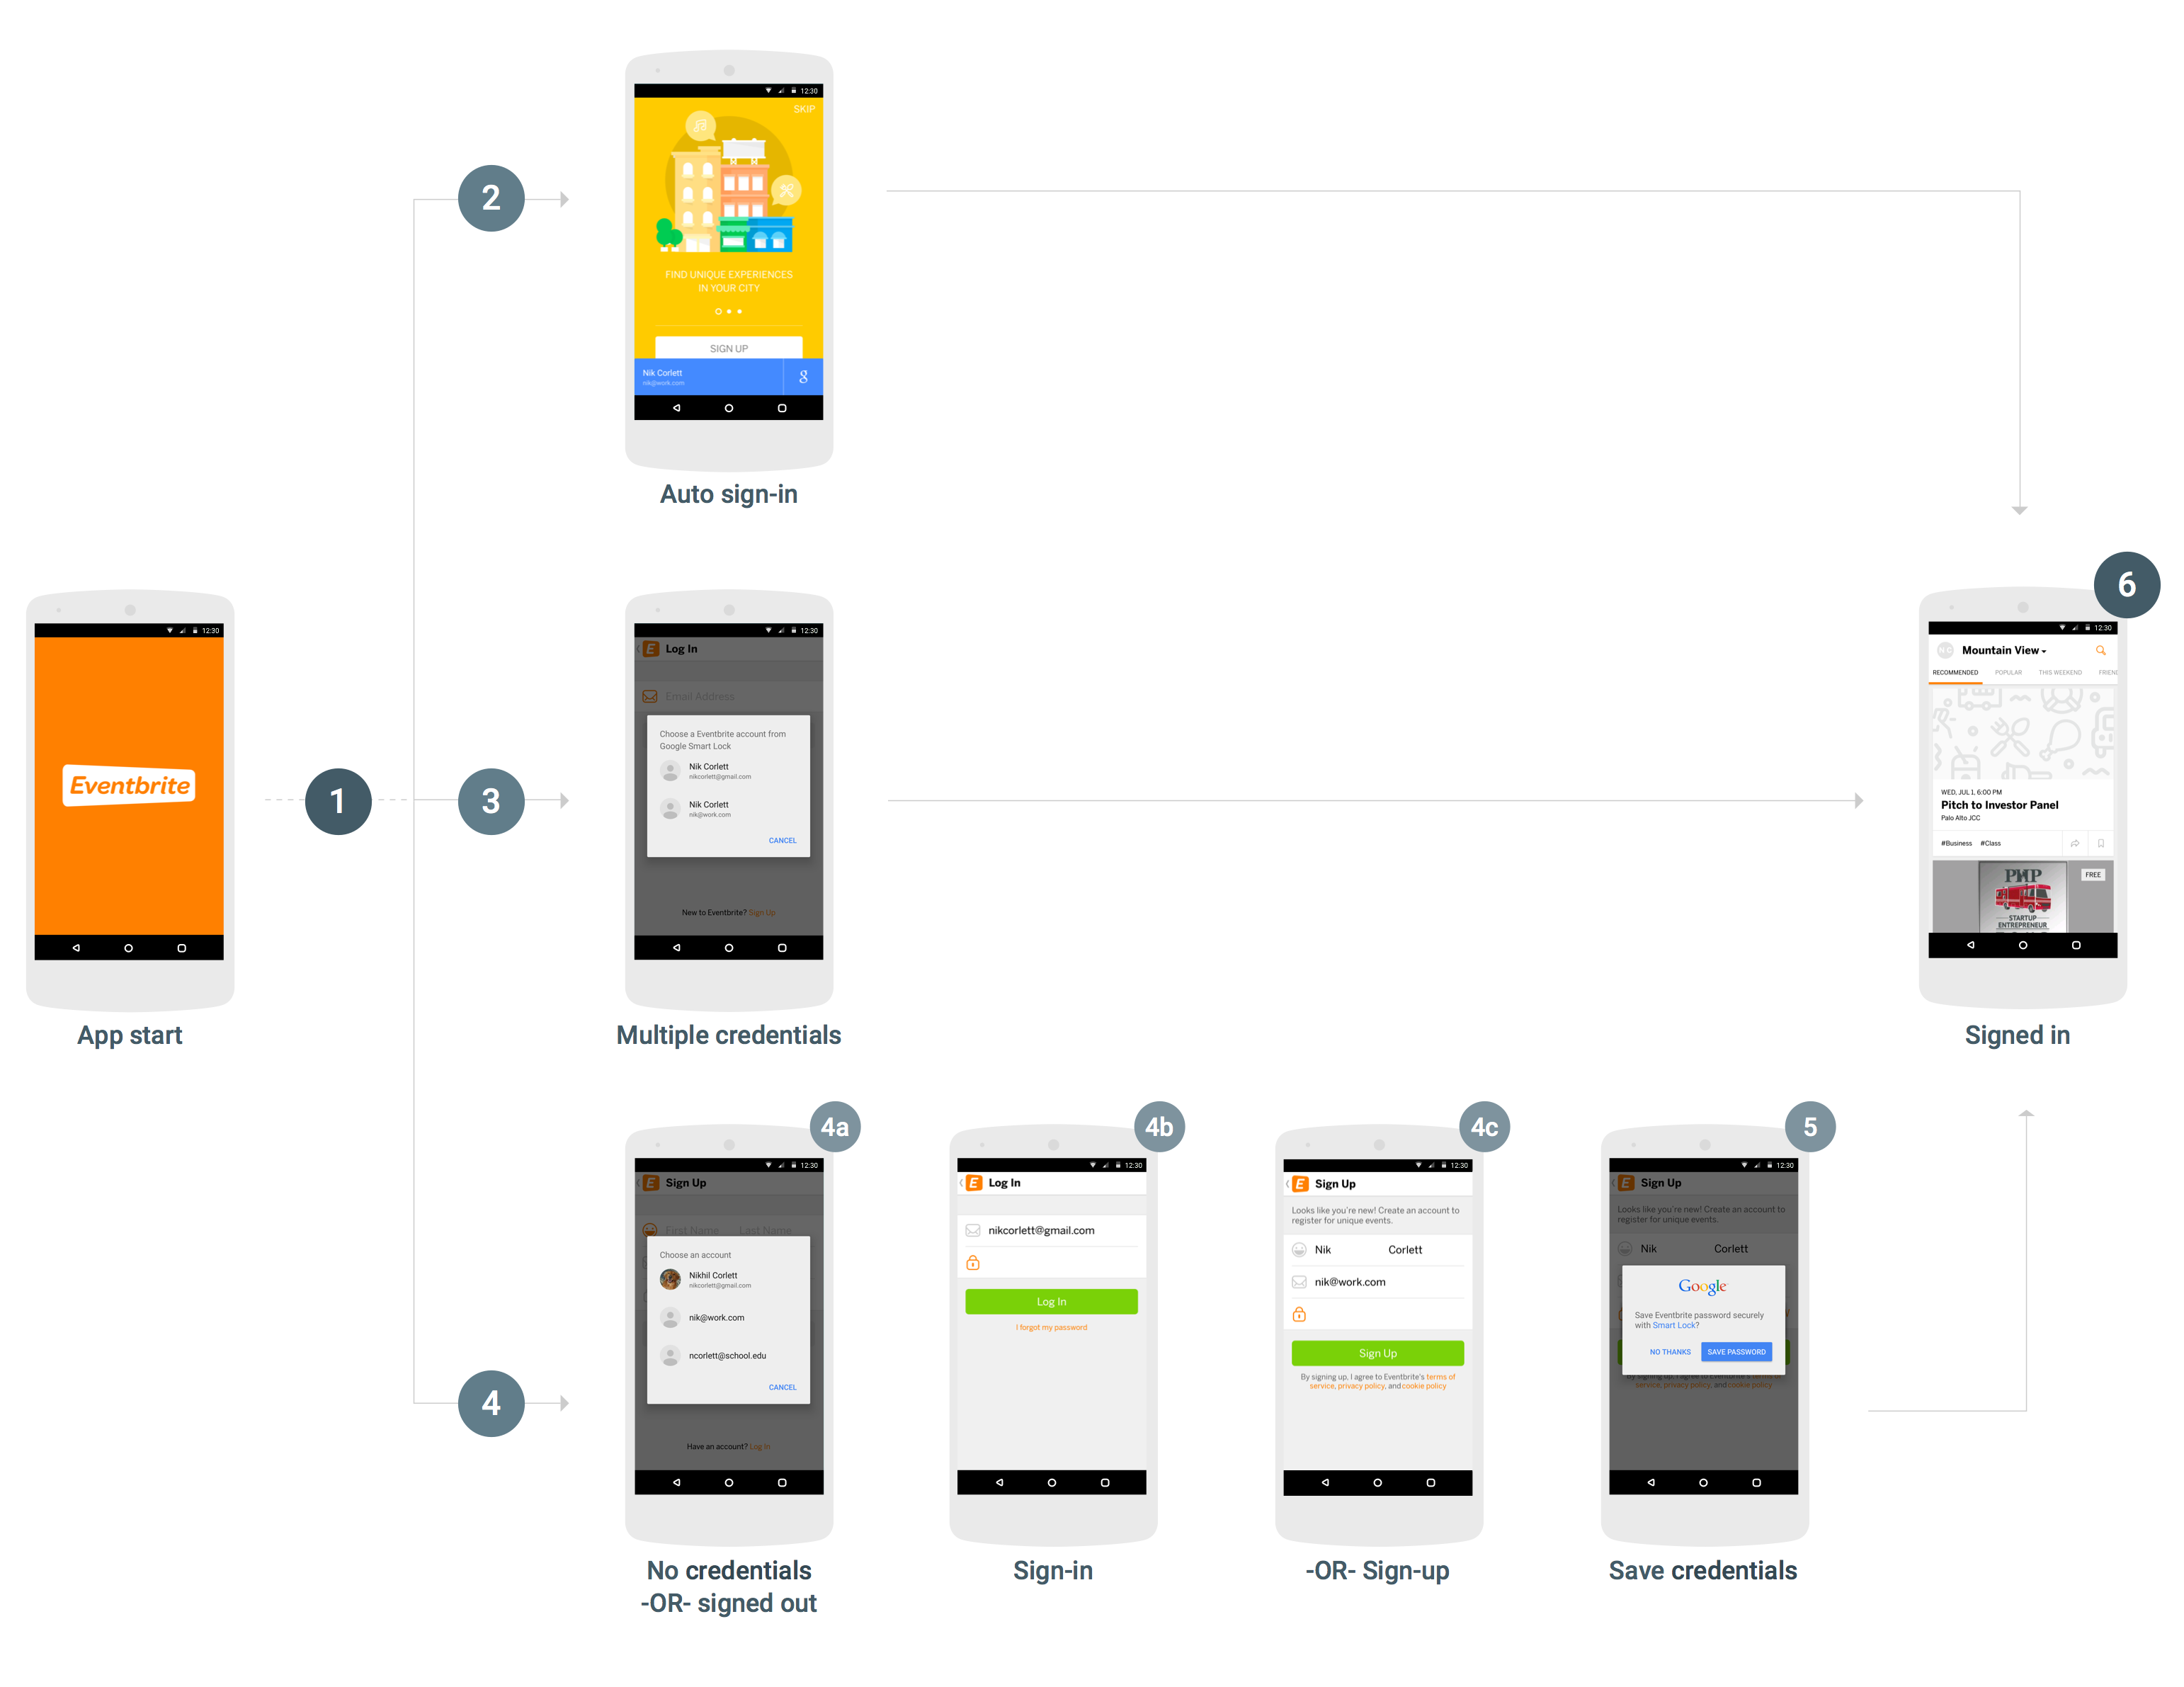
Để tích hợp Smart Lock cho Mật khẩu vào ứng dụng Android, bạn phải thêm các lệnh gọi vào API Thông tin xác thực vào quy trình khởi động và đăng nhập của ứng dụng. Sơ đồ sau đây cho thấy quy trình của một ứng dụng Android thông thường sử dụng Smart Lock cho Mật khẩu.
Mặc dù có nhiều cách để tích hợp thành công Smart Lock cho Mật khẩu. Tuy nhiên, chi tiết cụ thể của việc tích hợp phụ thuộc vào cấu trúc và trải nghiệm người dùng của ứng dụng, nhưng chúng tôi đề xuất quy trình sau đây cho hầu hết ứng dụng. Ứng dụng sử dụng quy trình này có những ưu điểm sau về trải nghiệm người dùng:
Những người dùng hiện tại đang sử dụng dịch vụ của bạn mà đã lưu một thông tin xác thực duy nhất sẽ được đăng nhập ngay lập tức và sẽ được chuyển thẳng đến chế độ xem đã đăng nhập khi mở ứng dụng.
Người dùng đã lưu nhiều thông tin xác thực hoặc đã tắt tính năng tự động đăng nhập chỉ cần phản hồi một hộp thoại trước khi chuyển đến chế độ xem đã đăng nhập của ứng dụng.
Người dùng chưa lưu thông tin xác thực hoặc chưa đăng ký có thể chọn tên và email chỉ bằng một lần nhấn. Các thông tin này sẽ được chuyển một cách thông minh đến chế độ xem đăng nhập hoặc đăng ký, với thông tin này đã được điền sẵn.
Khi người dùng đăng xuất, ứng dụng sẽ đảm bảo rằng họ không tự động đăng nhập lại.
Truy xuất thông tin xác thực
Khi ứng dụng khởi động, nếu chưa có người dùng nào đăng nhập, hãy gọi CredentialsClient.request().
Nếu Task thành công, hãy lấy thông tin đăng nhập của người dùng bằng getResult().getCredential() và sử dụng thông tin đó để đăng nhập.
Nếu Task không thành công và trường hợp ngoại lệ là một thực thể của ResolvableApiException và getStatusCode() trả về RESOLUTION_REQUIRED, thì hoạt động đầu vào của người dùng để chọn thông tin xác thực. Hãy gọi startResolutionForResult() để nhắc người dùng chọn một tài khoản đã lưu, sau đó gọi getParcelableExtra(Credential.EXTRA_KEY) để lấy thông tin xác thực của người dùng và dùng các thông tin đó để đăng nhập.
Lưu thông tin đăng nhập
Nếu Task không thành công với ApiException và getStatusCode() trả về SIGN_IN_REQUIRED, thì người dùng sẽ không có thông tin xác thực đã lưu và phải đăng nhập hoặc đăng ký theo cách thủ công bằng quy trình đăng nhập hoặc đăng ký hiện tại. Sau khi người dùng hoàn tất thành công quá trình đăng nhập, bạn có thể tạo cơ hội cho người dùng lưu thông tin xác thực của họ để truy xuất trong tương lai (bước 5).
Bạn có thể giúp người dùng đăng nhập hoặc đăng ký nhanh và dễ dàng hơn bằng cách truy xuất gợi ý đăng nhập, chẳng hạn như địa chỉ email của người dùng. Người dùng có thể chọn gợi ý và bỏ qua bước nhập thông tin xác thực của họ. Nếu ứng dụng của bạn yêu cầu người dùng đăng nhập, thì bạn có thể chọn truy xuất gợi ý ngay sau khi yêu cầu thông tin xác thực ban đầu không thành công (nếu không, bạn có thể đợi cho đến khi người dùng bắt đầu quy trình đăng nhập hoặc đăng ký).
Gọi CredentialsClient.getHintPickerIntent() và bắt đầu ý định nhắc người dùng chọn một tài khoản, sau đó gọi getParcelableExtra(Credential.EXTRA_KEY) để nhận gợi ý đăng nhập.
Nếu mã nhận dạng người dùng trong gợi ý khớp với người dùng hiện tại, hãy điền sẵn vào biểu mẫu đăng nhập và cho phép người dùng nhập mật khẩu để đăng nhập.
Nếu mã nhận dạng người dùng trong gợi ý không khớp với người dùng hiện có, hãy điền sẵn mã nhận dạng và tên của người dùng đó vào biểu mẫu đăng ký, sau đó để người dùng tạo một tài khoản mới.
Sau khi người dùng đăng nhập hoặc tạo tài khoản thành công, hãy lưu mã nhận dạng
người dùng và mật khẩu bằng CredentialsClient.save().
Nếu người dùng đã đăng nhập thông qua một nhà cung cấp danh tính được liên kết như tính năng Đăng nhập bằng Google, hãy tạo đối tượng Credential có địa chỉ email của người dùng làm mã nhận dạng và chỉ định nhà cung cấp danh tính bằng setAccountType.
Đăng xuất
Khi người dùng đăng xuất, hãy gọi CredentialsClient.disableAutoSignIn() để ngăn người dùng đăng nhập lại ngay. Việc tắt tính năng tự động đăng nhập cũng cho phép người dùng dễ dàng chuyển đổi giữa các tài khoản – ví dụ: giữa tài khoản công việc và tài khoản cá nhân hoặc giữa các tài khoản trên các thiết bị dùng chung – mà không phải nhập lại thông tin đăng nhập của họ.
Bạn đã sẵn sàng tích hợp Smart Lock cho Mật khẩu vào ứng dụng của mình chưa?
Bắt đầu.
[null,null,["Cập nhật lần gần đây nhất: 2025-07-25 UTC."],[[["\u003cp\u003eSmart Lock for Passwords is deprecated; migrate to Credential Manager for enhanced security and user experience with passkeys, passwords, and federated identities.\u003c/p\u003e\n"],["\u003cp\u003eSmart Lock for Passwords integration involves adding the Credentials API to your app's startup and sign-in flow to retrieve and save user credentials.\u003c/p\u003e\n"],["\u003cp\u003eExisting users with saved credentials can experience automatic sign-in, while new users can benefit from pre-filled forms using sign-in hints.\u003c/p\u003e\n"],["\u003cp\u003eEnsure to disable auto-sign-in upon user sign-out to prevent immediate re-authentication and facilitate account switching.\u003c/p\u003e\n"]]],[],null,["# Android integration flow\n\n| **Deprecated:** Smart Lock for Passwords is deprecated. To ensure the continued security and usability of your app, [migrate to\n| Credential Manager](https://developer.android.com/training/sign-in/passkeys/) today. Credential Manager supports passkey, password, and federated identity authentication (such as Sign-in with Google), stronger security, and a more consistent user experience.\n\nTo integrate Smart Lock for Passwords into your Android app, you must add calls\nto the [Credentials API](/android/reference/com/google/android/gms/auth/api/credentials/package-summary)\nto your app's start-up and sign-in flow. The following diagram shows the flow of\na typical Android app that uses Smart Lock for Passwords.\n\nWhile there are many ways to successfully integrate Smart Lock for Passwords,\nand the specifics of an integration depend on the structure and user experience\nof the app, the following flow is recommended for most apps. Apps that use this\nflow have these user experience advantages:\n\n- Existing users of your service that have a single credential saved are immediately signed in, and they will go directly to the signed-in view when they open the app.\n- Users that have multiple credentials saved or that have disabled automatic sign-in need to respond to only one dialog before they go to the app's signed-in view.\n- Users that have no saved credentials or haven't signed up yet can pick their name and email with a single tap and be intelligently sent to either the sign-in or sign-up view, with this information pre-filled.\n- When users sign out, the app ensures they are not automatically signed back in.\n\n[](/static/identity/smartlock-passwords/android/images/smartlock-passwords-flow.png)\n\n### Retrieve credentials\n\n1. When the app starts, if no user is already signed in, call `CredentialsClient.request()`.\n2. If the `Task` is successful, get the user's credentials with `getResult().getCredential()` and use them to sign in.\n3. If the `Task` fails and the exception is an instance of `ResolvableApiException` and `getStatusCode()` returns `RESOLUTION_REQUIRED`, user input is required to pick a credential. Call `startResolutionForResult()` to prompt the user to select a saved account, then call `getParcelableExtra(Credential.EXTRA_KEY)` to get the user's credentials and use them to sign in. If signing in with the retrieved credentials fails because the password is incorrect or the account doesn't exist, delete the credentials from Smart Lock with `CredentialsClient.delete()`.\n\n### Save credentials\n\n4. If the `Task` fails with an `ApiException` and\n `getStatusCode()` returns `SIGN_IN_REQUIRED`, the\n user has no saved credentials and must sign in or sign up manually using\n your current sign-in or sign-up flow. After the user successfully\n completes sign in, you can provide an opportunity for the user to save\n their credentials for future retrieval (step 5).\n\n You can help the user sign in or sign up faster and more\n easily by retrieving sign-in hints, such as the user's email address. The\n user can select the hint and skip typing their credentials. If your app\n requires users to sign in, you might choose to retrieve hints immediately\n after the initial credentials request fails (otherwise, you can wait until\n the user starts the sign-in or sign-up flow).\n 1. Call `CredentialsClient.getHintPickerIntent()` and start the intent to prompt the user to select an account, then call `getParcelableExtra(Credential.EXTRA_KEY)` to get the sign-in hint.\n 2. If the user ID of the hint matches an existing user, pre-fill the sign-in form with it and let the user enter the password to sign in.\n 3. If the user ID of the hint doesn't match an existing user, pre-fill the sign-up form with the user's ID and name, and let the user create a new account.\n5. After the user successfully signs in or creates an account, save the user\n ID and password with `CredentialsClient.save()`.\n\n If the user signed in with a federated identity provider such as Google\n Sign-In, create the `Credential` object with the user's email\n address as the ID and specify the identity provider with\n `setAccountType`.\n\n### Sign out\n\n6. When the user signs out, call `CredentialsClient.disableAutoSignIn()` to prevent the user from being immediately signed back in. Disabling auto-sign-in also enables users to switch between accounts easily---for example, between work and personal accounts, or between accounts on shared devices---without having to re-enter their sign-in information.\n\nReady to integrate Smart Lock for Passwords into your app?\n[Get started](/identity/smartlock-passwords/android/get-started)."]]