Cómo usar KML en Google Mashup Editor
Organiza tus páginas con colecciones
Guarda y categoriza el contenido según tus preferencias.
Valery Hronusov, desarrollador de KML, Perm State University, Rusia
Introducción
Google Mashup Editor (GME) es una de las herramientas más esperadas y útiles para los desarrolladores de mashups. GME ayuda a los desarrolladores a crear y editar componentes dinámicos
en páginas web, como mapas, tablas, listas y otros elementos, en función de conexiones con datos externos. Luego, estos elementos se pueden incluir en páginas web y blogs con un iframe.
En este instructivo, se muestra cómo incorporar un archivo KML en un mapa creado con GME.
Mis primeras impresiones sobre Google Mashup Editor
- Es muy simple y tiene una interfaz clara y distinta, como la mayoría de los productos de Google.
- Tiene un índice de proyectos conveniente con una colección de ejemplos de código en constante aumento, así como el código del autor.
- Permite almacenar fácilmente recursos adicionales en el proyecto (como archivos de imágenes).
- Tiene un depurador de XML fácil de usar.
- Tiene muchas aplicaciones de muestra fáciles de usar.
GME para desarrolladores de KML
Antes de la llegada de Internet, los datos espaciales eran tradicionalmente difíciles de compartir. Sin embargo, con el desarrollo de Internet, las aplicaciones de mapas se convirtieron en una forma estándar de compartir fácilmente los datos de los sistemas de información geográfica (SIG) con el mundo. El KML se está convirtiendo en un estándar para la presentación y el intercambio de datos de SIG porque es compacto, fácil de desarrollar y es compatible con aplicaciones populares como Google Earth y Google Maps.
Hasta hace poco, el proceso de creación y edición de páginas basadas en JavaScript era un gran problema para los desarrolladores de KML. Se requerían muchos pasos adicionales para crear un mashup y depurarlo. GME permite crear un mashup basado en KML muy rápidamente a partir de unos pocos componentes básicos. El proceso de creación no requiere conocimientos especiales de HTML o JavaScript. Los proyectos de muestra de GME proporcionan suficiente información para comenzar.
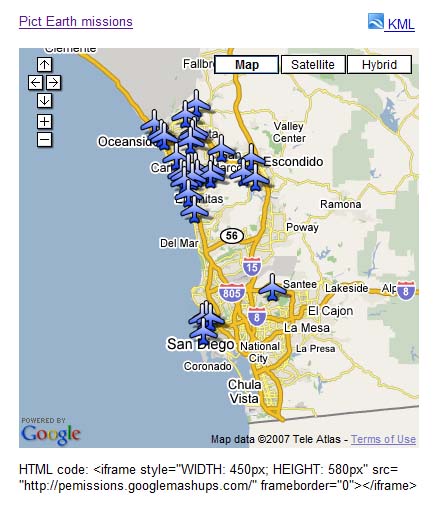
En el siguiente ejemplo, usaré un archivo KML que apunta a la colección de fotografías tomadas durante los vuelos de Pict Earth USA.
Esta es una instantánea de la combinación de mapas de Pict Earth:
Estos son los pasos para integrar un archivo KML en un proyecto de GME con la API de Google Maps:
Paso 1: Selecciona el archivo KML
Paso 2: Crea un nuevo proyecto de GME
Paso 3: Crea una función para agregar el archivo KML
Paso 4: Agrega un mapa
Paso 5: Prueba la combinación
Paso 6: Publica la combinación
Paso 7: Agrega la combinación a una página web
Paso 8: Colócala en la galería de GME
Paso 1: Selecciona el archivo KML
Selecciona el archivo KML que deseas agregar a tu mapa. Puede ser cualquier lugar que tenga funciones compatibles con Google Maps. Debe estar alojado en un servidor disponible públicamente.
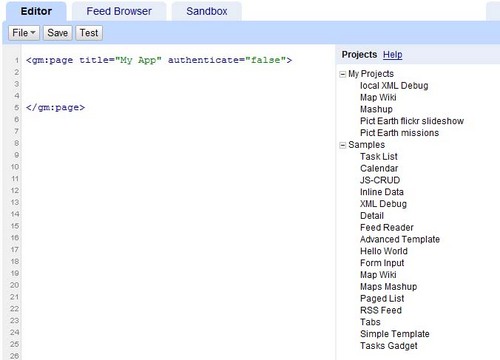
Paso 2: Crea un proyecto nuevo de GME
Crea un nuevo proyecto de GME en blanco.
Así se ve un proyecto de GME en blanco:
Agrega un título y un nombre para tu función.
<gm:page
title="Misiones de Pict Earth" authenticate="false"
onload="kmlPE()">
</gm:page>
Paso 3: Crea una función para agregar el KML
Crea una función de JavaScript con la ruta de acceso al archivo KML que se agregará al mapa.
<script>
function kmlPE()
{
<!-- Get map -->
var myMap = google.mashups.getObjectById('map').getMap();
<!-- Get KML -->
var geoXml = new GGeoXml("http://pictearthusa.com/kml/missions.kml");
<!--Place KML on Map -->
myMap.addOverlay(geoXml);
<!--Set zoom on double click -->
myMap.enableDoubleClickZoom();
}
</script>
Paso 4: Agrega un mapa
Agrega el mapa y los parámetros.
<gm:map id="map" height="400px" width="400px" lat="32.9393" lng="-117.206" zoom="9" maptypes="true"/>
Paso 5: Prueba la combinación.
Presiona el botón Probar (F4).
Esta es una imagen de la combinación de Pict Earth que se probó en el Sandbox.
Ahora podemos verificar el texto de la aplicación y ver el primer resultado. Podemos agregar un título y vínculos, y volver a probarlo.
Paso 6: Publica la combinación
Establece el nombre del proyecto y, luego, publícalo. Esto te proporcionará un vínculo permanente a tu combinación, que podrás usar para incorporarla en páginas web. En mi ejemplo, este es el vínculo a la página principal del proyecto de GME. También puedes ver el código fuente del proyecto.
Paso 7: Agrega la combinación a una página web
Agrega el mashup a una página web con un iframe. Por ejemplo, para insertar el proyecto de ejemplo, agrega lo siguiente:
<iframe style="WIDTH: 439px; HEIGHT: 491px" src="http://pemissions.googlemashups.com/" frameborder="0"></iframe>
Estos son ejemplos de la combinación en una página y un blog web.
También puedes agregar tu código de Google Analytics al proyecto, lo que te permitirá hacer un seguimiento de las estadísticas sobre quiénes ven tu página. Aquí tienes la secuencia de comandos simple para agregarlo:
<script src="http://www.google-analytics.com/urchin.js" type="text/javascript"></script>
<script type="text/javascript">uacct = "youraccountnumber";urchinTracker();</script>
Paso 8: Colócalo en la galería de GME
Publica tu mashup en la Galería de mashups de GME.
Esto permitirá que otros usuarios vean tu combinación.
Consulta la Guía de introducción al Editor de Mashup de Google, que presenta en detalle el proceso de creación de mashups. Además, consulta la lista de etiquetas para obtener una breve descripción de todas las etiquetas de gm con ejemplos.
Código:
Este es el código completo para usar el KML de Pict Earth en GME:
<gm:page title="Pict Earth missions" authenticate="false" onload="kmlPE()>
<!-- Map definition -->
<gm:mapid="map" height="400px" width="400px" lat="32.9393" lng="-117.206" zoom="9" maptypes="true"/>
<script>
function kmlPE(){
<!-- Get map -->
var myMap = google.mashups.getObjectById('map').getMap();
<!-- Get KML -->
var geoXml = new GGeoXml("http://pictearthusa.com/kml/missions.kml");
<!-- Place KML on Map -->
myMap.addOverlay(geoXml);
<!-- Set zoom on double click -->
myMap.enableDoubleClickZoom();
}
</script>
</gm:page>
Próximos pasos
Una vez que hayas publicado tu combinación, puedes usar el archivo KML que contiene como parámetro para incluirlo en otra aplicación o cargarlo directamente como mapa. Por ejemplo, esta página:
http://param.googlemashups.com
es una combinación de GME. Puedes hacer referencia directamente a un archivo KML en el mashup agregando kml= como parámetro en la URL, de la siguiente manera:
http://param.googlemashups.com/?kml=http://mapgadgets.googlepages.com/cta.kml
También puedes crear un gadget desde tu proyecto. Una vez que lo envíes, ve al menú de archivos, haz clic en Enviar gadget y sigue las instrucciones. Esto te permitirá agregar fácilmente tu aplicación a tu página principal personalizada de Google, a otras páginas web y compartirla con otras personas.
Salvo que se indique lo contrario, el contenido de esta página está sujeto a la licencia Atribución 4.0 de Creative Commons, y los ejemplos de código están sujetos a la licencia Apache 2.0. Para obtener más información, consulta las políticas del sitio de Google Developers. Java es una marca registrada de Oracle o sus afiliados.
Última actualización: 2025-07-27 (UTC)
[null,null,["Última actualización: 2025-07-27 (UTC)"],[[["\u003cp\u003eThis tutorial demonstrates how to integrate a KML file into a Google Mashup Editor (GME) project using the Google Maps API.\u003c/p\u003e\n"],["\u003cp\u003eGME simplifies the process of creating and editing KML-based mashups, enabling developers to build dynamic map components without extensive HTML or JavaScript knowledge.\u003c/p\u003e\n"],["\u003cp\u003eThe tutorial provides a step-by-step guide, covering selecting a KML file, creating a GME project, adding a map, testing, publishing, and embedding the mashup into web pages.\u003c/p\u003e\n"],["\u003cp\u003eUsers can further enhance their mashups by adding Google Analytics tracking and submitting them to the GME Mashup Gallery for wider visibility.\u003c/p\u003e\n"],["\u003cp\u003ePublished mashups can be parameterized to dynamically load different KML files and can be converted into Gadgets for integration into Google Personalized Home Page and other web pages.\u003c/p\u003e\n"]]],[],null,["# Using KML in Google Mashup Editor\n\n*Valery Hronusov, KML Developer,\nPerm State University, Russia* \n\nIntroduction\n------------\n\n[Google\nMashup Editor](http://editor.googlemashups.com/ \"Google Mashup Editor\") (GME) is one of the most long-awaited and useful tools for mashup developers. GME helps developers create and edit dynamic components in Web pages, such as maps, tables, lists, and other elements, based on connections with external data. These elements can be then be included in Web pages and blogs using an iframe. \n\nThis tutorial will show you how to incorporate a KML file into a Map created with GME. \n\n\u003cbr /\u003e\n\n### My first impressions of Google Mashup Editor\n\n- It has the utmost simplicity, with a clean and distinct interface, like the majority of Google products.\n- It has a convenient project index with a constantly increasing collection of code examples, as well as the author's code.\n- It allows for the easy storage of additional resources to the project (such as image files).\n- It has an easy-to-use XML debugger.\n- It has lots of easy-to-use sample applications.\n\n\u003cbr /\u003e\n\n### GME for KML Developers\n\nBefore the advent of the Internet, spatial data\nwas traditionally difficult to share. However, with\nthe development of the Internet, mapping applications became a standard\nway of easily sharing Geographic Information Systems\n(GIS) data with the world. KML is becoming a standard for the\npresentation and interchange of GIS data because it is compact, easy to\ndevelop, and is supported by popular applications such as Google Earth\nand\nGoogle Maps.\n\n\nUntil recently, the process of creating and editing pages\nbased\non\nJavaScript was a large problem for KML developers. It required a large\nnumber of\nadditional steps to create a mashup and debug it. GME makes\nit\npossible to create a KML-based mashup very rapidly\nout of a few basic\ncomponents. The process of creation does not require special\nknowledge of HTML\nor JavaScript. The GME sample projects provide enough to get\nstarted.\n\n\nIn the following example, I'll be using a KML file that points\nto the\ncollection of the photographs taken during\n[Pict Earth\nUSA](http://pictearth.com/missions.html \"Pict Earth USA\") flights.\n\nThis is a snapshot of the Pict Earth maps mashup: \n\n### Here are the steps to integrate a KML file into a GME project using the\nGoogle Maps API:\n\n\u003cbr /\u003e\n\n[Step 1: Select the KML file](#Step1) \n[Step 2: Create a new GME project](#Step2) \n[Step 3: Create a function to add the KML](#Step3) \n[Step 4: Add a map](#Step4) \n[Step 5: Test the mashup](#Step5) \n[Step 6: Publish the mashup](#Step6) \n[Step 7: Add the mashup to a web page](#Step7) \n[Step 8: Put it in the GME gallery](#Step8) \n\n### Step 1: Select the KML file\n\nSelect\nthe KML file you would like to add to your Map. This can be anything\nthat has features supported in Google Maps. It must be hosted on a\npublicly available server.\n\n### Step 2: Create a New\nGME Project\n\nCreate a new blank GME project.\n\nThis is what a blank GME project looks like: \n\nAdd a\ntitle and a name for your function.\n\\\u003cgm:page title=**\"Pict Earth\nmissions\"** authenticate=\"false\" **onload=**\"**kmlPE()**\"\\\u003e \n\\\u003c/gm:page\\\u003e \n\n### Step 3: Create\na function to add the KML\n\n\nCreate a JavaScript function with the path to the KML file to be added\nto the Map. \n\n```gdscript\n\u003cscript\u003e\n function kmlPE()\n {\n \u003c!-- Get map --\u003e\n var myMap = google.mashups.getObjectById('map').getMap();\n \u003c!-- Get KML --\u003e\n var geoXml = new GGeoXml(\"http://pictearthusa.com/kml/missions.kml\");\n \u003c!--Place KML on Map --\u003e\n myMap.addOverlay(geoXml);\n \u003c!--Set zoom on double click --\u003e\n myMap.enableDoubleClickZoom();\n }\n\u003c/script\u003e\n```\n\n### Step 4: Add a Map\n\nAdd map and parameters.\n\n```actionscript-3\n\u003cgm:map id=\"map\" height=\"400px\" width=\"400px\" lat=\"32.9393\" lng=\"-117.206\" zoom=\"9\" maptypes=\"true\"/\u003e\n```\n\n### Step 5: Test the mashup.\n\nPress the Test button (F4).\n\nThis is an image of the Pict Earth mashup tested in the\nSandbox. \n\nNow we can verify the text of application and see the first result. We\ncan add a\ntitle and links and test it again.\n\n### Step 6: Publish the mashup\n\nSet the name of the project, and then publish it. This will give you a\npermanent link to your mashup, which you can use to incorporate it into\nweb pages. Using my example, this is the link to the GME project\n[home page](http://pemissions.googlemashups.com/ \"home page\"). You\ncan also see\n[source\ncode](http://pemissions.googlemashups.com/index.gml \"Source code\") of project.\n\n### Step 7: Add the mashup\nto a web page\n\nAdd the mashup to a web page using an iframe. For instance, to insert\nthe example project, add this:\n\n```css+lasso\n\u003ciframe style=\"WIDTH: 439px; HEIGHT: 491px\" src=\"http://pemissions.googlemashups.com/\" frameborder=\"0\"\u003e\u003c/iframe\u003e\n```\n\nHere are examples of the mashup in a web [page](http://spreadsheetsgis.googlepages.com/pe \"page\")\nand a [blog](http://gisplanet.blogspot.com/2007/07/pict-earth-usa-missions.html \"blog\").\n\nYou can also add your [Google\nAnalytics](http://analytics.google.com/ \"Google Analytics\") code to the project, which will allow you to track\nstatistics about who is viewing your page. Here's the simple script to\nadd it:\n\n```carbon\n\u003cscript src=\"http://www.google-analytics.com/urchin.js\" type=\"text/javascript\"\u003e\u003c/script\u003e\n\u003cscript type=\"text/javascript\"\u003euacct = \"youraccountnumber\";urchinTracker();\u003c/script\u003e\n```\n\n\u003cbr /\u003e\n\n### Step 8: Put it in the\nGME Gallery\n\nPublish your mashup to the [GME Mashup Gallery](http://gallery.googlemashups.com/).\nThis will\nallow other users to view your mashup.\n\n\u003cbr /\u003e\n\n### For more information:\n\nCheck out the\n[Google\nMashup Editor Getting Started Guide](http://editor.googlemashups.com/docs/gettingstarted.html \"Google Mashup Editor Getting Started Guide\"), which presents in\ndetail the\nprocess of creating mashups. Also, check out\nthe [list\nof tags](http://editor.googlemashups.com/docs/reference.html \"list of tags\") for a brief description of all gm tags with\n[examples](http://editor.googlemashups.com/docs/samples.html \"examples\").\n\n\u003cbr /\u003e\n\n### Code:\n\nHere is\nthe whole code for using the Pict Earth KML in GME: \n\n```gdscript\n\u003cgm:page title=\"Pict Earth missions\" authenticate=\"false\" onload=\"kmlPE()\u003e\n\n\u003c!-- Map definition --\u003e\n\u003cgm:mapid=\"map\" height=\"400px\" width=\"400px\" lat=\"32.9393\" lng=\"-117.206\" zoom=\"9\" maptypes=\"true\"/\u003e\n\n\u003cscript\u003e\n function kmlPE(){\n\n \u003c!-- Get map --\u003e\n var myMap = google.mashups.getObjectById('map').getMap();\n\n \u003c!-- Get KML --\u003e\n var geoXml = new GGeoXml(\"http://pictearthusa.com/kml/missions.kml\");\n\n \u003c!-- Place KML on Map --\u003e\n myMap.addOverlay(geoXml);\n\n \u003c!-- Set zoom on double click --\u003e\n myMap.enableDoubleClickZoom();\n }\n\u003c/script\u003e\n\u003c/gm:page\u003e\n```\n\n### What's next?\n\nOnce you've published your mashup, you can use the KML file\nin it as a\nparameter to include in another application, or loaded directly as a\nmap. For\ninstance, this page:\n[http://param.googlemashups.com](http://param.googlemashups.com/?kml=http://pictearthusa.com/kml/missions.kml \"http://param.googlemashups.com/?kml=http://pictearthusa.com/kml/missions.kml\")\n\n\u003cbr /\u003e\n\nis a GME mashup. You can directly reference a KML file to the mashup by adding kml= as a parameter in the URL, like this:\n\n\u003cbr /\u003e\n\n\u003chttp://param.googlemashups.com/?kml=http://mapgadgets.googlepages.com/cta.kml\u003e \n\nYou can also create a [Gadget](http://www.google.com/apis/gadgets/) from your project. Once you've submitted it, go to the file menu and click on Submit Gadget, and follow the directions. This will allow you to easily add your application to your [Google personalized home page](http://www.google.com/ig), on other web pages, and to share it with others.\n\n\u003cbr /\u003e"]]