Menggunakan KML di Google Mashup Editor
Tetap teratur dengan koleksi
Simpan dan kategorikan konten berdasarkan preferensi Anda.
Valery Hronusov, Developer KML,
Perm State University, Rusia
Pengantar
Google Mashup Editor (GME) adalah salah satu alat yang paling dinanti dan berguna bagi developer mashup. GME membantu developer membuat dan mengedit komponen
dinamis
di Halaman web, seperti peta, tabel, daftar, dan elemen lainnya, berdasarkan
pada koneksi dengan data eksternal. Elemen ini kemudian dapat disertakan di Halaman web dan blog menggunakan iframe.
Tutorial ini akan menunjukkan cara menggabungkan file KML ke dalam Peta yang dibuat dengan GME.
Kesan pertama saya tentang Google Mashup Editor
- Fitur ini memiliki kesederhanaan yang luar biasa, dengan antarmuka yang bersih dan berbeda, seperti sebagian besar produk Google.
- Memiliki indeks project yang praktis dengan kumpulan contoh kode yang terus bertambah, serta kode penulis.
- Hal ini memungkinkan penyimpanan resource tambahan yang mudah ke
project (seperti file gambar).
- Memiliki debugger XML yang mudah digunakan.
- Ada banyak aplikasi contoh yang mudah digunakan.
GME untuk Developer KML
Sebelum munculnya Internet, data spasial biasanya sulit dibagikan. Namun, dengan
perkembangan Internet, aplikasi pemetaan menjadi cara standar
untuk membagikan data Sistem Informasi Geografis (GIS) dengan mudah kepada dunia. KML menjadi standar untuk presentasi dan pertukaran data GIS karena ringkas, mudah dikembangkan, dan didukung oleh aplikasi populer seperti Google Earth dan Google Maps.
Hingga saat ini, proses pembuatan dan pengeditan halaman
berdasarkan
JavaScript
merupakan masalah besar bagi developer KML. Membuat mashup dan men-debugnya memerlukan banyak langkah tambahan. GME memungkinkan pembuatan mashup berbasis KML dengan sangat cepat dari beberapa komponen dasar. Proses pembuatan tidak memerlukan pengetahuan khusus tentang HTML atau JavaScript. Project contoh GME menyediakan cukup banyak hal untuk
memulai.
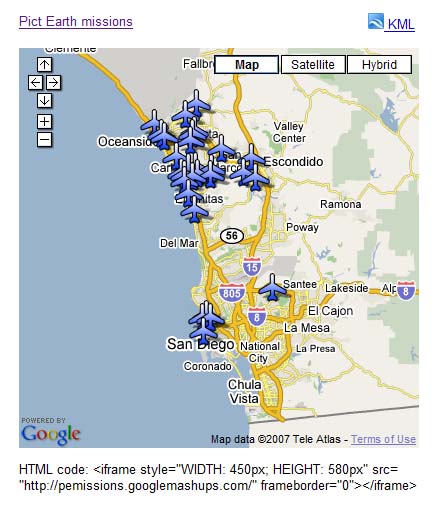
Dalam contoh berikut, saya akan menggunakan file KML yang mengarah ke koleksi foto yang diambil selama penerbangan Pict Earth USA.
Berikut adalah ringkasan mashup peta Pict Earth:
Berikut adalah langkah-langkah untuk mengintegrasikan file KML ke dalam project GME menggunakan
Google Maps API:
Langkah 1: Pilih file KML
Langkah 2: Buat project GME baru
Langkah 3: Buat fungsi untuk menambahkan KML
Langkah 4: Tambahkan peta
Langkah 5: Uji mashup
Langkah 6: Publikasikan mashup
Langkah 7: Tambahkan mashup ke halaman web
Langkah 8: Masukkan ke galeri GME
Langkah 1: Pilih file KML
Pilih
file KML yang ingin Anda tambahkan ke Peta Anda. Ini bisa berupa apa saja
yang memiliki fitur yang didukung di Google Maps. File harus dihosting di server yang tersedia secara publik.
Langkah 2: Buat Project GME Baru
Buat project GME kosong baru.
Tampilan project GME kosong adalah sebagai berikut:
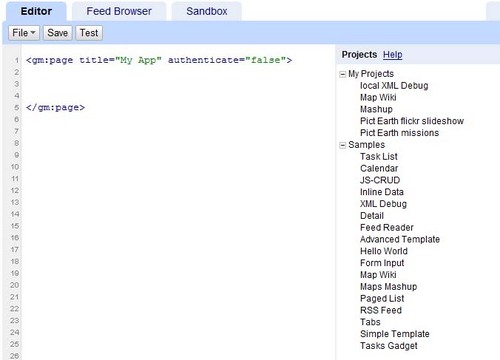
Tambahkan judul dan nama untuk fungsi Anda.
<gm:page
title="Misi Pict Earth" authenticate="false"
onload="kmlPE()">
</gm:page>
Langkah 3: Buat
fungsi untuk menambahkan KML
Buat fungsi JavaScript dengan jalur ke file KML yang akan ditambahkan ke Peta.
<script>
function kmlPE()
{
<!-- Get map -->
var myMap = google.mashups.getObjectById('map').getMap();
<!-- Get KML -->
var geoXml = new GGeoXml("http://pictearthusa.com/kml/missions.kml");
<!--Place KML on Map -->
myMap.addOverlay(geoXml);
<!--Set zoom on double click -->
myMap.enableDoubleClickZoom();
}
</script>
Langkah 4: Tambahkan Peta
Tambahkan peta dan parameter.
<gm:map id="map" height="400px" width="400px" lat="32.9393" lng="-117.206" zoom="9" maptypes="true"/>
Langkah 5: Uji mashup.
Tekan tombol Test (F4).
Ini adalah gambar mashup Pict Earth yang diuji di Sandbox.
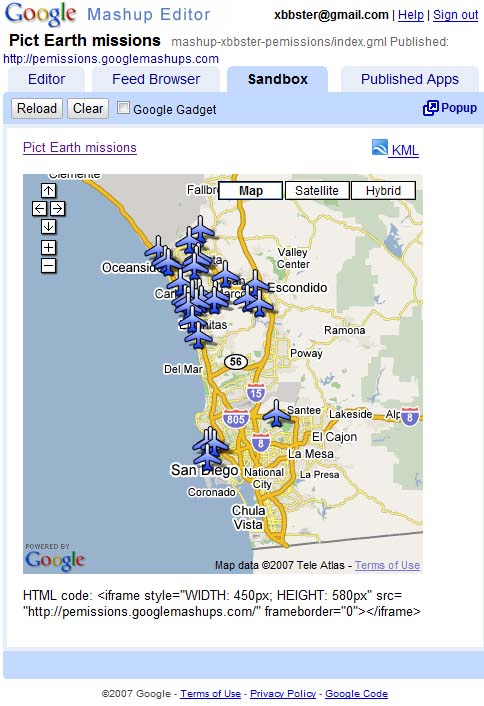
Sekarang kita dapat memverifikasi teks aplikasi dan melihat hasil pertama. Kita dapat menambahkan judul dan link, lalu mengujinya lagi.
Langkah 6: Publikasikan mashup
Tetapkan nama project, lalu publikasikan. Tindakan ini akan memberi Anda link permanen ke mashup, yang dapat Anda gunakan untuk menyertakannya ke halaman web. Dengan menggunakan contoh saya, berikut link ke halaman beranda project GME. Anda
juga dapat melihat
kode
sumber project.
Langkah 7: Tambahkan mashup
ke halaman web
Tambahkan mashup ke halaman web menggunakan iframe. Misalnya, untuk menyisipkan
project contoh, tambahkan ini:
<iframe style="WIDTH: 439px; HEIGHT: 491px" src="http://pemissions.googlemashups.com/" frameborder="0"></iframe>
Berikut adalah contoh mashup di halaman web dan blog.
Anda juga dapat menambahkan kode Google Analytics ke project, yang akan memungkinkan Anda melacak statistik tentang siapa yang melihat halaman Anda. Berikut skrip sederhana untuk menambahkannya:
<script src="http://www.google-analytics.com/urchin.js" type="text/javascript"></script>
<script type="text/javascript">uacct = "youraccountnumber";urchinTracker();</script>
Langkah 8: Masukkan ke Galeri GME
Publikasikan mashup Anda ke Galeri Mashup GME.
Tindakan ini akan
memungkinkan pengguna lain melihat mashup Anda.
Lihat Panduan Memulai Google Mashup Editor, yang menjelaskan secara mendetail proses pembuatan mashup. Selain itu, lihat daftar tag untuk mengetahui deskripsi singkat semua tag gm dengan contoh.
Kode:
Berikut
kode lengkap untuk menggunakan KML Pict Earth di GME:
<gm:page title="Pict Earth missions" authenticate="false" onload="kmlPE()>
<!-- Map definition -->
<gm:mapid="map" height="400px" width="400px" lat="32.9393" lng="-117.206" zoom="9" maptypes="true"/>
<script>
function kmlPE(){
<!-- Get map -->
var myMap = google.mashups.getObjectById('map').getMap();
<!-- Get KML -->
var geoXml = new GGeoXml("http://pictearthusa.com/kml/missions.kml");
<!-- Place KML on Map -->
myMap.addOverlay(geoXml);
<!-- Set zoom on double click -->
myMap.enableDoubleClickZoom();
}
</script>
</gm:page>
Apa langkah selanjutnya?
Setelah memublikasikan mashup, Anda dapat menggunakan file KML
di dalamnya sebagai
parameter untuk disertakan dalam aplikasi lain, atau dimuat langsung sebagai
peta. Misalnya, halaman ini:
http://param.googlemashups.com
adalah mashup GME. Anda dapat langsung merujuk file KML ke mashup dengan
menambahkan kml= sebagai parameter di URL, seperti ini:
http://param.googlemashups.com/?kml=http://mapgadgets.googlepages.com/cta.kml
Anda juga dapat membuat Gadget dari project Anda. Setelah Anda mengirimkannya, buka menu file, klik Kirim Gadget, lalu ikuti petunjuknya. Dengan begitu, Anda dapat dengan mudah menambahkan aplikasi ke halaman beranda yang dipersonalisasi Google, di halaman web lain, dan membagikannya kepada orang lain.
Kecuali dinyatakan lain, konten di halaman ini dilisensikan berdasarkan Lisensi Creative Commons Attribution 4.0, sedangkan contoh kode dilisensikan berdasarkan Lisensi Apache 2.0. Untuk mengetahui informasi selengkapnya, lihat Kebijakan Situs Google Developers. Java adalah merek dagang terdaftar dari Oracle dan/atau afiliasinya.
Terakhir diperbarui pada 2025-07-27 UTC.
[null,null,["Terakhir diperbarui pada 2025-07-27 UTC."],[[["\u003cp\u003eThis tutorial demonstrates how to integrate a KML file into a Google Mashup Editor (GME) project using the Google Maps API.\u003c/p\u003e\n"],["\u003cp\u003eGME simplifies the process of creating and editing KML-based mashups, enabling developers to build dynamic map components without extensive HTML or JavaScript knowledge.\u003c/p\u003e\n"],["\u003cp\u003eThe tutorial provides a step-by-step guide, covering selecting a KML file, creating a GME project, adding a map, testing, publishing, and embedding the mashup into web pages.\u003c/p\u003e\n"],["\u003cp\u003eUsers can further enhance their mashups by adding Google Analytics tracking and submitting them to the GME Mashup Gallery for wider visibility.\u003c/p\u003e\n"],["\u003cp\u003ePublished mashups can be parameterized to dynamically load different KML files and can be converted into Gadgets for integration into Google Personalized Home Page and other web pages.\u003c/p\u003e\n"]]],[],null,["# Using KML in Google Mashup Editor\n\n*Valery Hronusov, KML Developer,\nPerm State University, Russia* \n\nIntroduction\n------------\n\n[Google\nMashup Editor](http://editor.googlemashups.com/ \"Google Mashup Editor\") (GME) is one of the most long-awaited and useful tools for mashup developers. GME helps developers create and edit dynamic components in Web pages, such as maps, tables, lists, and other elements, based on connections with external data. These elements can be then be included in Web pages and blogs using an iframe. \n\nThis tutorial will show you how to incorporate a KML file into a Map created with GME. \n\n\u003cbr /\u003e\n\n### My first impressions of Google Mashup Editor\n\n- It has the utmost simplicity, with a clean and distinct interface, like the majority of Google products.\n- It has a convenient project index with a constantly increasing collection of code examples, as well as the author's code.\n- It allows for the easy storage of additional resources to the project (such as image files).\n- It has an easy-to-use XML debugger.\n- It has lots of easy-to-use sample applications.\n\n\u003cbr /\u003e\n\n### GME for KML Developers\n\nBefore the advent of the Internet, spatial data\nwas traditionally difficult to share. However, with\nthe development of the Internet, mapping applications became a standard\nway of easily sharing Geographic Information Systems\n(GIS) data with the world. KML is becoming a standard for the\npresentation and interchange of GIS data because it is compact, easy to\ndevelop, and is supported by popular applications such as Google Earth\nand\nGoogle Maps.\n\n\nUntil recently, the process of creating and editing pages\nbased\non\nJavaScript was a large problem for KML developers. It required a large\nnumber of\nadditional steps to create a mashup and debug it. GME makes\nit\npossible to create a KML-based mashup very rapidly\nout of a few basic\ncomponents. The process of creation does not require special\nknowledge of HTML\nor JavaScript. The GME sample projects provide enough to get\nstarted.\n\n\nIn the following example, I'll be using a KML file that points\nto the\ncollection of the photographs taken during\n[Pict Earth\nUSA](http://pictearth.com/missions.html \"Pict Earth USA\") flights.\n\nThis is a snapshot of the Pict Earth maps mashup: \n\n### Here are the steps to integrate a KML file into a GME project using the\nGoogle Maps API:\n\n\u003cbr /\u003e\n\n[Step 1: Select the KML file](#Step1) \n[Step 2: Create a new GME project](#Step2) \n[Step 3: Create a function to add the KML](#Step3) \n[Step 4: Add a map](#Step4) \n[Step 5: Test the mashup](#Step5) \n[Step 6: Publish the mashup](#Step6) \n[Step 7: Add the mashup to a web page](#Step7) \n[Step 8: Put it in the GME gallery](#Step8) \n\n### Step 1: Select the KML file\n\nSelect\nthe KML file you would like to add to your Map. This can be anything\nthat has features supported in Google Maps. It must be hosted on a\npublicly available server.\n\n### Step 2: Create a New\nGME Project\n\nCreate a new blank GME project.\n\nThis is what a blank GME project looks like: \n\nAdd a\ntitle and a name for your function.\n\\\u003cgm:page title=**\"Pict Earth\nmissions\"** authenticate=\"false\" **onload=**\"**kmlPE()**\"\\\u003e \n\\\u003c/gm:page\\\u003e \n\n### Step 3: Create\na function to add the KML\n\n\nCreate a JavaScript function with the path to the KML file to be added\nto the Map. \n\n```gdscript\n\u003cscript\u003e\n function kmlPE()\n {\n \u003c!-- Get map --\u003e\n var myMap = google.mashups.getObjectById('map').getMap();\n \u003c!-- Get KML --\u003e\n var geoXml = new GGeoXml(\"http://pictearthusa.com/kml/missions.kml\");\n \u003c!--Place KML on Map --\u003e\n myMap.addOverlay(geoXml);\n \u003c!--Set zoom on double click --\u003e\n myMap.enableDoubleClickZoom();\n }\n\u003c/script\u003e\n```\n\n### Step 4: Add a Map\n\nAdd map and parameters.\n\n```actionscript-3\n\u003cgm:map id=\"map\" height=\"400px\" width=\"400px\" lat=\"32.9393\" lng=\"-117.206\" zoom=\"9\" maptypes=\"true\"/\u003e\n```\n\n### Step 5: Test the mashup.\n\nPress the Test button (F4).\n\nThis is an image of the Pict Earth mashup tested in the\nSandbox. \n\nNow we can verify the text of application and see the first result. We\ncan add a\ntitle and links and test it again.\n\n### Step 6: Publish the mashup\n\nSet the name of the project, and then publish it. This will give you a\npermanent link to your mashup, which you can use to incorporate it into\nweb pages. Using my example, this is the link to the GME project\n[home page](http://pemissions.googlemashups.com/ \"home page\"). You\ncan also see\n[source\ncode](http://pemissions.googlemashups.com/index.gml \"Source code\") of project.\n\n### Step 7: Add the mashup\nto a web page\n\nAdd the mashup to a web page using an iframe. For instance, to insert\nthe example project, add this:\n\n```css+lasso\n\u003ciframe style=\"WIDTH: 439px; HEIGHT: 491px\" src=\"http://pemissions.googlemashups.com/\" frameborder=\"0\"\u003e\u003c/iframe\u003e\n```\n\nHere are examples of the mashup in a web [page](http://spreadsheetsgis.googlepages.com/pe \"page\")\nand a [blog](http://gisplanet.blogspot.com/2007/07/pict-earth-usa-missions.html \"blog\").\n\nYou can also add your [Google\nAnalytics](http://analytics.google.com/ \"Google Analytics\") code to the project, which will allow you to track\nstatistics about who is viewing your page. Here's the simple script to\nadd it:\n\n```carbon\n\u003cscript src=\"http://www.google-analytics.com/urchin.js\" type=\"text/javascript\"\u003e\u003c/script\u003e\n\u003cscript type=\"text/javascript\"\u003euacct = \"youraccountnumber\";urchinTracker();\u003c/script\u003e\n```\n\n\u003cbr /\u003e\n\n### Step 8: Put it in the\nGME Gallery\n\nPublish your mashup to the [GME Mashup Gallery](http://gallery.googlemashups.com/).\nThis will\nallow other users to view your mashup.\n\n\u003cbr /\u003e\n\n### For more information:\n\nCheck out the\n[Google\nMashup Editor Getting Started Guide](http://editor.googlemashups.com/docs/gettingstarted.html \"Google Mashup Editor Getting Started Guide\"), which presents in\ndetail the\nprocess of creating mashups. Also, check out\nthe [list\nof tags](http://editor.googlemashups.com/docs/reference.html \"list of tags\") for a brief description of all gm tags with\n[examples](http://editor.googlemashups.com/docs/samples.html \"examples\").\n\n\u003cbr /\u003e\n\n### Code:\n\nHere is\nthe whole code for using the Pict Earth KML in GME: \n\n```gdscript\n\u003cgm:page title=\"Pict Earth missions\" authenticate=\"false\" onload=\"kmlPE()\u003e\n\n\u003c!-- Map definition --\u003e\n\u003cgm:mapid=\"map\" height=\"400px\" width=\"400px\" lat=\"32.9393\" lng=\"-117.206\" zoom=\"9\" maptypes=\"true\"/\u003e\n\n\u003cscript\u003e\n function kmlPE(){\n\n \u003c!-- Get map --\u003e\n var myMap = google.mashups.getObjectById('map').getMap();\n\n \u003c!-- Get KML --\u003e\n var geoXml = new GGeoXml(\"http://pictearthusa.com/kml/missions.kml\");\n\n \u003c!-- Place KML on Map --\u003e\n myMap.addOverlay(geoXml);\n\n \u003c!-- Set zoom on double click --\u003e\n myMap.enableDoubleClickZoom();\n }\n\u003c/script\u003e\n\u003c/gm:page\u003e\n```\n\n### What's next?\n\nOnce you've published your mashup, you can use the KML file\nin it as a\nparameter to include in another application, or loaded directly as a\nmap. For\ninstance, this page:\n[http://param.googlemashups.com](http://param.googlemashups.com/?kml=http://pictearthusa.com/kml/missions.kml \"http://param.googlemashups.com/?kml=http://pictearthusa.com/kml/missions.kml\")\n\n\u003cbr /\u003e\n\nis a GME mashup. You can directly reference a KML file to the mashup by adding kml= as a parameter in the URL, like this:\n\n\u003cbr /\u003e\n\n\u003chttp://param.googlemashups.com/?kml=http://mapgadgets.googlepages.com/cta.kml\u003e \n\nYou can also create a [Gadget](http://www.google.com/apis/gadgets/) from your project. Once you've submitted it, go to the file menu and click on Submit Gadget, and follow the directions. This will allow you to easily add your application to your [Google personalized home page](http://www.google.com/ig), on other web pages, and to share it with others.\n\n\u003cbr /\u003e"]]