Google Mashup Editor で KML を使用する
コレクションでコンテンツを整理
必要に応じて、コンテンツの保存と分類を行います。
ロシア、ペルミ州立大学、KML デベロッパー、バレリー フロヌソフ
はじめに
Google Mashup Editor(GME)は、マッシュアップ デベロッパーにとって最も待望され、便利なツールの 1 つです。GME を使用すると、外部データとの接続に基づいて、地図、表、リストなどの要素を含む動的コンポーネントをウェブページで作成、編集できます。これらの要素は、iframe を使用してウェブページやブログに含めることができます。
このチュートリアルでは、GME で作成した地図に KML ファイルを組み込む方法を説明します。
Google Mashup Editor の第一印象
- Google の他の多くのプロダクトと同様に、シンプルさを追求した、すっきりとしたわかりやすいインターフェースを備えています。
- 便利なプロジェクト インデックスがあり、コード例のコレクションが常に増え続けています。また、著者のコードも含まれています。
- これにより、プロジェクトに画像ファイルなどの追加リソースを簡単に保存できます。
- 使いやすい XML デバッガが用意されています。
- 使いやすいサンプル アプリケーションが多数用意されています。
KML デベロッパー向けの GME
インターネットが登場する前は、空間データを共有することは困難でした。しかし、インターネットの発展に伴い、地図作成アプリケーションは、地理情報システム(GIS)データを世界と簡単に共有するための標準的な方法になりました。KML は、コンパクトで開発が容易であり、Google Earth や Google マップなどの一般的なアプリケーションでサポートされているため、GIS データの表示と交換の標準になりつつあります。
最近まで、JavaScript に基づいてページを作成、編集するプロセスは、KML デベロッパーにとって大きな問題でした。マッシュアップを作成してデバッグするには、多くの追加手順が必要でした。GME を使用すると、いくつかの基本的なコンポーネントから KML ベースのマッシュアップを非常に迅速に作成できます。作成プロセスでは、HTML や JavaScript に関する特別な知識は必要ありません。GME サンプル プロジェクトには、始めるのに十分なものが用意されています。
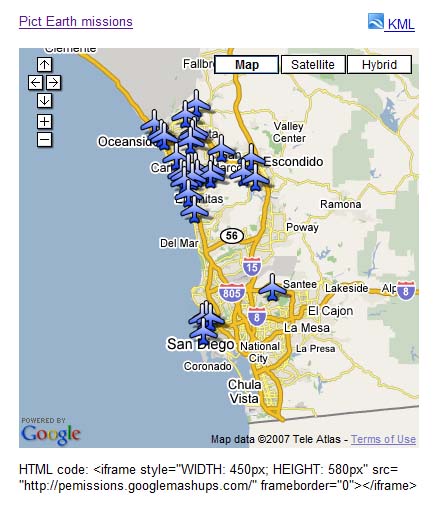
次の例では、Pict Earth USA のフライト中に撮影された写真のコレクションを指す KML ファイルを使用します。
Pict Earth マップのマッシュアップのスナップショットは次のとおりです。
Google Maps API を使用して KML ファイルを GME プロジェクトに統合する手順は次のとおりです。
ステップ 1: KML ファイルを選択する
ステップ 2: 新しい GME プロジェクトを作成する
ステップ 3: KML を追加する関数を作成する
ステップ 4: 地図を追加する
ステップ 5: マッシュアップをテストする
ステップ 6: マッシュアップを公開する
ステップ 7: マッシュアップをウェブページに追加する
ステップ 8: GME ギャラリーに登録する
ステップ 1: KML ファイルを選択する
地図に追加する KML ファイルを選択します。これは、Google マップでサポートされている機能を持つものであれば何でもかまいません。一般公開されているサーバーでホストする必要があります。
ステップ 2: 新しい GME プロジェクトを作成する
新しい空白の GME プロジェクトを作成します。
空の GME プロジェクトは次のようになります。
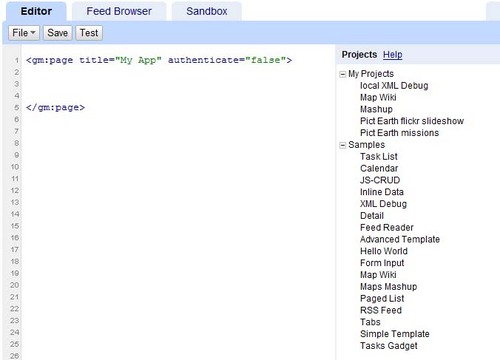
関数のタイトルと名前を追加します。
<gm:page
title="Pict Earth
missions" authenticate="false"
onload="kmlPE()">
</gm:page>
ステップ 3: KML を追加する関数を作成する
地図に追加する KML ファイルのパスを含む JavaScript 関数を作成します。
<script>
function kmlPE()
{
<!-- Get map -->
var myMap = google.mashups.getObjectById('map').getMap();
<!-- Get KML -->
var geoXml = new GGeoXml("http://pictearthusa.com/kml/missions.kml");
<!--Place KML on Map -->
myMap.addOverlay(geoXml);
<!--Set zoom on double click -->
myMap.enableDoubleClickZoom();
}
</script>
ステップ 4: 地図を追加する
マップとパラメータを追加します。
<gm:map id="map" height="400px" width="400px" lat="32.9393" lng="-117.206" zoom="9" maptypes="true"/>
ステップ 5: マッシュアップをテストします。
[テスト] ボタン(F4)を押します。
これは、Sandbox でテストされた Pict Earth マッシュアップの画像です。
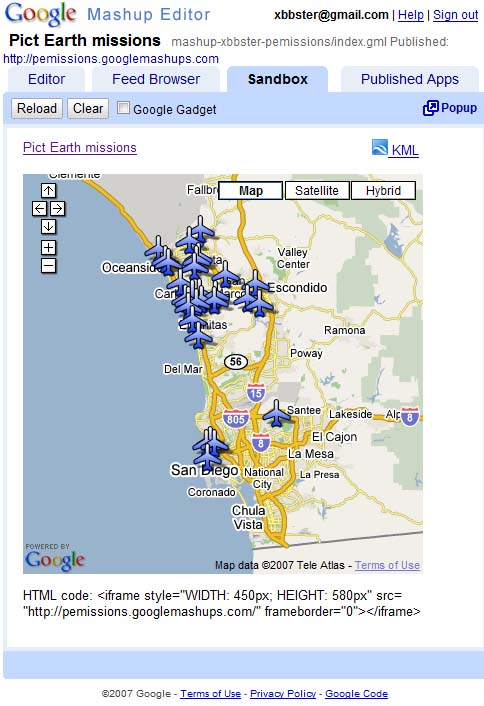
これで、アプリケーションのテキストを検証し、最初の結果を確認できます。タイトルとリンクを追加して、もう一度テストしてみましょう。
ステップ 6: マッシュアップを公開する
プロジェクトの名前を設定して公開します。これにより、マッシュアップへの永続的なリンクが生成され、ウェブページに組み込むことができます。この例では、GME プロジェクトのホームページへのリンクです。プロジェクトのソースコードも確認できます。
ステップ 7: マッシュアップをウェブページに追加する
iframe を使用して、マッシュアップをウェブページに追加します。たとえば、サンプル プロジェクトを挿入するには、次のように追加します。
<iframe style="WIDTH: 439px; HEIGHT: 491px" src="http://pemissions.googlemashups.com/" frameborder="0"></iframe>
ウェブページとブログでのマッシュアップの例を以下に示します。
Google アナリティクスのコードをプロジェクトに追加して、ページを閲覧しているユーザーに関する統計情報をトラッキングすることもできます。追加する簡単なスクリプトは次のとおりです。
<script src="http://www.google-analytics.com/urchin.js" type="text/javascript"></script>
<script type="text/javascript">uacct = "youraccountnumber";urchinTracker();</script>
ステップ 8: GME ギャラリーに登録する
マッシュアップを GME マッシュアップ ギャラリーに公開します。これにより、他のユーザーがマッシュアップを閲覧できるようになります。
Google Mashup Editor スタートガイドで、マッシュアップの作成プロセスについて詳しく説明しています。また、例付きのすべての gm タグの簡単な説明については、タグの一覧もご覧ください。
コード:
GME で Pict Earth KML を使用するためのコード全体は次のとおりです。
<gm:page title="Pict Earth missions" authenticate="false" onload="kmlPE()>
<!-- Map definition -->
<gm:mapid="map" height="400px" width="400px" lat="32.9393" lng="-117.206" zoom="9" maptypes="true"/>
<script>
function kmlPE(){
<!-- Get map -->
var myMap = google.mashups.getObjectById('map').getMap();
<!-- Get KML -->
var geoXml = new GGeoXml("http://pictearthusa.com/kml/missions.kml");
<!-- Place KML on Map -->
myMap.addOverlay(geoXml);
<!-- Set zoom on double click -->
myMap.enableDoubleClickZoom();
}
</script>
</gm:page>
次のステップ
マッシュアップを公開すると、その中の KML ファイルをパラメータとして使用して別のアプリケーションに含めたり、地図として直接読み込んだりできます。たとえば、このページは次のようになります。
http://param.googlemashups.com
GME マッシュアップです。次のように、URL に kml= をパラメータとして追加することで、KML ファイルをマッシュアップで直接参照できます。
http://param.googlemashups.com/?kml=http://mapgadgets.googlepages.com/cta.kml
プロジェクトからガジェットを作成することもできます。送信したら、ファイル メニューに移動して [ガジェットを送信] をクリックし、手順に沿って操作します。これにより、Google のパーソナライズされたホームページや他のウェブページにアプリケーションを簡単に追加したり、他のユーザーと共有したりできるようになります。
特に記載のない限り、このページのコンテンツはクリエイティブ・コモンズの表示 4.0 ライセンスにより使用許諾されます。コードサンプルは Apache 2.0 ライセンスにより使用許諾されます。詳しくは、Google Developers サイトのポリシーをご覧ください。Java は Oracle および関連会社の登録商標です。
最終更新日 2025-07-27 UTC。
[null,null,["最終更新日 2025-07-27 UTC。"],[[["\u003cp\u003eThis tutorial demonstrates how to integrate a KML file into a Google Mashup Editor (GME) project using the Google Maps API.\u003c/p\u003e\n"],["\u003cp\u003eGME simplifies the process of creating and editing KML-based mashups, enabling developers to build dynamic map components without extensive HTML or JavaScript knowledge.\u003c/p\u003e\n"],["\u003cp\u003eThe tutorial provides a step-by-step guide, covering selecting a KML file, creating a GME project, adding a map, testing, publishing, and embedding the mashup into web pages.\u003c/p\u003e\n"],["\u003cp\u003eUsers can further enhance their mashups by adding Google Analytics tracking and submitting them to the GME Mashup Gallery for wider visibility.\u003c/p\u003e\n"],["\u003cp\u003ePublished mashups can be parameterized to dynamically load different KML files and can be converted into Gadgets for integration into Google Personalized Home Page and other web pages.\u003c/p\u003e\n"]]],[],null,["# Using KML in Google Mashup Editor\n\n*Valery Hronusov, KML Developer,\nPerm State University, Russia* \n\nIntroduction\n------------\n\n[Google\nMashup Editor](http://editor.googlemashups.com/ \"Google Mashup Editor\") (GME) is one of the most long-awaited and useful tools for mashup developers. GME helps developers create and edit dynamic components in Web pages, such as maps, tables, lists, and other elements, based on connections with external data. These elements can be then be included in Web pages and blogs using an iframe. \n\nThis tutorial will show you how to incorporate a KML file into a Map created with GME. \n\n\u003cbr /\u003e\n\n### My first impressions of Google Mashup Editor\n\n- It has the utmost simplicity, with a clean and distinct interface, like the majority of Google products.\n- It has a convenient project index with a constantly increasing collection of code examples, as well as the author's code.\n- It allows for the easy storage of additional resources to the project (such as image files).\n- It has an easy-to-use XML debugger.\n- It has lots of easy-to-use sample applications.\n\n\u003cbr /\u003e\n\n### GME for KML Developers\n\nBefore the advent of the Internet, spatial data\nwas traditionally difficult to share. However, with\nthe development of the Internet, mapping applications became a standard\nway of easily sharing Geographic Information Systems\n(GIS) data with the world. KML is becoming a standard for the\npresentation and interchange of GIS data because it is compact, easy to\ndevelop, and is supported by popular applications such as Google Earth\nand\nGoogle Maps.\n\n\nUntil recently, the process of creating and editing pages\nbased\non\nJavaScript was a large problem for KML developers. It required a large\nnumber of\nadditional steps to create a mashup and debug it. GME makes\nit\npossible to create a KML-based mashup very rapidly\nout of a few basic\ncomponents. The process of creation does not require special\nknowledge of HTML\nor JavaScript. The GME sample projects provide enough to get\nstarted.\n\n\nIn the following example, I'll be using a KML file that points\nto the\ncollection of the photographs taken during\n[Pict Earth\nUSA](http://pictearth.com/missions.html \"Pict Earth USA\") flights.\n\nThis is a snapshot of the Pict Earth maps mashup: \n\n### Here are the steps to integrate a KML file into a GME project using the\nGoogle Maps API:\n\n\u003cbr /\u003e\n\n[Step 1: Select the KML file](#Step1) \n[Step 2: Create a new GME project](#Step2) \n[Step 3: Create a function to add the KML](#Step3) \n[Step 4: Add a map](#Step4) \n[Step 5: Test the mashup](#Step5) \n[Step 6: Publish the mashup](#Step6) \n[Step 7: Add the mashup to a web page](#Step7) \n[Step 8: Put it in the GME gallery](#Step8) \n\n### Step 1: Select the KML file\n\nSelect\nthe KML file you would like to add to your Map. This can be anything\nthat has features supported in Google Maps. It must be hosted on a\npublicly available server.\n\n### Step 2: Create a New\nGME Project\n\nCreate a new blank GME project.\n\nThis is what a blank GME project looks like: \n\nAdd a\ntitle and a name for your function.\n\\\u003cgm:page title=**\"Pict Earth\nmissions\"** authenticate=\"false\" **onload=**\"**kmlPE()**\"\\\u003e \n\\\u003c/gm:page\\\u003e \n\n### Step 3: Create\na function to add the KML\n\n\nCreate a JavaScript function with the path to the KML file to be added\nto the Map. \n\n```gdscript\n\u003cscript\u003e\n function kmlPE()\n {\n \u003c!-- Get map --\u003e\n var myMap = google.mashups.getObjectById('map').getMap();\n \u003c!-- Get KML --\u003e\n var geoXml = new GGeoXml(\"http://pictearthusa.com/kml/missions.kml\");\n \u003c!--Place KML on Map --\u003e\n myMap.addOverlay(geoXml);\n \u003c!--Set zoom on double click --\u003e\n myMap.enableDoubleClickZoom();\n }\n\u003c/script\u003e\n```\n\n### Step 4: Add a Map\n\nAdd map and parameters.\n\n```actionscript-3\n\u003cgm:map id=\"map\" height=\"400px\" width=\"400px\" lat=\"32.9393\" lng=\"-117.206\" zoom=\"9\" maptypes=\"true\"/\u003e\n```\n\n### Step 5: Test the mashup.\n\nPress the Test button (F4).\n\nThis is an image of the Pict Earth mashup tested in the\nSandbox. \n\nNow we can verify the text of application and see the first result. We\ncan add a\ntitle and links and test it again.\n\n### Step 6: Publish the mashup\n\nSet the name of the project, and then publish it. This will give you a\npermanent link to your mashup, which you can use to incorporate it into\nweb pages. Using my example, this is the link to the GME project\n[home page](http://pemissions.googlemashups.com/ \"home page\"). You\ncan also see\n[source\ncode](http://pemissions.googlemashups.com/index.gml \"Source code\") of project.\n\n### Step 7: Add the mashup\nto a web page\n\nAdd the mashup to a web page using an iframe. For instance, to insert\nthe example project, add this:\n\n```css+lasso\n\u003ciframe style=\"WIDTH: 439px; HEIGHT: 491px\" src=\"http://pemissions.googlemashups.com/\" frameborder=\"0\"\u003e\u003c/iframe\u003e\n```\n\nHere are examples of the mashup in a web [page](http://spreadsheetsgis.googlepages.com/pe \"page\")\nand a [blog](http://gisplanet.blogspot.com/2007/07/pict-earth-usa-missions.html \"blog\").\n\nYou can also add your [Google\nAnalytics](http://analytics.google.com/ \"Google Analytics\") code to the project, which will allow you to track\nstatistics about who is viewing your page. Here's the simple script to\nadd it:\n\n```carbon\n\u003cscript src=\"http://www.google-analytics.com/urchin.js\" type=\"text/javascript\"\u003e\u003c/script\u003e\n\u003cscript type=\"text/javascript\"\u003euacct = \"youraccountnumber\";urchinTracker();\u003c/script\u003e\n```\n\n\u003cbr /\u003e\n\n### Step 8: Put it in the\nGME Gallery\n\nPublish your mashup to the [GME Mashup Gallery](http://gallery.googlemashups.com/).\nThis will\nallow other users to view your mashup.\n\n\u003cbr /\u003e\n\n### For more information:\n\nCheck out the\n[Google\nMashup Editor Getting Started Guide](http://editor.googlemashups.com/docs/gettingstarted.html \"Google Mashup Editor Getting Started Guide\"), which presents in\ndetail the\nprocess of creating mashups. Also, check out\nthe [list\nof tags](http://editor.googlemashups.com/docs/reference.html \"list of tags\") for a brief description of all gm tags with\n[examples](http://editor.googlemashups.com/docs/samples.html \"examples\").\n\n\u003cbr /\u003e\n\n### Code:\n\nHere is\nthe whole code for using the Pict Earth KML in GME: \n\n```gdscript\n\u003cgm:page title=\"Pict Earth missions\" authenticate=\"false\" onload=\"kmlPE()\u003e\n\n\u003c!-- Map definition --\u003e\n\u003cgm:mapid=\"map\" height=\"400px\" width=\"400px\" lat=\"32.9393\" lng=\"-117.206\" zoom=\"9\" maptypes=\"true\"/\u003e\n\n\u003cscript\u003e\n function kmlPE(){\n\n \u003c!-- Get map --\u003e\n var myMap = google.mashups.getObjectById('map').getMap();\n\n \u003c!-- Get KML --\u003e\n var geoXml = new GGeoXml(\"http://pictearthusa.com/kml/missions.kml\");\n\n \u003c!-- Place KML on Map --\u003e\n myMap.addOverlay(geoXml);\n\n \u003c!-- Set zoom on double click --\u003e\n myMap.enableDoubleClickZoom();\n }\n\u003c/script\u003e\n\u003c/gm:page\u003e\n```\n\n### What's next?\n\nOnce you've published your mashup, you can use the KML file\nin it as a\nparameter to include in another application, or loaded directly as a\nmap. For\ninstance, this page:\n[http://param.googlemashups.com](http://param.googlemashups.com/?kml=http://pictearthusa.com/kml/missions.kml \"http://param.googlemashups.com/?kml=http://pictearthusa.com/kml/missions.kml\")\n\n\u003cbr /\u003e\n\nis a GME mashup. You can directly reference a KML file to the mashup by adding kml= as a parameter in the URL, like this:\n\n\u003cbr /\u003e\n\n\u003chttp://param.googlemashups.com/?kml=http://mapgadgets.googlepages.com/cta.kml\u003e \n\nYou can also create a [Gadget](http://www.google.com/apis/gadgets/) from your project. Once you've submitted it, go to the file menu and click on Submit Gadget, and follow the directions. This will allow you to easily add your application to your [Google personalized home page](http://www.google.com/ig), on other web pages, and to share it with others.\n\n\u003cbr /\u003e"]]