Korzystanie z KML w Google Mashup Editor
Zadbaj o dobrą organizację dzięki kolekcji
Zapisuj i kategoryzuj treści zgodnie ze swoimi preferencjami.
Valery Hronusov, programista KML,
Uniwersytet Państwowy w Permie, Rosja
Wprowadzenie
Edytor mashupów Google (GME) to jedno z najbardziej wyczekiwanych i przydatnych narzędzi dla deweloperów mashupów. GME pomaga deweloperom tworzyć i edytować dynamiczne komponenty na stronach internetowych, takie jak mapy, tabele, listy i inne elementy, na podstawie połączeń z danymi zewnętrznymi. Te elementy można następnie umieszczać na stronach internetowych i blogach za pomocą elementu iframe.
Z tego samouczka dowiesz się, jak włączyć plik KML do mapy utworzonej za pomocą GME.
Moje pierwsze wrażenia dotyczące Google Mashup Editor
- Jest bardzo prosta w obsłudze i ma przejrzysty interfejs, podobnie jak większość usług Google.
- Zawiera wygodny indeks projektów z stale rosnącą kolekcją przykładów kodu, a także kodem autora.
- Umożliwia łatwe przechowywanie dodatkowych zasobów w projekcie (np. plików obrazów).
- Ma łatwy w obsłudze debuger XML.
- Zawiera wiele łatwych w użyciu przykładowych aplikacji.
GME dla deweloperów KML
Przed pojawieniem się internetu udostępnianie danych przestrzennych było tradycyjnie trudne. Jednak wraz z rozwojem internetu aplikacje do mapowania stały się standardowym sposobem łatwego udostępniania danych systemów informacji geograficznej (GIS) całemu światu. KML staje się standardem prezentacji i wymiany danych GIS, ponieważ jest kompaktowy, łatwy w opracowaniu i obsługiwany przez popularne aplikacje, takie jak Google Earth i Mapy Google.
Do niedawna tworzenie i edytowanie stron opartych na JavaScript było dużym problemem dla deweloperów KML. Tworzenie i debugowanie mashupu wymagało wielu dodatkowych kroków. GME umożliwia bardzo szybkie tworzenie kompozycji opartych na KML z kilku podstawowych komponentów. Proces tworzenia nie wymaga specjalistycznej wiedzy z zakresu HTML ani JavaScript. Przykładowe projekty GME wystarczą, aby zacząć.
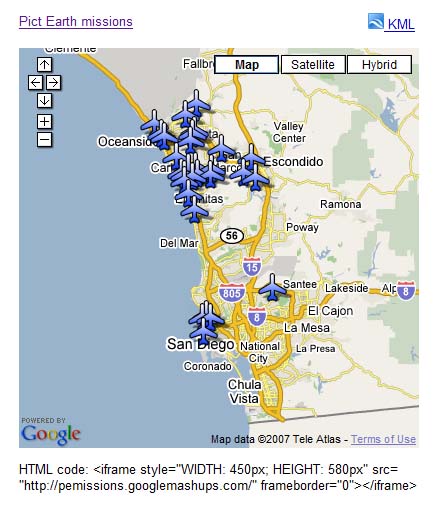
W poniższym przykładzie użyję pliku KML, który wskazuje kolekcję zdjęć zrobionych podczas lotów Pict Earth USA.
Oto zrzut ekranu z mashupu map Pict Earth:
Aby zintegrować plik KML z projektem GME za pomocą interfejsu Google Maps API:
Krok 1. Wybierz plik KML
Krok 2. Utwórz nowy projekt GME
Krok 3. Utwórz funkcję dodawania pliku KML
Krok 4. Dodaj mapę
Krok 5. Przetestuj mashup
Krok 6. Opublikuj mashup
Krok 7. Dodaj mashup do strony internetowej
Krok 8. Umieść go w galerii GME
Krok 1. Wybierz plik KML
Wybierz plik KML, który chcesz dodać do mapy. Może to być dowolny obiekt, który ma funkcje obsługiwane w Mapach Google. Musi być przechowywany na serwerze dostępnym publicznie.
Krok 2. Utwórz nowy projekt GME
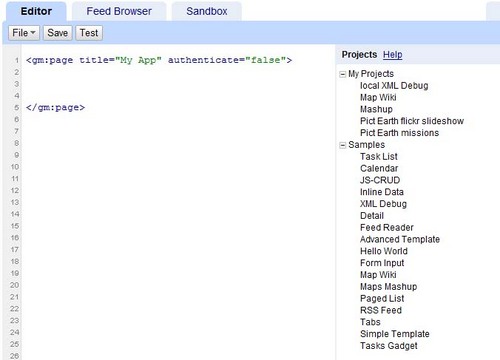
Utwórz nowy pusty projekt GME.
Tak wygląda pusty projekt GME:
Dodaj tytuł i nazwę funkcji.
<gm:page
title="Pict Earth
missions" authenticate="false"
onload="kmlPE()">
</gm:page>
Krok 3. Utwórz funkcję dodawania pliku KML
Utwórz funkcję JavaScript ze ścieżką do pliku KML, który ma zostać dodany do mapy.
<script>
function kmlPE()
{
<!-- Get map -->
var myMap = google.mashups.getObjectById('map').getMap();
<!-- Get KML -->
var geoXml = new GGeoXml("http://pictearthusa.com/kml/missions.kml");
<!--Place KML on Map -->
myMap.addOverlay(geoXml);
<!--Set zoom on double click -->
myMap.enableDoubleClickZoom();
}
</script>
Krok 4. Dodaj mapę
Dodaj mapę i parametry.
<gm:map id="map" height="400px" width="400px" lat="32.9393" lng="-117.206" zoom="9" maptypes="true"/>
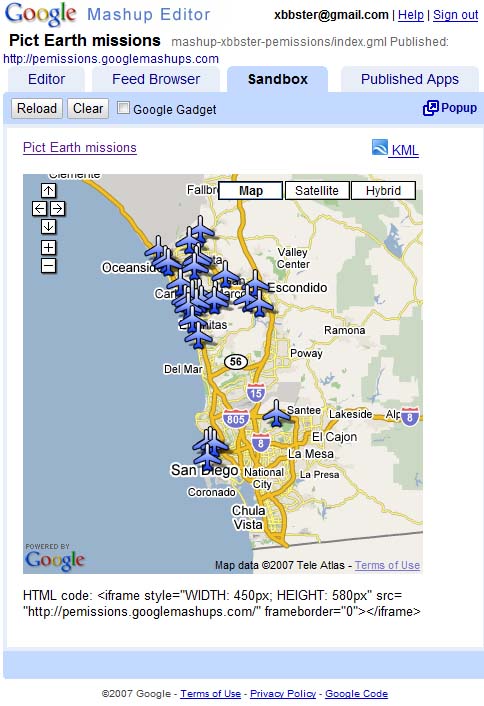
Krok 5. Przetestuj mashup.
Naciśnij przycisk Test (F4).
To jest obraz połączenia Pict Earth przetestowanego w Sandboxie.
Teraz możemy sprawdzić tekst aplikacji i zobaczyć pierwszy wynik. Możemy dodać tytuł i linki, a potem ponownie przetestować.
Krok 6. Opublikuj mashup
Ustaw nazwę projektu, a następnie go opublikuj. Wyświetli się stały link do Twojego mashupu, którego możesz użyć, aby umieścić go na stronach internetowych. W moim przykładzie jest to link do strony głównej projektu GME. Możesz też wyświetlić kod źródłowy projektu.
Krok 7. Dodaj mashup do strony internetowej
Dodaj mashup do strony internetowej za pomocą elementu iframe. Aby na przykład wstawić przykładowy projekt, dodaj ten kod:
<iframe style="WIDTH: 439px; HEIGHT: 491px" src="http://pemissions.googlemashups.com/" frameborder="0"></iframe>
Oto przykłady mashupu na stronie i na blogu.
Możesz też dodać do projektu kod Google Analytics, który umożliwi Ci śledzenie statystyk dotyczących osób wyświetlających Twoją stronę. Oto prosty skrypt, który umożliwia dodanie tego elementu:
<script src="http://www.google-analytics.com/urchin.js" type="text/javascript"></script>
<script type="text/javascript">uacct = "youraccountnumber";urchinTracker();</script>
Krok 8. Umieść go w Galerii GME
Opublikuj mashup w Galerii mashupów GME.
Umożliwi to innym użytkownikom wyświetlanie Twojego mashupu.
Zapoznaj się z przewodnikiem dla początkujących dotyczącym Edytora Mashup Google, w którym szczegółowo opisujemy proces tworzenia mashupów. Zapoznaj się też z listą tagów, aby poznać krótki opis wszystkich tagów gm wraz z przykładami.
Kod:
Oto cały kod używany do korzystania z pliku KML Pict Earth w GME:
<gm:page title="Pict Earth missions" authenticate="false" onload="kmlPE()>
<!-- Map definition -->
<gm:mapid="map" height="400px" width="400px" lat="32.9393" lng="-117.206" zoom="9" maptypes="true"/>
<script>
function kmlPE(){
<!-- Get map -->
var myMap = google.mashups.getObjectById('map').getMap();
<!-- Get KML -->
var geoXml = new GGeoXml("http://pictearthusa.com/kml/missions.kml");
<!-- Place KML on Map -->
myMap.addOverlay(geoXml);
<!-- Set zoom on double click -->
myMap.enableDoubleClickZoom();
}
</script>
</gm:page>
Co dalej?
Po opublikowaniu kompozycji możesz użyć w niej pliku KML jako parametru do uwzględnienia w innej aplikacji lub załadować go bezpośrednio jako mapę. Na przykład ta strona:
http://param.googlemashups.com
jest połączeniem GME. Możesz bezpośrednio odwołać się do pliku KML w mashupie, dodając parametr kml= do adresu URL, np. tak:
http://param.googlemashups.com/?kml=http://mapgadgets.googlepages.com/cta.kml
Możesz też utworzyć gadżet z projektu. Po przesłaniu pliku otwórz menu pliku i kliknij Prześlij gadżet, a następnie postępuj zgodnie z instrukcjami. Dzięki temu możesz łatwo dodać aplikację do spersonalizowanej strony głównej Google, innych stron internetowych i udostępniać ją innym osobom.
O ile nie stwierdzono inaczej, treść tej strony jest objęta licencją Creative Commons – uznanie autorstwa 4.0, a fragmenty kodu są dostępne na licencji Apache 2.0. Szczegółowe informacje na ten temat zawierają zasady dotyczące witryny Google Developers. Java jest zastrzeżonym znakiem towarowym firmy Oracle i jej podmiotów stowarzyszonych.
Ostatnia aktualizacja: 2025-07-27 UTC.
[null,null,["Ostatnia aktualizacja: 2025-07-27 UTC."],[[["\u003cp\u003eThis tutorial demonstrates how to integrate a KML file into a Google Mashup Editor (GME) project using the Google Maps API.\u003c/p\u003e\n"],["\u003cp\u003eGME simplifies the process of creating and editing KML-based mashups, enabling developers to build dynamic map components without extensive HTML or JavaScript knowledge.\u003c/p\u003e\n"],["\u003cp\u003eThe tutorial provides a step-by-step guide, covering selecting a KML file, creating a GME project, adding a map, testing, publishing, and embedding the mashup into web pages.\u003c/p\u003e\n"],["\u003cp\u003eUsers can further enhance their mashups by adding Google Analytics tracking and submitting them to the GME Mashup Gallery for wider visibility.\u003c/p\u003e\n"],["\u003cp\u003ePublished mashups can be parameterized to dynamically load different KML files and can be converted into Gadgets for integration into Google Personalized Home Page and other web pages.\u003c/p\u003e\n"]]],[],null,["# Using KML in Google Mashup Editor\n\n*Valery Hronusov, KML Developer,\nPerm State University, Russia* \n\nIntroduction\n------------\n\n[Google\nMashup Editor](http://editor.googlemashups.com/ \"Google Mashup Editor\") (GME) is one of the most long-awaited and useful tools for mashup developers. GME helps developers create and edit dynamic components in Web pages, such as maps, tables, lists, and other elements, based on connections with external data. These elements can be then be included in Web pages and blogs using an iframe. \n\nThis tutorial will show you how to incorporate a KML file into a Map created with GME. \n\n\u003cbr /\u003e\n\n### My first impressions of Google Mashup Editor\n\n- It has the utmost simplicity, with a clean and distinct interface, like the majority of Google products.\n- It has a convenient project index with a constantly increasing collection of code examples, as well as the author's code.\n- It allows for the easy storage of additional resources to the project (such as image files).\n- It has an easy-to-use XML debugger.\n- It has lots of easy-to-use sample applications.\n\n\u003cbr /\u003e\n\n### GME for KML Developers\n\nBefore the advent of the Internet, spatial data\nwas traditionally difficult to share. However, with\nthe development of the Internet, mapping applications became a standard\nway of easily sharing Geographic Information Systems\n(GIS) data with the world. KML is becoming a standard for the\npresentation and interchange of GIS data because it is compact, easy to\ndevelop, and is supported by popular applications such as Google Earth\nand\nGoogle Maps.\n\n\nUntil recently, the process of creating and editing pages\nbased\non\nJavaScript was a large problem for KML developers. It required a large\nnumber of\nadditional steps to create a mashup and debug it. GME makes\nit\npossible to create a KML-based mashup very rapidly\nout of a few basic\ncomponents. The process of creation does not require special\nknowledge of HTML\nor JavaScript. The GME sample projects provide enough to get\nstarted.\n\n\nIn the following example, I'll be using a KML file that points\nto the\ncollection of the photographs taken during\n[Pict Earth\nUSA](http://pictearth.com/missions.html \"Pict Earth USA\") flights.\n\nThis is a snapshot of the Pict Earth maps mashup: \n\n### Here are the steps to integrate a KML file into a GME project using the\nGoogle Maps API:\n\n\u003cbr /\u003e\n\n[Step 1: Select the KML file](#Step1) \n[Step 2: Create a new GME project](#Step2) \n[Step 3: Create a function to add the KML](#Step3) \n[Step 4: Add a map](#Step4) \n[Step 5: Test the mashup](#Step5) \n[Step 6: Publish the mashup](#Step6) \n[Step 7: Add the mashup to a web page](#Step7) \n[Step 8: Put it in the GME gallery](#Step8) \n\n### Step 1: Select the KML file\n\nSelect\nthe KML file you would like to add to your Map. This can be anything\nthat has features supported in Google Maps. It must be hosted on a\npublicly available server.\n\n### Step 2: Create a New\nGME Project\n\nCreate a new blank GME project.\n\nThis is what a blank GME project looks like: \n\nAdd a\ntitle and a name for your function.\n\\\u003cgm:page title=**\"Pict Earth\nmissions\"** authenticate=\"false\" **onload=**\"**kmlPE()**\"\\\u003e \n\\\u003c/gm:page\\\u003e \n\n### Step 3: Create\na function to add the KML\n\n\nCreate a JavaScript function with the path to the KML file to be added\nto the Map. \n\n```gdscript\n\u003cscript\u003e\n function kmlPE()\n {\n \u003c!-- Get map --\u003e\n var myMap = google.mashups.getObjectById('map').getMap();\n \u003c!-- Get KML --\u003e\n var geoXml = new GGeoXml(\"http://pictearthusa.com/kml/missions.kml\");\n \u003c!--Place KML on Map --\u003e\n myMap.addOverlay(geoXml);\n \u003c!--Set zoom on double click --\u003e\n myMap.enableDoubleClickZoom();\n }\n\u003c/script\u003e\n```\n\n### Step 4: Add a Map\n\nAdd map and parameters.\n\n```actionscript-3\n\u003cgm:map id=\"map\" height=\"400px\" width=\"400px\" lat=\"32.9393\" lng=\"-117.206\" zoom=\"9\" maptypes=\"true\"/\u003e\n```\n\n### Step 5: Test the mashup.\n\nPress the Test button (F4).\n\nThis is an image of the Pict Earth mashup tested in the\nSandbox. \n\nNow we can verify the text of application and see the first result. We\ncan add a\ntitle and links and test it again.\n\n### Step 6: Publish the mashup\n\nSet the name of the project, and then publish it. This will give you a\npermanent link to your mashup, which you can use to incorporate it into\nweb pages. Using my example, this is the link to the GME project\n[home page](http://pemissions.googlemashups.com/ \"home page\"). You\ncan also see\n[source\ncode](http://pemissions.googlemashups.com/index.gml \"Source code\") of project.\n\n### Step 7: Add the mashup\nto a web page\n\nAdd the mashup to a web page using an iframe. For instance, to insert\nthe example project, add this:\n\n```css+lasso\n\u003ciframe style=\"WIDTH: 439px; HEIGHT: 491px\" src=\"http://pemissions.googlemashups.com/\" frameborder=\"0\"\u003e\u003c/iframe\u003e\n```\n\nHere are examples of the mashup in a web [page](http://spreadsheetsgis.googlepages.com/pe \"page\")\nand a [blog](http://gisplanet.blogspot.com/2007/07/pict-earth-usa-missions.html \"blog\").\n\nYou can also add your [Google\nAnalytics](http://analytics.google.com/ \"Google Analytics\") code to the project, which will allow you to track\nstatistics about who is viewing your page. Here's the simple script to\nadd it:\n\n```carbon\n\u003cscript src=\"http://www.google-analytics.com/urchin.js\" type=\"text/javascript\"\u003e\u003c/script\u003e\n\u003cscript type=\"text/javascript\"\u003euacct = \"youraccountnumber\";urchinTracker();\u003c/script\u003e\n```\n\n\u003cbr /\u003e\n\n### Step 8: Put it in the\nGME Gallery\n\nPublish your mashup to the [GME Mashup Gallery](http://gallery.googlemashups.com/).\nThis will\nallow other users to view your mashup.\n\n\u003cbr /\u003e\n\n### For more information:\n\nCheck out the\n[Google\nMashup Editor Getting Started Guide](http://editor.googlemashups.com/docs/gettingstarted.html \"Google Mashup Editor Getting Started Guide\"), which presents in\ndetail the\nprocess of creating mashups. Also, check out\nthe [list\nof tags](http://editor.googlemashups.com/docs/reference.html \"list of tags\") for a brief description of all gm tags with\n[examples](http://editor.googlemashups.com/docs/samples.html \"examples\").\n\n\u003cbr /\u003e\n\n### Code:\n\nHere is\nthe whole code for using the Pict Earth KML in GME: \n\n```gdscript\n\u003cgm:page title=\"Pict Earth missions\" authenticate=\"false\" onload=\"kmlPE()\u003e\n\n\u003c!-- Map definition --\u003e\n\u003cgm:mapid=\"map\" height=\"400px\" width=\"400px\" lat=\"32.9393\" lng=\"-117.206\" zoom=\"9\" maptypes=\"true\"/\u003e\n\n\u003cscript\u003e\n function kmlPE(){\n\n \u003c!-- Get map --\u003e\n var myMap = google.mashups.getObjectById('map').getMap();\n\n \u003c!-- Get KML --\u003e\n var geoXml = new GGeoXml(\"http://pictearthusa.com/kml/missions.kml\");\n\n \u003c!-- Place KML on Map --\u003e\n myMap.addOverlay(geoXml);\n\n \u003c!-- Set zoom on double click --\u003e\n myMap.enableDoubleClickZoom();\n }\n\u003c/script\u003e\n\u003c/gm:page\u003e\n```\n\n### What's next?\n\nOnce you've published your mashup, you can use the KML file\nin it as a\nparameter to include in another application, or loaded directly as a\nmap. For\ninstance, this page:\n[http://param.googlemashups.com](http://param.googlemashups.com/?kml=http://pictearthusa.com/kml/missions.kml \"http://param.googlemashups.com/?kml=http://pictearthusa.com/kml/missions.kml\")\n\n\u003cbr /\u003e\n\nis a GME mashup. You can directly reference a KML file to the mashup by adding kml= as a parameter in the URL, like this:\n\n\u003cbr /\u003e\n\n\u003chttp://param.googlemashups.com/?kml=http://mapgadgets.googlepages.com/cta.kml\u003e \n\nYou can also create a [Gadget](http://www.google.com/apis/gadgets/) from your project. Once you've submitted it, go to the file menu and click on Submit Gadget, and follow the directions. This will allow you to easily add your application to your [Google personalized home page](http://www.google.com/ig), on other web pages, and to share it with others.\n\n\u003cbr /\u003e"]]