গুগল ম্যাশআপ এডিটরে KML ব্যবহার করা
সেভ করা পৃষ্ঠা গুছিয়ে রাখতে 'সংগ্রহ' ব্যবহার করুন
আপনার পছন্দ অনুযায়ী কন্টেন্ট সেভ করুন ও সঠিক বিভাগে রাখুন।
Valery Hronusov, KML বিকাশকারী, পার্ম স্টেট ইউনিভার্সিটি, রাশিয়া ভূমিকা
Google Mashup Editor (GME) ম্যাশআপ ডেভেলপারদের জন্য সবচেয়ে দীর্ঘ প্রতীক্ষিত এবং দরকারী টুলগুলির মধ্যে একটি। বাহ্যিক ডেটার সাথে সংযোগের উপর ভিত্তি করে GME বিকাশকারীদের ওয়েব পৃষ্ঠাগুলিতে গতিশীল উপাদান তৈরি এবং সম্পাদনা করতে সহায়তা করে, যেমন মানচিত্র, টেবিল, তালিকা এবং অন্যান্য উপাদান। এই উপাদানগুলি একটি iframe ব্যবহার করে ওয়েব পেজ এবং ব্লগে অন্তর্ভুক্ত করা যেতে পারে।
এই টিউটোরিয়ালটি আপনাকে দেখাবে কিভাবে একটি KML ফাইলকে GME দিয়ে তৈরি করা মানচিত্রে অন্তর্ভুক্ত করতে হয়।
Google ম্যাশআপ সম্পাদকের আমার প্রথম ইমপ্রেশন
- এটির সর্বাধিক সরলতা রয়েছে, একটি পরিষ্কার এবং স্বতন্ত্র ইন্টারফেস সহ, বেশিরভাগ Google পণ্যের মতো৷
- এটিতে একটি সুবিধাজনক প্রজেক্ট সূচী রয়েছে যেখানে ক্রমাগত ক্রমবর্ধমান কোড উদাহরণের সংগ্রহ, সেইসাথে লেখকের কোড রয়েছে।
- এটি প্রকল্পে অতিরিক্ত সম্পদের সহজ সঞ্চয়স্থানের জন্য অনুমতি দেয় (যেমন চিত্র ফাইল)।
- এটিতে একটি সহজে ব্যবহারযোগ্য XML ডিবাগার রয়েছে৷
- এটিতে অনেকগুলি সহজে ব্যবহারযোগ্য নমুনা অ্যাপ্লিকেশন রয়েছে৷
KML ডেভেলপারদের জন্য GME
ইন্টারনেটের আবির্ভাবের আগে, স্থানিক ডেটা ঐতিহ্যগতভাবে ভাগ করা কঠিন ছিল। যাইহোক, ইন্টারনেটের বিকাশের সাথে, ম্যাপিং অ্যাপ্লিকেশনগুলি বিশ্বের সাথে সহজেই ভৌগলিক তথ্য সিস্টেম (GIS) ডেটা ভাগ করার একটি আদর্শ উপায় হয়ে উঠেছে। KML GIS ডেটার উপস্থাপনা এবং আদান-প্রদানের জন্য একটি মান হয়ে উঠছে কারণ এটি কমপ্যাক্ট, বিকাশ করা সহজ এবং জনপ্রিয় অ্যাপ্লিকেশন যেমন Google Earth এবং Google Maps দ্বারা সমর্থিত।
সম্প্রতি অবধি, জাভাস্ক্রিপ্টের উপর ভিত্তি করে পৃষ্ঠাগুলি তৈরি এবং সম্পাদনা করার প্রক্রিয়াটি কেএমএল বিকাশকারীদের জন্য একটি বড় সমস্যা ছিল। একটি ম্যাশআপ তৈরি এবং ডিবাগ করার জন্য এটির জন্য প্রচুর সংখ্যক অতিরিক্ত পদক্ষেপের প্রয়োজন৷ GME কিছু মৌলিক উপাদানের মধ্যে খুব দ্রুত একটি KML-ভিত্তিক ম্যাশআপ তৈরি করা সম্ভব করে। সৃষ্টির প্রক্রিয়ার জন্য এইচটিএমএল বা জাভাস্ক্রিপ্টের বিশেষ জ্ঞানের প্রয়োজন হয় না। GME নমুনা প্রকল্পগুলি শুরু করার জন্য যথেষ্ট প্রদান করে।
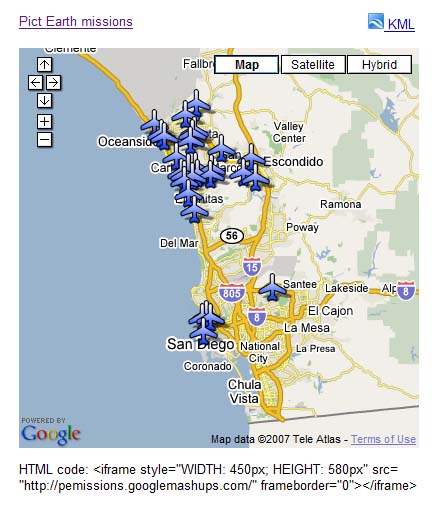
নিম্নলিখিত উদাহরণে, আমি একটি KML ফাইল ব্যবহার করব যা পিক্ট আর্থ ইউএসএ ফ্লাইটের সময় তোলা ফটোগ্রাফের সংগ্রহের দিকে নির্দেশ করে।
এটি পিক্ট আর্থ ম্যাপ ম্যাশআপের একটি স্ন্যাপশট:
Google Maps API ব্যবহার করে একটি GME প্রজেক্টে একটি KML ফাইল সংহত করার ধাপগুলি এখানে রয়েছে:
ধাপ 1: KML ফাইলটি নির্বাচন করুন ধাপ 2: একটি নতুন GME প্রকল্প তৈরি করুন ধাপ 3: KML যোগ করার জন্য একটি ফাংশন তৈরি করুন ধাপ 4: একটি মানচিত্র যোগ করুন ধাপ 5: ম্যাশআপ পরীক্ষা করুন ধাপ 6: ম্যাশআপ প্রকাশ করুন ধাপ 7: একটি ওয়েব পেজে ম্যাশআপ যোগ করুন ধাপ 8: এটিকে GME গ্যালারিতে রাখুন
ধাপ 1: KML ফাইলটি নির্বাচন করুন
আপনি আপনার মানচিত্রে যোগ করতে চান এমন KML ফাইলটি নির্বাচন করুন৷ এটি এমন যেকোনো কিছু হতে পারে যা Google মানচিত্রে সমর্থিত বৈশিষ্ট্য রয়েছে। এটি একটি সর্বজনীনভাবে উপলব্ধ সার্ভারে হোস্ট করা আবশ্যক.
ধাপ 2: একটি নতুন GME প্রকল্প তৈরি করুন
একটি নতুন ফাঁকা GME প্রকল্প তৈরি করুন।
এটি একটি ফাঁকা GME প্রকল্পের মত দেখাচ্ছে:
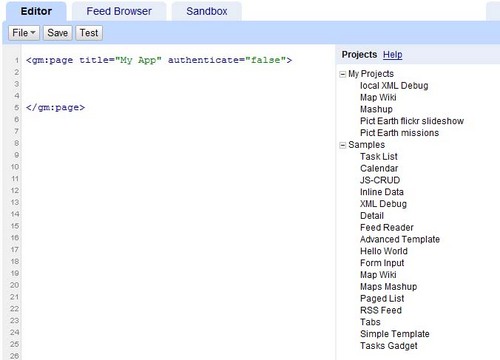
আপনার ফাংশনের জন্য একটি শিরোনাম এবং একটি নাম যোগ করুন।
<gm:পৃষ্ঠা শিরোনাম = "আর্থ মিশনের ছবি" প্রমাণীকরণ=" মিথ্যা" অনলোড= " kmlPE() "> </gm:page>
ধাপ 3: KML যোগ করার জন্য একটি ফাংশন তৈরি করুন
ম্যাপে যোগ করার জন্য KML ফাইলের পাথ সহ একটি জাভাস্ক্রিপ্ট ফাংশন তৈরি করুন।
<script>
function kmlPE()
{
<!-- Get map -->
var myMap = google.mashups.getObjectById('map').getMap();
<!-- Get KML -->
var geoXml = new GGeoXml("http://pictearthusa.com/kml/missions.kml");
<!--Place KML on Map -->
myMap.addOverlay(geoXml);
<!--Set zoom on double click -->
myMap.enableDoubleClickZoom();
}
</script>
ধাপ 4: একটি মানচিত্র যোগ করুন
মানচিত্র এবং পরামিতি যোগ করুন।
<gm:map id="map" height="400px" width="400px" lat="32.9393" lng="-117.206" zoom="9" maptypes="true"/>
ধাপ 5: ম্যাশআপ পরীক্ষা করুন।
টেস্ট বোতাম টিপুন (F4)।
এটি স্যান্ডবক্সে পরীক্ষা করা পিক্ট আর্থ ম্যাশআপের একটি চিত্র।
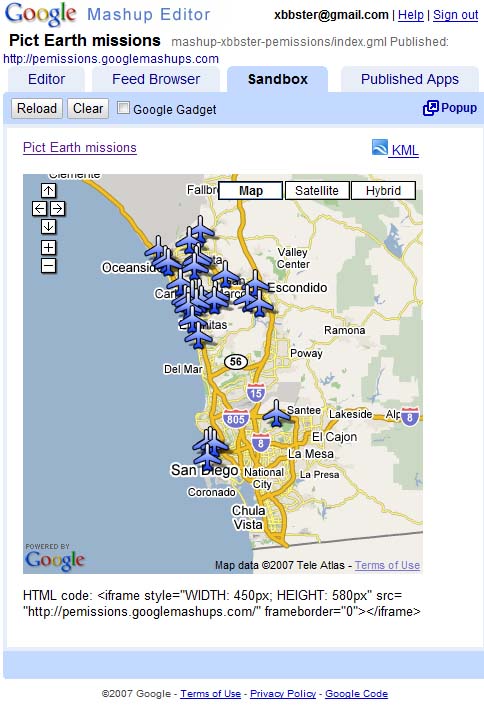
এখন আমরা আবেদনের পাঠ্য যাচাই করতে পারি এবং প্রথম ফলাফল দেখতে পারি। আমরা একটি শিরোনাম এবং লিঙ্ক যোগ করতে পারি এবং এটি আবার পরীক্ষা করতে পারি।
ধাপ 6: ম্যাশআপ প্রকাশ করুন
প্রকল্পের নাম সেট করুন এবং তারপর এটি প্রকাশ করুন। এটি আপনাকে আপনার ম্যাশআপের একটি স্থায়ী লিঙ্ক দেবে, যা আপনি এটিকে ওয়েব পৃষ্ঠাগুলিতে অন্তর্ভুক্ত করতে ব্যবহার করতে পারেন। আমার উদাহরণ ব্যবহার করে, এটি GME প্রকল্পের হোম পেজের লিঙ্ক। আপনি প্রকল্পের সোর্স কোডও দেখতে পারেন।
ধাপ 7: একটি ওয়েব পেজে ম্যাশআপ যোগ করুন
একটি iframe ব্যবহার করে একটি ওয়েব পেজে ম্যাশআপ যোগ করুন। উদাহরণস্বরূপ, উদাহরণ প্রকল্প সন্নিবেশ করতে, এটি যোগ করুন:
<iframe style="WIDTH: 439px; HEIGHT: 491px" src="http://pemissions.googlemashups.com/" frameborder="0"></iframe>
এখানে একটি ওয়েব পৃষ্ঠা এবং একটি ব্লগে ম্যাশআপের উদাহরণ রয়েছে৷
আপনি প্রজেক্টে আপনার Google Analytics কোড যোগ করতে পারেন, যা আপনাকে আপনার পৃষ্ঠাটি কে দেখছে তার পরিসংখ্যান ট্র্যাক করতে দেয়। এটি যোগ করার জন্য এখানে সহজ স্ক্রিপ্ট আছে:
<script src="http://www.google-analytics.com/urchin.js" type="text/javascript"></script>
<script type="text/javascript">uacct = "youraccountnumber";urchinTracker();</script>
ধাপ 8: এটিকে GME গ্যালারিতে রাখুন
আপনার ম্যাশআপটি GME ম্যাশআপ গ্যালারিতে প্রকাশ করুন। এটি অন্যান্য ব্যবহারকারীদের আপনার ম্যাশআপ দেখতে অনুমতি দেবে।
Google ম্যাশআপ এডিটর শুরু করার নির্দেশিকা দেখুন, যা ম্যাশআপ তৈরির প্রক্রিয়া বিস্তারিতভাবে উপস্থাপন করে। এছাড়াও, উদাহরণ সহ সমস্ত গ্রাম ট্যাগের সংক্ষিপ্ত বিবরণের জন্য ট্যাগের তালিকাটি দেখুন।
কোড:
এখানে জিএমইতে পিক্ট আর্থ কেএমএল ব্যবহার করার জন্য সম্পূর্ণ কোড রয়েছে:
<gm:page title="Pict Earth missions" authenticate="false" onload="kmlPE()>
<!-- Map definition -->
<gm:mapid="map" height="400px" width="400px" lat="32.9393" lng="-117.206" zoom="9" maptypes="true"/>
<script>
function kmlPE(){
<!-- Get map -->
var myMap = google.mashups.getObjectById('map').getMap();
<!-- Get KML -->
var geoXml = new GGeoXml("http://pictearthusa.com/kml/missions.kml");
<!-- Place KML on Map -->
myMap.addOverlay(geoXml);
<!-- Set zoom on double click -->
myMap.enableDoubleClickZoom();
}
</script>
</gm:page>
এরপর কি?
একবার আপনি আপনার ম্যাশআপ প্রকাশ করলে, আপনি এটিতে থাকা KML ফাইলটিকে একটি প্যারামিটার হিসাবে অন্য অ্যাপ্লিকেশনে অন্তর্ভুক্ত করতে বা সরাসরি একটি মানচিত্র হিসাবে লোড করতে পারেন৷ উদাহরণস্বরূপ, এই পৃষ্ঠাটি:
http://param.googlemashups.com একটি GME ম্যাশআপ৷ আপনি URL-এ একটি প্যারামিটার হিসাবে kml= যোগ করে ম্যাশআপে সরাসরি একটি KML ফাইল উল্লেখ করতে পারেন, এইভাবে: http://param.googlemashups.com/?kml=http://mapgadgets.googlepages.com/cta.kml
আপনি আপনার প্রকল্প থেকে একটি গ্যাজেট তৈরি করতে পারেন। একবার আপনি এটি জমা দিলে, ফাইল মেনুতে যান এবং সাবমিট গ্যাজেট-এ ক্লিক করুন এবং নির্দেশাবলী অনুসরণ করুন। এটি আপনাকে সহজেই আপনার Google ব্যক্তিগতকৃত হোম পেজে , অন্যান্য ওয়েব পৃষ্ঠাগুলিতে আপনার অ্যাপ্লিকেশন যোগ করতে এবং অন্যদের সাথে শেয়ার করার অনুমতি দেবে৷
অন্য কিছু উল্লেখ না করা থাকলে, এই পৃষ্ঠার কন্টেন্ট Creative Commons Attribution 4.0 License-এর অধীনে এবং কোডের নমুনাগুলি Apache 2.0 License-এর অধীনে লাইসেন্স প্রাপ্ত। আরও জানতে, Google Developers সাইট নীতি দেখুন। Java হল Oracle এবং/অথবা তার অ্যাফিলিয়েট সংস্থার রেজিস্টার্ড ট্রেডমার্ক।
2025-07-24 UTC-তে শেষবার আপডেট করা হয়েছে।
[null,null,["2025-07-24 UTC-তে শেষবার আপডেট করা হয়েছে।"],[[["\u003cp\u003eThis tutorial demonstrates how to integrate a KML file into a Google Mashup Editor (GME) project using the Google Maps API.\u003c/p\u003e\n"],["\u003cp\u003eGME simplifies the process of creating and editing KML-based mashups, enabling developers to build dynamic map components without extensive HTML or JavaScript knowledge.\u003c/p\u003e\n"],["\u003cp\u003eThe tutorial provides a step-by-step guide, covering selecting a KML file, creating a GME project, adding a map, testing, publishing, and embedding the mashup into web pages.\u003c/p\u003e\n"],["\u003cp\u003eUsers can further enhance their mashups by adding Google Analytics tracking and submitting them to the GME Mashup Gallery for wider visibility.\u003c/p\u003e\n"],["\u003cp\u003ePublished mashups can be parameterized to dynamically load different KML files and can be converted into Gadgets for integration into Google Personalized Home Page and other web pages.\u003c/p\u003e\n"]]],[],null,["# Using KML in Google Mashup Editor\n\n*Valery Hronusov, KML Developer,\nPerm State University, Russia* \n\nIntroduction\n------------\n\n[Google\nMashup Editor](http://editor.googlemashups.com/ \"Google Mashup Editor\") (GME) is one of the most long-awaited and useful tools for mashup developers. GME helps developers create and edit dynamic components in Web pages, such as maps, tables, lists, and other elements, based on connections with external data. These elements can be then be included in Web pages and blogs using an iframe. \n\nThis tutorial will show you how to incorporate a KML file into a Map created with GME. \n\n\u003cbr /\u003e\n\n### My first impressions of Google Mashup Editor\n\n- It has the utmost simplicity, with a clean and distinct interface, like the majority of Google products.\n- It has a convenient project index with a constantly increasing collection of code examples, as well as the author's code.\n- It allows for the easy storage of additional resources to the project (such as image files).\n- It has an easy-to-use XML debugger.\n- It has lots of easy-to-use sample applications.\n\n\u003cbr /\u003e\n\n### GME for KML Developers\n\nBefore the advent of the Internet, spatial data\nwas traditionally difficult to share. However, with\nthe development of the Internet, mapping applications became a standard\nway of easily sharing Geographic Information Systems\n(GIS) data with the world. KML is becoming a standard for the\npresentation and interchange of GIS data because it is compact, easy to\ndevelop, and is supported by popular applications such as Google Earth\nand\nGoogle Maps.\n\n\nUntil recently, the process of creating and editing pages\nbased\non\nJavaScript was a large problem for KML developers. It required a large\nnumber of\nadditional steps to create a mashup and debug it. GME makes\nit\npossible to create a KML-based mashup very rapidly\nout of a few basic\ncomponents. The process of creation does not require special\nknowledge of HTML\nor JavaScript. The GME sample projects provide enough to get\nstarted.\n\n\nIn the following example, I'll be using a KML file that points\nto the\ncollection of the photographs taken during\n[Pict Earth\nUSA](http://pictearth.com/missions.html \"Pict Earth USA\") flights.\n\nThis is a snapshot of the Pict Earth maps mashup: \n\n### Here are the steps to integrate a KML file into a GME project using the\nGoogle Maps API:\n\n\u003cbr /\u003e\n\n[Step 1: Select the KML file](#Step1) \n[Step 2: Create a new GME project](#Step2) \n[Step 3: Create a function to add the KML](#Step3) \n[Step 4: Add a map](#Step4) \n[Step 5: Test the mashup](#Step5) \n[Step 6: Publish the mashup](#Step6) \n[Step 7: Add the mashup to a web page](#Step7) \n[Step 8: Put it in the GME gallery](#Step8) \n\n### Step 1: Select the KML file\n\nSelect\nthe KML file you would like to add to your Map. This can be anything\nthat has features supported in Google Maps. It must be hosted on a\npublicly available server.\n\n### Step 2: Create a New\nGME Project\n\nCreate a new blank GME project.\n\nThis is what a blank GME project looks like: \n\nAdd a\ntitle and a name for your function.\n\\\u003cgm:page title=**\"Pict Earth\nmissions\"** authenticate=\"false\" **onload=**\"**kmlPE()**\"\\\u003e \n\\\u003c/gm:page\\\u003e \n\n### Step 3: Create\na function to add the KML\n\n\nCreate a JavaScript function with the path to the KML file to be added\nto the Map. \n\n```gdscript\n\u003cscript\u003e\n function kmlPE()\n {\n \u003c!-- Get map --\u003e\n var myMap = google.mashups.getObjectById('map').getMap();\n \u003c!-- Get KML --\u003e\n var geoXml = new GGeoXml(\"http://pictearthusa.com/kml/missions.kml\");\n \u003c!--Place KML on Map --\u003e\n myMap.addOverlay(geoXml);\n \u003c!--Set zoom on double click --\u003e\n myMap.enableDoubleClickZoom();\n }\n\u003c/script\u003e\n```\n\n### Step 4: Add a Map\n\nAdd map and parameters.\n\n```actionscript-3\n\u003cgm:map id=\"map\" height=\"400px\" width=\"400px\" lat=\"32.9393\" lng=\"-117.206\" zoom=\"9\" maptypes=\"true\"/\u003e\n```\n\n### Step 5: Test the mashup.\n\nPress the Test button (F4).\n\nThis is an image of the Pict Earth mashup tested in the\nSandbox. \n\nNow we can verify the text of application and see the first result. We\ncan add a\ntitle and links and test it again.\n\n### Step 6: Publish the mashup\n\nSet the name of the project, and then publish it. This will give you a\npermanent link to your mashup, which you can use to incorporate it into\nweb pages. Using my example, this is the link to the GME project\n[home page](http://pemissions.googlemashups.com/ \"home page\"). You\ncan also see\n[source\ncode](http://pemissions.googlemashups.com/index.gml \"Source code\") of project.\n\n### Step 7: Add the mashup\nto a web page\n\nAdd the mashup to a web page using an iframe. For instance, to insert\nthe example project, add this:\n\n```css+lasso\n\u003ciframe style=\"WIDTH: 439px; HEIGHT: 491px\" src=\"http://pemissions.googlemashups.com/\" frameborder=\"0\"\u003e\u003c/iframe\u003e\n```\n\nHere are examples of the mashup in a web [page](http://spreadsheetsgis.googlepages.com/pe \"page\")\nand a [blog](http://gisplanet.blogspot.com/2007/07/pict-earth-usa-missions.html \"blog\").\n\nYou can also add your [Google\nAnalytics](http://analytics.google.com/ \"Google Analytics\") code to the project, which will allow you to track\nstatistics about who is viewing your page. Here's the simple script to\nadd it:\n\n```carbon\n\u003cscript src=\"http://www.google-analytics.com/urchin.js\" type=\"text/javascript\"\u003e\u003c/script\u003e\n\u003cscript type=\"text/javascript\"\u003euacct = \"youraccountnumber\";urchinTracker();\u003c/script\u003e\n```\n\n\u003cbr /\u003e\n\n### Step 8: Put it in the\nGME Gallery\n\nPublish your mashup to the [GME Mashup Gallery](http://gallery.googlemashups.com/).\nThis will\nallow other users to view your mashup.\n\n\u003cbr /\u003e\n\n### For more information:\n\nCheck out the\n[Google\nMashup Editor Getting Started Guide](http://editor.googlemashups.com/docs/gettingstarted.html \"Google Mashup Editor Getting Started Guide\"), which presents in\ndetail the\nprocess of creating mashups. Also, check out\nthe [list\nof tags](http://editor.googlemashups.com/docs/reference.html \"list of tags\") for a brief description of all gm tags with\n[examples](http://editor.googlemashups.com/docs/samples.html \"examples\").\n\n\u003cbr /\u003e\n\n### Code:\n\nHere is\nthe whole code for using the Pict Earth KML in GME: \n\n```gdscript\n\u003cgm:page title=\"Pict Earth missions\" authenticate=\"false\" onload=\"kmlPE()\u003e\n\n\u003c!-- Map definition --\u003e\n\u003cgm:mapid=\"map\" height=\"400px\" width=\"400px\" lat=\"32.9393\" lng=\"-117.206\" zoom=\"9\" maptypes=\"true\"/\u003e\n\n\u003cscript\u003e\n function kmlPE(){\n\n \u003c!-- Get map --\u003e\n var myMap = google.mashups.getObjectById('map').getMap();\n\n \u003c!-- Get KML --\u003e\n var geoXml = new GGeoXml(\"http://pictearthusa.com/kml/missions.kml\");\n\n \u003c!-- Place KML on Map --\u003e\n myMap.addOverlay(geoXml);\n\n \u003c!-- Set zoom on double click --\u003e\n myMap.enableDoubleClickZoom();\n }\n\u003c/script\u003e\n\u003c/gm:page\u003e\n```\n\n### What's next?\n\nOnce you've published your mashup, you can use the KML file\nin it as a\nparameter to include in another application, or loaded directly as a\nmap. For\ninstance, this page:\n[http://param.googlemashups.com](http://param.googlemashups.com/?kml=http://pictearthusa.com/kml/missions.kml \"http://param.googlemashups.com/?kml=http://pictearthusa.com/kml/missions.kml\")\n\n\u003cbr /\u003e\n\nis a GME mashup. You can directly reference a KML file to the mashup by adding kml= as a parameter in the URL, like this:\n\n\u003cbr /\u003e\n\n\u003chttp://param.googlemashups.com/?kml=http://mapgadgets.googlepages.com/cta.kml\u003e \n\nYou can also create a [Gadget](http://www.google.com/apis/gadgets/) from your project. Once you've submitted it, go to the file menu and click on Submit Gadget, and follow the directions. This will allow you to easily add your application to your [Google personalized home page](http://www.google.com/ig), on other web pages, and to share it with others.\n\n\u003cbr /\u003e"]]