Utilizzare KML in Google Mashup Editor
Mantieni tutto organizzato con le raccolte
Salva e classifica i contenuti in base alle tue preferenze.
Valery Hronusov, sviluppatore KML,
Perm State University, Russia
Introduzione
Google
Mashup Editor (GME) è uno degli strumenti più attesi e
utili per gli sviluppatori
di mashup. GME aiuta gli sviluppatori a creare e modificare componenti dinamici nelle pagine web, come mappe, tabelle, elenchi e altri elementi, in base alle connessioni con dati esterni. Questi elementi possono essere inclusi in pagine web e blog utilizzando un iframe.
Questo tutorial ti mostrerà come incorporare un file KML in una mappa
creata
con GME.
Le mie prime impressioni su Google Mashup Editor
- È caratterizzato dalla massima semplicità, con un'interfaccia pulita e distinta, come la maggior parte dei prodotti Google.
- Ha un indice di progetto pratico con
una raccolta di esempi di codice in costante aumento, nonché
il codice dell'autore.
- Consente di archiviare facilmente risorse aggiuntive nel progetto (ad esempio file immagine).
- Dispone di un debugger XML facile da usare.
- Contiene molte applicazioni di esempio facili da usare.
GME per gli sviluppatori KML
Prima dell'avvento di internet, i dati spaziali
erano tradizionalmente difficili da condividere. Tuttavia, con lo sviluppo di internet, le applicazioni di mappatura sono diventate un modo standard per condividere facilmente i dati dei sistemi di informazione geografica (GIS) con il mondo. KML sta diventando uno standard per la presentazione e lo scambio di dati GIS perché è compatto, facile da sviluppare ed è supportato da applicazioni popolari come Google Earth e Google Maps.
Fino a poco tempo fa, il processo di creazione e modifica delle pagine basate su JavaScript era un problema importante per gli sviluppatori KML. Per creare un mashup e eseguirne il debug erano necessari molti passaggi aggiuntivi. GME consente
di
creare un mashup basato su KML molto rapidamente
a partire da alcuni
componenti di base. Il processo di creazione non richiede conoscenze
speciali di HTML
o JavaScript. I progetti di esempio di GME forniscono materiale sufficiente per iniziare.
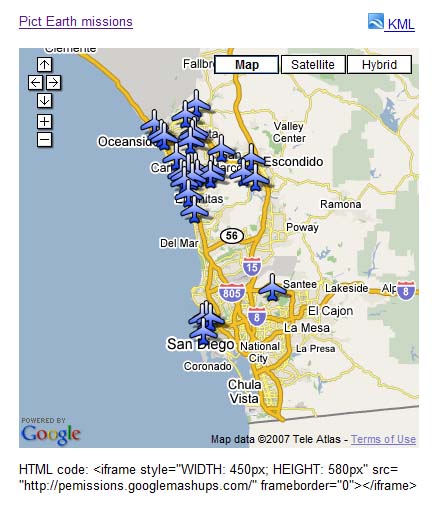
Nell'esempio seguente, utilizzerò un file KML che punta
alla
raccolta di fotografie scattate durante
i voli di Pict Earth
USA.
Questa è un'istantanea del mashup delle mappe di Pict Earth:
Ecco i passaggi per integrare un file KML in un progetto GME utilizzando l'API Google Maps:
Passaggio 1: seleziona il file KML
Passaggio 2: crea un nuovo progetto GME
Passaggio 3: crea una funzione per aggiungere il file KML
Passaggio 4: aggiungi una mappa
Passaggio 5: testa il mashup
Passaggio 6: pubblica il mashup
Passaggio 7: aggiungi il mashup a una pagina web
Passaggio 8: inserisci il mashup nella galleria GME
Passaggio 1: seleziona il file KML
Seleziona
il file KML che vuoi aggiungere alla mappa. Può essere qualsiasi cosa
che abbia funzionalità supportate in Google Maps. Deve essere ospitato su un server
disponibile pubblicamente.
Passaggio 2: crea un nuovo
progetto GME
Crea un nuovo progetto GME vuoto.
Ecco l'aspetto di un progetto GME vuoto:
Aggiungi un titolo e un nome per la funzione.
<gm:page
title="Missioni
di Pict Earth" authenticate="false"
onload="kmlPE()">
</gm:page>
Passaggio 3: crea
una funzione per aggiungere il file KML
Crea una funzione JavaScript con il percorso del file KML da aggiungere
alla mappa.
<script>
function kmlPE()
{
<!-- Get map -->
var myMap = google.mashups.getObjectById('map').getMap();
<!-- Get KML -->
var geoXml = new GGeoXml("http://pictearthusa.com/kml/missions.kml");
<!--Place KML on Map -->
myMap.addOverlay(geoXml);
<!--Set zoom on double click -->
myMap.enableDoubleClickZoom();
}
</script>
Passaggio 4: aggiungi una mappa
Aggiungi la mappa e i parametri.
<gm:map id="map" height="400px" width="400px" lat="32.9393" lng="-117.206" zoom="9" maptypes="true"/>
Passaggio 5: testa il mashup.
Premi il pulsante Test (F4).
Questa è un'immagine del mashup di Pict Earth testato nella sandbox.
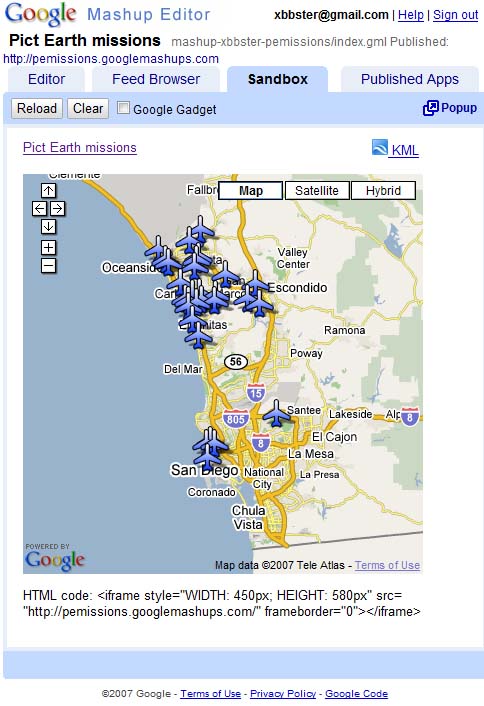
Ora possiamo verificare il testo dell'applicazione e vedere il primo risultato. Possiamo
aggiungere un
titolo e dei link e riprovare.
Passaggio 6: pubblica il mashup
Imposta il nome del progetto e pubblicalo. In questo modo otterrai un link permanente al tuo mashup, che potrai utilizzare per incorporarlo nelle pagine web. Utilizzando il mio esempio, questo è il link alla
home page del progetto GME. Puoi anche visualizzare il codice sorgente del progetto.
Passaggio 7: aggiungi il mashup
a una pagina web
Aggiungi il mashup a una pagina web utilizzando un iframe. Ad esempio, per inserire
il progetto di esempio, aggiungi questo:
<iframe style="WIDTH: 439px; HEIGHT: 491px" src="http://pemissions.googlemashups.com/" frameborder="0"></iframe>
Ecco alcuni esempi di mashup in una pagina web e in un blog.
Puoi anche aggiungere il codice Google
Analytics al progetto, il che ti consentirà di monitorare
le statistiche su chi visualizza la tua pagina. Ecco il semplice script per
aggiungerlo:
<script src="http://www.google-analytics.com/urchin.js" type="text/javascript"></script>
<script type="text/javascript">uacct = "youraccountnumber";urchinTracker();</script>
Passaggio 8: inserisci l'estensione nella
Galleria GME
Pubblica il mashup nella galleria di mashup di GME.
Ciò
consentirà ad altri utenti di visualizzare il tuo mashup.
Consulta la
Guida introduttiva
a Google Mashup Editor, che illustra in
dettaglio la
procedura di creazione dei mashup. Consulta anche l'elenco dei tag per una breve descrizione di tutti i tag gm con esempi.
Codice:
Ecco
il codice completo per utilizzare il file KML di Pict Earth in GME:
<gm:page title="Pict Earth missions" authenticate="false" onload="kmlPE()>
<!-- Map definition -->
<gm:mapid="map" height="400px" width="400px" lat="32.9393" lng="-117.206" zoom="9" maptypes="true"/>
<script>
function kmlPE(){
<!-- Get map -->
var myMap = google.mashups.getObjectById('map').getMap();
<!-- Get KML -->
var geoXml = new GGeoXml("http://pictearthusa.com/kml/missions.kml");
<!-- Place KML on Map -->
myMap.addOverlay(geoXml);
<!-- Set zoom on double click -->
myMap.enableDoubleClickZoom();
}
</script>
</gm:page>
Passaggi successivi
Una volta pubblicato il mashup, puoi utilizzare il file KML
che contiene come
parametro da includere in un'altra applicazione o caricarlo direttamente come
mappa. Ad esempio, questa pagina:
http://param.googlemashups.com
è un mashup di GME. Puoi fare riferimento direttamente a un file KML per il mashup
aggiungendo kml= come parametro nell'URL, in questo modo:
http://param.googlemashups.com/?kml=http://mapgadgets.googlepages.com/cta.kml
Puoi anche creare un gadget dal tuo progetto. Una volta inviato, vai al menu File, fai clic su Invia gadget e segui le istruzioni. In questo modo potrai aggiungere facilmente la tua applicazione alla home page personalizzata di Google, ad altre pagine web e condividerla con altri.
Salvo quando diversamente specificato, i contenuti di questa pagina sono concessi in base alla licenza Creative Commons Attribution 4.0, mentre gli esempi di codice sono concessi in base alla licenza Apache 2.0. Per ulteriori dettagli, consulta le norme del sito di Google Developers. Java è un marchio registrato di Oracle e/o delle sue consociate.
Ultimo aggiornamento 2025-07-27 UTC.
[null,null,["Ultimo aggiornamento 2025-07-27 UTC."],[[["\u003cp\u003eThis tutorial demonstrates how to integrate a KML file into a Google Mashup Editor (GME) project using the Google Maps API.\u003c/p\u003e\n"],["\u003cp\u003eGME simplifies the process of creating and editing KML-based mashups, enabling developers to build dynamic map components without extensive HTML or JavaScript knowledge.\u003c/p\u003e\n"],["\u003cp\u003eThe tutorial provides a step-by-step guide, covering selecting a KML file, creating a GME project, adding a map, testing, publishing, and embedding the mashup into web pages.\u003c/p\u003e\n"],["\u003cp\u003eUsers can further enhance their mashups by adding Google Analytics tracking and submitting them to the GME Mashup Gallery for wider visibility.\u003c/p\u003e\n"],["\u003cp\u003ePublished mashups can be parameterized to dynamically load different KML files and can be converted into Gadgets for integration into Google Personalized Home Page and other web pages.\u003c/p\u003e\n"]]],[],null,["# Using KML in Google Mashup Editor\n\n*Valery Hronusov, KML Developer,\nPerm State University, Russia* \n\nIntroduction\n------------\n\n[Google\nMashup Editor](http://editor.googlemashups.com/ \"Google Mashup Editor\") (GME) is one of the most long-awaited and useful tools for mashup developers. GME helps developers create and edit dynamic components in Web pages, such as maps, tables, lists, and other elements, based on connections with external data. These elements can be then be included in Web pages and blogs using an iframe. \n\nThis tutorial will show you how to incorporate a KML file into a Map created with GME. \n\n\u003cbr /\u003e\n\n### My first impressions of Google Mashup Editor\n\n- It has the utmost simplicity, with a clean and distinct interface, like the majority of Google products.\n- It has a convenient project index with a constantly increasing collection of code examples, as well as the author's code.\n- It allows for the easy storage of additional resources to the project (such as image files).\n- It has an easy-to-use XML debugger.\n- It has lots of easy-to-use sample applications.\n\n\u003cbr /\u003e\n\n### GME for KML Developers\n\nBefore the advent of the Internet, spatial data\nwas traditionally difficult to share. However, with\nthe development of the Internet, mapping applications became a standard\nway of easily sharing Geographic Information Systems\n(GIS) data with the world. KML is becoming a standard for the\npresentation and interchange of GIS data because it is compact, easy to\ndevelop, and is supported by popular applications such as Google Earth\nand\nGoogle Maps.\n\n\nUntil recently, the process of creating and editing pages\nbased\non\nJavaScript was a large problem for KML developers. It required a large\nnumber of\nadditional steps to create a mashup and debug it. GME makes\nit\npossible to create a KML-based mashup very rapidly\nout of a few basic\ncomponents. The process of creation does not require special\nknowledge of HTML\nor JavaScript. The GME sample projects provide enough to get\nstarted.\n\n\nIn the following example, I'll be using a KML file that points\nto the\ncollection of the photographs taken during\n[Pict Earth\nUSA](http://pictearth.com/missions.html \"Pict Earth USA\") flights.\n\nThis is a snapshot of the Pict Earth maps mashup: \n\n### Here are the steps to integrate a KML file into a GME project using the\nGoogle Maps API:\n\n\u003cbr /\u003e\n\n[Step 1: Select the KML file](#Step1) \n[Step 2: Create a new GME project](#Step2) \n[Step 3: Create a function to add the KML](#Step3) \n[Step 4: Add a map](#Step4) \n[Step 5: Test the mashup](#Step5) \n[Step 6: Publish the mashup](#Step6) \n[Step 7: Add the mashup to a web page](#Step7) \n[Step 8: Put it in the GME gallery](#Step8) \n\n### Step 1: Select the KML file\n\nSelect\nthe KML file you would like to add to your Map. This can be anything\nthat has features supported in Google Maps. It must be hosted on a\npublicly available server.\n\n### Step 2: Create a New\nGME Project\n\nCreate a new blank GME project.\n\nThis is what a blank GME project looks like: \n\nAdd a\ntitle and a name for your function.\n\\\u003cgm:page title=**\"Pict Earth\nmissions\"** authenticate=\"false\" **onload=**\"**kmlPE()**\"\\\u003e \n\\\u003c/gm:page\\\u003e \n\n### Step 3: Create\na function to add the KML\n\n\nCreate a JavaScript function with the path to the KML file to be added\nto the Map. \n\n```gdscript\n\u003cscript\u003e\n function kmlPE()\n {\n \u003c!-- Get map --\u003e\n var myMap = google.mashups.getObjectById('map').getMap();\n \u003c!-- Get KML --\u003e\n var geoXml = new GGeoXml(\"http://pictearthusa.com/kml/missions.kml\");\n \u003c!--Place KML on Map --\u003e\n myMap.addOverlay(geoXml);\n \u003c!--Set zoom on double click --\u003e\n myMap.enableDoubleClickZoom();\n }\n\u003c/script\u003e\n```\n\n### Step 4: Add a Map\n\nAdd map and parameters.\n\n```actionscript-3\n\u003cgm:map id=\"map\" height=\"400px\" width=\"400px\" lat=\"32.9393\" lng=\"-117.206\" zoom=\"9\" maptypes=\"true\"/\u003e\n```\n\n### Step 5: Test the mashup.\n\nPress the Test button (F4).\n\nThis is an image of the Pict Earth mashup tested in the\nSandbox. \n\nNow we can verify the text of application and see the first result. We\ncan add a\ntitle and links and test it again.\n\n### Step 6: Publish the mashup\n\nSet the name of the project, and then publish it. This will give you a\npermanent link to your mashup, which you can use to incorporate it into\nweb pages. Using my example, this is the link to the GME project\n[home page](http://pemissions.googlemashups.com/ \"home page\"). You\ncan also see\n[source\ncode](http://pemissions.googlemashups.com/index.gml \"Source code\") of project.\n\n### Step 7: Add the mashup\nto a web page\n\nAdd the mashup to a web page using an iframe. For instance, to insert\nthe example project, add this:\n\n```css+lasso\n\u003ciframe style=\"WIDTH: 439px; HEIGHT: 491px\" src=\"http://pemissions.googlemashups.com/\" frameborder=\"0\"\u003e\u003c/iframe\u003e\n```\n\nHere are examples of the mashup in a web [page](http://spreadsheetsgis.googlepages.com/pe \"page\")\nand a [blog](http://gisplanet.blogspot.com/2007/07/pict-earth-usa-missions.html \"blog\").\n\nYou can also add your [Google\nAnalytics](http://analytics.google.com/ \"Google Analytics\") code to the project, which will allow you to track\nstatistics about who is viewing your page. Here's the simple script to\nadd it:\n\n```carbon\n\u003cscript src=\"http://www.google-analytics.com/urchin.js\" type=\"text/javascript\"\u003e\u003c/script\u003e\n\u003cscript type=\"text/javascript\"\u003euacct = \"youraccountnumber\";urchinTracker();\u003c/script\u003e\n```\n\n\u003cbr /\u003e\n\n### Step 8: Put it in the\nGME Gallery\n\nPublish your mashup to the [GME Mashup Gallery](http://gallery.googlemashups.com/).\nThis will\nallow other users to view your mashup.\n\n\u003cbr /\u003e\n\n### For more information:\n\nCheck out the\n[Google\nMashup Editor Getting Started Guide](http://editor.googlemashups.com/docs/gettingstarted.html \"Google Mashup Editor Getting Started Guide\"), which presents in\ndetail the\nprocess of creating mashups. Also, check out\nthe [list\nof tags](http://editor.googlemashups.com/docs/reference.html \"list of tags\") for a brief description of all gm tags with\n[examples](http://editor.googlemashups.com/docs/samples.html \"examples\").\n\n\u003cbr /\u003e\n\n### Code:\n\nHere is\nthe whole code for using the Pict Earth KML in GME: \n\n```gdscript\n\u003cgm:page title=\"Pict Earth missions\" authenticate=\"false\" onload=\"kmlPE()\u003e\n\n\u003c!-- Map definition --\u003e\n\u003cgm:mapid=\"map\" height=\"400px\" width=\"400px\" lat=\"32.9393\" lng=\"-117.206\" zoom=\"9\" maptypes=\"true\"/\u003e\n\n\u003cscript\u003e\n function kmlPE(){\n\n \u003c!-- Get map --\u003e\n var myMap = google.mashups.getObjectById('map').getMap();\n\n \u003c!-- Get KML --\u003e\n var geoXml = new GGeoXml(\"http://pictearthusa.com/kml/missions.kml\");\n\n \u003c!-- Place KML on Map --\u003e\n myMap.addOverlay(geoXml);\n\n \u003c!-- Set zoom on double click --\u003e\n myMap.enableDoubleClickZoom();\n }\n\u003c/script\u003e\n\u003c/gm:page\u003e\n```\n\n### What's next?\n\nOnce you've published your mashup, you can use the KML file\nin it as a\nparameter to include in another application, or loaded directly as a\nmap. For\ninstance, this page:\n[http://param.googlemashups.com](http://param.googlemashups.com/?kml=http://pictearthusa.com/kml/missions.kml \"http://param.googlemashups.com/?kml=http://pictearthusa.com/kml/missions.kml\")\n\n\u003cbr /\u003e\n\nis a GME mashup. You can directly reference a KML file to the mashup by adding kml= as a parameter in the URL, like this:\n\n\u003cbr /\u003e\n\n\u003chttp://param.googlemashups.com/?kml=http://mapgadgets.googlepages.com/cta.kml\u003e \n\nYou can also create a [Gadget](http://www.google.com/apis/gadgets/) from your project. Once you've submitted it, go to the file menu and click on Submit Gadget, and follow the directions. This will allow you to easily add your application to your [Google personalized home page](http://www.google.com/ig), on other web pages, and to share it with others.\n\n\u003cbr /\u003e"]]