Como usar o KML no Google Mashup Editor
Mantenha tudo organizado com as coleções
Salve e categorize o conteúdo com base nas suas preferências.
Valery Hronusov, desenvolvedor de KML,
Universidade Estadual de Perm, Rússia
Introdução
O
Google Mashup Editor (GME) é uma das ferramentas mais aguardadas e úteis para desenvolvedores de mashups. O GME ajuda os desenvolvedores a criar e editar componentes dinâmicos em páginas da Web, como mapas, tabelas, listas e outros elementos, com base em conexões com dados externos. Esses elementos podem ser incluídos em páginas da Web e blogs usando um iframe.
Neste tutorial, mostramos como incorporar um arquivo KML a um mapa criado com o GME.
Minhas primeiras impressões sobre o Google Mashup Editor
- Ele tem a maior simplicidade, com uma interface limpa e distinta, como a maioria dos produtos do Google.
- Ele tem um índice de projetos conveniente com uma coleção cada vez maior de exemplos de código, além do código do autor.
- Ela permite o armazenamento fácil de recursos adicionais no
projeto, como arquivos de imagem.
- Ele tem um depurador XML fácil de usar.
- Ele tem muitos aplicativos de amostra fáceis de usar.
GME para desenvolvedores de KML
Antes do surgimento da Internet, era difícil compartilhar dados espaciais. No entanto, com o desenvolvimento da Internet, os aplicativos de mapas se tornaram uma maneira padrão de compartilhar facilmente dados de Sistemas de Informações Geográficas (SIG) com o mundo. O KML está se tornando um padrão para a apresentação e o intercâmbio de dados de SIG porque é compacto, fácil de desenvolver e compatível com aplicativos conhecidos, como o Google Earth e o Google Maps.
Até recentemente, o processo de criação e edição de páginas com base em JavaScript era um grande problema para os desenvolvedores de KML. Era necessário um grande número de etapas adicionais para criar e depurar um mashup. O GME permite criar um mashup baseado em KML muito rapidamente com alguns componentes básicos. O processo de criação não exige conhecimento especial de HTML ou JavaScript. Os projetos de exemplo do GME oferecem o suficiente para começar.
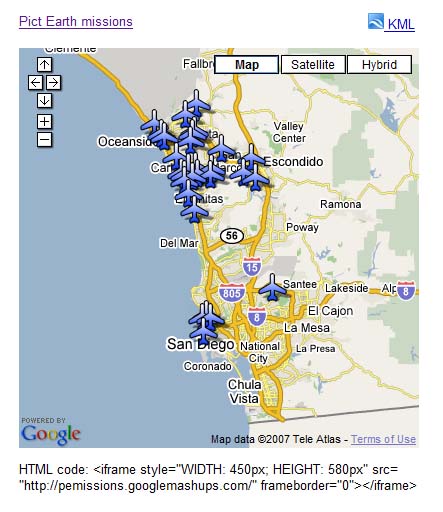
No exemplo a seguir, vou usar um arquivo KML que aponta para a coleção de fotografias tiradas durante os voos do Pict Earth USA.
Esta é uma imagem da combinação de mapas do Pict Earth:
Estas são as etapas para integrar um arquivo KML a um projeto do GME usando a API Google Maps:
Etapa 1: selecionar o arquivo KML
Etapa 2: criar um projeto do GME
Etapa 3: criar uma função para adicionar o KML
Etapa 4: adicionar um mapa
Etapa 5: testar o mashup
Etapa 6: publicar o mashup
Etapa 7: adicionar o mashup a uma página da Web
Etapa 8: colocar na galeria do GME
Etapa 1: selecione o arquivo KML
Selecione o arquivo KML que você quer adicionar ao mapa. Pode ser qualquer coisa que tenha recursos compatíveis com o Google Maps. Ele precisa ser hospedado em um servidor disponível publicamente.
Etapa 2: criar um novo projeto do GME
Crie um projeto em branco do GME.
Esta é a aparência de um projeto em branco do GME:
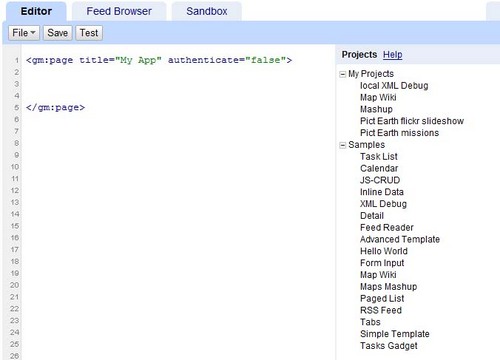
Adicione um título e um nome para a função.
<gm:page
title="Pict Earth
missions" authenticate="false"
onload="kmlPE()">
</gm:page>
Etapa 3: criar uma função para adicionar o KML
Crie uma função JavaScript com o caminho do arquivo KML a ser adicionado ao mapa.
<script>
function kmlPE()
{
<!-- Get map -->
var myMap = google.mashups.getObjectById('map').getMap();
<!-- Get KML -->
var geoXml = new GGeoXml("http://pictearthusa.com/kml/missions.kml");
<!--Place KML on Map -->
myMap.addOverlay(geoXml);
<!--Set zoom on double click -->
myMap.enableDoubleClickZoom();
}
</script>
Etapa 4: adicionar um mapa
Adicione o mapa e os parâmetros.
<gm:map id="map" height="400px" width="400px" lat="32.9393" lng="-117.206" zoom="9" maptypes="true"/>
Etapa 5: teste o mashup.
Pressione o botão "Testar" (F4).
Esta é uma imagem do mashup do Pict Earth testado na Sandbox.
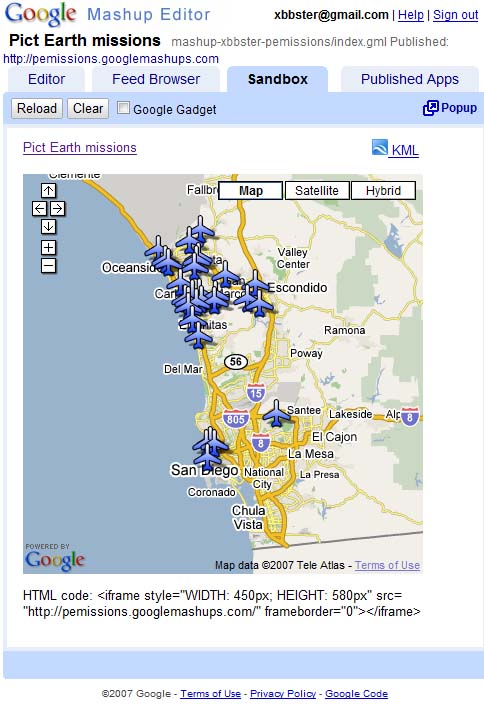
Agora podemos verificar o texto do aplicativo e conferir o primeiro resultado. Podemos adicionar um título e links e testar novamente.
Etapa 6: publicar a mashup
Defina o nome do projeto e publique-o. Isso vai gerar um link permanente para seu mashup, que você pode usar para incorporá-lo a páginas da Web. Usando meu exemplo, este é o link para a página inicial do projeto do GME. Também
é possível ver o
código
fonte do projeto.
Etapa 7: adicionar o mashup a uma página da Web
Adicione o mashup a uma página da Web usando um iframe. Por exemplo, para inserir o projeto de exemplo, adicione:
<iframe style="WIDTH: 439px; HEIGHT: 491px" src="http://pemissions.googlemashups.com/" frameborder="0"></iframe>
Confira exemplos da combinação em uma página
e em um blog.
Você também pode adicionar o código do Google Analytics ao projeto para acompanhar estatísticas sobre quem está visualizando sua página. Confira o script simples para
adicionar:
<script src="http://www.google-analytics.com/urchin.js" type="text/javascript"></script>
<script type="text/javascript">uacct = "youraccountnumber";urchinTracker();</script>
Etapa 8: colocar na
Galeria do GME
Publique seu mashup na Galeria de mashups do GME.
Assim, outros usuários poderão acessar seu mashup.
Confira o
Guia de primeiros passos do
Google Mashup Editor, que apresenta em
detalhe o
processo de criação de mashups. Confira também a lista de tags para uma breve descrição de todas as tags gm com exemplos.
Code:
Confira o código completo para usar o KML do Pict Earth no GME:
<gm:page title="Pict Earth missions" authenticate="false" onload="kmlPE()>
<!-- Map definition -->
<gm:mapid="map" height="400px" width="400px" lat="32.9393" lng="-117.206" zoom="9" maptypes="true"/>
<script>
function kmlPE(){
<!-- Get map -->
var myMap = google.mashups.getObjectById('map').getMap();
<!-- Get KML -->
var geoXml = new GGeoXml("http://pictearthusa.com/kml/missions.kml");
<!-- Place KML on Map -->
myMap.addOverlay(geoXml);
<!-- Set zoom on double click -->
myMap.enableDoubleClickZoom();
}
</script>
</gm:page>
A seguir
Depois de publicar o mashup, você pode usar o arquivo KML
como um
parâmetro para incluir em outro aplicativo ou carregá-lo diretamente como um
mapa. Por exemplo, esta página:
http://param.googlemashups.com
é um mashup do GME. Você pode referenciar diretamente um arquivo KML no mashup
adicionando kml= como um parâmetro no URL, assim:
http://param.googlemashups.com/?kml=http://mapgadgets.googlepages.com/cta.kml
Também é possível criar um gadget no seu projeto. Depois de enviar, acesse o menu "Arquivo", clique em "Enviar gadget" e siga as instruções. Assim, você pode adicionar facilmente o aplicativo à sua página inicial personalizada do Google, a outras páginas da Web e compartilhar com outras pessoas.
Exceto em caso de indicação contrária, o conteúdo desta página é licenciado de acordo com a Licença de atribuição 4.0 do Creative Commons, e as amostras de código são licenciadas de acordo com a Licença Apache 2.0. Para mais detalhes, consulte as políticas do site do Google Developers. Java é uma marca registrada da Oracle e/ou afiliadas.
Última atualização 2025-07-27 UTC.
[null,null,["Última atualização 2025-07-27 UTC."],[[["\u003cp\u003eThis tutorial demonstrates how to integrate a KML file into a Google Mashup Editor (GME) project using the Google Maps API.\u003c/p\u003e\n"],["\u003cp\u003eGME simplifies the process of creating and editing KML-based mashups, enabling developers to build dynamic map components without extensive HTML or JavaScript knowledge.\u003c/p\u003e\n"],["\u003cp\u003eThe tutorial provides a step-by-step guide, covering selecting a KML file, creating a GME project, adding a map, testing, publishing, and embedding the mashup into web pages.\u003c/p\u003e\n"],["\u003cp\u003eUsers can further enhance their mashups by adding Google Analytics tracking and submitting them to the GME Mashup Gallery for wider visibility.\u003c/p\u003e\n"],["\u003cp\u003ePublished mashups can be parameterized to dynamically load different KML files and can be converted into Gadgets for integration into Google Personalized Home Page and other web pages.\u003c/p\u003e\n"]]],[],null,["# Using KML in Google Mashup Editor\n\n*Valery Hronusov, KML Developer,\nPerm State University, Russia* \n\nIntroduction\n------------\n\n[Google\nMashup Editor](http://editor.googlemashups.com/ \"Google Mashup Editor\") (GME) is one of the most long-awaited and useful tools for mashup developers. GME helps developers create and edit dynamic components in Web pages, such as maps, tables, lists, and other elements, based on connections with external data. These elements can be then be included in Web pages and blogs using an iframe. \n\nThis tutorial will show you how to incorporate a KML file into a Map created with GME. \n\n\u003cbr /\u003e\n\n### My first impressions of Google Mashup Editor\n\n- It has the utmost simplicity, with a clean and distinct interface, like the majority of Google products.\n- It has a convenient project index with a constantly increasing collection of code examples, as well as the author's code.\n- It allows for the easy storage of additional resources to the project (such as image files).\n- It has an easy-to-use XML debugger.\n- It has lots of easy-to-use sample applications.\n\n\u003cbr /\u003e\n\n### GME for KML Developers\n\nBefore the advent of the Internet, spatial data\nwas traditionally difficult to share. However, with\nthe development of the Internet, mapping applications became a standard\nway of easily sharing Geographic Information Systems\n(GIS) data with the world. KML is becoming a standard for the\npresentation and interchange of GIS data because it is compact, easy to\ndevelop, and is supported by popular applications such as Google Earth\nand\nGoogle Maps.\n\n\nUntil recently, the process of creating and editing pages\nbased\non\nJavaScript was a large problem for KML developers. It required a large\nnumber of\nadditional steps to create a mashup and debug it. GME makes\nit\npossible to create a KML-based mashup very rapidly\nout of a few basic\ncomponents. The process of creation does not require special\nknowledge of HTML\nor JavaScript. The GME sample projects provide enough to get\nstarted.\n\n\nIn the following example, I'll be using a KML file that points\nto the\ncollection of the photographs taken during\n[Pict Earth\nUSA](http://pictearth.com/missions.html \"Pict Earth USA\") flights.\n\nThis is a snapshot of the Pict Earth maps mashup: \n\n### Here are the steps to integrate a KML file into a GME project using the\nGoogle Maps API:\n\n\u003cbr /\u003e\n\n[Step 1: Select the KML file](#Step1) \n[Step 2: Create a new GME project](#Step2) \n[Step 3: Create a function to add the KML](#Step3) \n[Step 4: Add a map](#Step4) \n[Step 5: Test the mashup](#Step5) \n[Step 6: Publish the mashup](#Step6) \n[Step 7: Add the mashup to a web page](#Step7) \n[Step 8: Put it in the GME gallery](#Step8) \n\n### Step 1: Select the KML file\n\nSelect\nthe KML file you would like to add to your Map. This can be anything\nthat has features supported in Google Maps. It must be hosted on a\npublicly available server.\n\n### Step 2: Create a New\nGME Project\n\nCreate a new blank GME project.\n\nThis is what a blank GME project looks like: \n\nAdd a\ntitle and a name for your function.\n\\\u003cgm:page title=**\"Pict Earth\nmissions\"** authenticate=\"false\" **onload=**\"**kmlPE()**\"\\\u003e \n\\\u003c/gm:page\\\u003e \n\n### Step 3: Create\na function to add the KML\n\n\nCreate a JavaScript function with the path to the KML file to be added\nto the Map. \n\n```gdscript\n\u003cscript\u003e\n function kmlPE()\n {\n \u003c!-- Get map --\u003e\n var myMap = google.mashups.getObjectById('map').getMap();\n \u003c!-- Get KML --\u003e\n var geoXml = new GGeoXml(\"http://pictearthusa.com/kml/missions.kml\");\n \u003c!--Place KML on Map --\u003e\n myMap.addOverlay(geoXml);\n \u003c!--Set zoom on double click --\u003e\n myMap.enableDoubleClickZoom();\n }\n\u003c/script\u003e\n```\n\n### Step 4: Add a Map\n\nAdd map and parameters.\n\n```actionscript-3\n\u003cgm:map id=\"map\" height=\"400px\" width=\"400px\" lat=\"32.9393\" lng=\"-117.206\" zoom=\"9\" maptypes=\"true\"/\u003e\n```\n\n### Step 5: Test the mashup.\n\nPress the Test button (F4).\n\nThis is an image of the Pict Earth mashup tested in the\nSandbox. \n\nNow we can verify the text of application and see the first result. We\ncan add a\ntitle and links and test it again.\n\n### Step 6: Publish the mashup\n\nSet the name of the project, and then publish it. This will give you a\npermanent link to your mashup, which you can use to incorporate it into\nweb pages. Using my example, this is the link to the GME project\n[home page](http://pemissions.googlemashups.com/ \"home page\"). You\ncan also see\n[source\ncode](http://pemissions.googlemashups.com/index.gml \"Source code\") of project.\n\n### Step 7: Add the mashup\nto a web page\n\nAdd the mashup to a web page using an iframe. For instance, to insert\nthe example project, add this:\n\n```css+lasso\n\u003ciframe style=\"WIDTH: 439px; HEIGHT: 491px\" src=\"http://pemissions.googlemashups.com/\" frameborder=\"0\"\u003e\u003c/iframe\u003e\n```\n\nHere are examples of the mashup in a web [page](http://spreadsheetsgis.googlepages.com/pe \"page\")\nand a [blog](http://gisplanet.blogspot.com/2007/07/pict-earth-usa-missions.html \"blog\").\n\nYou can also add your [Google\nAnalytics](http://analytics.google.com/ \"Google Analytics\") code to the project, which will allow you to track\nstatistics about who is viewing your page. Here's the simple script to\nadd it:\n\n```carbon\n\u003cscript src=\"http://www.google-analytics.com/urchin.js\" type=\"text/javascript\"\u003e\u003c/script\u003e\n\u003cscript type=\"text/javascript\"\u003euacct = \"youraccountnumber\";urchinTracker();\u003c/script\u003e\n```\n\n\u003cbr /\u003e\n\n### Step 8: Put it in the\nGME Gallery\n\nPublish your mashup to the [GME Mashup Gallery](http://gallery.googlemashups.com/).\nThis will\nallow other users to view your mashup.\n\n\u003cbr /\u003e\n\n### For more information:\n\nCheck out the\n[Google\nMashup Editor Getting Started Guide](http://editor.googlemashups.com/docs/gettingstarted.html \"Google Mashup Editor Getting Started Guide\"), which presents in\ndetail the\nprocess of creating mashups. Also, check out\nthe [list\nof tags](http://editor.googlemashups.com/docs/reference.html \"list of tags\") for a brief description of all gm tags with\n[examples](http://editor.googlemashups.com/docs/samples.html \"examples\").\n\n\u003cbr /\u003e\n\n### Code:\n\nHere is\nthe whole code for using the Pict Earth KML in GME: \n\n```gdscript\n\u003cgm:page title=\"Pict Earth missions\" authenticate=\"false\" onload=\"kmlPE()\u003e\n\n\u003c!-- Map definition --\u003e\n\u003cgm:mapid=\"map\" height=\"400px\" width=\"400px\" lat=\"32.9393\" lng=\"-117.206\" zoom=\"9\" maptypes=\"true\"/\u003e\n\n\u003cscript\u003e\n function kmlPE(){\n\n \u003c!-- Get map --\u003e\n var myMap = google.mashups.getObjectById('map').getMap();\n\n \u003c!-- Get KML --\u003e\n var geoXml = new GGeoXml(\"http://pictearthusa.com/kml/missions.kml\");\n\n \u003c!-- Place KML on Map --\u003e\n myMap.addOverlay(geoXml);\n\n \u003c!-- Set zoom on double click --\u003e\n myMap.enableDoubleClickZoom();\n }\n\u003c/script\u003e\n\u003c/gm:page\u003e\n```\n\n### What's next?\n\nOnce you've published your mashup, you can use the KML file\nin it as a\nparameter to include in another application, or loaded directly as a\nmap. For\ninstance, this page:\n[http://param.googlemashups.com](http://param.googlemashups.com/?kml=http://pictearthusa.com/kml/missions.kml \"http://param.googlemashups.com/?kml=http://pictearthusa.com/kml/missions.kml\")\n\n\u003cbr /\u003e\n\nis a GME mashup. You can directly reference a KML file to the mashup by adding kml= as a parameter in the URL, like this:\n\n\u003cbr /\u003e\n\n\u003chttp://param.googlemashups.com/?kml=http://mapgadgets.googlepages.com/cta.kml\u003e \n\nYou can also create a [Gadget](http://www.google.com/apis/gadgets/) from your project. Once you've submitted it, go to the file menu and click on Submit Gadget, and follow the directions. This will allow you to easily add your application to your [Google personalized home page](http://www.google.com/ig), on other web pages, and to share it with others.\n\n\u003cbr /\u003e"]]