Hiển thị bản đồ cơ bản
Sử dụng bộ sưu tập để sắp xếp ngăn nắp các trang
Lưu và phân loại nội dung dựa trên lựa chọn ưu tiên của bạn.

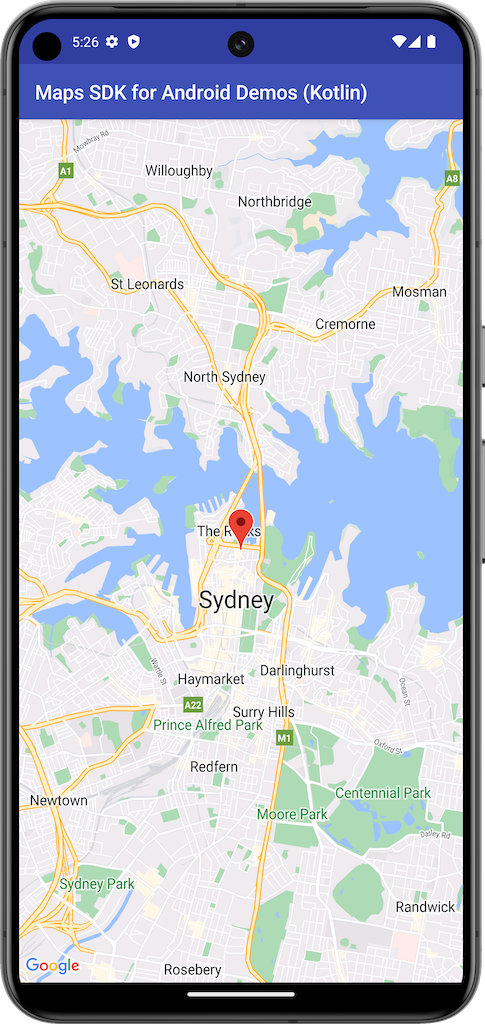
Ví dụ này tạo một bản đồ bằng cách sử dụng SupportMapFragment
từ SDK Bản đồ dành cho Android.
Để biết thêm thông tin, hãy xem tài liệu.
Bắt đầu
Trước khi có thể thử mã mẫu, bạn phải định cấu hình môi trường phát triển.
Để biết thêm thông tin, hãy xem Mã mẫu SDK Bản đồ dành cho Android.
Xem mã
Kotlin
class BasicMapDemoActivity : SamplesBaseActivity(), OnMapReadyCallback {
val SYDNEY = LatLng(-33.862, 151.21)
val ZOOM_LEVEL = 13f
override fun onCreate(savedInstanceState: Bundle?) {
super.onCreate(savedInstanceState)
setContentView(com.example.common_ui.R.layout.basic_demo)
val mapFragment : SupportMapFragment? =
supportFragmentManager.findFragmentById(com.example.common_ui.R.id.map) as? SupportMapFragment
mapFragment?.getMapAsync(this)
}
/**
* This is where we can add markers or lines, add listeners or move the camera. In this case,
* we just move the camera to Sydney and add a marker in Sydney.
*/
override fun onMapReady(googleMap: GoogleMap) {
with(googleMap) {
moveCamera(CameraUpdateFactory.newLatLngZoom(SYDNEY, ZOOM_LEVEL))
addMarker(MarkerOptions().position(SYDNEY))
}
}
}
Java
public class BasicMapDemoActivity extends SamplesBaseActivity implements OnMapReadyCallback {
@Override
protected void onCreate(Bundle savedInstanceState) {
super.onCreate(savedInstanceState);
setContentView(com.example.common_ui.R.layout.basic_demo);
SupportMapFragment mapFragment =
(SupportMapFragment) getSupportFragmentManager().findFragmentById(com.example.common_ui.R.id.map);
mapFragment.getMapAsync(this);
applyInsets(findViewById(com.example.common_ui.R.id.map_container));
}
/**
* This is where we can add markers or lines, add listeners or move the camera. In this case,
* we
* just add a marker near Africa.
*/
@Override
public void onMapReady(GoogleMap map) {
map.addMarker(new MarkerOptions().position(new LatLng(0, 0)).title("Marker"));
}
}
Sao chép và chạy các mẫu
Bạn cần có Git để chạy mẫu này trên máy. Lệnh sau đây sẽ sao chép kho lưu trữ ứng dụng mẫu.
git clone git@github.com:googlemaps-samples/android-samples.git
Nhập dự án mẫu vào Android Studio:
- Trong Android Studio, hãy chọn File > New > Import Project (Tệp > Mới > Nhập dự án).
Chuyển đến vị trí bạn đã lưu kho lưu trữ và chọn thư mục dự án cho Kotlin hoặc Java:
- Kotlin:
PATH-REPO/android-samples/ApiDemos/kotlin
- Java:
PATH-REPO/android-samples/ApiDemos/java
- Chọn Mở. Android Studio sẽ tạo dự án của bạn bằng công cụ bản dựng Gradle.
- Tạo một tệp
secrets.properties
trống trong cùng thư mục với tệp local.properties
của dự án. Để biết thêm thông tin về tệp này, hãy xem phần Thêm khoá API vào dự án.
- Lấy khoá API từ dự án của bạn bằng cách bật SDK Bản đồ dành cho Android.
Thêm chuỗi sau vào secrets.properties
, thay thế YOUR_API_KEY bằng giá trị của khoá API:
MAPS_API_KEY=YOUR_API_KEY
- Chạy ứng dụng.
Trừ phi có lưu ý khác, nội dung của trang này được cấp phép theo Giấy phép ghi nhận tác giả 4.0 của Creative Commons và các mẫu mã lập trình được cấp phép theo Giấy phép Apache 2.0. Để biết thông tin chi tiết, vui lòng tham khảo Chính sách trang web của Google Developers. Java là nhãn hiệu đã đăng ký của Oracle và/hoặc các đơn vị liên kết với Oracle.
Cập nhật lần gần đây nhất: 2025-08-31 UTC.
[null,null,["Cập nhật lần gần đây nhất: 2025-08-31 UTC."],[[["\u003cp\u003eThis guide demonstrates how to create a basic map in your Android application using the Maps SDK for Android and a \u003ccode\u003eSupportMapFragment\u003c/code\u003e.\u003c/p\u003e\n"],["\u003cp\u003eCode samples are provided in both Kotlin and Java, showing how to display a map with a marker.\u003c/p\u003e\n"],["\u003cp\u003eBefore running the sample code, you need to configure your development environment, including cloning the sample repository and importing the project into Android Studio.\u003c/p\u003e\n"],["\u003cp\u003eYou will also need to obtain an API key and add it to your project's configuration files to enable map functionality.\u003c/p\u003e\n"]]],[],null,["This example creates a map using a `SupportMapFragment` from the\nMaps SDK for Android.\n\nFor more information, see the [documentation.](/maps/documentation/android-sdk/map)\n\nGet started\n\nBefore you can try the sample code, you must configure your development environment.\nFor more information, see [Maps SDK for Android code samples](/maps/documentation/android-sdk/examples).\n\nView the code\n\n\nKotlin \n\n```kotlin\nclass BasicMapDemoActivity : SamplesBaseActivity(), OnMapReadyCallback {\n\n val SYDNEY = LatLng(-33.862, 151.21)\n val ZOOM_LEVEL = 13f\n\n override fun onCreate(savedInstanceState: Bundle?) {\n super.onCreate(savedInstanceState)\n setContentView(com.example.common_ui.R.layout.basic_demo)\n val mapFragment : SupportMapFragment? =\n supportFragmentManager.findFragmentById(com.example.common_ui.R.id.map) as? SupportMapFragment\n mapFragment?.getMapAsync(this)\n }\n\n /**\n * This is where we can add markers or lines, add listeners or move the camera. In this case,\n * we just move the camera to Sydney and add a marker in Sydney.\n */\n override fun onMapReady(googleMap: GoogleMap) {\n with(googleMap) {\n moveCamera(CameraUpdateFactory.newLatLngZoom(SYDNEY, ZOOM_LEVEL))\n addMarker(MarkerOptions().position(SYDNEY))\n }\n }\n}https://github.com/googlemaps-samples/android-samples/blob/73ac16ffca01a2ca6fedd1988c713138ec000082/ApiDemos/project/kotlin-app/src/main/java/com/example/kotlindemos/BasicMapDemoActivity.kt#L32-L55\n\n \n```\n\nJava \n\n```java\npublic class BasicMapDemoActivity extends SamplesBaseActivity implements OnMapReadyCallback {\n\n @Override\n protected void onCreate(Bundle savedInstanceState) {\n super.onCreate(savedInstanceState);\n setContentView(com.example.common_ui.R.layout.basic_demo);\n\n SupportMapFragment mapFragment =\n (SupportMapFragment) getSupportFragmentManager().findFragmentById(com.example.common_ui.R.id.map);\n mapFragment.getMapAsync(this);\n applyInsets(findViewById(com.example.common_ui.R.id.map_container));\n }\n\n /**\n * This is where we can add markers or lines, add listeners or move the camera. In this case,\n * we\n * just add a marker near Africa.\n */\n @Override\n public void onMapReady(GoogleMap map) {\n map.addMarker(new MarkerOptions().position(new LatLng(0, 0)).title(\"Marker\"));\n }\n}https://github.com/googlemaps-samples/android-samples/blob/73ac16ffca01a2ca6fedd1988c713138ec000082/ApiDemos/project/java-app/src/main/java/com/example/mapdemo/BasicMapDemoActivity.java#L31-L53\n\n \n```\n\n\u003cbr /\u003e\n\nClone and run the samples\n\nGit is required to run this sample locally. The following command clones the sample\napplication repository. \n\n```\ngit clone git@github.com:googlemaps-samples/android-samples.git\n```\n\nImport the sample project into Android Studio:\n\n1. In Android Studio, select **File \\\u003e New \\\u003e Import Project**.\n2. Go to the location where you saved the repository and select the project directory for\n Kotlin or Java:\n\n - **Kotlin** : \u003cvar translate=\"no\"\u003ePATH-REPO\u003c/var\u003e`/android-samples/ApiDemos/kotlin`\n - **Java** : \u003cvar translate=\"no\"\u003ePATH-REPO\u003c/var\u003e`/android-samples/ApiDemos/java`\n3. Select **Open**. Android Studio builds your project, using the Gradle build tool.\n4. Create a blank `secrets.properties` file in the same directory as your project's `local.properties` file. For more information about this file, see [Add your API key to the project](/maps/documentation/android-sdk/config#step_3_add_your_api_key_to_the_project).\n5. [Get an API key](/maps/documentation/android-sdk/get-api-key) from your project with the [Maps SDK for Android enabled](/maps/documentation/android-sdk/cloud-setup#enabling-apis).\n6. Add the following string to `secrets.properties`, replacing **YOUR_API_KEY** with the value of\n your API key:\n\n ```scdoc\n MAPS_API_KEY=YOUR_API_KEY\n ```\n7. Run the app."]]