

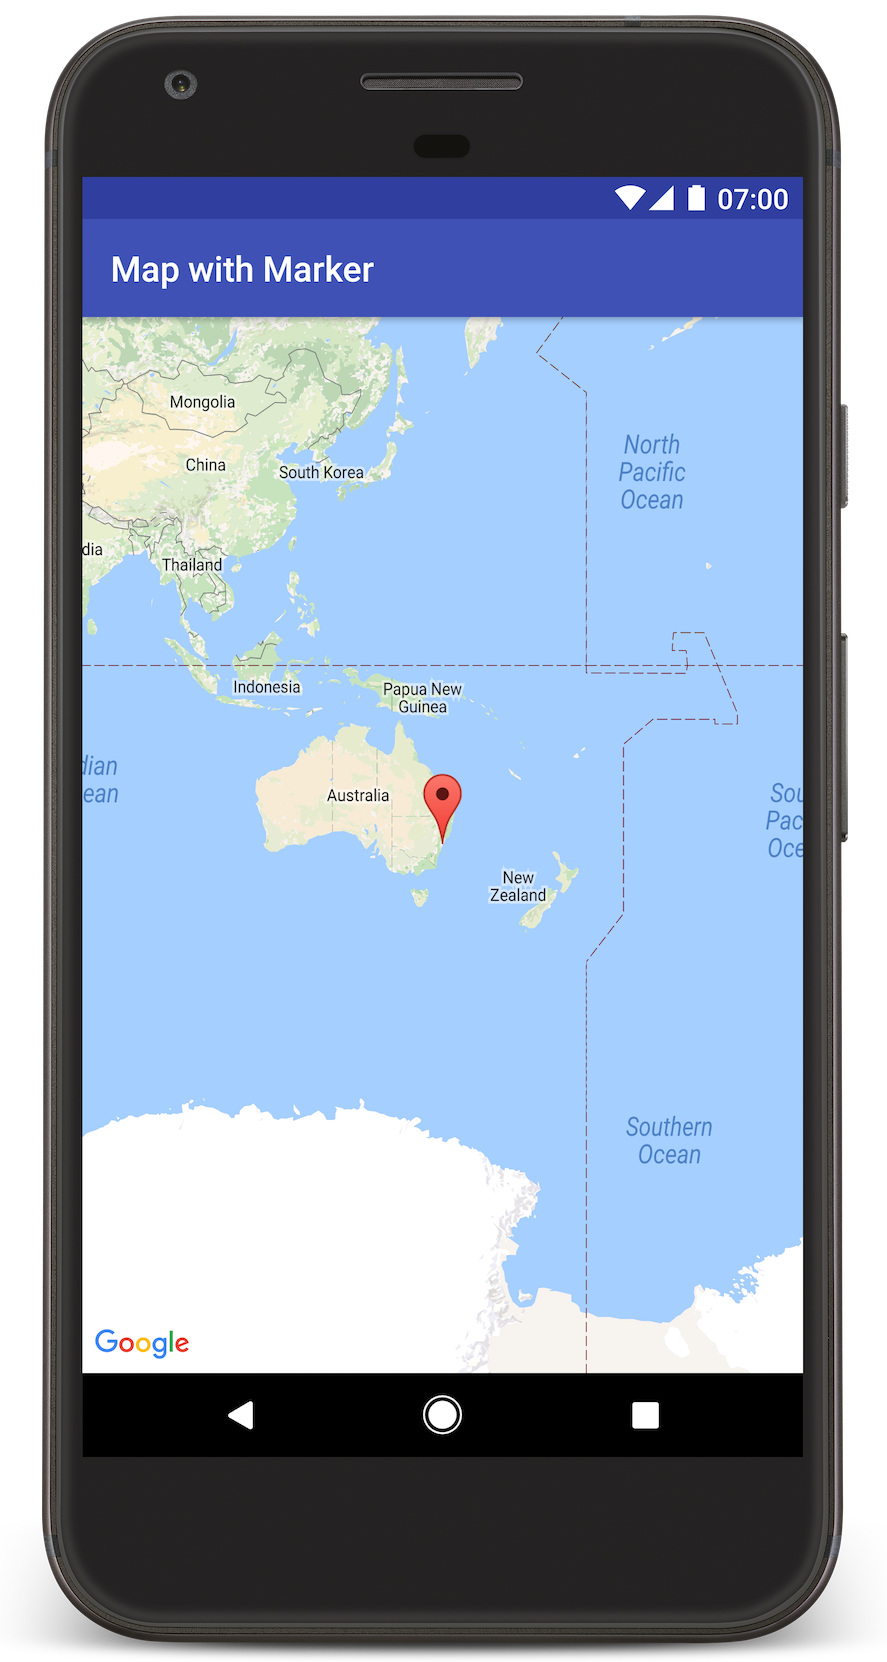
این آموزش به شما نشان میدهد که چگونه یک نقشه Google را به برنامه Android خود اضافه کنید. نقشه شامل یک نشانگر، که پین نیز نامیده میشود، برای نشان دادن یک مکان خاص است.
برای ساختن برنامه Android بااستفاده از «کیت توسعه نرمافزار Maps برای Android»، آموزش گامبهگام را دنبال کنید. محیط توسعه نرمافزار توصیهشده استودیو Android است.
دریافت کد
مخزن Google Maps Android API v2 Samples را از GitHub شبیهسازی یا بارگیری کنید.
مشاهده نسخه Java فعالیت:
// Copyright 2020 Google LLC // // Licensed under the Apache License, Version 2.0 (the "License"); // you may not use this file except in compliance with the License. // You may obtain a copy of the License at // // http://www.apache.org/licenses/LICENSE-2.0 // // Unless required by applicable law or agreed to in writing, software // distributed under the License is distributed on an "AS IS" BASIS, // WITHOUT WARRANTIES OR CONDITIONS OF ANY KIND, either express or implied. // See the License for the specific language governing permissions and // limitations under the License. package com.example.mapwithmarker; import android.os.Bundle; import androidx.appcompat.app.AppCompatActivity; import com.google.android.gms.maps.CameraUpdateFactory; import com.google.android.gms.maps.GoogleMap; import com.google.android.gms.maps.OnMapReadyCallback; import com.google.android.gms.maps.SupportMapFragment; import com.google.android.gms.maps.model.LatLng; import com.google.android.gms.maps.model.MarkerOptions; /** An activity that displays a Google map with a marker (pin) to indicate a particular location. */ public class MapsMarkerActivity extends AppCompatActivity implements OnMapReadyCallback { @Override protected void onCreate(Bundle savedInstanceState) { super.onCreate(savedInstanceState); // Retrieve the content view that renders the map. setContentView(R.layout.activity_maps); // Get the SupportMapFragment and request notification when the map is ready to be used. SupportMapFragment mapFragment = (SupportMapFragment) getSupportFragmentManager().findFragmentById(R.id.map); mapFragment.getMapAsync(this); } /** * Manipulates the map when it's available. The API invokes this callback when the map is ready * to be used. This is where we can add markers or lines, add listeners or move the camera. In * this case, we just add a marker near Sydney, Australia. If Google Play services is not * installed on the device, the user receives a prompt to install Play services inside the * SupportMapFragment. The API invokes this method after the user has installed Google Play * services and returned to the app. */ @Override public void onMapReady(GoogleMap googleMap) { // Add a marker in Sydney, Australia, // and move the map's camera to the same location. LatLng sydney = new LatLng(-33.852, 151.211); googleMap.addMarker(new MarkerOptions().position(sydney).title("Marker in Sydney")); googleMap.moveCamera(CameraUpdateFactory.newLatLng(sydney)); } }
نسخه Kotlin فعالیت را مشاهده کنید:
// Copyright 2020 Google LLC // // Licensed under the Apache License, Version 2.0 (the "License"); // you may not use this file except in compliance with the License. // You may obtain a copy of the License at // // http://www.apache.org/licenses/LICENSE-2.0 // // Unless required by applicable law or agreed to in writing, software // distributed under the License is distributed on an "AS IS" BASIS, // WITHOUT WARRANTIES OR CONDITIONS OF ANY KIND, either express or implied. // See the License for the specific language governing permissions and // limitations under the License. package com.example.mapwithmarker import android.os.Bundle import android.widget.Toast import androidx.appcompat.app.AppCompatActivity import com.google.android.gms.maps.CameraUpdateFactory import com.google.android.gms.maps.GoogleMap import com.google.android.gms.maps.OnMapReadyCallback import com.google.android.gms.maps.SupportMapFragment import com.google.android.gms.maps.model.LatLng import com.google.android.gms.maps.model.MarkerOptions /** * An activity that displays a Google map with a marker (pin) to indicate a particular location. */ class MapsMarkerActivity : AppCompatActivity(), OnMapReadyCallback { override fun onCreate(savedInstanceState: Bundle?) { super.onCreate(savedInstanceState) // Retrieve the content view that renders the map. setContentView(R.layout.activity_maps) // Get the SupportMapFragment and request notification when the map is ready to be used. val mapFragment = supportFragmentManager.findFragmentById(R.id.map) as? SupportMapFragment mapFragment?.getMapAsync(this) } override fun onMapReady(googleMap: GoogleMap) { val sydney = LatLng(-33.852, 151.211) googleMap.addMarker( MarkerOptions() .position(sydney) .title("Marker in Sydney"), ) googleMap.moveCamera(CameraUpdateFactory.newLatLng(sydney)) } }
راهاندازی پروژه توسعه
برای ایجاد پروژه آموزشی در Android Studio، این مراحل را دنبال کنید.
- «استودیو Android» را بارگیری و نصب کنید.
- بسته خدمات Google Play را به Android Studio اضافه کنید.
- اگر هنگام شروع مطالعه این آموزش، مخزن نمونههای Google Maps Android API v2 را شبیهسازی یا بارگیری نکردهاید، این کار را انجام دهید.
وارد کردن پروژه آموزشی:
- در Android Studio، فایل > جدید > وارد کردن پروژه را انتخاب کنید.
- به مکانی بروید که Google Maps Android API v2 Samples repository را پساز بارگیری در آن ذخیره کردهاید.
- پروژه MapWithMarker را در این مکان پیدا کنید:
PATH-TO-SAVED-REPO/android-samples/tutorials/java/MapWithMarker(Java) یا
PATH-TO-SAVED-REPO/android-samples/tutorials/kotlin/MapWithMarker(Kotlin) - فهرست راهنمای پروژه را انتخاب کنید، سپس روی باز کردن کلیک کنید. اکنون «استودیو Android» پروژه شما را بااستفاده از ابزار ساخت Gradle میسازد.
میاناهای برنامهسازی کاربردی لازم را فعال کنید و کلید میانای برنامهسازی کاربردی دریافت کنید
برای تکمیل این آموزش، به پروژه Google Cloud با میاناهای برنامهسازی کاربردی لازم فعالشده و کلید میانای برنامهسازی کاربردی که برای استفاده از کیت توسعه نرمافزار Maps برای Android مجاز باشد نیاز دارید. برای جزئیات بیشتر، به این مقاله مراجعه کنید:
کلید میانای برنامهسازی کاربردی را به برنامهتان اضافه کنید
- فایل
local.propertiesپروژهتان را باز کنید. رشته زیر را اضافه کنید و سپس
YOUR_API_KEYرا با مقدار کلید میانای برنامهسازی کاربردی خود جایگزین کنید:MAPS_API_KEY=YOUR_API_KEYوقتی برنامهتان را میسازید، افزایه Secrets Gradle ویژه Android کلید میانای برنامهسازی کاربردی را کپی میکند و آن را بهعنوان متغیر ساخت در مانیفست Android دردسترس قرار میدهد، همانطور که در زیر توضیح داده شده است.
ساختن و اجرای برنامه
برای ساختن و اجرای برنامه:
دستگاه Android را به رایانه وصل کنید. دستورالعملها را دنبال کنید تا گزینههای توسعهدهنده را در دستگاه Android خود فعال کنید و سیستم خود را برای شناسایی دستگاه پیکربندی کنید.
یا میتوانید از مدیر دستگاه مجازی Android (AVD) برای پیکربندی دستگاه مجازی استفاده کنید. هنگام انتخاب شبیهساز، حتماً تصویری را انتخاب کنید که شامل Google APIs باشد. برای جزئیات بیشتر، راهاندازی پروژه Android Studio را ببینید.
در Android Studio، روی گزینه منو اجرا (یا نماد دکمه پخش) کلیک کنید. دستگاهی را طبق درخواست انتخاب کنید.
Android Studio برای ساختن برنامه، Gradle را فراخوانی میکند و سپس برنامه را در دستگاه یا شبیهساز اجرا میکند. باید نقشهای با نشانگری که به سیدنی در ساحل شرقی استرالیا اشاره میکند ببینید، مشابه تصویر موجود در این صفحه.
عیبیابی:
- اگر نقشهای نمیبینید، بررسی کنید که کلید میانای برنامهسازی کاربردی را دریافت کرده باشید و آن را به برنامه اضافه کرده باشید، همانطور که در بالا توضیح داده شد. برای مشاهده پیامهای خطا درباره کلید API، گزارش را در Android Monitor در Android Studio بررسی کنید.
- از ابزارهای اشکالزدایی «استودیو Android» برای مشاهده گزارشها و اشکالزدایی برنامه استفاده کنید.
درک کردن کد
این بخش از آموزش مهمترین بخشهای برنامه MapWithMarker را توضیح میدهد تا به شما کمک کند نحوه ساختن برنامهای مشابه را درک کنید.
بررسی مانیفست Android
به عناصر زیر در فایل AndroidManifest.xml برنامهتان توجه کنید:
عنصر
meta-dataرا برای جاسازی نسخه «خدمات Google Play» که برنامه با آن کامپایل شده است اضافه کنید.<meta-data android:name="com.google.android.gms.version" android:value="@integer/google_play_services_version" />یک عنصر
meta-dataاضافه کنید که کلید میانای برنامهسازی کاربردی شما را مشخص کند. نمونه همراه این آموزش مقدار کلید میانای برنامهسازی کاربردی را به متغیر ساخت مطابق با نام کلیدی که قبلاً تعریف کردهاید،MAPS_API_KEY، نگاشت میکند. وقتی برنامهتان را میسازید، افزایه Secrets Gradle ویژه Android کلیدهای موجود در فایلlocal.propertiesرا بهعنوان متغیرهای ساخت مانیفست دردسترس قرار میدهد.<meta-data android:name="com.google.android.geo.API_KEY" android:value="${MAPS_API_KEY}" />در فایل
build.gradle، خط زیر کلید میانای برنامهسازی کاربردی شما را به مانیفست Android شما منتقل میکند.id 'com.google.android.libraries.mapsplatform.secrets-gradle-plugin'
در زیر نمونهای از مانیفست کامل آورده شده است:
<?xml version="1.0" encoding="utf-8"?>
<!--
 Copyright 2020 Google LLC

 Licensed under the Apache License, Version 2.0 (the "License");
 you may not use this file except in compliance with the License.
 You may obtain a copy of the License at

      http://www.apache.org/licenses/LICENSE-2.0

 Unless required by applicable law or agreed to in writing, software
 distributed under the License is distributed on an "AS IS" BASIS,
 WITHOUT WARRANTIES OR CONDITIONS OF ANY KIND, either express or implied.
 See the License for the specific language governing permissions and
 limitations under the License.
-->

<manifest xmlns:android="http://schemas.android.com/apk/res/android">

    <application
        android:allowBackup="true"
        android:icon="@mipmap/ic_launcher"
        android:label="@string/app_name"
        android:supportsRtl="true"
        android:theme="@style/AppTheme">

        <meta-data
            android:name="com.google.android.gms.version"
            android:value="@integer/google_play_services_version" />

        <!--
             The API key for Google Maps-based APIs.
        -->
        <meta-data
            android:name="com.google.android.geo.API_KEY"
            android:value="${MAPS_API_KEY}" />

        <activity
            android:name=".MapsMarkerActivity"
            android:label="@string/title_activity_maps"
            android:exported="true">
            <intent-filter>
                <action android:name="android.intent.action.MAIN" />

                <category android:name="android.intent.category.LAUNCHER" />
            </intent-filter>
        </activity>
    </application>

</manifest>
افزودن نقشه
نمایش نقشه بااستفاده از کیت توسعه نرمافزار Google Maps برای Android.
عنصر
<fragment>را به فایل چیدمان فعالیتتان اضافه کنید،activity_maps.xml. این عنصرSupportMapFragmentرا تعریف میکند تا بهعنوان محفظهای برای نقشه عمل کند و دسترسی به شیءGoogleMapرا فراهم کند. این آموزش از نسخه کتابخانه پشتیبانی Android برای قطعه نقشه استفاده میکند تا از سازگاری با نسخههای قدیمیتر چارچوب Android اطمینان حاصل شود.<!-- Copyright 2020 Google LLC Licensed under the Apache License, Version 2.0 (the "License"); you may not use this file except in compliance with the License. You may obtain a copy of the License at http://www.apache.org/licenses/LICENSE-2.0 Unless required by applicable law or agreed to in writing, software distributed under the License is distributed on an "AS IS" BASIS, WITHOUT WARRANTIES OR CONDITIONS OF ANY KIND, either express or implied. See the License for the specific language governing permissions and limitations under the License. --> <fragment xmlns:android="http://schemas.android.com/apk/res/android" xmlns:tools="http://schemas.android.com/tools" android:id="@+id/map" android:name="com.google.android.gms.maps.SupportMapFragment" android:layout_width="match_parent" android:layout_height="match_parent" tools:context="com.example.mapwithmarker.MapsMarkerActivity" />
در روش
onCreate()فعالیتتان، فایل چیدمان را بهعنوان نمای محتوا تنظیم کنید. با فراخوانیFragmentManager.findFragmentById()، دستگیرهای برای قطعه نقشه دریافت کنید. سپس ازgetMapAsync()برای ثبتنام در فراخوانی نقشه استفاده کنید:جاوا
@Override protected void onCreate(Bundle savedInstanceState) { super.onCreate(savedInstanceState); // Retrieve the content view that renders the map. setContentView(R.layout.activity_maps); // Get the SupportMapFragment and request notification when the map is ready to be used. SupportMapFragment mapFragment = (SupportMapFragment) getSupportFragmentManager().findFragmentById(R.id.map); mapFragment.getMapAsync(this); }
Kotlin
override fun onCreate(savedInstanceState: Bundle?) { super.onCreate(savedInstanceState) // Retrieve the content view that renders the map. setContentView(R.layout.activity_maps) // Get the SupportMapFragment and request notification when the map is ready to be used. val mapFragment = supportFragmentManager.findFragmentById(R.id.map) as? SupportMapFragment mapFragment?.getMapAsync(this) }
رابط
OnMapReadyCallbackرا پیادهسازی کنید و روشonMapReady()را لغو کنید تا وقتی شیءGoogleMapدردسترس است، نقشه را راهاندازی کنید:جاوا
public class MapsMarkerActivity extends AppCompatActivity implements OnMapReadyCallback { // ... @Override public void onMapReady(GoogleMap googleMap) { LatLng sydney = new LatLng(-33.852, 151.211); googleMap.addMarker(new MarkerOptions().position(sydney).title("Marker in Sydney")); } }
Kotlin
class MapsMarkerActivity : AppCompatActivity(), OnMapReadyCallback { // ... override fun onMapReady(googleMap: GoogleMap) { val sydney = LatLng(-33.852, 151.211) googleMap.addMarker( MarkerOptions() .position(sydney) .title("Marker in Sydney"), ) } }
بهطور پیشفرض، وقتی کاربر روی نشانگر تکضرب میزند، «کیت توسعه نرمافزار Google Maps برای Android» محتوای پنجره اطلاعات را نمایش میدهد. اگر میخواهید از رفتار پیشفرض استفاده کنید، نیازی به افزودن شنونده کلیک برای نشانگر نیست.
مراحل بعدی
درباره شیء نقشه و کارهایی که میتوانید با نشانگرها انجام دهید بیشتر بدانید.