
이 튜토리얼에서는 Google 지도를 Android 앱에 추가하고 지도에서 다중선과 다각형을 사용하여 경로와 영역을 나타내는 방법을 설명합니다.
튜토리얼에 따라 Android용 Maps SDK를 사용하여 Android 앱을 빌드하세요. 권장되는 개발 환경은 Android 스튜디오입니다.
코드 가져오기
GitHub에서 Google Maps Android API v2 샘플 저장소를 클론하거나 다운로드합니다.
활동의 Java 버전을 확인하세요.
    // Copyright 2020 Google LLC
//
// Licensed under the Apache License, Version 2.0 (the "License");
// you may not use this file except in compliance with the License.
// You may obtain a copy of the License at
//
//      http://www.apache.org/licenses/LICENSE-2.0
//
// Unless required by applicable law or agreed to in writing, software
// distributed under the License is distributed on an "AS IS" BASIS,
// WITHOUT WARRANTIES OR CONDITIONS OF ANY KIND, either express or implied.
// See the License for the specific language governing permissions and
// limitations under the License.

package com.example.polygons;

import android.os.Bundle;
import android.widget.Toast;
import androidx.appcompat.app.AppCompatActivity;
import com.google.android.gms.maps.CameraUpdateFactory;
import com.google.android.gms.maps.GoogleMap;
import com.google.android.gms.maps.OnMapReadyCallback;
import com.google.android.gms.maps.SupportMapFragment;
import com.google.android.gms.maps.model.BitmapDescriptorFactory;
import com.google.android.gms.maps.model.CustomCap;
import com.google.android.gms.maps.model.Dash;
import com.google.android.gms.maps.model.Dot;
import com.google.android.gms.maps.model.Gap;
import com.google.android.gms.maps.model.JointType;
import com.google.android.gms.maps.model.LatLng;
import com.google.android.gms.maps.model.PatternItem;
import com.google.android.gms.maps.model.Polygon;
import com.google.android.gms.maps.model.PolygonOptions;
import com.google.android.gms.maps.model.Polyline;
import com.google.android.gms.maps.model.PolylineOptions;
import com.google.android.gms.maps.model.RoundCap;
import java.util.Arrays;
import java.util.List;


/**
 * An activity that displays a Google map with polylines to represent paths or routes,
 * and polygons to represent areas.
 */
public class PolyActivity extends AppCompatActivity
        implements
                OnMapReadyCallback,
                GoogleMap.OnPolylineClickListener,
                GoogleMap.OnPolygonClickListener {

    @Override
    protected void onCreate(Bundle savedInstanceState) {
        super.onCreate(savedInstanceState);

        // Retrieve the content view that renders the map.
        setContentView(R.layout.activity_maps);

        // Get the SupportMapFragment and request notification when the map is ready to be used.
        SupportMapFragment mapFragment = (SupportMapFragment) getSupportFragmentManager()
                .findFragmentById(R.id.map);
        mapFragment.getMapAsync(this);
    }

    /**
     * Manipulates the map when it's available.
     * The API invokes this callback when the map is ready to be used.
     * This is where we can add markers or lines, add listeners or move the camera.
     * In this tutorial, we add polylines and polygons to represent routes and areas on the map.
     */
    @Override
    public void onMapReady(GoogleMap googleMap) {

        // Add polylines to the map.
        // Polylines are useful to show a route or some other connection between points.
        Polyline polyline1 = googleMap.addPolyline(new PolylineOptions()
                .clickable(true)
                .add(
                        new LatLng(-35.016, 143.321),
                        new LatLng(-34.747, 145.592),
                        new LatLng(-34.364, 147.891),
                        new LatLng(-33.501, 150.217),
                        new LatLng(-32.306, 149.248),
                        new LatLng(-32.491, 147.309)));
        // Store a data object with the polyline, used here to indicate an arbitrary type.
        polyline1.setTag("A");
        // Style the polyline.
        stylePolyline(polyline1);

        Polyline polyline2 = googleMap.addPolyline(new PolylineOptions()
                .clickable(true)
                .add(
                        new LatLng(-29.501, 119.700),
                        new LatLng(-27.456, 119.672),
                        new LatLng(-25.971, 124.187),
                        new LatLng(-28.081, 126.555),
                        new LatLng(-28.848, 124.229),
                        new LatLng(-28.215, 123.938)));
        polyline2.setTag("B");
        stylePolyline(polyline2);

        // Add polygons to indicate areas on the map.
        Polygon polygon1 = googleMap.addPolygon(new PolygonOptions()
                .clickable(true)
                .add(
                        new LatLng(-27.457, 153.040),
                        new LatLng(-33.852, 151.211),
                        new LatLng(-37.813, 144.962),
                        new LatLng(-34.928, 138.599)));
        // Store a data object with the polygon, used here to indicate an arbitrary type.
        polygon1.setTag("alpha");
        // Style the polygon.
        stylePolygon(polygon1);

        Polygon polygon2 = googleMap.addPolygon(new PolygonOptions()
                .clickable(true)
                .add(
                        new LatLng(-31.673, 128.892),
                        new LatLng(-31.952, 115.857),
                        new LatLng(-17.785, 122.258),
                        new LatLng(-12.4258, 130.7932)));
        polygon2.setTag("beta");
        stylePolygon(polygon2);

        // Position the map's camera near Alice Springs in the center of Australia,
        // and set the zoom factor so most of Australia shows on the screen.
        googleMap.moveCamera(CameraUpdateFactory.newLatLngZoom(new LatLng(-23.684, 133.903), 4));

        // Set listeners for click events.
        googleMap.setOnPolylineClickListener(this);
        googleMap.setOnPolygonClickListener(this);
    }

    private static final int COLOR_BLACK_ARGB = 0xff000000;
    private static final int POLYLINE_STROKE_WIDTH_PX = 12;

    /**
     * Styles the polyline, based on type.
     * @param polyline The polyline object that needs styling.
     */
    private void stylePolyline(Polyline polyline) {
        String type = "";
        // Get the data object stored with the polyline.
        if (polyline.getTag() != null) {
            type = polyline.getTag().toString();
        }

        switch (type) {
            // If no type is given, allow the API to use the default.
            case "A":
                // Use a custom bitmap as the cap at the start of the line.
                polyline.setStartCap(
                        new CustomCap(
                                BitmapDescriptorFactory.fromResource(R.drawable.ic_arrow), 10));
                break;
            case "B":
                // Use a round cap at the start of the line.
                polyline.setStartCap(new RoundCap());
                break;
        }

        polyline.setEndCap(new RoundCap());
        polyline.setWidth(POLYLINE_STROKE_WIDTH_PX);
        polyline.setColor(COLOR_BLACK_ARGB);
        polyline.setJointType(JointType.ROUND);
    }

    private static final int PATTERN_GAP_LENGTH_PX = 20;
    private static final PatternItem DOT = new Dot();
    private static final PatternItem GAP = new Gap(PATTERN_GAP_LENGTH_PX);

    // Create a stroke pattern of a gap followed by a dot.
    private static final List<PatternItem> PATTERN_POLYLINE_DOTTED = Arrays.asList(GAP, DOT);

    /**
     * Listens for clicks on a polyline.
     * @param polyline The polyline object that the user has clicked.
     */
    @Override
    public void onPolylineClick(Polyline polyline) {
        // Flip from solid stroke to dotted stroke pattern.
        if ((polyline.getPattern() == null) || (!polyline.getPattern().contains(DOT))) {
            polyline.setPattern(PATTERN_POLYLINE_DOTTED);
        } else {
            // The default pattern is a solid stroke.
            polyline.setPattern(null);
        }

        Toast.makeText(this, "Route type " + polyline.getTag().toString(),
                Toast.LENGTH_SHORT).show();
    }

    /**
     * Listens for clicks on a polygon.
     * @param polygon The polygon object that the user has clicked.
     */
    @Override
    public void onPolygonClick(Polygon polygon) {
        // Flip the values of the red, green, and blue components of the polygon's color.
        int color = polygon.getStrokeColor() ^ 0x00ffffff;
        polygon.setStrokeColor(color);
        color = polygon.getFillColor() ^ 0x00ffffff;
        polygon.setFillColor(color);

        Toast.makeText(this, "Area type " + polygon.getTag().toString(), Toast.LENGTH_SHORT).show();
    }

    private static final int COLOR_WHITE_ARGB = 0xffffffff;
    private static final int COLOR_DARK_GREEN_ARGB = 0xff388E3C;
    private static final int COLOR_LIGHT_GREEN_ARGB = 0xff81C784;
    private static final int COLOR_DARK_ORANGE_ARGB = 0xffF57F17;
    private static final int COLOR_LIGHT_ORANGE_ARGB = 0xffF9A825;

    private static final int POLYGON_STROKE_WIDTH_PX = 8;
    private static final int PATTERN_DASH_LENGTH_PX = 20;
    private static final PatternItem DASH = new Dash(PATTERN_DASH_LENGTH_PX);

    // Create a stroke pattern of a gap followed by a dash.
    private static final List<PatternItem> PATTERN_POLYGON_ALPHA = Arrays.asList(GAP, DASH);

    // Create a stroke pattern of a dot followed by a gap, a dash, and another gap.
    private static final List<PatternItem> PATTERN_POLYGON_BETA =
        Arrays.asList(DOT, GAP, DASH, GAP);

    /**
     * Styles the polygon, based on type.
     * @param polygon The polygon object that needs styling.
     */
    private void stylePolygon(Polygon polygon) {
        String type = "";
        // Get the data object stored with the polygon.
        if (polygon.getTag() != null) {
            type = polygon.getTag().toString();
        }

        List<PatternItem> pattern = null;
        int strokeColor = COLOR_BLACK_ARGB;
        int fillColor = COLOR_WHITE_ARGB;

        switch (type) {
            // If no type is given, allow the API to use the default.
            case "alpha":
                // Apply a stroke pattern to render a dashed line, and define colors.
                pattern = PATTERN_POLYGON_ALPHA;
                strokeColor = COLOR_DARK_GREEN_ARGB;
                fillColor = COLOR_LIGHT_GREEN_ARGB;
                break;
            case "beta":
                // Apply a stroke pattern to render a line of dots and dashes, and define colors.
                pattern = PATTERN_POLYGON_BETA;
                strokeColor = COLOR_DARK_ORANGE_ARGB;
                fillColor = COLOR_LIGHT_ORANGE_ARGB;
                break;
        }

        polygon.setStrokePattern(pattern);
        polygon.setStrokeWidth(POLYGON_STROKE_WIDTH_PX);
        polygon.setStrokeColor(strokeColor);
        polygon.setFillColor(fillColor);
    }
}
활동의 Kotlin 버전을 확인하세요.
    // Copyright 2020 Google LLC
//
// Licensed under the Apache License, Version 2.0 (the "License");
// you may not use this file except in compliance with the License.
// You may obtain a copy of the License at
//
//      http://www.apache.org/licenses/LICENSE-2.0
//
// Unless required by applicable law or agreed to in writing, software
// distributed under the License is distributed on an "AS IS" BASIS,
// WITHOUT WARRANTIES OR CONDITIONS OF ANY KIND, either express or implied.
// See the License for the specific language governing permissions and
// limitations under the License.
package com.example.polygons

import android.os.Bundle
import android.widget.Toast
import androidx.appcompat.app.AppCompatActivity
import com.google.android.gms.maps.CameraUpdateFactory
import com.google.android.gms.maps.GoogleMap
import com.google.android.gms.maps.GoogleMap.OnPolygonClickListener
import com.google.android.gms.maps.GoogleMap.OnPolylineClickListener
import com.google.android.gms.maps.OnMapReadyCallback
import com.google.android.gms.maps.SupportMapFragment
import com.google.android.gms.maps.model.BitmapDescriptorFactory
import com.google.android.gms.maps.model.CustomCap
import com.google.android.gms.maps.model.Dash
import com.google.android.gms.maps.model.Dot
import com.google.android.gms.maps.model.Gap
import com.google.android.gms.maps.model.JointType
import com.google.android.gms.maps.model.LatLng
import com.google.android.gms.maps.model.PatternItem
import com.google.android.gms.maps.model.Polygon
import com.google.android.gms.maps.model.PolygonOptions
import com.google.android.gms.maps.model.Polyline
import com.google.android.gms.maps.model.PolylineOptions
import com.google.android.gms.maps.model.RoundCap

/**
 * An activity that displays a Google map with polylines to represent paths or routes,
 * and polygons to represent areas.
 */
class PolyActivity : AppCompatActivity(), OnMapReadyCallback, OnPolylineClickListener, OnPolygonClickListener {

    override fun onCreate(savedInstanceState: Bundle?) {
        super.onCreate(savedInstanceState)

        // Retrieve the content view that renders the map.
        setContentView(R.layout.activity_maps)

        // Get the SupportMapFragment and request notification when the map is ready to be used.
        val mapFragment = supportFragmentManager
            .findFragmentById(R.id.map) as SupportMapFragment?
        mapFragment?.getMapAsync(this)
    }

    /**
     * Manipulates the map when it's available.
     * The API invokes this callback when the map is ready to be used.
     * This is where we can add markers or lines, add listeners or move the camera.
     * In this tutorial, we add polylines and polygons to represent routes and areas on the map.
     */
    override fun onMapReady(googleMap: GoogleMap) {

        // Add polylines to the map.
        // Polylines are useful to show a route or some other connection between points.
        val polyline1 = googleMap.addPolyline(PolylineOptions()
            .clickable(true)
            .add(
                LatLng(-35.016, 143.321),
                LatLng(-34.747, 145.592),
                LatLng(-34.364, 147.891),
                LatLng(-33.501, 150.217),
                LatLng(-32.306, 149.248),
                LatLng(-32.491, 147.309)))
        // Store a data object with the polyline, used here to indicate an arbitrary type.
        polyline1.tag = "A"
        // Style the polyline.
        stylePolyline(polyline1)

        val polyline2 = googleMap.addPolyline(PolylineOptions()
            .clickable(true)
            .add(
                LatLng(-29.501, 119.700),
                LatLng(-27.456, 119.672),
                LatLng(-25.971, 124.187),
                LatLng(-28.081, 126.555),
                LatLng(-28.848, 124.229),
                LatLng(-28.215, 123.938)))
        polyline2.tag = "B"
        stylePolyline(polyline2)

        // Add polygons to indicate areas on the map.
        val polygon1 = googleMap.addPolygon(PolygonOptions()
            .clickable(true)
            .add(
                LatLng(-27.457, 153.040),
                LatLng(-33.852, 151.211),
                LatLng(-37.813, 144.962),
                LatLng(-34.928, 138.599)))
        // Store a data object with the polygon, used here to indicate an arbitrary type.
        polygon1.tag = "alpha"
        // Style the polygon.
        stylePolygon(polygon1)

        val polygon2 = googleMap.addPolygon(PolygonOptions()
            .clickable(true)
            .add(
                LatLng(-31.673, 128.892),
                LatLng(-31.952, 115.857),
                LatLng(-17.785, 122.258),
                LatLng(-12.4258, 130.7932)))
        polygon2.tag = "beta"
        stylePolygon(polygon2)

        // Position the map's camera near Alice Springs in the center of Australia,
        // and set the zoom factor so most of Australia shows on the screen.
        googleMap.moveCamera(CameraUpdateFactory.newLatLngZoom(LatLng(-23.684, 133.903), 4f))

        // Set listeners for click events.
        googleMap.setOnPolylineClickListener(this)
        googleMap.setOnPolygonClickListener(this)
    }

    private val COLOR_BLACK_ARGB = -0x1000000
    private val POLYLINE_STROKE_WIDTH_PX = 12

    /**
     * Styles the polyline, based on type.
     * @param polyline The polyline object that needs styling.
     */
    private fun stylePolyline(polyline: Polyline) {
        // Get the data object stored with the polyline.
        val type = polyline.tag?.toString() ?: ""
        when (type) {
            "A" -> {
                // Use a custom bitmap as the cap at the start of the line.
                polyline.startCap = CustomCap(
                    BitmapDescriptorFactory.fromResource(R.drawable.ic_arrow), 10f)
            }
            "B" -> {
               // Use a round cap at the start of the line.
                polyline.startCap = RoundCap()
            }
        }
        polyline.endCap = RoundCap()
        polyline.width = POLYLINE_STROKE_WIDTH_PX.toFloat()
        polyline.color = COLOR_BLACK_ARGB
        polyline.jointType = JointType.ROUND
    }

    private val PATTERN_GAP_LENGTH_PX = 20
    private val DOT: PatternItem = Dot()
    private val GAP: PatternItem = Gap(PATTERN_GAP_LENGTH_PX.toFloat())

    // Create a stroke pattern of a gap followed by a dot.
    private val PATTERN_POLYLINE_DOTTED = listOf(GAP, DOT)

    /**
     * Listens for clicks on a polyline.
     * @param polyline The polyline object that the user has clicked.
     */
    override fun onPolylineClick(polyline: Polyline) {
        // Flip from solid stroke to dotted stroke pattern.
        if (polyline.pattern == null || !polyline.pattern!!.contains(DOT)) {
            polyline.pattern = PATTERN_POLYLINE_DOTTED
        } else {
            // The default pattern is a solid stroke.
            polyline.pattern = null
        }
        Toast.makeText(this, "Route type " + polyline.tag.toString(),
            Toast.LENGTH_SHORT).show()
    }

    /**
     * Listens for clicks on a polygon.
     * @param polygon The polygon object that the user has clicked.
     */
    override fun onPolygonClick(polygon: Polygon) {
        // Flip the values of the red, green, and blue components of the polygon's color.
        var color = polygon.strokeColor xor 0x00ffffff
        polygon.strokeColor = color
        color = polygon.fillColor xor 0x00ffffff
        polygon.fillColor = color
        Toast.makeText(this, "Area type ${polygon.tag?.toString()}", Toast.LENGTH_SHORT).show()
    }

    private val COLOR_WHITE_ARGB = -0x1
    private val COLOR_DARK_GREEN_ARGB = -0xc771c4
    private val COLOR_LIGHT_GREEN_ARGB = -0x7e387c
    private val COLOR_DARK_ORANGE_ARGB = -0xa80e9
    private val COLOR_LIGHT_ORANGE_ARGB = -0x657db
    private val POLYGON_STROKE_WIDTH_PX = 8
    private val PATTERN_DASH_LENGTH_PX = 20

    private val DASH: PatternItem = Dash(PATTERN_DASH_LENGTH_PX.toFloat())

    // Create a stroke pattern of a gap followed by a dash.
    private val PATTERN_POLYGON_ALPHA = listOf(GAP, DASH)

    // Create a stroke pattern of a dot followed by a gap, a dash, and another gap.
    private val PATTERN_POLYGON_BETA = listOf(DOT, GAP, DASH, GAP)

    /**
     * Styles the polygon, based on type.
     * @param polygon The polygon object that needs styling.
     */
    private fun stylePolygon(polygon: Polygon) {
        // Get the data object stored with the polygon.
        val type = polygon.tag?.toString() ?: ""
        var pattern: List<PatternItem>? = null
        var strokeColor = COLOR_BLACK_ARGB
        var fillColor = COLOR_WHITE_ARGB
        when (type) {
            "alpha" -> {
                // Apply a stroke pattern to render a dashed line, and define colors.
                pattern = PATTERN_POLYGON_ALPHA
                strokeColor = COLOR_DARK_GREEN_ARGB
                fillColor = COLOR_LIGHT_GREEN_ARGB
            }
            "beta" -> {
                // Apply a stroke pattern to render a line of dots and dashes, and define colors.
                pattern = PATTERN_POLYGON_BETA
                strokeColor = COLOR_DARK_ORANGE_ARGB
                fillColor = COLOR_LIGHT_ORANGE_ARGB
            }
        }
        polygon.strokePattern = pattern
        polygon.strokeWidth = POLYGON_STROKE_WIDTH_PX.toFloat()
        polygon.strokeColor = strokeColor
        polygon.fillColor = fillColor
    }
}
개발 프로젝트 설정
다음 단계에 따라 Android 스튜디오에서 튜토리얼 프로젝트를 만듭니다.
- Android 스튜디오를 다운로드하여 설치합니다.
- Android 스튜디오에 Google Play 서비스 패키지를 추가합니다.
- 이 튜토리얼을 읽기 전에 Google Maps Android API v2 샘플 저장소를 클론하거나 다운로드하지 않았다면 지금 진행합니다.
튜토리얼 프로젝트를 가져옵니다.
- Android 스튜디오에서 File > New > Import Project를 선택합니다.
- Google Maps Android API v2 샘플 저장소를 다운로드한 후 저장한 위치로 이동합니다.
- 다음 위치에서 Polygons 프로젝트를 찾습니다.
PATH-TO-SAVED-REPO/android-samples/tutorials/java/Polygons(Java) 또는
PATH-TO-SAVED-REPO/android-samples/tutorials/kotlin/Polygons(Kotlin) - 프로젝트 디렉터리를 선택한 다음 Open을 클릭합니다. 이제 Android 스튜디오에서 Gradle 빌드 도구를 사용하여 프로젝트를 빌드합니다.
필요한 API 사용 설정 및 API 키 가져오기
이 튜토리얼을 완료하려면 필요한 API가 사용 설정되고 Android용 Maps SDK를 사용할 수 있도록 승인된 API 키가 포함된 Google Cloud 프로젝트가 필요합니다. 자세한 내용은 다음을 참고하세요.
앱에 API 키 추가
- 프로젝트의
local.properties파일을 엽니다. 다음 문자열을 추가한 다음
YOUR_API_KEY를 API 키 값으로 대체합니다.MAPS_API_KEY=YOUR_API_KEY앱을 빌드할 때 아래 설명된 대로 Android용 Secrets Gradle 플러그인에서 API 키를 복사하여 이를 Android 매니페스트에서 빌드 변수로 제공합니다.
앱 빌드 및 실행
앱을 빌드 및 실행하려면 다음 안내를 따르세요.
컴퓨터에 Android 기기를 연결합니다. 안내에 따라 Android 기기에서 개발자 옵션을 사용 설정하고 기기를 감지하도록 시스템을 구성합니다.
또는 Android Virtual Device(AVD) Manager를 사용하여 가상 기기를 구성할 수 있습니다. 에뮬레이터를 선택할 때 Google API가 포함된 이미지를 선택해야 합니다. 자세한 내용은 Android 스튜디오 프로젝트 설정을 참고하세요.
Android 스튜디오에서 Run 메뉴 옵션(또는 재생 버튼 아이콘)을 클릭합니다. 표시되는 메시지에 따라 기기를 선택합니다.
Android 스튜디오에서 Gradle을 호출하여 앱을 빌드한 다음 기기 또는 에뮬레이터에서 앱을 실행합니다.
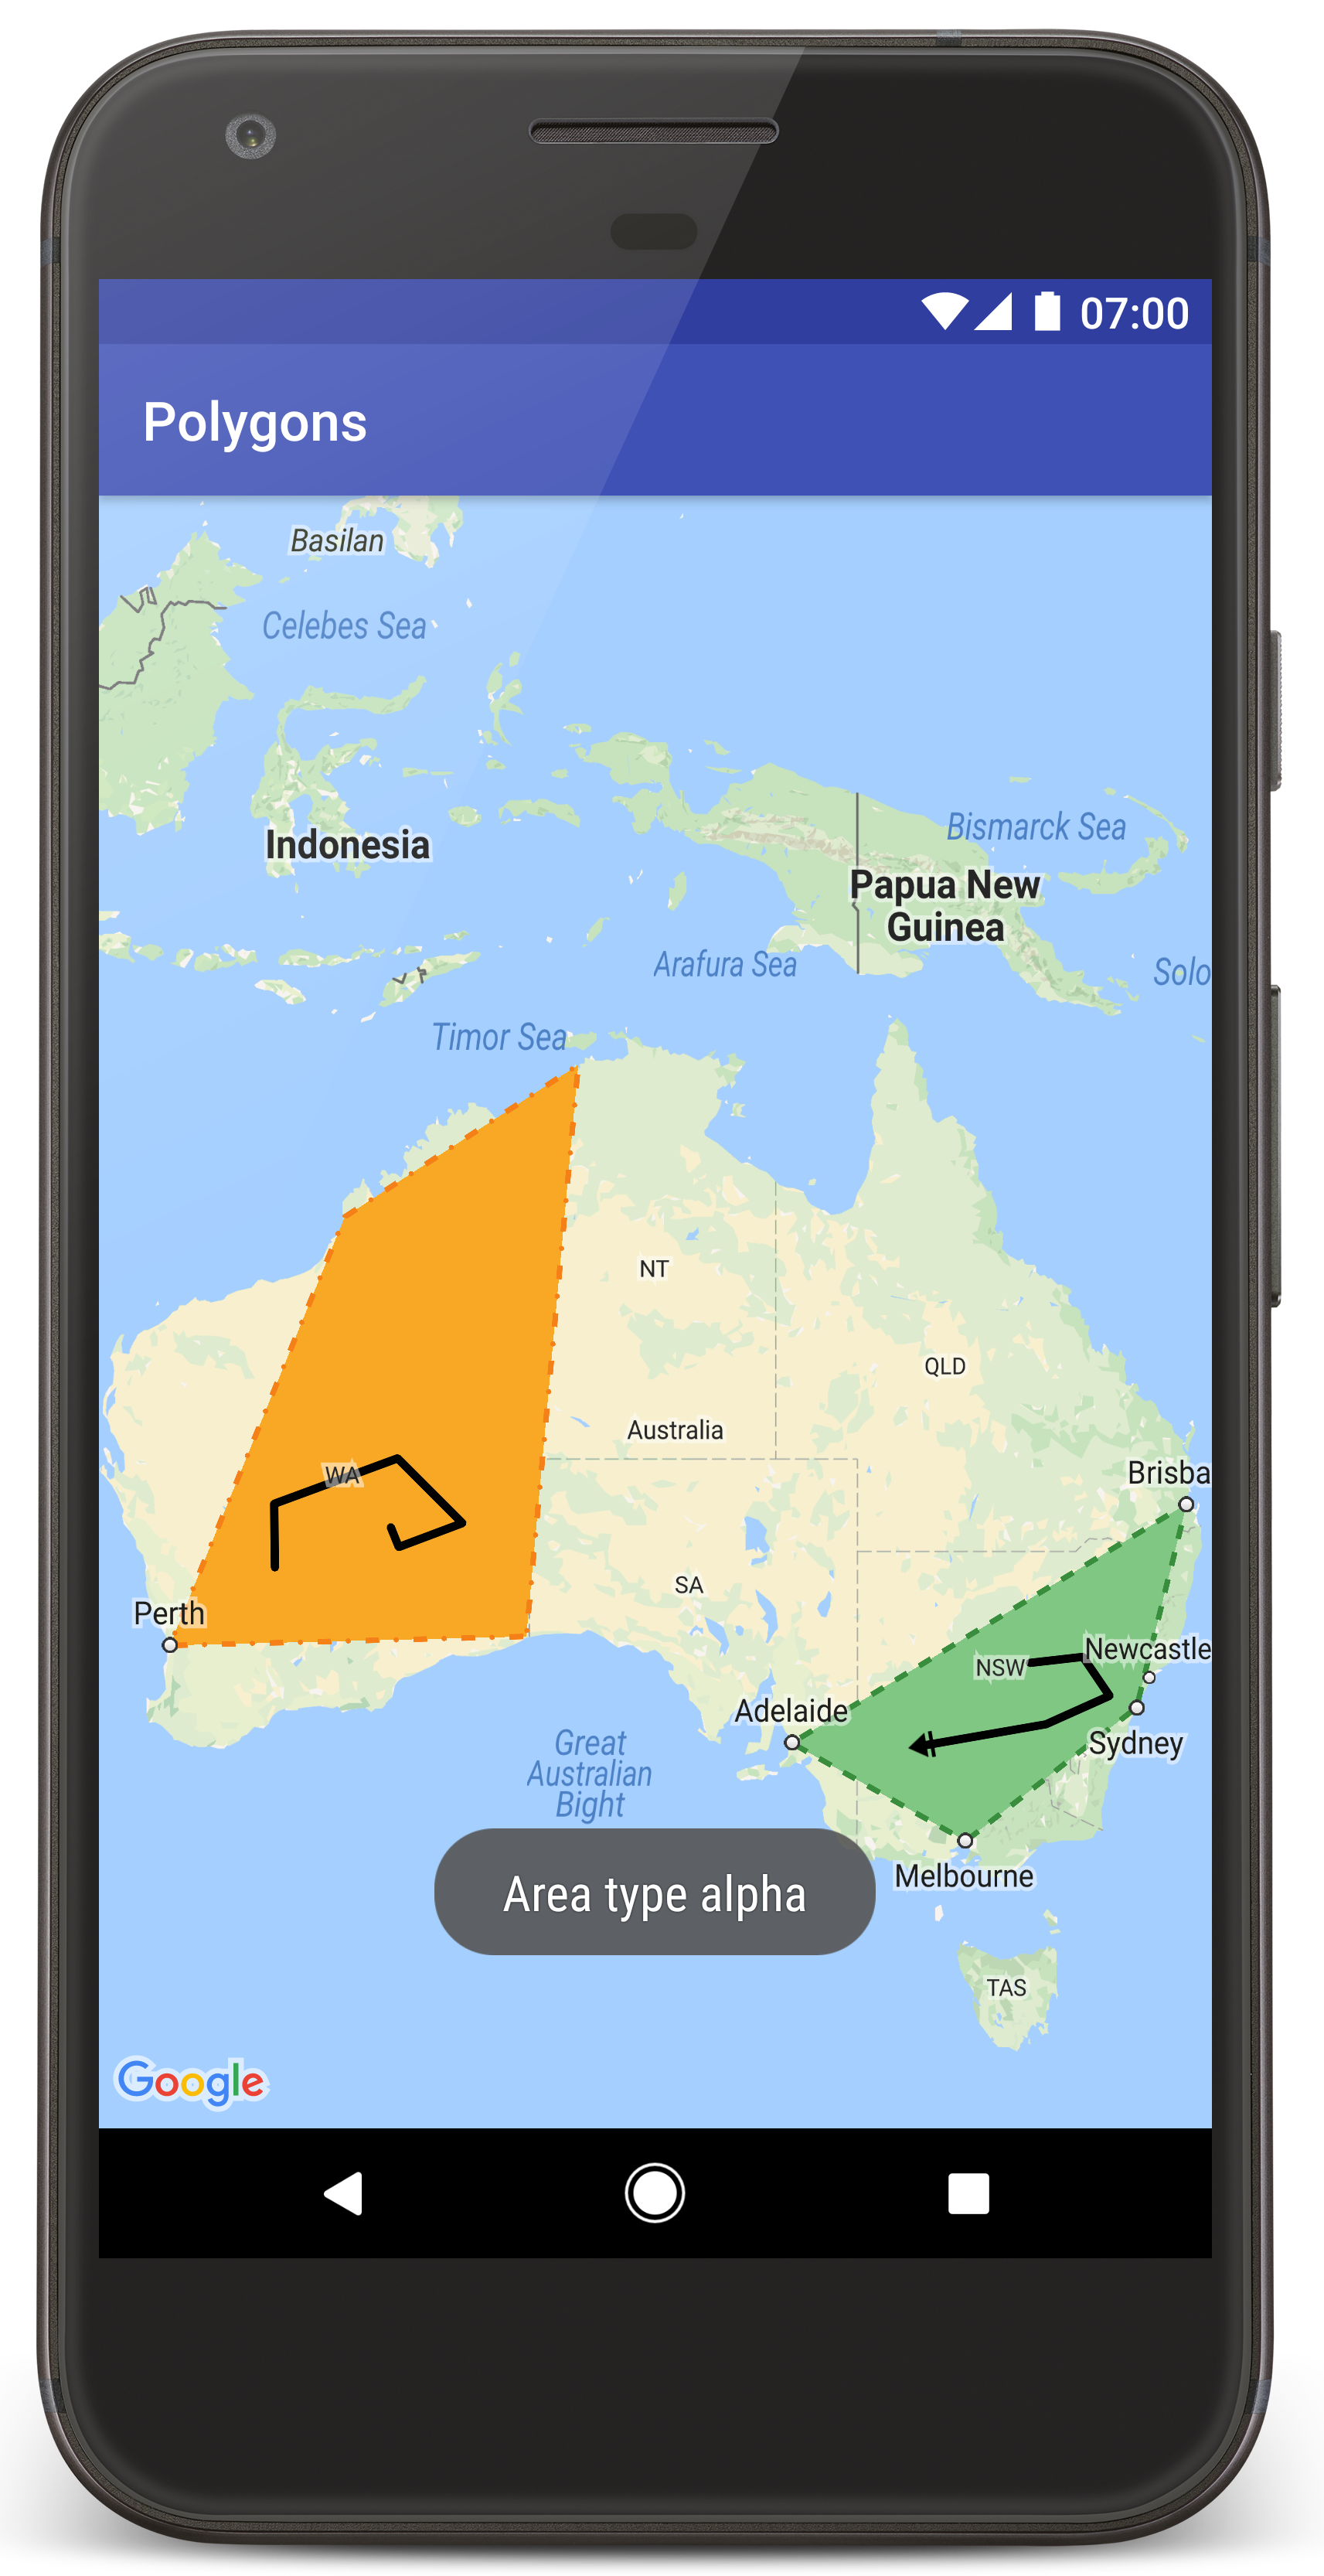
이 페이지의 이미지와 비슷하게, 오스트레일리아 위에 다각형 두 개가 오버레이된 지도가 표시됩니다.
문제 해결:
- 지도가 표시되지 않으면 위에서 설명한 대로 API 키를 가져와 앱에 추가했는지 확인하세요. Android 스튜디오의 Android Monitor에 있는 로그에 API 키 관련 오류 메시지가 있는지 확인합니다.
- Android 스튜디오 디버깅 도구를 사용하여 로그를 확인하고 앱을 디버깅하세요.
코드 이해하기
여기에서는 유사한 앱을 빌드하는 방법을 이해할 수 있도록 Polygons 앱의 가장 중요한 부분을 설명합니다.
Android 매니페스트 확인
앱의 AndroidManifest.xml 파일에서 다음 요소를 확인합니다.
meta-data요소를 추가하여 앱이 컴파일된 Google Play 서비스의 버전을 삽입합니다.<meta-data android:name="com.google.android.gms.version" android:value="@integer/google_play_services_version" />API 키를 지정하는
meta-data요소를 추가합니다. 이 튜토리얼에 포함된 샘플에서는 API 키의 값을 앞부분에서 정의한 키의 이름(MAPS_API_KEY)과 일치하는 빌드 변수에 매핑합니다. 앱을 빌드할 때 Android용 Secrets Gradle 플러그인에서local.properties파일의 키를 매니페스트 빌드 변수로 제공합니다.<meta-data android:name="com.google.android.geo.API_KEY" android:value="${MAPS_API_KEY}" />build.gradle파일에서 다음 행이 API 키를 Android 매니페스트에 전달합니다.id 'com.google.android.libraries.mapsplatform.secrets-gradle-plugin'
다음은 매니페스트의 전체 예입니다.
<?xml version="1.0" encoding="utf-8"?>
<!--
Copyright 2020 Google LLC
Licensed under the Apache License, Version 2.0 (the "License");
you may not use this file except in compliance with the License.
You may obtain a copy of the License at
http://www.apache.org/licenses/LICENSE-2.0
Unless required by applicable law or agreed to in writing, software
distributed under the License is distributed on an "AS IS" BASIS,
WITHOUT WARRANTIES OR CONDITIONS OF ANY KIND, either express or implied.
See the License for the specific language governing permissions and
limitations under the License.
-->
<manifest xmlns:android="http://schemas.android.com/apk/res/android">
<application
android:allowBackup="true"
android:icon="@mipmap/ic_launcher"
android:label="@string/app_name"
android:supportsRtl="true"
android:theme="@style/AppTheme">
<meta-data
    android:name="com.google.android.gms.version"
    android:value="@integer/google_play_services_version" />
<!--
The API key for Google Maps-based APIs.
-->
<meta-data
  android:name="com.google.android.geo.API_KEY"
  android:value="${MAPS_API_KEY}" />
<activity
android:name="com.example.polygons.PolyActivity"
android:exported="true"
android:label="@string/title_activity_maps">
<intent-filter>
<action android:name="android.intent.action.MAIN" />
<category android:name="android.intent.category.LAUNCHER" />
</intent-filter>
</activity>
</application>
</manifest>
지도 추가
Android용 Maps SDK를 사용하여 지도를 표시합니다.
활동의 레이아웃 파일인
activity_maps.xml에<fragment>요소를 추가합니다. 이 요소는 지도의 컨테이너 역할을 하고GoogleMap객체에 대한 액세스 권한을 제공하도록SupportMapFragment를 정의합니다. 이 튜토리얼에서는 이전 버전 Android 프레임워크와의 호환성을 위해 지도 프래그먼트의 Android 지원 라이브러리 버전을 사용합니다.<!-- Copyright 2020 Google LLC Licensed under the Apache License, Version 2.0 (the "License"); you may not use this file except in compliance with the License. You may obtain a copy of the License at http://www.apache.org/licenses/LICENSE-2.0 Unless required by applicable law or agreed to in writing, software distributed under the License is distributed on an "AS IS" BASIS, WITHOUT WARRANTIES OR CONDITIONS OF ANY KIND, either express or implied. See the License for the specific language governing permissions and limitations under the License. --> <fragment xmlns:android="http://schemas.android.com/apk/res/android" xmlns:tools="http://schemas.android.com/tools" android:id="@+id/map" android:name="com.google.android.gms.maps.SupportMapFragment" android:layout_width="match_parent" android:layout_height="match_parent" tools:context="com.example.polygons.PolyActivity" />활동의
onCreate()메서드에서 레이아웃 파일을 콘텐츠 뷰로 설정합니다.FragmentManager.findFragmentById()를 호출하여 지도 프래그먼트에 대한 핸들을 가져옵니다. 그런 다음getMapAsync()를 사용하여 지도 콜백에 등록합니다.Java
@Override protected void onCreate(Bundle savedInstanceState) { super.onCreate(savedInstanceState); // Retrieve the content view that renders the map. setContentView(R.layout.activity_maps); // Get the SupportMapFragment and request notification when the map is ready to be used. SupportMapFragment mapFragment = (SupportMapFragment) getSupportFragmentManager() .findFragmentById(R.id.map); mapFragment.getMapAsync(this); }Kotlin
override fun onCreate(savedInstanceState: Bundle?) { super.onCreate(savedInstanceState) // Retrieve the content view that renders the map. setContentView(R.layout.activity_maps) // Get the SupportMapFragment and request notification when the map is ready to be used. val mapFragment = supportFragmentManager .findFragmentById(R.id.map) as SupportMapFragment? mapFragment?.getMapAsync(this) }OnMapReadyCallback인터페이스를 구현하고onMapReady()메서드를 재정의합니다.GoogleMap객체를 사용할 수 있을 때 API가 이 콜백을 호출하므로 지도에 객체를 추가하고 앱에 맞게 맞춤설정할 수 있습니다.Java
public class PolyActivity extends AppCompatActivity implements OnMapReadyCallback, GoogleMap.OnPolylineClickListener, GoogleMap.OnPolygonClickListener { @Override protected void onCreate(Bundle savedInstanceState) { super.onCreate(savedInstanceState); // Retrieve the content view that renders the map. setContentView(R.layout.activity_maps); // Get the SupportMapFragment and request notification when the map is ready to be used. SupportMapFragment mapFragment = (SupportMapFragment) getSupportFragmentManager() .findFragmentById(R.id.map); mapFragment.getMapAsync(this); } /** * Manipulates the map when it's available. * The API invokes this callback when the map is ready to be used. * This is where we can add markers or lines, add listeners or move the camera. * In this tutorial, we add polylines and polygons to represent routes and areas on the map. */ @Override public void onMapReady(GoogleMap googleMap) { // Add polylines to the map. // Polylines are useful to show a route or some other connection between points. Polyline polyline1 = googleMap.addPolyline(new PolylineOptions() .clickable(true) .add( new LatLng(-35.016, 143.321), new LatLng(-34.747, 145.592), new LatLng(-34.364, 147.891), new LatLng(-33.501, 150.217), new LatLng(-32.306, 149.248), new LatLng(-32.491, 147.309))); // Position the map's camera near Alice Springs in the center of Australia, // and set the zoom factor so most of Australia shows on the screen. googleMap.moveCamera(CameraUpdateFactory.newLatLngZoom(new LatLng(-23.684, 133.903), 4)); // Set listeners for click events. googleMap.setOnPolylineClickListener(this); googleMap.setOnPolygonClickListener(this); }Kotlin
class PolyActivity : AppCompatActivity(), OnMapReadyCallback, OnPolylineClickListener, OnPolygonClickListener { override fun onCreate(savedInstanceState: Bundle?) { super.onCreate(savedInstanceState) // Retrieve the content view that renders the map. setContentView(R.layout.activity_maps) // Get the SupportMapFragment and request notification when the map is ready to be used. val mapFragment = supportFragmentManager .findFragmentById(R.id.map) as SupportMapFragment? mapFragment?.getMapAsync(this) } /** * Manipulates the map when it's available. * The API invokes this callback when the map is ready to be used. * This is where we can add markers or lines, add listeners or move the camera. * In this tutorial, we add polylines and polygons to represent routes and areas on the map. */ override fun onMapReady(googleMap: GoogleMap) { // Add polylines to the map. // Polylines are useful to show a route or some other connection between points. val polyline1 = googleMap.addPolyline(PolylineOptions() .clickable(true) .add( LatLng(-35.016, 143.321), LatLng(-34.747, 145.592), LatLng(-34.364, 147.891), LatLng(-33.501, 150.217), LatLng(-32.306, 149.248), LatLng(-32.491, 147.309))) // Position the map's camera near Alice Springs in the center of Australia, // and set the zoom factor so most of Australia shows on the screen. googleMap.moveCamera(CameraUpdateFactory.newLatLngZoom(LatLng(-23.684, 133.903), 4f)) // Set listeners for click events. googleMap.setOnPolylineClickListener(this) googleMap.setOnPolygonClickListener(this) }
다중선을 추가하여 지도에 선 그리기
Polyline은 여러 선분이 연결된 형태이며, 지도에서
경로 또는 기타 위치 간 연결을 나타내는 데
유용합니다.
PolylineOptions객체를 만들고 여기에 점을 추가합니다. 각 점은 위도 및 경도 값이 포함된LatLng객체를 사용하여 정의하는 지도상의 한 위치를 나타냅니다. 아래의 코드 샘플에서는 점 6개로 다중선을 만듭니다.GoogleMap.addPolyline()을 호출하여 지도에 다중선을 추가합니다.Java
Polyline polyline1 = googleMap.addPolyline(new PolylineOptions() .clickable(true) .add( new LatLng(-35.016, 143.321), new LatLng(-34.747, 145.592), new LatLng(-34.364, 147.891), new LatLng(-33.501, 150.217), new LatLng(-32.306, 149.248), new LatLng(-32.491, 147.309)));Kotlin
val polyline1 = googleMap.addPolyline(PolylineOptions() .clickable(true) .add( LatLng(-35.016, 143.321), LatLng(-34.747, 145.592), LatLng(-34.364, 147.891), LatLng(-33.501, 150.217), LatLng(-32.306, 149.248), LatLng(-32.491, 147.309)))
다중선의 클릭 이벤트를 처리하려면 다중선의 clickable 옵션을
true로 설정합니다. 이 튜토리얼의 뒷부분에 이벤트 처리에 대해 자세히 설명되어
있습니다.
다중선과 함께 임의의 데이터 저장
다중선 및 기타 도형 객체와 함께 임의의 데이터 객체를 저장할 수 있습니다.
Polyline.setTag()를 호출하여 다중선과 함께 데이터 객체를 저장합니다. 아래 코드에서는 다중선의 유형을 나타내는 임의의 태그(A)를 정의합니다.Java
Polyline polyline1 = googleMap.addPolyline(new PolylineOptions()
    .clickable(true)
    .add(
            new LatLng(-35.016, 143.321),
            new LatLng(-34.747, 145.592),
            new LatLng(-34.364, 147.891),
            new LatLng(-33.501, 150.217),
            new LatLng(-32.306, 149.248),
            new LatLng(-32.491, 147.309)));
// Store a data object with the polyline, used here to indicate an arbitrary type.
polyline1.setTag("A");
Kotlin
val polyline1 = googleMap.addPolyline(PolylineOptions()
.clickable(true)
.add(
    LatLng(-35.016, 143.321),
    LatLng(-34.747, 145.592),
    LatLng(-34.364, 147.891),
    LatLng(-33.501, 150.217),
    LatLng(-32.306, 149.248),
    LatLng(-32.491, 147.309)))
// Store a data object with the polyline, used here to indicate an arbitrary type.
polyline1.tag = "A
다음 섹션에 설명된 대로
Polyline.getTag()를 사용하여 데이터를 가져옵니다.
다중선에 맞춤 스타일 지정 추가
PolylineOptions 객체에서 다양한 스타일 속성을
지정할 수 있습니다. 스타일 지정 옵션에는 획 색상,
획 두께, 획 패턴, 연결부 유형, 시작 및 끝 모양이 있습니다. 특정
속성을 지정하지 않으면 API에서 해당 속성에 기본값을
사용합니다.
다음 코드에서는 선 끝에 둥근 모양을 적용하고, 선의 시작 부분에는 다중선의 유형에 따라 다른 모양을 적용합니다. 여기에서 유형은 다중선의 데이터 객체에 저장된 임의의 속성입니다. 샘플에서는 획 두께, 획 색상, 연결부 유형도 지정합니다.
Java
private static final int COLOR_BLACK_ARGB = 0xff000000;
private static final int POLYLINE_STROKE_WIDTH_PX = 12;
/**
* Styles the polyline, based on type.
* @param polyline The polyline object that needs styling.
*/
private void stylePolyline(Polyline polyline) {
String type = "";
// Get the data object stored with the polyline.
if (polyline.getTag() != null) {
type = polyline.getTag().toString();
}
switch (type) {
// If no type is given, allow the API to use the default.
case "A":
// Use a custom bitmap as the cap at the start of the line.
polyline.setStartCap(
new CustomCap(
BitmapDescriptorFactory.fromResource(R.drawable.ic_arrow), 10));
break;
case "B":
// Use a round cap at the start of the line.
polyline.setStartCap(new RoundCap());
break;
}
polyline.setEndCap(new RoundCap());
polyline.setWidth(POLYLINE_STROKE_WIDTH_PX);
polyline.setColor(COLOR_BLACK_ARGB);
polyline.setJointType(JointType.ROUND);
}
Kotlin
private val COLOR_BLACK_ARGB = -0x1000000
private val POLYLINE_STROKE_WIDTH_PX = 12
/**
* Styles the polyline, based on type.
* @param polyline The polyline object that needs styling.
*/
private fun stylePolyline(polyline: Polyline) {
// Get the data object stored with the polyline.
val type = polyline.tag?.toString() ?: ""
when (type) {
"A" -> {
// Use a custom bitmap as the cap at the start of the line.
polyline.startCap = CustomCap(
BitmapDescriptorFactory.fromResource(R.drawable.ic_arrow), 10f)
}
"B" -> {
// Use a round cap at the start of the line.
polyline.startCap = RoundCap()
}
}
polyline.endCap = RoundCap()
polyline.width = POLYLINE_STROKE_WIDTH_PX.toFloat()
polyline.color = COLOR_BLACK_ARGB
polyline.jointType = JointType.ROUND
}
위의 코드에서는 A 유형 다중선의 시작 모양에 적용할 맞춤 비트맵과 10픽셀의 참조 획 두께를 지정합니다. API에서는 참조 획 두께에 따라 비트맵의 크기를 조절합니다. 참조 획 두께를 지정하는 경우 이미지의 원래 크기에서 비트맵 이미지를 디자인할 때 사용한 너비를 입력하세요. 참고: 이미지 편집기에서 비트맵 이미지를 100% 확대/축소 수준에서 열고, 이미지를 기준으로 원하는 두께의 선을 그립니다.
선 시작/끝 모양 및 기타 도형 맞춤설정 옵션에 대해 자세히 알아보세요.
다중선의 클릭 이벤트 처리
Polyline.setClickable()을 호출하여 다중선을 클릭 가능하도록 설정합니다. (기본적으로 다중선은 클릭할 수 없으며 사용자가 다중선을 탭할 때 앱에서 알림을 수신하지 않습니다.)OnPolylineClickListener인터페이스를 구현하고GoogleMap.setOnPolylineClickListener()를 호출하여 지도에 리스너를 설정합니다.Java
public class PolyActivity extends AppCompatActivity implements OnMapReadyCallback, GoogleMap.OnPolylineClickListener, GoogleMap.OnPolygonClickListener { @Override protected void onCreate(Bundle savedInstanceState) { super.onCreate(savedInstanceState); // Retrieve the content view that renders the map. setContentView(R.layout.activity_maps); // Get the SupportMapFragment and request notification when the map is ready to be used. SupportMapFragment mapFragment = (SupportMapFragment) getSupportFragmentManager() .findFragmentById(R.id.map); mapFragment.getMapAsync(this); } /** * Manipulates the map when it's available. * The API invokes this callback when the map is ready to be used. * This is where we can add markers or lines, add listeners or move the camera. * In this tutorial, we add polylines and polygons to represent routes and areas on the map. */ @Override public void onMapReady(GoogleMap googleMap) { // Add polylines to the map. // Polylines are useful to show a route or some other connection between points. Polyline polyline1 = googleMap.addPolyline(new PolylineOptions() .clickable(true) .add( new LatLng(-35.016, 143.321), new LatLng(-34.747, 145.592), new LatLng(-34.364, 147.891), new LatLng(-33.501, 150.217), new LatLng(-32.306, 149.248), new LatLng(-32.491, 147.309))); // Position the map's camera near Alice Springs in the center of Australia, // and set the zoom factor so most of Australia shows on the screen. googleMap.moveCamera(CameraUpdateFactory.newLatLngZoom(new LatLng(-23.684, 133.903), 4)); // Set listeners for click events. googleMap.setOnPolylineClickListener(this); googleMap.setOnPolygonClickListener(this); }Kotlin
class PolyActivity : AppCompatActivity(), OnMapReadyCallback, OnPolylineClickListener, OnPolygonClickListener { override fun onCreate(savedInstanceState: Bundle?) { super.onCreate(savedInstanceState) // Retrieve the content view that renders the map. setContentView(R.layout.activity_maps) // Get the SupportMapFragment and request notification when the map is ready to be used. val mapFragment = supportFragmentManager .findFragmentById(R.id.map) as SupportMapFragment? mapFragment?.getMapAsync(this) } /** * Manipulates the map when it's available. * The API invokes this callback when the map is ready to be used. * This is where we can add markers or lines, add listeners or move the camera. * In this tutorial, we add polylines and polygons to represent routes and areas on the map. */ override fun onMapReady(googleMap: GoogleMap) { // Add polylines to the map. // Polylines are useful to show a route or some other connection between points. val polyline1 = googleMap.addPolyline(PolylineOptions() .clickable(true) .add( LatLng(-35.016, 143.321), LatLng(-34.747, 145.592), LatLng(-34.364, 147.891), LatLng(-33.501, 150.217), LatLng(-32.306, 149.248), LatLng(-32.491, 147.309))) // Position the map's camera near Alice Springs in the center of Australia, // and set the zoom factor so most of Australia shows on the screen. googleMap.moveCamera(CameraUpdateFactory.newLatLngZoom(LatLng(-23.684, 133.903), 4f)) // Set listeners for click events. googleMap.setOnPolylineClickListener(this) googleMap.setOnPolygonClickListener(this) }onPolylineClick()콜백 메서드를 재정의합니다. 다음 예에서는 사용자가 다중선을 클릭할 때마다 실선과 점선 간의 선 패턴을 바꿉니다.Java
private static final int PATTERN_GAP_LENGTH_PX = 20; private static final PatternItem DOT = new Dot(); private static final PatternItem GAP = new Gap(PATTERN_GAP_LENGTH_PX); // Create a stroke pattern of a gap followed by a dot. private static final List<PatternItem> PATTERN_POLYLINE_DOTTED = Arrays.asList(GAP, DOT); /** * Listens for clicks on a polyline. * @param polyline The polyline object that the user has clicked. */ @Override public void onPolylineClick(Polyline polyline) { // Flip from solid stroke to dotted stroke pattern. if ((polyline.getPattern() == null) || (!polyline.getPattern().contains(DOT))) { polyline.setPattern(PATTERN_POLYLINE_DOTTED); } else { // The default pattern is a solid stroke. polyline.setPattern(null); } Toast.makeText(this, "Route type " + polyline.getTag().toString(), Toast.LENGTH_SHORT).show(); }Kotlin
private val PATTERN_GAP_LENGTH_PX = 20 private val DOT: PatternItem = Dot() private val GAP: PatternItem = Gap(PATTERN_GAP_LENGTH_PX.toFloat()) // Create a stroke pattern of a gap followed by a dot. private val PATTERN_POLYLINE_DOTTED = listOf(GAP, DOT) /** * Listens for clicks on a polyline. * @param polyline The polyline object that the user has clicked. */ override fun onPolylineClick(polyline: Polyline) { // Flip from solid stroke to dotted stroke pattern. if (polyline.pattern == null || !polyline.pattern!!.contains(DOT)) { polyline.pattern = PATTERN_POLYLINE_DOTTED } else { // The default pattern is a solid stroke. polyline.pattern = null } Toast.makeText(this, "Route type " + polyline.tag.toString(), Toast.LENGTH_SHORT).show() }
지도에 영역을 나타내는 다각형 추가
Polygon은 Polyline과 마찬가지로 순서가 지정된
일련의 좌표로 구성된 도형입니다. 다각형은 양 끝이 연결된 닫힌 영역이고, 다중선은 양 끝이 연결되지 않은 선 형태라는 점이 다릅니다.
PolygonOptions객체를 만들고 여기에 점을 추가합니다. 각 점은 위도 및 경도 값이 포함된LatLng객체를 사용하여 정의하는 지도상의 한 위치를 나타냅니다. 아래의 코드 샘플에서는 점 4개로 다각형을 만듭니다.Polygon.setClickable()을 호출하여 다각형을 클릭 가능하도록 설정합니다. (기본적으로 다각형은 클릭할 수 없으며 사용자가 다각형을 탭할 때 앱에서 알림을 수신하지 않습니다.) 다각형 클릭 이벤트는 이 튜토리얼의 앞부분에서 설명한 다중선의 이벤트와 유사하게 처리됩니다.GoogleMap.addPolygon()을 호출하여 지도에 다각형을 추가합니다.Polygon.setTag()를 호출하여 다각형과 함께 데이터 객체를 저장합니다. 아래 코드에서는 다각형에 임의의 유형(alpha)을 정의합니다.Java
// Add polygons to indicate areas on the map. Polygon polygon1 = googleMap.addPolygon(new PolygonOptions() .clickable(true) .add( new LatLng(-27.457, 153.040), new LatLng(-33.852, 151.211), new LatLng(-37.813, 144.962), new LatLng(-34.928, 138.599))); // Store a data object with the polygon, used here to indicate an arbitrary type. polygon1.setTag("alpha");Kotlin
// Add polygons to indicate areas on the map. val polygon1 = googleMap.addPolygon(PolygonOptions() .clickable(true) .add( LatLng(-27.457, 153.040), LatLng(-33.852, 151.211), LatLng(-37.813, 144.962), LatLng(-34.928, 138.599))) // Store a data object with the polygon, used here to indicate an arbitrary type. polygon1.tag = "alpha" // Style the polygon.
다각형에 맞춤 스타일 지정 추가
PolygonOptions 객체에서 다양한 스타일 속성을
지정할 수 있습니다. 스타일 지정 옵션에는 획 색상,
획 굵기, 획 패턴, 획 연결부 유형, 채우기 색상이 있습니다. 특정
속성을 지정하지 않으면 API에서 해당 속성에 기본값을
사용합니다.
다음 코드에서는 다각형의 유형에 따라 특정 색상과 획 패턴을 적용합니다. 여기에서 유형은 다각형의 데이터 객체에 저장된 임의의 속성입니다.
Java
private static final int COLOR_WHITE_ARGB = 0xffffffff;
private static final int COLOR_DARK_GREEN_ARGB = 0xff388E3C;
private static final int COLOR_LIGHT_GREEN_ARGB = 0xff81C784;
private static final int COLOR_DARK_ORANGE_ARGB = 0xffF57F17;
private static final int COLOR_LIGHT_ORANGE_ARGB = 0xffF9A825;
private static final int POLYGON_STROKE_WIDTH_PX = 8;
private static final int PATTERN_DASH_LENGTH_PX = 20;
private static final PatternItem DASH = new Dash(PATTERN_DASH_LENGTH_PX);
// Create a stroke pattern of a gap followed by a dash.
private static final List<PatternItem> PATTERN_POLYGON_ALPHA = Arrays.asList(GAP, DASH);
// Create a stroke pattern of a dot followed by a gap, a dash, and another gap.
private static final List<PatternItem> PATTERN_POLYGON_BETA =
Arrays.asList(DOT, GAP, DASH, GAP);
/**
* Styles the polygon, based on type.
* @param polygon The polygon object that needs styling.
*/
private void stylePolygon(Polygon polygon) {
String type = "";
// Get the data object stored with the polygon.
if (polygon.getTag() != null) {
type = polygon.getTag().toString();
}
List<PatternItem> pattern = null;
int strokeColor = COLOR_BLACK_ARGB;
int fillColor = COLOR_WHITE_ARGB;
switch (type) {
// If no type is given, allow the API to use the default.
case "alpha":
// Apply a stroke pattern to render a dashed line, and define colors.
pattern = PATTERN_POLYGON_ALPHA;
strokeColor = COLOR_DARK_GREEN_ARGB;
fillColor = COLOR_LIGHT_GREEN_ARGB;
break;
case "beta":
// Apply a stroke pattern to render a line of dots and dashes, and define colors.
pattern = PATTERN_POLYGON_BETA;
strokeColor = COLOR_DARK_ORANGE_ARGB;
fillColor = COLOR_LIGHT_ORANGE_ARGB;
break;
}
polygon.setStrokePattern(pattern);
polygon.setStrokeWidth(POLYGON_STROKE_WIDTH_PX);
polygon.setStrokeColor(strokeColor);
polygon.setFillColor(fillColor);
}
Kotlin
private val COLOR_WHITE_ARGB = -0x1
private val COLOR_DARK_GREEN_ARGB = -0xc771c4
private val COLOR_LIGHT_GREEN_ARGB = -0x7e387c
private val COLOR_DARK_ORANGE_ARGB = -0xa80e9
private val COLOR_LIGHT_ORANGE_ARGB = -0x657db
private val POLYGON_STROKE_WIDTH_PX = 8
private val PATTERN_DASH_LENGTH_PX = 20
private val DASH: PatternItem = Dash(PATTERN_DASH_LENGTH_PX.toFloat())
// Create a stroke pattern of a gap followed by a dash.
private val PATTERN_POLYGON_ALPHA = listOf(GAP, DASH)
// Create a stroke pattern of a dot followed by a gap, a dash, and another gap.
private val PATTERN_POLYGON_BETA = listOf(DOT, GAP, DASH, GAP)
/**
* Styles the polygon, based on type.
* @param polygon The polygon object that needs styling.
*/
private fun stylePolygon(polygon: Polygon) {
// Get the data object stored with the polygon.
val type = polygon.tag?.toString() ?: ""
var pattern: List<PatternItem>? = null
var strokeColor = COLOR_BLACK_ARGB
var fillColor = COLOR_WHITE_ARGB
when (type) {
"alpha" -> {
// Apply a stroke pattern to render a dashed line, and define colors.
pattern = PATTERN_POLYGON_ALPHA
strokeColor = COLOR_DARK_GREEN_ARGB
fillColor = COLOR_LIGHT_GREEN_ARGB
}
"beta" -> {
// Apply a stroke pattern to render a line of dots and dashes, and define colors.
pattern = PATTERN_POLYGON_BETA
strokeColor = COLOR_DARK_ORANGE_ARGB
fillColor = COLOR_LIGHT_ORANGE_ARGB
}
}
polygon.strokePattern = pattern
polygon.strokeWidth = POLYGON_STROKE_WIDTH_PX.toFloat()
polygon.strokeColor = strokeColor
polygon.fillColor = fillColor
}
획 패턴 및 기타 도형 맞춤설정 옵션에 대해 자세히 알아보세요.
다음 단계
원 객체에 대해 자세히 알아보세요. 원은 다각형과 유사하지만 원의 모양이 반영된 속성을 갖습니다.