Navigation SDK 개요
컬렉션을 사용해 정리하기
내 환경설정을 기준으로 콘텐츠를 저장하고 분류하세요.
Navigation SDK를 사용하면 Google 지도 세부 경로 안내를 모바일 애플리케이션에 통합할 수 있습니다. 중요한 점은 현재 경로 세그먼트와 최종 목적지 데이터를 제공한다는 것입니다. 이 데이터는 위치 업데이트 및 Driver SDK의 위도/경도 좌표와 함께 운전자가 운전을 시작할 때 Fleet Engine으로 전송됩니다. 따라서 완전한 운전 경험을 제공합니다.
Navigation SDK를 사용해야 하는 이유
Navigation SDK를 사용하면 Fleet Engine과 더 쉽게 통합하여 운전자 경로를 업데이트할 수 있습니다. Navigation SDK를 Driver SDK와 함께 사용하면 운전자가 다른 앱으로 전환하지 않고도 할당을 관리하고 Google 지도 소비자 버전을 사용하는 것처럼 탐색할 수 있습니다.
Navigation SDK로 어떤 작업을 할 수 있나요?
Navigation SDK를 사용하여 Fleet Engine과 다음을 통신합니다.
- Google 지도에서 제공하는 신뢰할 수 있는 세부 경로 안내
- Driver SDK에서 제공하는 위도/경도 좌표를 기반으로 맞춤설정된 경로
- 맞춤 마커, 오버레이, UI 요소와 같은 맞춤 지도 요소를 사용하여 주요 탐색 정보를 강조하고 탐색 환경을 맞춤설정합니다.
Navigation SDK 작동 방식
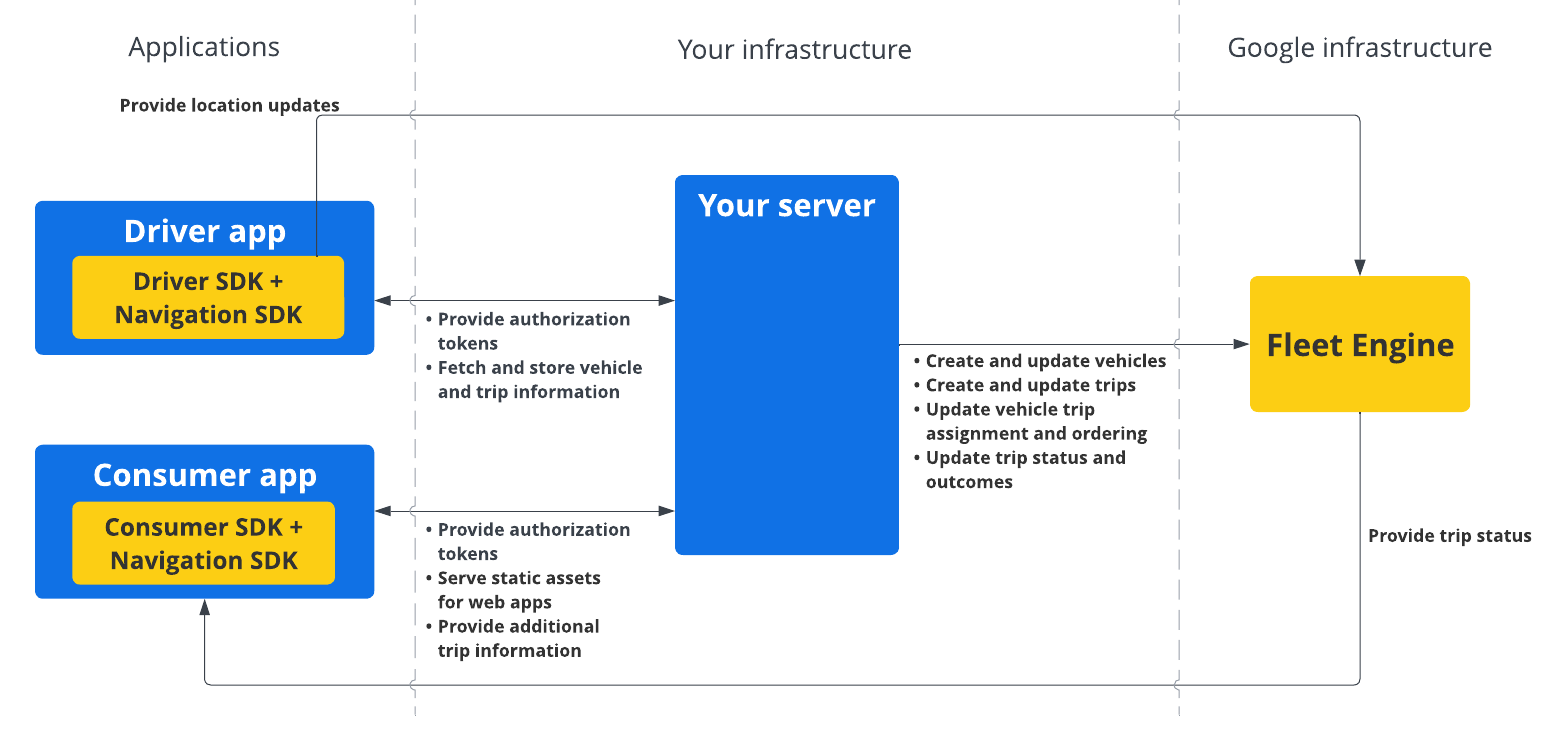
Navigation SDK는 Fleet Engine에 경로 정보와 목적지를 제공하고, Driver SDK는 위치 업데이트, 위도/경도 좌표, 남은 거리, 예상 도착 시간 스트림을 제공합니다. 다른 모든 차량 데이터 업데이트는 데이터를 Fleet Engine에 중계하는 고객 백엔드로 전송해야 합니다.

Navigation SDK 사용 방법
아래 단계에서는 내비게이션 SDK를 운전자 애플리케이션에 통합하는 일반적인 사용 사례 시나리오를 다룹니다.
Android
1 |
Google Cloud 프로젝트 설정 |
Navigation SDK를 사용하기 전에 Google Cloud 프로젝트를 만드세요. 자세한 내용은 Google Cloud 프로젝트 설정을 참고하세요. |
2 |
API 키에 Navigation SDK 추가 |
API 키는 요청을 인증하는 고유 식별자입니다. Navigation SDK를 사용하려면 프로젝트에 하나 이상의 API 키를 연결하세요. 자세한 내용은 API 키 사용을 참조하세요. |
3 |
Android 스튜디오 프로젝트 설정 |
Android 프로젝트를 만들고 Navigation SDK를 통합합니다. 자세한 내용은 Android 스튜디오 프로젝트 설정을 참고하세요. |
4 |
프로젝트에 Driver SDK 추가 |
Driver SDK를 설치하고 구성하여 Fleet Engine의 모든 기능을 활용하세요. 자세한 내용은 주문형 이동용 Driver SDK 가져오기 및 예약된 작업용 Driver SDK 가져오기를 참고하세요. |
iOS
1 |
Google Cloud 프로젝트 설정 |
Navigation SDK를 사용하기 전에 Google Cloud 프로젝트를 만드세요. 자세한 내용은 Google Cloud 프로젝트 설정을 참고하세요. |
2 |
API 키에 Navigation SDK 추가 |
API 키는 요청을 인증하는 고유 식별자입니다. Navigation SDK를 사용하려면 프로젝트에 하나 이상의 API 키를 연결하세요. 자세한 내용은 API 키 사용을 참조하세요. |
3 |
Xcode 프로젝트 설정 |
Xcode 프로젝트를 만들고 여기에 Navigation SDK를 설치합니다. 자세한 내용은 Xcode 프로젝트 설정을 참고하세요. |
4 |
프로젝트에 Driver SDK 추가 |
Driver SDK를 설치하고 구성하여 Fleet Engine의 모든 기능을 활용하세요. 자세한 내용은 주문형 이동용 Driver SDK 가져오기 및 예약된 작업용 Driver SDK 가져오기를 참고하세요. |
Navigation SDK 기능에 관한 자세한 내용은 Android 및 iOS용 Navigation SDK의 전체 문서를 참고하세요.
달리 명시되지 않는 한 이 페이지의 콘텐츠에는 Creative Commons Attribution 4.0 라이선스에 따라 라이선스가 부여되며, 코드 샘플에는 Apache 2.0 라이선스에 따라 라이선스가 부여됩니다. 자세한 내용은 Google Developers 사이트 정책을 참조하세요. 자바는 Oracle 및/또는 Oracle 계열사의 등록 상표입니다.
최종 업데이트: 2025-08-31(UTC)
[null,null,["최종 업데이트: 2025-08-31(UTC)"],[[["\u003cp\u003eThe Navigation SDK enables turn-by-turn navigation within your mobile apps, seamlessly integrating with Google Maps and Fleet Engine for real-time route and location updates.\u003c/p\u003e\n"],["\u003cp\u003eWhen used with the Driver SDK, it provides a comprehensive driving experience within a single app, eliminating the need for drivers to switch between navigation and task management.\u003c/p\u003e\n"],["\u003cp\u003eThe SDK offers customizable routes, map elements, and navigation instructions powered by Google Maps, ensuring a tailored and efficient navigation experience for drivers.\u003c/p\u003e\n"],["\u003cp\u003eTo utilize the Navigation SDK, developers need to set up a Google Cloud project, integrate the SDK into their Android or iOS project, and add the Driver SDK for comprehensive Fleet Engine functionality.\u003c/p\u003e\n"]]],[],null,["The Navigation SDK lets you to integrate Google Maps turn-by-turn navigation\ninto your mobile applications. Crucially, it provides\ncurrent route segment and final destination data, which, along with location\nupdates and latitude/longitude coordinates from the Driver SDK, are sent to the\nFleet Engine when your driver begins driving. This results in a complete driving\nexperience.\n\nWhy use the Navigation SDK?\n\nThe Navigation SDK enables easier integration with Fleet Engine for updates to\nthe driver's routes. Using the Navigation SDK along with the Driver SDK enables\nyour driver can use a single app to manage assignments and navigate as they\nwould using their consumer version of Google Maps, without having to switch to\nanother app.\n\nWhat can you do with the Navigation SDK?\n\nUse the Navigation SDK to communicate the following with Fleet Engine.\n\n- Reliable turn-by-turn navigation instructions powered by Google Maps.\n- Customized routes based on the latitude/longitude coordinates provided by the Driver SDK.\n- Customized map elements, such as custom markers, overlays, and UI elements to highlight key navigation information and to personalize the navigation experience.\n\nHow the Navigation SDK works\n\nThe Navigation SDK provides routing information and destination to Fleet Engine,\nwhile the Driver SDK provides a stream of location updates, latitude/longitude\ncoordinates, remaining distance, and ETAs. All other vehicle data updates must\nbe sent to the customer backend, which relays the data to Fleet Engine.\n\nHow to use the Navigation SDK\n\nThe steps below cover a typical use-case scenario for incorporating the\nNavigation SDK into your driver application: \n\nAndroid\n\n|---|--------------------------------------------|-----------------------------------------------------------------------------------------------------------------------------------------------------------------------------------------------------------------------------------------------------------------------------------------------------------------------------------------------------------------------------------|\n| 1 | **Set up your Google Cloud project** | Create a Google Cloud project before using the Navigation SDK. For more information, see [Set up your Google Cloud project](/maps/documentation/navigation/android-sdk/cloud-setup). |\n| 2 | **Add the Navigation SDK to your API key** | The API key is a unique identifier that authenticates your requests, associate at least one API key with your project to use the Navigation SDK. For more information, see [Using API keys](/maps/documentation/navigation/android-sdk/get-api-key). |\n| 3 | **Set up your Android Studio project** | Create an Android project and integrate the Navigation SDK into it. For more information, see [Set up your Android Studio project](/maps/documentation/navigation/android-sdk/android-studio-setup). |\n| 4 | **Add the Driver SDK to your project** | Install and configure the Driver SDK to start taking advantage of all the Fleet Engine features. For more information, see [Get the Driver SDK for on-demand trips](/maps/documentation/mobility/driver-sdk/on-demand/android/minimum-requirements) and [Get the Driver SDK for scheduled tasks](/maps/documentation/mobility/driver-sdk/scheduled/android/minimum-requirements). |\n\niOS\n\n|---|--------------------------------------------|---------------------------------------------------------------------------------------------------------------------------------------------------------------------------------------------------------------------------------------------------------------------------------------------------------------------------------------------------------------------------|\n| 1 | **Set up your Google Cloud project** | Create a Google Cloud project before using the Navigation SDK. For more information, see [Set up your Google Cloud project](/maps/documentation/navigation/ios-sdk/cloud-setup). |\n| 2 | **Add the Navigation SDK to your API key** | The API key is a unique identifier that authenticates your requests, associate at least one API key with your project to use the Navigation SDK. For more information, see [Using API keys](/maps/documentation/navigation/ios-sdk/get-api-key). |\n| 3 | **Set up your Xcode project** | Create an Xcode project and install the Navigation SDK into it. For more information, see [Set up your Xcode project](/maps/documentation/navigation/ios-sdk/xcode-setup). |\n| 4 | **Add the Driver SDK to your project** | Install and configure the Driver SDK to start taking advantage of all the Fleet Engine features. For more information, see [Get the Driver SDK for on-demand trips](/maps/documentation/mobility/driver-sdk/on-demand/ios/minimum-requirements) and [Get the Driver SDK for scheduled tasks](/maps/documentation/mobility/driver-sdk/scheduled/ios/minimum-requirements). |\n\nFor more information about the Navigation SDK features, see the complete\ndocumentation for Navigation SDK for\n[Android](/maps/documentation/navigation/android-sdk) and\n[iOS](/maps/documentation/navigation/ios-sdk)."]]