
تتيح لك حزمة Navigation SDK دمج ميزة الاتجاهات المفصّلة في "خرائط Google" في تطبيقاتك للأجهزة الجوّالة. والأهم من ذلك أنّها توفّر بيانات عن جزء المسار الحالي والوجهة النهائية، والتي يتم إرسالها إلى Fleet Engine مع إشعارات التحديث بشأن الموقع الجغرافي وإحداثيات خطوط العرض/الطول من Driver SDK عندما يبدأ السائق القيادة. ويؤدي ذلك إلى توفير تجربة قيادة كاملة.
ما هي مزايا استخدام Navigation SDK؟
تسهّل حزمة Navigation SDK عملية الدمج مع Fleet Engine لتلقّي آخر التعديلات على مسارات السائق. باستخدام Navigation SDK مع Driver SDK، يمكن للسائق استخدام تطبيق واحد لإدارة المهام والتنقّل كما لو كان يستخدم الإصدار المخصّص للمستهلكين من "خرائط Google"، بدون الحاجة إلى التبديل إلى تطبيق آخر.
ما هي الإجراءات التي يمكن تنفيذها باستخدام Navigation SDK؟
يمكنك استخدام Navigation SDK لإرسال المعلومات التالية إلى Fleet Engine.
- تعليمات تنقّل مفصّلة موثوقة تستند إلى "خرائط Google"
- مسارات مخصّصة استنادًا إلى إحداثيات خطوط العرض/الطول التي توفّرها Driver SDK
- عناصر خريطة مخصّصة، مثل العلامات المخصّصة والطبقات المتراكبة وعناصر واجهة المستخدم لتسليط الضوء على معلومات التنقّل الرئيسية وتخصيص تجربة التنقّل
آلية عمل Navigation SDK
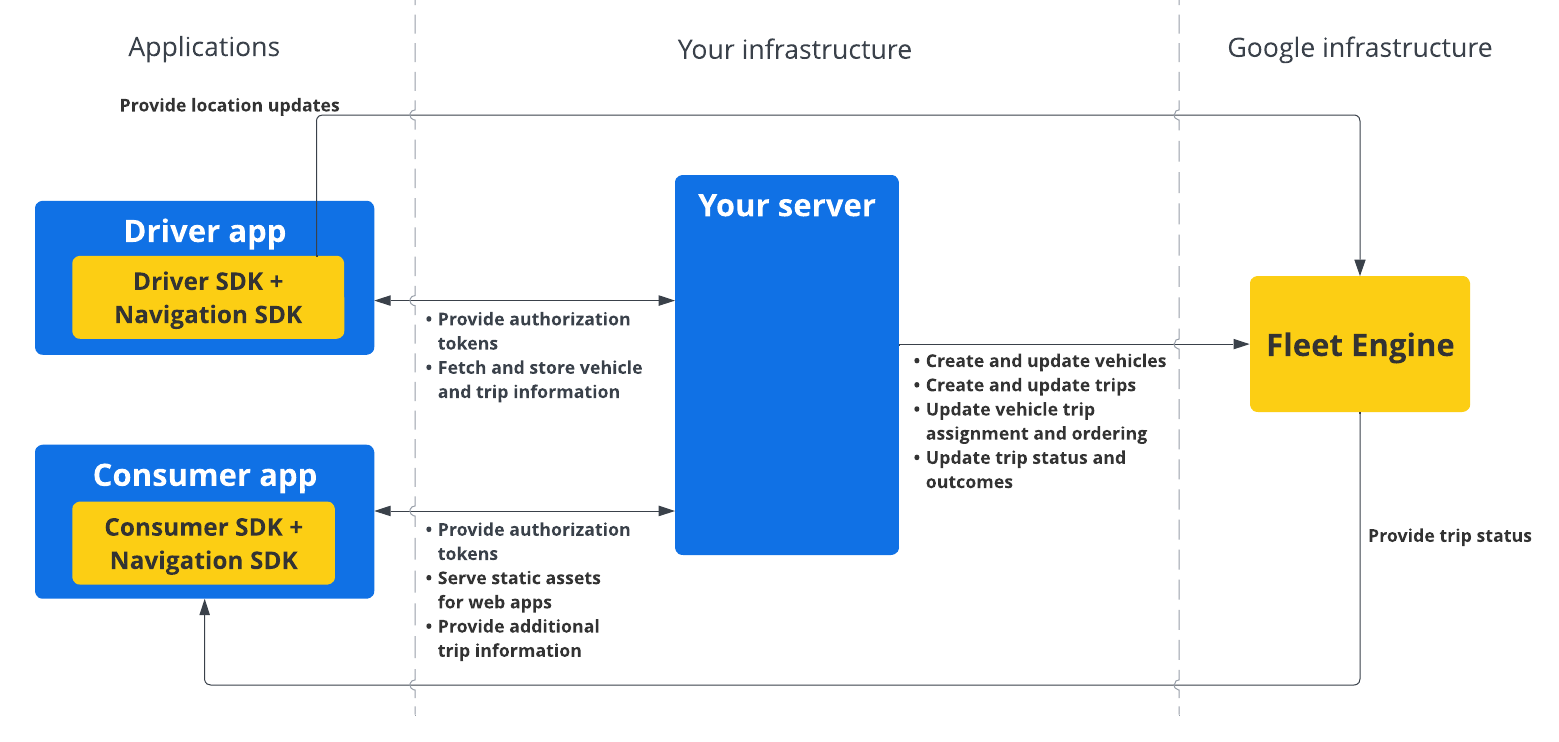
توفّر Navigation SDK معلومات عن التوجيه والوجهة إلى Fleet Engine، بينما توفّر Driver SDK سلسلة من إشعارات التحديث بشأن الموقع الجغرافي وإحداثيات خطوط العرض/الطول والمسافة المتبقية والوقت المقدَّر للوصول. يجب إرسال جميع التعديلات الأخرى على بيانات المركبة إلى نظام العميل الخلفي الذي ينقل البيانات إلى Fleet Engine.
كيفية استخدام Navigation SDK
تغطّي الخطوات أدناه سيناريو نموذجيًا لاستخدام حزمة Navigation SDK في تطبيق السائق:
Android
| 1 | إعداد مشروعك على Google Cloud | يجب إنشاء مشروع على السحابة الإلكترونية على Google Cloud قبل استخدام Navigation SDK. لمزيد من المعلومات، يُرجى الاطّلاع على مقالة إعداد مشروعك على Google Cloud. |
| 2 | إضافة Navigation SDK إلى مفتاح واجهة برمجة التطبيقات | مفتاح واجهة برمجة التطبيقات هو معرّف فريد يصادق على طلباتك، لذا يجب ربط مفتاح واجهة برمجة تطبيقات واحد على الأقل بمشروعك لاستخدام Navigation SDK. لمزيد من المعلومات، يُرجى الاطّلاع على مقالة استخدام مفاتيح واجهة برمجة التطبيقات. |
| 3 | إعداد مشروعك على "استوديو Android" | يجب إنشاء مشروع Android ودمج Navigation SDK فيه. لمزيد من المعلومات، يُرجى الاطّلاع على مقالة إعداد مشروعك على "استوديو Android". |
| 4 | إضافة Driver SDK إلى مشروعك | يجب تثبيت Driver SDK وإعداده لبدء الاستفادة من جميع ميزات Fleet Engine. لمزيد من المعلومات، يُرجى الاطّلاع على مقالتَي الحصول على Driver SDK للرحلات عند الطلب والحصول على Driver SDK للمهام المجدولة. |
iOS
| 1 | إعداد مشروعك على Google Cloud | يجب إنشاء مشروع على السحابة الإلكترونية على Google Cloud قبل استخدام Navigation SDK. لمزيد من المعلومات، يُرجى الاطّلاع على مقالة إعداد مشروعك على Google Cloud. |
| 2 | إضافة Navigation SDK إلى مفتاح واجهة برمجة التطبيقات | مفتاح واجهة برمجة التطبيقات هو معرّف فريد يصادق على طلباتك، لذا يجب ربط مفتاح واجهة برمجة تطبيقات واحد على الأقل بمشروعك لاستخدام Navigation SDK. لمزيد من المعلومات، يُرجى الاطّلاع على مقالة استخدام مفاتيح واجهة برمجة التطبيقات. |
| 3 | إعداد مشروعك على Xcode | يجب إنشاء مشروع على Xcode وتثبيت Navigation SDK فيه. لمزيد من المعلومات، يُرجى الاطّلاع على مقالة إعداد مشروعك على Xcode. |
| 4 | إضافة Driver SDK إلى مشروعك | يجب تثبيت Driver SDK وإعداده لبدء الاستفادة من جميع ميزات Fleet Engine. لمزيد من المعلومات، يُرجى الاطّلاع على مقالتَي الحصول على Driver SDK للرحلات عند الطلب والحصول على Driver SDK للمهام المجدولة. |
لمزيد من المعلومات عن ميزات Navigation SDK، يُرجى الاطّلاع على المستندات الكاملة لحزمة Navigation SDK على Android و iOS.