Navigation SDK 概览
使用集合让一切井井有条
根据您的偏好保存内容并对其进行分类。
借助 Navigation SDK,您可以将 Google 地图精细导航功能集成到移动应用中。最重要的是,它提供当前路线段和最终目的地数据,这些数据以及来自 Driver SDK 的位置更新和纬度/经度坐标会在司机开始驾驶时发送到 Fleet Engine。从而带来完整的驾驶体验。
为何使用 Navigation SDK?
借助 Navigation SDK,您可以更轻松地与 Fleet Engine 集成,以更新司机的路线。将 Navigation SDK 与 Driver SDK 搭配使用,可让司机使用单个应用来管理任务和导航,就像使用 Google 地图的消费者版一样,无需切换到其他应用。
Navigation SDK 可用于哪些用途?
使用 Navigation SDK 与 Fleet Engine 通信,以实现以下目的。
- 由 Google 地图提供支持的可靠的精细导航说明。
- 根据 Driver SDK 提供的纬度/经度坐标自定义路线。
- 自定义地图元素,例如自定义标记、叠加层和界面元素,以突出显示关键导航信息并打造个性化的导航体验。
Navigation SDK 的运作方式
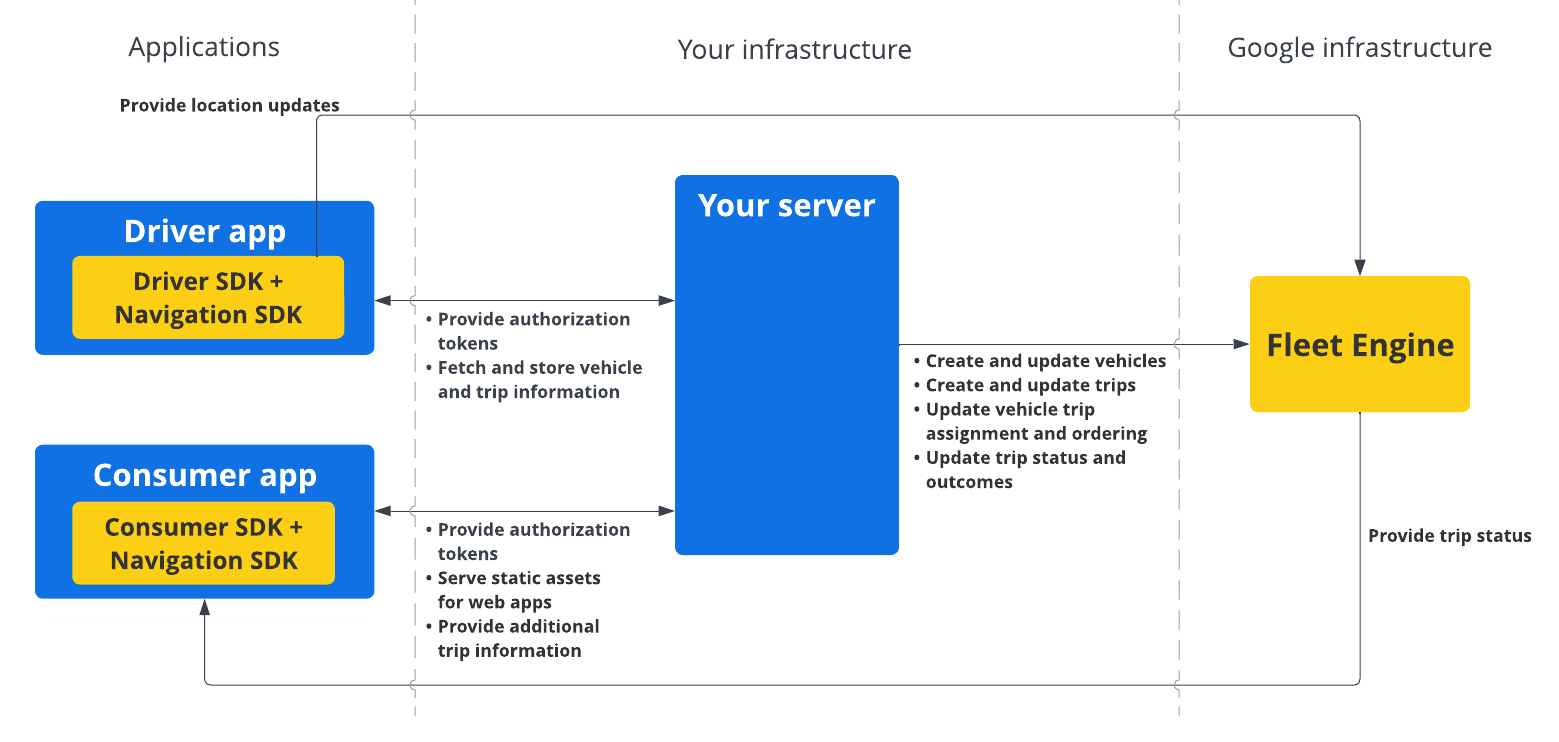
Navigation SDK 会向 Fleet Engine 提供路线信息和目的地,而 Driver SDK 会提供位置更新、纬度/经度坐标、剩余距离和预计到达时间 (ETA) 的数据流。所有其他车辆数据更新都必须发送到客户后端,然后由客户后端将数据中继到 Fleet Engine。

如何使用 Navigation SDK
以下步骤涵盖了将 Navigation SDK 纳入到您的司机应用中的典型使用场景:
iOS
1 |
设置您的 Google Cloud 项目 |
在使用 Navigation SDK 之前,请先创建一个 Google Cloud 项目。如需了解详情,请参阅设置您的 Google Cloud 项目。 |
2 |
将 Navigation SDK 添加到您的 API 密钥 |
API 密钥是用于对您的请求进行身份验证的唯一标识符,您必须将至少一个 API 密钥与您的项目相关联,才能使用 Navigation SDK。如需了解详情,请参阅使用 API 密钥。 |
3 |
设置 Xcode 项目 |
创建 Xcode 项目并将 Navigation SDK 安装到其中。如需了解详情,请参阅设置 Xcode 项目。 |
4 |
将 Driver SDK 添加到您的项目 |
安装并配置 Driver SDK,以便开始利用所有 Fleet Engine 功能。如需了解详情,请参阅获取 Driver SDK(用于按需行程)和获取 Driver SDK(用于预定任务)。 |
如需详细了解 Navigation SDK 功能,请参阅 Android 和 iOS 版 Navigation SDK 的完整文档。
如未另行说明,那么本页面中的内容已根据知识共享署名 4.0 许可获得了许可,并且代码示例已根据 Apache 2.0 许可获得了许可。有关详情,请参阅 Google 开发者网站政策。Java 是 Oracle 和/或其关联公司的注册商标。
最后更新时间 (UTC):2025-08-31。
[null,null,["最后更新时间 (UTC):2025-08-31。"],[[["\u003cp\u003eThe Navigation SDK enables turn-by-turn navigation within your mobile apps, seamlessly integrating with Google Maps and Fleet Engine for real-time route and location updates.\u003c/p\u003e\n"],["\u003cp\u003eWhen used with the Driver SDK, it provides a comprehensive driving experience within a single app, eliminating the need for drivers to switch between navigation and task management.\u003c/p\u003e\n"],["\u003cp\u003eThe SDK offers customizable routes, map elements, and navigation instructions powered by Google Maps, ensuring a tailored and efficient navigation experience for drivers.\u003c/p\u003e\n"],["\u003cp\u003eTo utilize the Navigation SDK, developers need to set up a Google Cloud project, integrate the SDK into their Android or iOS project, and add the Driver SDK for comprehensive Fleet Engine functionality.\u003c/p\u003e\n"]]],[],null,["The Navigation SDK lets you to integrate Google Maps turn-by-turn navigation\ninto your mobile applications. Crucially, it provides\ncurrent route segment and final destination data, which, along with location\nupdates and latitude/longitude coordinates from the Driver SDK, are sent to the\nFleet Engine when your driver begins driving. This results in a complete driving\nexperience.\n\nWhy use the Navigation SDK?\n\nThe Navigation SDK enables easier integration with Fleet Engine for updates to\nthe driver's routes. Using the Navigation SDK along with the Driver SDK enables\nyour driver can use a single app to manage assignments and navigate as they\nwould using their consumer version of Google Maps, without having to switch to\nanother app.\n\nWhat can you do with the Navigation SDK?\n\nUse the Navigation SDK to communicate the following with Fleet Engine.\n\n- Reliable turn-by-turn navigation instructions powered by Google Maps.\n- Customized routes based on the latitude/longitude coordinates provided by the Driver SDK.\n- Customized map elements, such as custom markers, overlays, and UI elements to highlight key navigation information and to personalize the navigation experience.\n\nHow the Navigation SDK works\n\nThe Navigation SDK provides routing information and destination to Fleet Engine,\nwhile the Driver SDK provides a stream of location updates, latitude/longitude\ncoordinates, remaining distance, and ETAs. All other vehicle data updates must\nbe sent to the customer backend, which relays the data to Fleet Engine.\n\nHow to use the Navigation SDK\n\nThe steps below cover a typical use-case scenario for incorporating the\nNavigation SDK into your driver application: \n\nAndroid\n\n|---|--------------------------------------------|-----------------------------------------------------------------------------------------------------------------------------------------------------------------------------------------------------------------------------------------------------------------------------------------------------------------------------------------------------------------------------------|\n| 1 | **Set up your Google Cloud project** | Create a Google Cloud project before using the Navigation SDK. For more information, see [Set up your Google Cloud project](/maps/documentation/navigation/android-sdk/cloud-setup). |\n| 2 | **Add the Navigation SDK to your API key** | The API key is a unique identifier that authenticates your requests, associate at least one API key with your project to use the Navigation SDK. For more information, see [Using API keys](/maps/documentation/navigation/android-sdk/get-api-key). |\n| 3 | **Set up your Android Studio project** | Create an Android project and integrate the Navigation SDK into it. For more information, see [Set up your Android Studio project](/maps/documentation/navigation/android-sdk/android-studio-setup). |\n| 4 | **Add the Driver SDK to your project** | Install and configure the Driver SDK to start taking advantage of all the Fleet Engine features. For more information, see [Get the Driver SDK for on-demand trips](/maps/documentation/mobility/driver-sdk/on-demand/android/minimum-requirements) and [Get the Driver SDK for scheduled tasks](/maps/documentation/mobility/driver-sdk/scheduled/android/minimum-requirements). |\n\niOS\n\n|---|--------------------------------------------|---------------------------------------------------------------------------------------------------------------------------------------------------------------------------------------------------------------------------------------------------------------------------------------------------------------------------------------------------------------------------|\n| 1 | **Set up your Google Cloud project** | Create a Google Cloud project before using the Navigation SDK. For more information, see [Set up your Google Cloud project](/maps/documentation/navigation/ios-sdk/cloud-setup). |\n| 2 | **Add the Navigation SDK to your API key** | The API key is a unique identifier that authenticates your requests, associate at least one API key with your project to use the Navigation SDK. For more information, see [Using API keys](/maps/documentation/navigation/ios-sdk/get-api-key). |\n| 3 | **Set up your Xcode project** | Create an Xcode project and install the Navigation SDK into it. For more information, see [Set up your Xcode project](/maps/documentation/navigation/ios-sdk/xcode-setup). |\n| 4 | **Add the Driver SDK to your project** | Install and configure the Driver SDK to start taking advantage of all the Fleet Engine features. For more information, see [Get the Driver SDK for on-demand trips](/maps/documentation/mobility/driver-sdk/on-demand/ios/minimum-requirements) and [Get the Driver SDK for scheduled tasks](/maps/documentation/mobility/driver-sdk/scheduled/ios/minimum-requirements). |\n\nFor more information about the Navigation SDK features, see the complete\ndocumentation for Navigation SDK for\n[Android](/maps/documentation/navigation/android-sdk) and\n[iOS](/maps/documentation/navigation/ios-sdk)."]]