Navigation SDK 總覽
透過集合功能整理內容
你可以依據偏好儲存及分類內容。
Navigation SDK 可讓您將 Google 地圖的即時路線指引整合至行動應用程式。最重要的是,這項服務會提供目前的路線路段和最終目的地資料,這些資料會連同 Driver SDK 的位置更新和經緯度座標,在駕駛人開始開車時傳送至 Fleet Engine。提供完整的駕駛體驗。
為什麼要使用 Navigation SDK?
Navigation SDK 可輕鬆與 Fleet Engine 整合,更新駕駛人的路線。搭配使用 Navigation SDK 和 Driver SDK,駕駛人就能透過單一應用程式管理指派事項,並像使用 Google 地圖消費者版一樣導航,不必切換到其他應用程式。
Navigation SDK 提供哪些功能?
使用 Navigation SDK 與 Fleet Engine 通訊,傳送下列資訊:
- Google 地圖提供可靠的即時路線導航指示。
- 根據 Driver SDK 提供的經緯度座標,規劃自訂路線。
- 自訂地圖元素,例如自訂標記、疊加層和 UI 元素,可醒目顯示重要導航資訊,並提供個人化導航體驗。
Navigation SDK 的運作方式
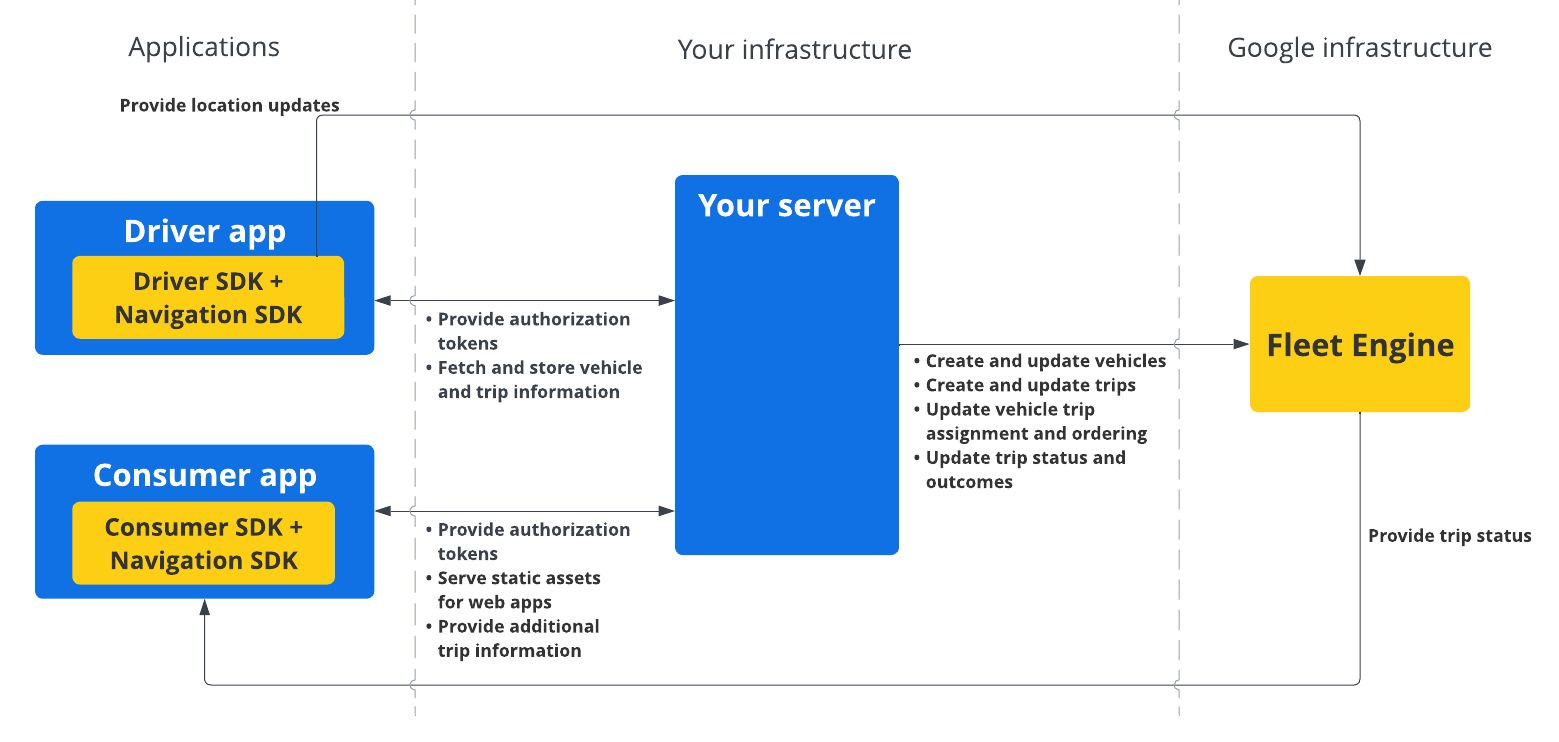
Navigation SDK 會向 Fleet Engine 提供路線資訊和目的地,而 Driver SDK 則會提供位置資訊更新串流、經緯度座標、剩餘距離和預計抵達時間。所有其他車輛資料更新都必須傳送至客戶後端,後者會將資料轉送至 Fleet Engine。

如何使用 Navigation SDK
以下步驟說明將 Navigation SDK 併入駕駛人應用程式的常見用途情境:
如要進一步瞭解 Navigation SDK 功能,請參閱 Android 版和 iOS 版 Navigation SDK 的完整說明文件。
除非另有註明,否則本頁面中的內容是採用創用 CC 姓名標示 4.0 授權,程式碼範例則為阿帕契 2.0 授權。詳情請參閱《Google Developers 網站政策》。Java 是 Oracle 和/或其關聯企業的註冊商標。
上次更新時間:2025-08-31 (世界標準時間)。
[null,null,["上次更新時間:2025-08-31 (世界標準時間)。"],[[["\u003cp\u003eThe Navigation SDK enables turn-by-turn navigation within your mobile apps, seamlessly integrating with Google Maps and Fleet Engine for real-time route and location updates.\u003c/p\u003e\n"],["\u003cp\u003eWhen used with the Driver SDK, it provides a comprehensive driving experience within a single app, eliminating the need for drivers to switch between navigation and task management.\u003c/p\u003e\n"],["\u003cp\u003eThe SDK offers customizable routes, map elements, and navigation instructions powered by Google Maps, ensuring a tailored and efficient navigation experience for drivers.\u003c/p\u003e\n"],["\u003cp\u003eTo utilize the Navigation SDK, developers need to set up a Google Cloud project, integrate the SDK into their Android or iOS project, and add the Driver SDK for comprehensive Fleet Engine functionality.\u003c/p\u003e\n"]]],[],null,["The Navigation SDK lets you to integrate Google Maps turn-by-turn navigation\ninto your mobile applications. Crucially, it provides\ncurrent route segment and final destination data, which, along with location\nupdates and latitude/longitude coordinates from the Driver SDK, are sent to the\nFleet Engine when your driver begins driving. This results in a complete driving\nexperience.\n\nWhy use the Navigation SDK?\n\nThe Navigation SDK enables easier integration with Fleet Engine for updates to\nthe driver's routes. Using the Navigation SDK along with the Driver SDK enables\nyour driver can use a single app to manage assignments and navigate as they\nwould using their consumer version of Google Maps, without having to switch to\nanother app.\n\nWhat can you do with the Navigation SDK?\n\nUse the Navigation SDK to communicate the following with Fleet Engine.\n\n- Reliable turn-by-turn navigation instructions powered by Google Maps.\n- Customized routes based on the latitude/longitude coordinates provided by the Driver SDK.\n- Customized map elements, such as custom markers, overlays, and UI elements to highlight key navigation information and to personalize the navigation experience.\n\nHow the Navigation SDK works\n\nThe Navigation SDK provides routing information and destination to Fleet Engine,\nwhile the Driver SDK provides a stream of location updates, latitude/longitude\ncoordinates, remaining distance, and ETAs. All other vehicle data updates must\nbe sent to the customer backend, which relays the data to Fleet Engine.\n\nHow to use the Navigation SDK\n\nThe steps below cover a typical use-case scenario for incorporating the\nNavigation SDK into your driver application: \n\nAndroid\n\n|---|--------------------------------------------|-----------------------------------------------------------------------------------------------------------------------------------------------------------------------------------------------------------------------------------------------------------------------------------------------------------------------------------------------------------------------------------|\n| 1 | **Set up your Google Cloud project** | Create a Google Cloud project before using the Navigation SDK. For more information, see [Set up your Google Cloud project](/maps/documentation/navigation/android-sdk/cloud-setup). |\n| 2 | **Add the Navigation SDK to your API key** | The API key is a unique identifier that authenticates your requests, associate at least one API key with your project to use the Navigation SDK. For more information, see [Using API keys](/maps/documentation/navigation/android-sdk/get-api-key). |\n| 3 | **Set up your Android Studio project** | Create an Android project and integrate the Navigation SDK into it. For more information, see [Set up your Android Studio project](/maps/documentation/navigation/android-sdk/android-studio-setup). |\n| 4 | **Add the Driver SDK to your project** | Install and configure the Driver SDK to start taking advantage of all the Fleet Engine features. For more information, see [Get the Driver SDK for on-demand trips](/maps/documentation/mobility/driver-sdk/on-demand/android/minimum-requirements) and [Get the Driver SDK for scheduled tasks](/maps/documentation/mobility/driver-sdk/scheduled/android/minimum-requirements). |\n\niOS\n\n|---|--------------------------------------------|---------------------------------------------------------------------------------------------------------------------------------------------------------------------------------------------------------------------------------------------------------------------------------------------------------------------------------------------------------------------------|\n| 1 | **Set up your Google Cloud project** | Create a Google Cloud project before using the Navigation SDK. For more information, see [Set up your Google Cloud project](/maps/documentation/navigation/ios-sdk/cloud-setup). |\n| 2 | **Add the Navigation SDK to your API key** | The API key is a unique identifier that authenticates your requests, associate at least one API key with your project to use the Navigation SDK. For more information, see [Using API keys](/maps/documentation/navigation/ios-sdk/get-api-key). |\n| 3 | **Set up your Xcode project** | Create an Xcode project and install the Navigation SDK into it. For more information, see [Set up your Xcode project](/maps/documentation/navigation/ios-sdk/xcode-setup). |\n| 4 | **Add the Driver SDK to your project** | Install and configure the Driver SDK to start taking advantage of all the Fleet Engine features. For more information, see [Get the Driver SDK for on-demand trips](/maps/documentation/mobility/driver-sdk/on-demand/ios/minimum-requirements) and [Get the Driver SDK for scheduled tasks](/maps/documentation/mobility/driver-sdk/scheduled/ios/minimum-requirements). |\n\nFor more information about the Navigation SDK features, see the complete\ndocumentation for Navigation SDK for\n[Android](/maps/documentation/navigation/android-sdk) and\n[iOS](/maps/documentation/navigation/ios-sdk)."]]