
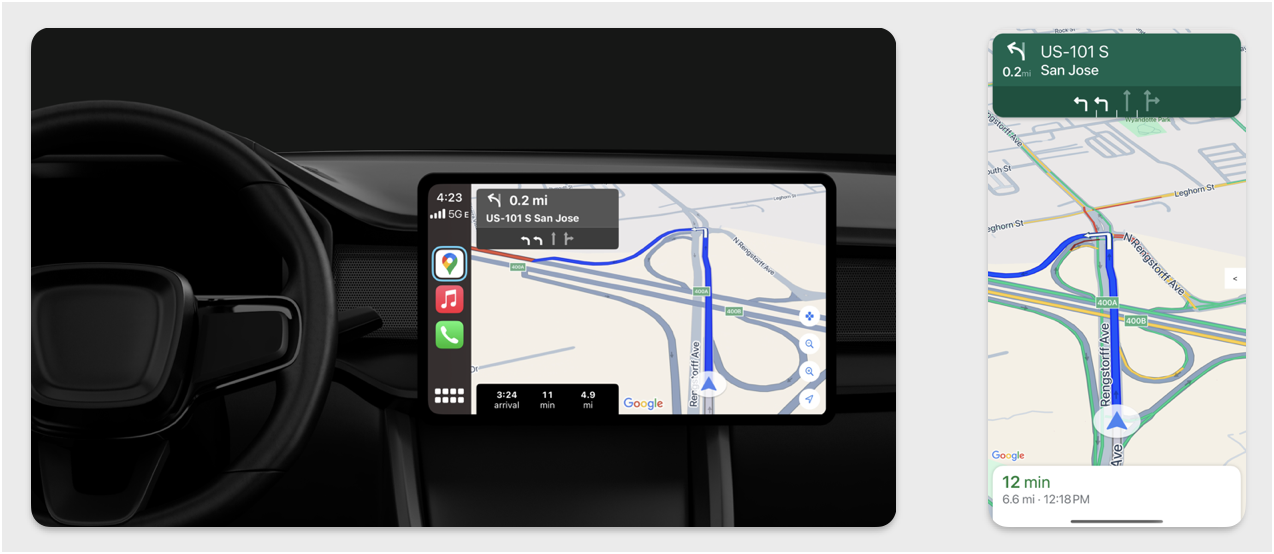
Phần này mô tả cách bạn có thể sử dụng Navigation SDK với thư viện Apple CarPlay để hiển thị trải nghiệm điều hướng của ứng dụng trên đầu phát trung tâm trong bảng điều khiển. Nếu hệ thống trên bảng điều khiển điện tử của người lái xe hỗ trợ CarPlay, thì người lái xe có thể dùng ứng dụng của bạn ngay trên màn hình ô tô bằng cách kết nối điện thoại với thiết bị. Hướng dẫn bằng giọng nói cũng được phát qua loa của xe.
Bạn tạo ứng dụng CarPlay từ một tập hợp các mẫu giao diện người dùng do Apple cung cấp. Ứng dụng của bạn chịu trách nhiệm chọn mẫu để hiển thị và cung cấp dữ liệu bên trong mẫu đó.
Hệ thống trên bảng điều khiển hiển thị các phần tử tương tác đã được phê duyệt về độ an toàn để người lái xe có thể lái xe đến đích một cách an toàn mà không bị mất tập trung quá mức. Bạn cũng có thể lập trình ứng dụng để người lái xe có thể tương tác với các tính năng dành riêng cho ứng dụng của bạn, chẳng hạn như chấp nhận hoặc từ chối đơn đặt hàng, hoặc xem vị trí của khách hàng trên bản đồ. Bạn cũng có thể lập trình để thông tin cập nhật về trạng thái đơn đặt hàng xuất hiện trên đơn vị trong trang tổng quan.
Thiết lập
Bắt đầu bằng CarPlay
Trước tiên, hãy làm quen với tài liệu của Apple:
Thiết lập Navigation SDK
- Sau khi đọc tài liệu của Apple, bạn đã sẵn sàng làm việc với Navigation SDK.
- Thiết lập dự án nếu bạn chưa tích hợp Navigation SDK vào ứng dụng của mình.
- Bật nguồn cấp dữ liệu chỉ dẫn từng chặng cho ứng dụng của bạn.
- Không bắt buộc. Sử dụng các biểu tượng được tạo từ Navigation SDK.
- Vẽ bản đồ bằng lớp
GMSMapViewcó trong lớp UIView. Hãy xem bài viết Điều hướng theo tuyến đường để biết thêm thông tin. Điền dữ liệu từ thư viện TurnByTurn vàoCPNavigationSession.
Vẽ giao diện người dùng bản đồ và chỉ đường
Lớp GMSMapView kết xuất bản đồ và CPMapTemplate kết xuất giao diện người dùng trên màn hình CarPlay. Thành phần này cung cấp nhiều chức năng tương tự như GMSMapView cho điện thoại, nhưng có khả năng tương tác hạn chế.
Swift
init(window: CPWindow) {
    super.init(nibName: nil, bundle: nil)
    self.window = window

    // More CPMapTemplate initialization

}

override func viewDidLoad() {
    super.viewDidLoad()

    let mapViewOptions = GMSMapViewOptions()
    mapViewOptions.screen = window.screen
    mapViewOptions.frame = self.view.bounds

    mapView = GMSMapView(options: mapViewOptions)
    mapView.autoresizingMask = [.flexibleHeight, .flexibleWidth]
    mapView.settings.isNavigationHeaderEnabled = false
    mapView.settings.isNavigationFooterEnabled = false

    // Disable buttons: in CarPlay, no part of the map is clickable.
    // The app should instead place these buttons in the appropriate slots of the CarPlay template.
    mapView.settings.compassButton = false
    mapView.settings.isRecenterButtonEnabled = false
    mapView.shouldDisplaySpeedometer = false
    mapView.isMyLocationEnabled = true

    self.view.addSubview(mapView)
}
Objective-C
- (instancetype)initWithWindow:(CPWindow *)window {
  self = [super initWithNibName:nil bundle:nil];
  if (self) {
    _window = window;

  // More CPMapTemplate initialization
  }
}

- (void)viewDidLoad {
  [super viewDidLoad];
  GMSMapViewOptions *options = [[GMSMapViewOptions alloc] init];
  options.screen = _window.screen;
  options.frame = self.view.bounds;
  _mapView = [[GMSMapView alloc] initWithOptions:options];
  _mapView.autoresizingMask = UIViewAutoresizingFlexibleHeight | UIViewAutoresizingFlexibleWidth;
  _mapView.settings.navigationHeaderEnabled = NO;
  _mapView.settings.navigationFooterEnabled = NO;

  // Disable buttons: in CarPlay, no part of the map is clickable.
  // The app should instead place these buttons in the appropriate slots of the CarPlay template.
  _mapView.settings.compassButton = NO;
  _mapView.settings.recenterButtonEnabled = NO;

  _mapView.shouldDisplaySpeedometer = NO;
  _mapView.myLocationEnabled = YES;

  [self.view addSubview:_mapView];
}
Bật tính năng tương tác với bản đồ
Để đảm bảo an toàn cho người lái xe, CarPlay giới hạn hoạt động tương tác trên màn hình thành một loạt phương thức CPMapTemplateDelegate. Sử dụng các lệnh gọi lại này để hỗ trợ người lái xe tương tác có giới hạn với bản đồ trên màn hình trong xe.
Để hỗ trợ các thao tác khác của người dùng, hãy tạo một mảng CPMapButton và chỉ định mảng đó cho CPMapTemplate.mapButtons.
Đoạn mã sau đây tạo ra các lượt tương tác di chuyển và các nút để di chuyển, phóng to và thu nhỏ, đồng thời cung cấp vị trí của người dùng.
Lượt tương tác khi lia máy
Swift
// MARK: CPMapTemplateDelegate
func mapTemplate(_ mapTemplate: CPMapTemplate, panBeganWith direction: CPMapTemplate.PanDirection) {

}

func mapTemplate(_ mapTemplate: CPMapTemplate, panWith direction: CPMapTemplate.PanDirection) {
    let scrollAmount = scrollAmount(for: direction)
    let scroll = GMSCameraUpdate.scrollBy(x: scrollAmount.x, y: scrollAmount.y)
    mapView.animate(with: scroll)
}

func mapTemplate(_ mapTemplate: CPMapTemplate, panEndedWith direction: CPMapTemplate.PanDirection) {
}

func scrollAmount(for panDirection: CPMapTemplate.PanDirection) -> CGPoint {
    let scrollDistance = 80.0
    var scrollAmount = CGPoint(x: 0, y: 0)
    switch panDirection {
        case .left:
            scrollAmount.x -= scrollDistance
            break;
        case .right:
            scrollAmount.x += scrollDistance
            break;
        case .up:
            scrollAmount.y += scrollDistance
            break;
        case .down:
            scrollAmount.y -= scrollDistance
            break;
        default:
            break;
    }
    if scrollAmount.x != 0 && scrollAmount.y != 0 {
        // Adjust length if scrolling diagonally.
        scrollAmount = CGPointMake(scrollAmount.x * sqrt(1.0/2.0), scrollAmount.y * sqrt(1.0/2.0))
    }
    return scrollAmount
}
Objective-C
#pragma mark - CPMapTemplateDelegate

- (void)mapTemplate:(CPMapTemplate *)mapTemplate panBeganWithDirection:(CPPanDirection)direction {
}

- (void)mapTemplate:(CPMapTemplate *)mapTemplate panWithDirection:(CPPanDirection)direction {
CGPoint scrollAmount = [self scrollAmountForPanDirection:direction];
GMSCameraUpdate *scroll = [GMSCameraUpdate scrollByX:scrollAmount.x Y:scrollAmount.y];
[_mapView animateWithCameraUpdate:scroll];
}

- (void)mapTemplate:(CPMapTemplate *)mapTemplate panEndedWithDirection:(CPPanDirection)direction {
}
- (CGPoint)scrollAmountForPanDirection:(CPPanDirection)direction {
  static const CGFloat scrollDistance = 80.;
  CGPoint scrollAmount = {0., 0.};
  if (direction & CPPanDirectionLeft) {
    scrollAmount.x = -scrollDistance;
  }
  if (direction & CPPanDirectionRight) {
    scrollAmount.x = scrollDistance;
  }
  if (direction & CPPanDirectionUp) {
    scrollAmount.y = -scrollDistance;
  }
  if (direction & CPPanDirectionDown) {
    scrollAmount.y = scrollDistance;
  }
  if (scrollAmount.x != 0 && scrollAmount.y != 0) {
  // Adjust length if scrolling diagonally.
  scrollAmount =
    CGPointMake(scrollAmount.x * (CGFloat)M_SQRT1_2, scrollAmount.y * (CGFloat)M_SQRT1_2);
  }
  return scrollAmount;
}
Các cách sử dụng nút phổ biến
Swift
// MARK: Create Buttons

func createMapButtons() -> [CPMapButton] {
    let panButton = mapButton(systemImageName: "dpad.fill") { [weak self] in
        self?.didTapPanButton()
    }

    let zoomOutButton = mapButton(systemImageName: "minus.magnifyingglass") { [weak self] in
        self?.didTapZoomOutButton()
    }

    let zoomInButton = mapButton(systemImageName: "plus.magnifyingglass") { [weak self] in
        self?.didTapZoomInButton()
    }

    let myLocationButton = mapButton(systemImageName: "location") { [weak self] in
        self?.didTapMyLocationButton()
    }

    let mapButtons = [panButton, zoomOutButton, zoomInButton, myLocationButton]
    return mapButtons
}

func mapButton(systemImageName: String, handler: @escaping () -> Void) -> CPMapButton {

}


// MARK: Button callbacks

@objc func didTapPanButton() {
    mapTemplate?.showPanningInterface(animated: true)
}

@objc func didTapZoomOutButton() {
    mapView.animate(with: GMSCameraUpdate.zoomOut())
}

@objc func didTapZoomInButton() {
    mapView.animate(with: GMSCameraUpdate.zoomIn())
}

@objc func didTapMyLocationButton() {
    if let lastLocation = lastLocation {
        let cameraPosition = GMSCameraPosition(target: lastLocation.coordinate, zoom: 15)
        mapView.animate(to: cameraPosition)
    }
}
Objective-C
#pragma mark - Create Buttons

- (NSArray<CPMapButton *>*)createMapButtons {
    NSMutableArray<CPMapButton *> *mapButtons = [NSMutableArray<CPMapButton *> array];

    __weak __typeof__(self) weakSelf = self;
    CPMapButton *panButton = [self mapButtonWithSystemImageNamed:@"dpad.fill"
                                                        handler:^(CPMapButton *_) {
                                                        [weakSelf didTapPanButton];
                                                        }];
    [mapButtons addObject:panButton];

    CPMapButton *zoomOutButton =
        [self mapButtonWithSystemImageNamed:@"minus.magnifyingglass"
                                    handler:^(CPMapButton *_Nonnull mapButon) {
                                    [weakSelf didTapZoomOutButton];
                                    }];
    [mapButtons addObject:zoomOutButton];

    CPMapButton *zoomInButton =
        [self mapButtonWithSystemImageNamed:@"plus.magnifyingglass"
                                    handler:^(CPMapButton *_Nonnull mapButon) {
                                    [weakSelf didTapZoomInButton];
                                    }];
    [mapButtons addObject:zoomInButton];

    CPMapButton *myLocationButton =
        [self mapButtonWithSystemImageNamed:@"location"
                                    handler:^(CPMapButton *_Nonnull mapButton) {
                                    [weakSelf didTapMyLocationButton];
                                    }];
    [mapButtons addObject:myLocationButton];
    return mapButtons;
}

#pragma mark - Button Callbacks

- (void)didTapZoomOutButton {
[_mapView animateWithCameraUpdate:[GMSCameraUpdate zoomOut]];
}

- (void)didTapZoomInButton {
[_mapView animateWithCameraUpdate:[GMSCameraUpdate zoomIn]];
}

- (void)didTapMyLocationButton {
CLLocation *location = self.lastLocation;
if (location) {
    GMSCameraPosition *position =
        [[GMSCameraPosition alloc] initWithTarget:self.lastLocation.coordinate zoom:15.];
    [_mapView animateToCameraPosition:position];
}
}

- (void)didTapPanButton {
[_mapTemplate showPanningInterfaceAnimated:YES];
_isPanningInterfaceEnabled = YES;
}

- (void)didTapStopPanningButton {
[_mapTemplate dismissPanningInterfaceAnimated:YES];
_isPanningInterfaceEnabled = NO;
}
Lưu ý: Bạn không thể chọn các tuyến đường thay thế trên màn hình CarPlay. Bạn phải chọn những người này trên điện thoại trước khi CarPlay khởi động.
Hiển thị chỉ dẫn đường đi
Phần này trình bày cách thiết lập một trình nghe cho nguồn cấp dữ liệu và cách điền sẵn chỉ dẫn điều hướng vào các bảng điều khiển chỉ dẫn và thông tin ước tính về chuyến đi. Hãy xem phần"Tạo ứng dụng chỉ đường cho CarPlay" trong Hướng dẫn lập trình ứng dụng CarPlay để biết thêm thông tin.
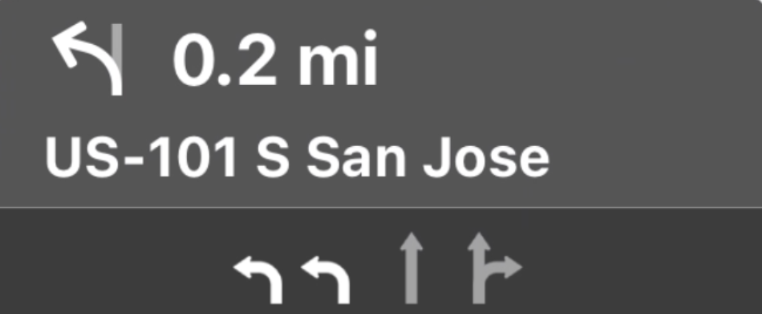
Các bảng điều khiển hướng dẫn và ước tính chuyến đi cung cấp một thẻ chỉ đường hiển thị thông tin chỉ đường liên quan đến chuyến đi hiện tại. Thư viện TurnByTurn trong Navigation SDK có thể giúp cung cấp một số thông tin này, chẳng hạn như biểu tượng, văn bản và thời gian còn lại.
Thiết lập trình nghe
Làm theo hướng dẫn thiết lập trình nghe sự kiện trong phần Thông tin chi tiết về nguồn cấp dữ liệu chỉ đường từng chặng.
Điền sẵn thông tin điều hướng
Phần đầu tiên của mã mẫu sau đây cho biết cách tạo thông tin ước tính về chuyến đi trên CarPlay bằng cách dịch GMSNavigationNavInfo.timeToCurrentStepSeconds sang CPTravelEstimate. Bạn có thể đọc thêm về những phần tử hiển thị này và các phần tử khác trong phần Thông tin chi tiết về nguồn cấp dữ liệu chỉ đường từng chặng.
Phần thứ hai của mẫu cho biết cách tạo một đối tượng và lưu trữ đối tượng đó trong trường userInfo của CPManuevers. Điều này xác định CPManeuverDisplayStyle, cũng được dùng cho thông tin hướng dẫn làn đường. Hãy xem Hướng dẫn lập trình ứng dụng CarPlay của Apple để biết thêm thông tin.
Swift
// Get a CPTravelEstimate from GMSNavigationNavInfo
func getTravelEstimates(from navInfo:GMSNavigationNavInfo) -> CPTravelEstimates {
    let distanceRemaining = navInfo.roundedDistance(navInfo.distanceToCurrentStepMeters)
    let timeRemaining = navInfo.roundedTime(navInfo.timeToCurrentStepSeconds)
    let travelEstimates = CPTravelEstimates(distanceRemaining: distanceRemaining, timeRemaining: timeRemaining)
    return travelEstimates
}

//  Create an object to be stored in the userInfo field of CPManeuver to determine the CPManeuverDisplayStyle.

/** An object to be stored in the userInfo field of a CPManeuver. */

struct ManeuverUserInfo {
    var stepInfo: GMSNavigationStepInfo
    var isLaneGuidance: Bool
}

func mapTemplate(_ mapTemplate: CPMapTemplate, displayStyleFor maneuver: CPManeuver) -> CPManeuverDisplayStyle {
    let userInfo = maneuver.userInfo
    if let maneuverUserInfo = userInfo as? ManeuverUserInfo {
        return maneuverUserInfo.isLaneGuidance ? .symbolOnly : .leadingSymbol
    }
    return .leadingSymbol
}

// Get a CPManeuver with instructionVariants and symbolImage from GMSNavigationStepInfo
func getManeuver(for stepInfo: GMSNavigationStepInfo) -> CPManeuver {
    let maneuver = CPManeuver()
    maneuver.userInfo = ManeuverUserInfo(stepInfo: stepInfo, isLaneGuidance: false)
    switch stepInfo.maneuver {
        case .destination:
            maneuver.instructionVariants = ["Your destination is ahead."]
            break
        case .destinationLeft:
            maneuver.instructionVariants = ["Your destination is ahead on your left."]
            break
        case .destinationRight:
            maneuver.instructionVariants = ["Your destination is ahead on your right."]
            break
        default:
            maneuver.attributedInstructionVariants = currentNavInfo?.instructions(forStep: stepInfo, options: instructionOptions)
            break
    }
    maneuver.symbolImage = stepInfo.maneuverImage(with: instructionOptions.imageOptions)
    return maneuver
}

// Get the lane image for a CPManeuver from GMSNavigationStepInfo
func laneGuidanceManeuver(for stepInfo: GMSNavigationStepInfo) -> CPManeuver? {
    let maneuver = CPManeuver()
    maneuver.userInfo = ManeuverUserInfo(stepInfo: stepInfo, isLaneGuidance: true)
    let lanesImage = stepInfo.lanesImage(with: imageOptions)
    guard let lanesImage = lanesImage else { return nil }
    maneuver.symbolImage = lanesImage
    return maneuver
}
Objective-C
// Get a CPTravelEstimate from GMSNavigationNavInfo
- (nonull CPTravelEstimates *)travelEstimates:(GMSNavigationNavInfo *_Nonnull navInfo) {
NSMeasurement<NSUnitLength *> *distanceRemaining = [navInfo roundedDistance:navInfo.distanceToCurrentStepMeters];
NSTimeInterval timeRemaining = [navInfo roundedTime:navInfo.timeToCurrentStepSeconds];
CPTravelEstimate* travelEstimate = [[CPTravelEstimates alloc] initWithDistanceRemaining:distanceRemaining
                                                timeRemaining:timeRemaining];
}
//  Create an object to be stored in the userInfo field of CPManeuver to determine the CPManeuverDisplayStyle.

/** An object to be stored in the userInfo field of a CPManeuver. */
@interface ManeuverUserInfo : NSObject

@property(nonatomic, readonly, nonnull) GMSNavigationStepInfo *stepInfo;
@property(nonatomic, readonly, getter=isLaneGuidance) BOOL laneGuidance;

- (nonnull instancetype)initWithStepInfo:(GMSNavigationStepInfo *)stepInfo
                        isLaneGuidance:(BOOL)isLaneGuidance NS_DESIGNATED_INITIALIZER;

- (instancetype)init NS_UNAVAILABLE;

@end

- (CPManeuverDisplayStyle)mapTemplate:(CPMapTemplate *)mapTemplate
            displayStyleForManeuver:(nonnull CPManeuver *)maneuver {
ManeuverUserInfo *userInfo = maneuver.userInfo;
return userInfo.laneGuidance ? CPManeuverDisplayStyleSymbolOnly : CPManeuverDisplayStyleDefault;
}
// Get a CPManeuver with instructionVariants and symbolImage from GMSNavigationStepInfo
- (nonnull CPManeuver *)maneuverForStep:(nonnull GMSNavigationStepInfo *)stepInfo {
CPManeuver *maneuver = [[CPManeuver alloc] init];
maneuver.userInfo = [[ManeuverUserInfo alloc] initWithStepInfo:stepInfo isLaneGuidance:NO];
switch (stepInfo.maneuver) {
    case GMSNavigationManeuverDestination:
    maneuver.instructionVariants = @[ @"Your destination is ahead." ];
    break;
    case GMSNavigationManeuverDestinationLeft:
    maneuver.instructionVariants = @[ @"Your destination is ahead on your left." ];
    break;
    case GMSNavigationManeuverDestinationRight:
    maneuver.instructionVariants = @[ @"Your destination is ahead on your right." ];
    break;
    default: {
    maneuver.attributedInstructionVariants =
        [_currentNavInfo instructionsForStep:stepInfo options:_instructionOptions];
    break;
    }
}
maneuver.symbolImage = [stepInfo maneuverImageWithOptions:_instructionOptions.imageOptions];
return maneuver;
}
// Get the lane image for a CPManeuver from GMSNavigationStepInfo
- (nullable CPManeuver *)laneGuidanceManeuverForStep:(nonnull GMSNavigationStepInfo *)stepInfo {
CPManeuver *maneuver = [[CPManeuver alloc] init];
maneuver.userInfo = [[ManeuverUserInfo alloc] initWithStepInfo:stepInfo isLaneGuidance:YES];
UIImage *lanesImage = [stepInfo lanesImageWithOptions:_imageOptions];
if (!lanesImage) {
    return nil;
}
maneuver.symbolImage = lanesImage;
return maneuver;
}
Maneuvers
CarPlay sử dụng lớp CPManeuver để cung cấp hướng dẫn từng chặng. Hãy xem Thông tin chi tiết về nguồn cấp dữ liệu chỉ dẫn từng chặng để biết thêm thông tin về các thao tác và hướng dẫn làn đường.
Tài liệu liên quan
- https://developer.apple.com/carplay/
- https://developer.apple.com/carplay/documentation/CarPlay-App-Programming-Guide.pdf
- https://developer.apple.com/design/human-interface-guidelines/carplay
- Thông tin chi tiết về nguồn cấp dữ liệu chỉ dẫn từng chặng
- Chỉ đường