iOS용 Navigation SDK를 사용하면 지도에 표시되는 기본 제공 UI 컨트롤 및 요소와 허용되는 동작을 지정하여 지도의 사용자 환경을 수정할 수 있습니다. 탐색 UI의 시각적 모양을 수정할 수도 있습니다. 내비게이션 UI의 허용되는 수정사항에 관한 가이드라인은 정책 페이지를 참고하세요.
지도 UI 컨트롤
Navigation SDK는 iOS용 Google 지도 애플리케이션에 있는 컨트롤과 유사한 UI 컨트롤을 기본으로 제공합니다. GMSUISettings 클래스를 사용하여 이러한 컨트롤의 표시 여부를 전환할 수 있습니다.
이 클래스에서 변경한 내용은 지도에 즉시 반영됩니다.
나침반
Navigation SDK는 특정 상황에서 지도의 오른쪽 상단에 표시되는 나침반 그래픽을 제공하며, 이 그래픽은 사용 설정된 경우에만 표시됩니다. 사용자가 나침반을 클릭하면 카메라가 방위가 0인 위치 (기본 방향)로 다시 움직이고 나침반은 바로 사라집니다.
탐색이 사용 설정되어 있고 카메라 모드가 '따라가기'로 설정되어 있으면 나침반이 계속 표시되며 나침반을 탭하면 기울어진 카메라 시점과 개요 카메라 시점 간에 전환됩니다.
운전자 주의 분산을 방지하기 위해 헤더 (세로 모드)가 확장되어 나침반의 기본 위치와 충돌하는 경우 나침반은 동일한 위치에 유지됩니다. 보조 헤더 맞춤 컨트롤이나 헤더 액세서리 뷰를 추가하면 UI 충돌을 방지하기 위해 나침반이 숨겨집니다.
나침반은 주간 모드와 야간 모드, 어두운 모드를 지원합니다.
나침반은 기본적으로 비활성화되어 있습니다. GMSUISettings의 compassButton 속성을 true로 설정하여 나침반을 사용 설정할 수 있습니다. 하지만 나침반이 항상 표시되도록 설정할 수는 없습니다.
Swift
mapView.settings.compassButton = true
Objective-C
mapView.settings.compassButton = YES;
내 위치 버튼
내 위치 버튼은 내 위치 버튼이 사용 설정된 경우에만
화면의 오른쪽 하단에 표시됩니다. 사용자가 버튼을 클릭하면 사용자의 위치를 알고 있는 경우 카메라가 사용자의 현재 위치에 초점을 맞추도록 애니메이션이 적용됩니다. GMSUISettings의 myLocationButton 속성을 true로 설정하여 버튼을 사용 설정할 수 있습니다.
Swift
mapView.settings.myLocationButton = true
Objective-C
mapView.settings.myLocationButton = YES;
다시 가운데로 정렬 버튼
탐색이 사용 설정된 경우 사용자가 지도 뷰를 스크롤하면 다시 가운데로 버튼이 표시되고 사용자가 탭하여 지도를 다시 가운데로 설정하면 사라집니다. 리센터 버튼이 표시되도록 하려면 GMSUISettings의 recenterButtonEnabled 속성을 true로 설정합니다. 리센터 버튼이 표시되지 않도록 하려면 recenterButtonEnabled을 false으로 설정합니다.
Swift
mapView.settings.isRecenterButtonEnabled = true
Objective-C
mapView.settings.recenterButtonEnabled = YES;
지도 UI 액세서리
Navigation SDK는 iOS용 Google 지도 애플리케이션에 있는 것과 유사한 UI 액세서리를 내비게이션 중에 표시합니다. 이 섹션에 설명된 대로 이러한 컨트롤의 공개 상태 또는 시각적 모양을 조정할 수 있습니다. 여기에서 변경한 내용은 사용자의 다음 이동에 반영됩니다.
탐색 머리글 및 바닥글
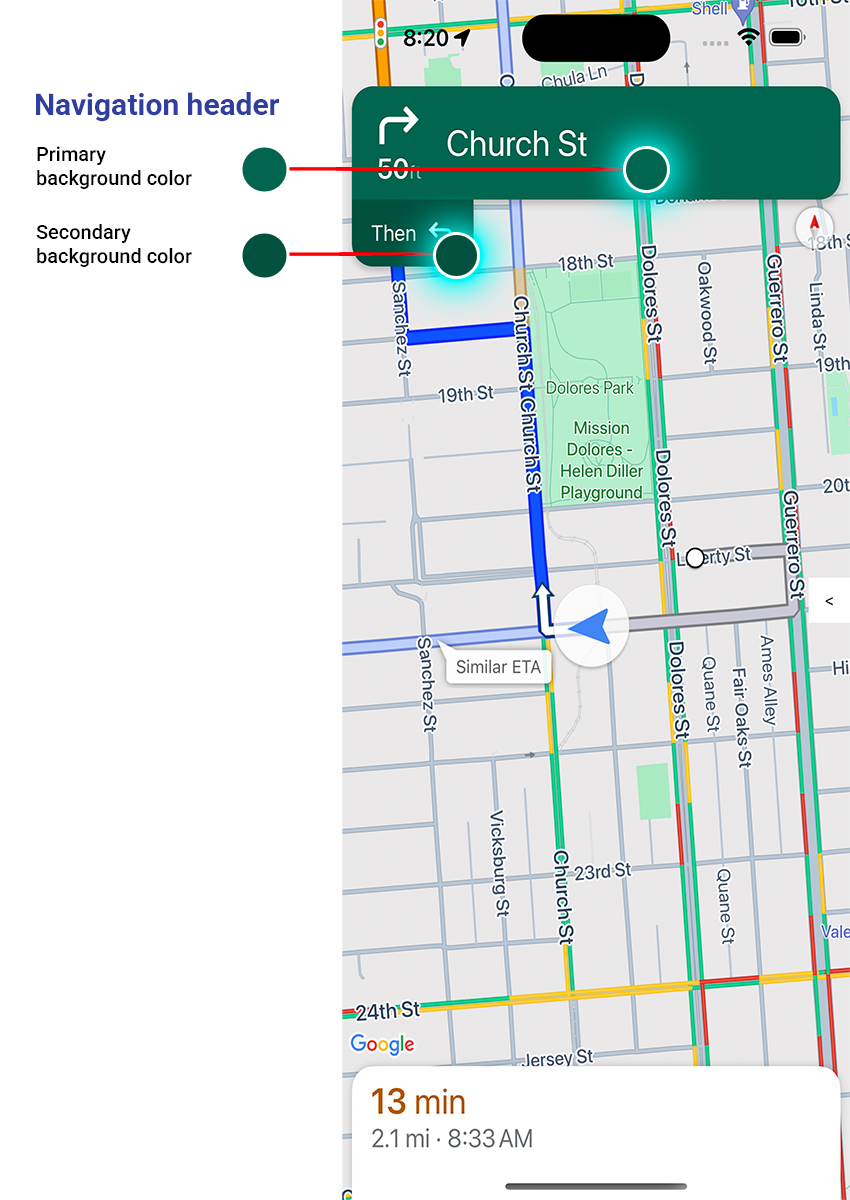
탐색 중에는 탐색 헤더가 화면 상단에 표시되고 탐색 바닥글이 하단에 표시됩니다. 탐색 헤더에는 경로의 다음 회전 지점의 도로 이름과 방향, 다음 회전 지점의 방향이 표시됩니다. 탐색 바닥글에는 목적지까지의 예상 시간과 거리, 예상 도착 시간이 표시됩니다.
다음 속성을 사용하여 탐색 헤더와 바닥글의 표시 여부를 전환하고 색상을 프로그래매틱 방식으로 설정할 수 있습니다.
navigationHeaderEnabled- 탐색 헤더가 표시되는지 여부를 제어합니다 (기본값은true).navigationFooterEnabled- 탐색 바닥글의 표시 여부를 제어합니다 (기본값은true).navigationHeaderPrimaryBackgroundColor- 탐색 헤더의 기본 배경 색상을 설정합니다.navigationHeaderSecondaryBackgroundColor- 탐색 헤더의 보조 배경 색상을 설정합니다.
다음 코드 예시에서는 헤더와 바닥글의 표시 여부를 사용 설정한 다음 navigationHeaderPrimaryBackgroundColor를 파란색으로, navigationHeaderSecondaryBackgroundColor를 빨간색으로 설정합니다.
Swift
mapView.settings.isNavigationHeaderEnabled = true
mapView.settings.isNavigationFooterEnabled = true
mapView.settings.navigationHeaderPrimaryBackgroundColor = .blue
mapView.settings.navigationHeaderSecondaryBackgroundColor = .red
Objective-C
mapView.settings.navigationHeaderEnabled = YES;
mapView.settings.navigationFooterEnabled = YES;
mapView.settings.navigationHeaderPrimaryBackgroundColor = [UIColor blueColor];
mapView.settings.navigationHeaderSecondaryBackgroundColor = [UIColor redColor];
탐색 액세서리 헤더 뷰
보조 탐색 헤더 뷰를 맞춤설정된 액세서리 뷰로 대체하여 앱을 맞춤설정할 수 있습니다. GMSNavigationAccessoryView 프로토콜을 구현하는 뷰를 만들어 이를 실행합니다. 이 프로토콜에는 필수 메서드인 -heightForAccessoryViewConstrainedToSize:onMapView:가 하나 있습니다. 지정된 mapView에서 뷰에 사용할 수 있는 최대 크기가 제공되며 뷰에 필요한 높이를 제공해야 합니다.
그런 다음 setHeaderAccessoryView:를 호출하여 이 뷰를 mapView에 전달할 수 있습니다. mapView는 현재 뷰를 애니메이션으로 표시한 후 맞춤 뷰를 애니메이션으로 표시합니다. 맞춤 뷰가 표시될 수 있도록 탐색 헤더가 표시되어야 합니다.
맞춤 헤더 액세서리 뷰를 삭제하려면 nil를 setHeaderAccessoryView:에 전달합니다.
뷰의 크기를 언제든지 변경해야 하는 경우 크기를 변경해야 하는 뷰를 전달하여 invalidateLayoutForAccessoryView:를 호출하면 됩니다.
예
다음 코드 예는 GMSNavigationAccessoryView 프로토콜을 구현하는 맞춤 뷰를 보여줍니다. 그런 다음 이 맞춤 뷰를 사용하여 맞춤 탐색 헤더 액세서리 뷰를 설정합니다.
Swift
class MyCustomView: UIView, GMSNavigationAccessoryView {
…
  func heightForAccessoryViewConstrained(to size: CGSize, on mapView: GMSMapView) -> CGFloat {
    // viewHeight gets calculated as the height your view needs.
    return viewHeight
  }
…
}

let customView = MyCustomView(...)
mapView.setHeaderAccessory(customView)

// At some later point customView changes size.
mapView.invalidateLayout(forAccessoryView: customView)

// Remove the custom header accessory view.
mapView.setHeaderAccessory(nil)
Objective-C
@interface MyCustomView : UIView <GMSNavigationAccessoryView>
…
@end

@implementation MyCustomView
…
- (CGFloat)heightForAccessoryViewConstrainedToSize:(CGSize)size onMapView:(GMSMapView *)mapView {
  // viewHeight gets calculated as the height your view needs.
  return viewHeight;
}
…
@end

MyCustomView *customView = [[MyCustomView alloc] init…];
[_mapView setHeaderAccessoryView:customView];

// At some later point customView changes size.
[_mapView invalidateLayoutForAccessoryView:customView];

// Remove the custom header accessory view.
[_mapView setHeaderAccessoryView:nil];
일반 모드 및 어두운 조명 모드
예상 조명 조건이 업데이트되면 GMSNavigatorListener.didChangeSuggestedLightingMode 리스너 메서드가 트리거됩니다. 예를 들어 기기의 현재 위치에 밤이 찾아온 경우입니다. 다음과 같은 방법으로 프로그래매틱 방식으로 저조도 모드 동작을 수정할 수 있습니다.
GMSNavigationLightingMode열거형을 사용하여 일반 모드와 저조도 모드가 사용되는 시점을 선택합니다.navigationHeaderPrimaryBackgroundColorNightMode및navigationHeaderSecondaryBackgroundColorNightMode속성의 값을 설정하여 야간 모드의 기본 및 보조 배경색을 선택합니다.
길찾기 목록
앱에서 단계별 안내를 제공할 수 있습니다. 다음 예에서는 이를 수행하는 한 가지 방법을 보여줍니다. 이 단계는 자체 구현에 따라 다를 수 있습니다.
GMSNavigator(탐색기)의setDestinations가 성공적으로 완료되고 탐색기의guidanceActive가 사용 설정된 후 진입점 버튼을 사용 설정해야 합니다.- 사용자가 진입점 버튼을 탭하면
GMSMapView(mapView)와 연결된 탐색기로GMSNavigationDirectionsListController(컨트롤러)를 만듭니다. UIViewController(뷰 컨트롤러) 인스턴스에 컨트롤러를 추가하고directionsListView을 뷰 컨트롤러의 하위 뷰로 추가합니다. 컨트롤러의reloadData및invalidateLayout메서드는UICollectionView와 마찬가지로 호출해야 합니다.- 앱의 뷰 컨트롤러 계층 구조에 뷰 컨트롤러를 푸시합니다.
다음 코드 예는 DirectionsListViewController 추가를 보여줍니다.
Swift
override func viewDidLoad() {
  super.viewDidLoad()
  // Add the directionsListView to the host view controller's view.
  let directionsListView = directionsListController.directionsListView
  directionsListView.frame = self.view.frame
  self.view.addSubview(directionsListView)
  directionsListView.translatesAutoresizingMaskIntoConstraints = false
  directionsListView.topAnchor.constraint(equalTo: self.view.topAnchor).isActive = true
  directionsListView.leadingAnchor.constraint(equalTo: self.view.leadingAnchor).isActive = true
  directionsListView.trailingAnchor.constraint(equalTo: self.view.trailingAnchor).isActive = true
  directionsListView.bottomAnchor.constraint(equalTo: self.view.bottomAnchor).isActive = true
  ...
}

override func viewWillAppear(_ animated: Bool) {
  super.viewWillAppear(animated)
  // Make sure data is fresh when the view appears.
  directionsListController.reloadData()
  ...
}

override func willTransition(to newCollection: UITraitCollection, with coordinator: UIViewControllerTransitionCoordinator) {
  super.willTransition(to: newCollection, with: coordinator)
  // Invalidate the layout during rotation.
  coordinator.animate(alongsideTransition: {_ in
    self.directionsListController.invalidateLayout()
  })
  ...
}
Objective-C
- (void)viewDidLoad {
  [super viewDidLoad];
  // Add the directionsListView to the host view controller's view.
  UIView *directionsListView = _directionsListController.directionsListView;
  directionsListView.frame = self.view.bounds;
  [self.view addSubview:directionsListView];
  directionsListView.translatesAutoresizingMaskIntoConstraints = NO;
  [directionsListView.topAnchor constraintEqualToAnchor:self.view.topAnchor].active = YES;
  [directionsListView.leadingAnchor constraintEqualToAnchor:self.view.leadingAnchor].active = YES;
  [directionsListView.trailingAnchor constraintEqualToAnchor:self.view.trailingAnchor].active = YES;
  [directionsListView.bottomAnchor constraintEqualToAnchor:self.view.bottomAnchor].active = YES;
  ...
}

- (void)viewWillAppear:(BOOL)animated {
  [super viewWillAppear:animated];
  // Make sure data is fresh when the view appears.
  [_directionsListController reloadData];
  ...
}

- (void)willTransitionToTraitCollection:(UITraitCollection *)newCollection
              withTransitionCoordinator:(id<UIViewControllerTransitionCoordinator>)coordinator {
  [super willTransitionToTraitCollection:newCollection withTransitionCoordinator:coordinator];
  void(^animationBlock)(id <UIViewControllerTransitionCoordinatorContext>context) =
      ^void(id <UIViewControllerTransitionCoordinatorContext>context) {
    [_directionsListController invalidateLayout];
  };
  // Invalidate the layout during rotation.
  [coordinator animateAlongsideTransition:animationBlock
                               completion:nil];
  ...
}

...
여행 진행률 표시줄
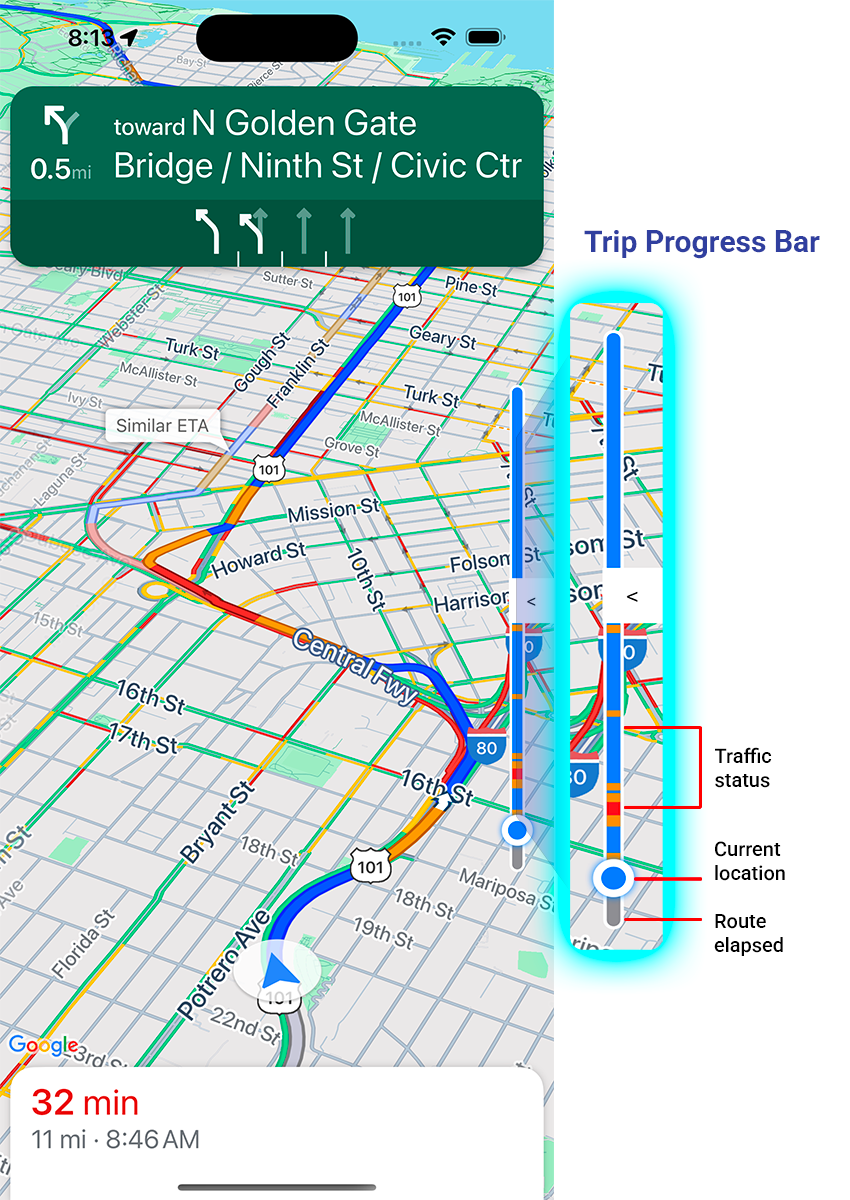
이동 진행률 표시줄은 내비게이션이 시작될 때 지도의 시작/선두 측면에 표시되는 세로 막대입니다. 사용 설정하면 사용자의 목적지와 현재 위치와 함께 전체 여정의 개요가 표시됩니다.
이를 통해 사용자는 확대하지 않고도 트래픽과 같은 향후 문제를 빠르게 예측할 수 있습니다. 그런 다음 필요한 경우 이동 경로를 다시 지정할 수 있습니다. 사용자가 여정을 다시 라우팅하면 해당 지점부터 새 여정이 시작된 것처럼 진행률 표시줄이 재설정됩니다.
여행 진행률 표시줄에는 다음 상태 표시기가 표시됩니다.
교통 상황: 예정된 교통 상황입니다.
현재 위치: 이동 중인 운전자의 현재 위치입니다.
경로 경과: 이동의 경과된 부분입니다.
GMSUISettings에서 navigationTripProgressBarEnabled 속성을 설정하여 여정 진행률 표시줄을 사용 설정합니다.
Swift
mapView.settings.isNavigationTripProgressBarEnabled = true
Objective-C
mapView.settings.navigationTripProgressBarEnabled = YES;
여행 진행률 표시줄 위치
- 막대의 왼쪽은 속도계, Google 로고, 다시 가운데로 버튼 (표시되는 경우)의 왼쪽과 대략적으로 정렬됩니다. 너비는 12pt입니다.
- 여행 진행률 표시줄은 화면의 세로 공간에 동적으로 반응합니다. 막대 하단은 화면 하단에서 210pt 떨어진 위치에 배치됩니다. 여행 진행률 표시줄의 상단은 화면 상단에서 최소 170pt 떨어져 있으며 표시줄의 최대 높이는 400pt입니다.
- 이동 진행률 표시줄이 회전 카드 또는 기타 탐색 UI 요소와 겹치는 경우 다른 요소 아래에 표시됩니다.
프롬프트 표시 여부 API (실험적)
프롬프트 표시 상태 API를 사용하면 Navigation SDK에서 생성된 UI 요소와 자체 맞춤 UI 요소 간의 충돌을 방지할 수 있습니다. Navigation SDK UI 요소가 표시되기 전과 요소가 삭제되는 즉시 콜백을 수신하는 리스너를 추가하면 됩니다. 코드 샘플을 비롯한 자세한 내용은 실시간 교통 혼잡 구성 페이지의 프롬프트 표시 API 섹션을 참고하세요.
신호등 및 정지 표지
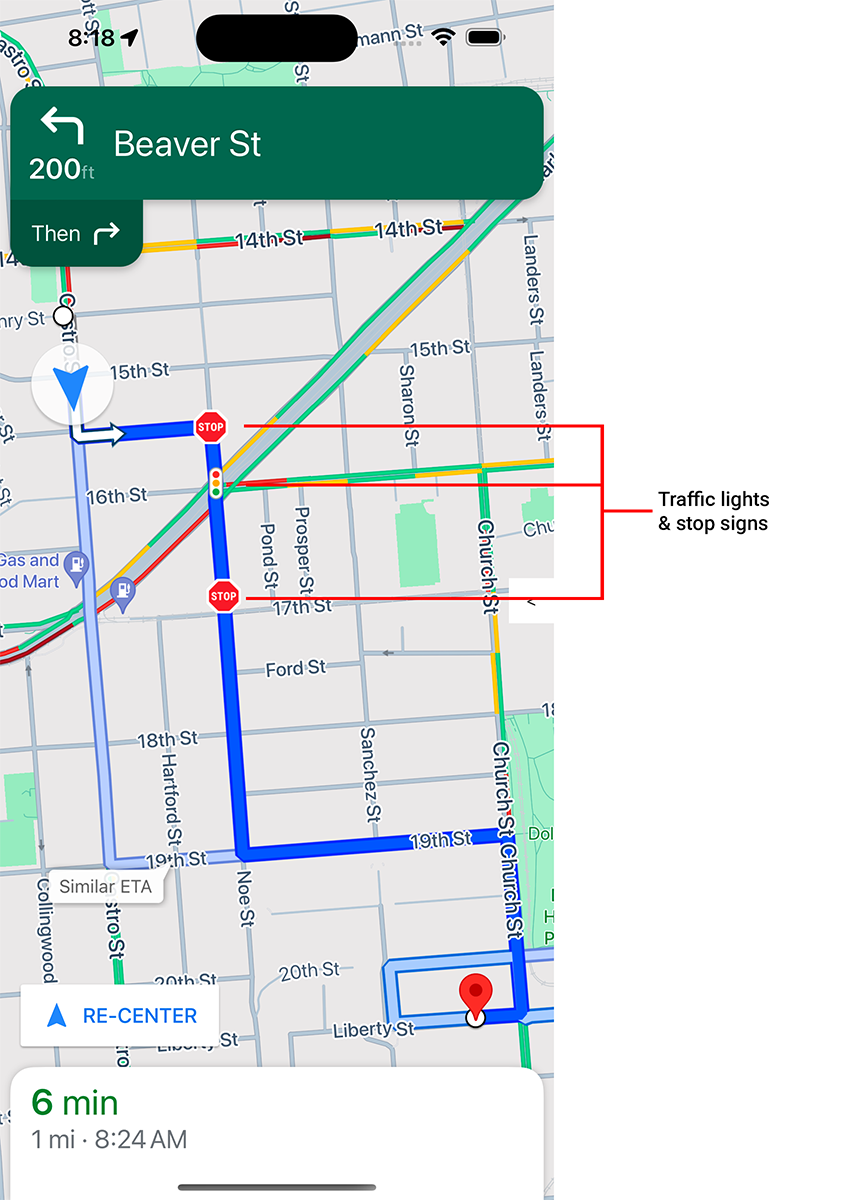
mapView에서 활성 탐색 중에 신호등과 정지 표지판의 표시를 사용 설정하여 경로와 이동 조작에 관한 추가 컨텍스트를 제공할 수 있습니다.
기본적으로 iOS용 Navigation SDK에서는 신호등과 정지 표지판이 사용 중지되어 있습니다. 이 기능을 사용 설정하려면 각 옵션의 GMSMapView 설정을 독립적으로 호출하세요(showsTrafficLights 및 showsStopSigns).
Swift
mapView.settings.showsTrafficLights = true
mapView.settings.showsStopSigns = true
Objective-C
mapView.settings.showsTrafficLights = YES;
mapView.settings.showsStopSigns = YES;
속도계 제어
탐색이 사용 설정되고 이동 모드가 운전으로 설정되면 iOS용 Navigation SDK는 현재 속도 제한을 보여주는 속도 제한 컨트롤을 지도의 하단에 표시합니다. 운전자가 제한 속도를 초과하면 컨트롤이 확장되어 운전자의 현재 속도가 표시된 두 번째 속도계가 표시됩니다.
운전자가 제한 속도를 지정된 양만큼 초과할 때 속도계 표시의 형식을 변경하도록 경고 수준을 설정할 수 있습니다. 예를 들어 운전자가 제한 속도를 8km/h 초과하면 현재 속도가 빨간색 텍스트 색상으로 표시되고, 제한 속도를 16km/h 초과하면 빨간색 배경색으로 표시되도록 지정할 수 있습니다.
속도 제한 컨트롤을 표시하려면 GMSUISettings의 shouldDisplaySpeedometer 속성을 true로 설정합니다. 속도 제한 컨트롤의 표시를 사용 중지하려면 shouldDisplaySpeedometer을 false로 설정합니다.
Swift
mapView.shouldDisplaySpeedometer = true
Objective-C
mapView.shouldDisplaySpeedometer = YES;
속도계 알림 설정에 관한 자세한 내용은 속도계 알림 구성을 참고하세요.
대상 마커
GMSUISettings의 showsDestinationMarkers 속성을 설정하여 특정 경로의 대상 마커를 표시하거나 숨길 수 있습니다. 다음 예에서는 대상 마커를 사용 중지하는 방법을 보여줍니다.
Swift
mapView.settings.showsDestinationMarkers = false
Objective-C
mapView.settings.showsDestinationMarkers = NO;
지도 환경 기능
Navigation SDK를 사용하면 사용자의 탐색 환경을 추가로 맞춤설정할 수 있습니다. 인스턴스에 적용한 변경사항은 사용자가 앱을 다음 번에 업데이트할 때 반영됩니다.
대상 강조 표시 및 입구
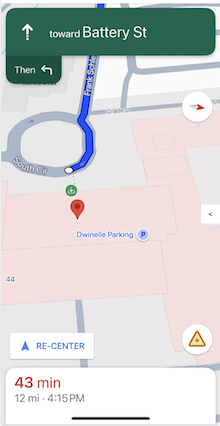
placeID로 대상을 만들면 대상 건물이 강조 표시되고 가능한 경우 입구 아이콘이 표시됩니다. 이러한 시각적 단서는 사용자가 의도한 목적지를 구분하고 탐색하는 데 도움이 됩니다.
placeID로 대상을 만들려면 placeID를 허용하는 GMSNavigationWaypoint 이니셜라이저 중 하나를 사용하세요. 예를 들어 경로 탐색 튜토리얼에서 생성된 목적지에는 가능한 경우 목적지 강조 표시와 입구 라벨이 포함됩니다.
내비게이션 중 3D 건물 표시
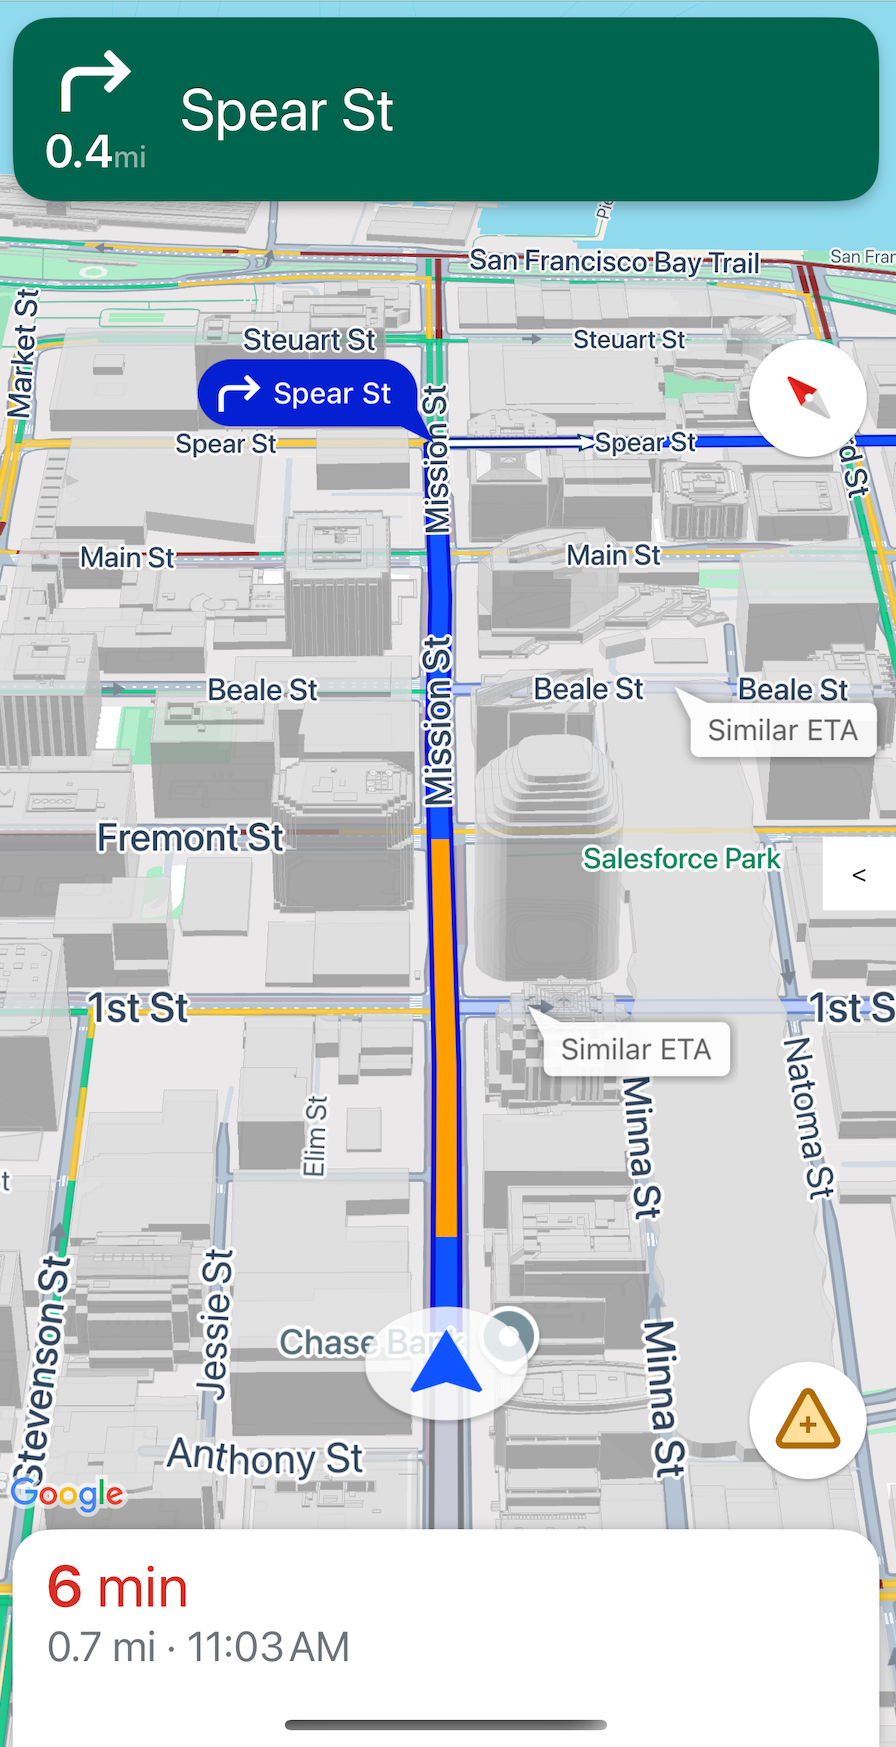
기본적으로 내비게이션 중에 3D 빌딩이 표시됩니다. 이 기능을 사용 중지하려면 buildingsEnabled를 false (Swift) 또는 NO (Objective-C)로 설정합니다.
기본 지도 동작 사용 중지
GMSMapView의 속성으로 제공되는 GMSUISettings 클래스의 속성을 설정하여 지도에서 기본 동작을 사용 중지할 수 있습니다.
다음 제스처는 프로그래밍 방식으로 활성화/비활성화할 수 있습니다. 동작을 사용 중지해도 카메라 설정에 대한 프로그래매틱 액세스는 제한되지 않습니다.
scrollGestures- 스크롤 동작의 사용 설정 또는 사용 중지 여부를 제어합니다. 이 제스처가 활성화된 경우, 사용자가 카메라를 스와이프해서 패닝할 수 있습니다.zoomGestures- 확대/축소 동작의 사용 설정 여부를 제어합니다. 사용 설정하면 사용자가 두 번 탭하거나, 두 손가락으로 탭하거나, 핀치하여 카메라를 확대할 수 있습니다.scrollGestures가 사용 설정된 상태에서 두 번 탭하거나 손가락으로 확대/축소하면 카메라가 지정된 지점으로 이동할 수 있습니다.tiltGestures- 기울기 동작의 사용 설정 또는 사용 중지 여부를 제어합니다. 사용 설정하면 사용자가 두 손가락으로 위아래로 스와이프하여 카메라를 기울일 수 있습니다.rotateGestures- 회전 동작의 사용 설정 또는 사용 중지 여부를 제어합니다. 사용 설정하면 사용자가 두 손가락 회전 동작을 사용하여 카메라를 회전할 수 있습니다.
이 예시에서는 화면 이동과 확대/축소 동작이 모두 사용 중지되었습니다.
Swift
mapView.settings.scrollGestures = false
mapView.settings.zoomGestures = false
Objective-C
mapView.settings.scrollGestures = NO;
mapView.settings.zoomGestures = NO;
위치 컨트롤 및 UI 요소
다음 속성을 사용하여 탐색 헤더 및 푸터의 위치를 기준으로 컨트롤 및 기타 UI 요소를 배치할 수 있습니다.
navigationHeaderLayoutGuidenavigationFooterLayoutGuidebottomTrailingButtonsLayoutGuide
다음 코드 예에서는 레이아웃 가이드를 사용하여 지도 뷰에 라벨 쌍을 배치하는 방법을 보여줍니다.
Swift
/* Add a label to the top left, positioned below the header. */
let topLabel = UILabel()
topLabel.text = "Top Left"
mapView.addSubview(topLabel)
topLabel.translatesAutoresizingMaskIntoConstraints = false
topLabel.topAnchor.constraint(equalTo: mapView.navigationHeaderLayoutGuide.bottomAnchor).isActive = true
topLabel.leadingAnchor.constraint(equalTo: mapView.leadingAnchor).isActive = true

/* Add a label to the bottom right, positioned above the footer. */
let bottomLabel = UILabel()
bottomLabel.text = "Bottom Right"
mapView.addSubview(bottomLabel)
bottomLabel.translatesAutoresizingMaskIntoConstraints = false
bottomLabel.bottomAnchor.constraint(equalTo: mapView.navigationFooterLayoutGuide.topAnchor).isActive = true
bottomLabel.trailingAnchor.constraint(equalTo: mapView.trailingAnchor).isActive = true
Objective-C
/* Add a label to the top left, positioned below the header. */
UILabel *topLabel = [[UILabel alloc] init];
topLabel.text = @"Top Left";
[view addSubview:topLabel];
topLabel.translatesAutoresizingMaskIntoConstraints = NO;
[topLabel.topAnchor
    constraintEqualToAnchor:mapView.navigationHeaderLayoutGuide.bottomAnchor].active = YES;
[topLabel.leadingAnchor constraintEqualToAnchor:mapView.leadingAnchor].active = YES;

/* Add a label to the bottom right, positioned above the footer. */
UILabel *bottomLabel = [[UILabel alloc] init];
bottomLabel.text = @"Bottom Right";
[view addSubview:bottomLabel];
bottomLabel.translatesAutoresizingMaskIntoConstraints = NO;
[bottomLabel.bottomAnchor
    constraintEqualToAnchor:mapView.navigationFooterLayoutGuide.topAnchor].active = YES;
[bottomLabel.trailingAnchor constraintEqualToAnchor:mapView.trailingAnchor].active = YES;
bottomTrailingButtonsLayoutGuide를 사용하여 실시간 교통 혼잡 신고 버튼을 배치하는 방법의 예는 실시간 교통 혼잡 구성을 참고하세요.
대체 경로 숨기기
사용자 인터페이스가 너무 많은 정보로 어수선해지면 기본값 (2개)보다 적은 대체 경로를 표시하거나 대체 경로를 전혀 표시하지 않아 어수선함을 줄일 수 있습니다. GMSNavigationRoutingOptions를 구성하고 다음 열거형 값 중 하나로 alternateRoutesStrategy를 설정하여 경로를 가져오기 전에 이 옵션을 구성할 수 있습니다.
| 열거 값 | 설명 |
|---|---|
| GMSNavigationAlternateRoutesStrategyAll | 기본값입니다. 최대 2개의 대체 경로가 표시됩니다. |
| GMSNavigationAlternateRoutesStrategyOne | 대체 경로를 하나 표시합니다 (있는 경우). |
| GMSNavigationAlternateRoutesStrategyNone | 대체 경로를 숨깁니다. |
예
다음 코드 예는 대체 경로를 완전히 숨기는 방법을 보여줍니다.
Swift
let routingOptions = GMSNavigationRoutingOptions(alternateRoutesStrategy: .none)
navigator?.setDestinations(destinations,
                           routingOptions: routingOptions) { routeStatus in
  ...
}
Objective-C
GMSNavigationRoutingOptions *routingOptions = [[GMSNavigationRoutingOptions alloc] initWithAlternateRoutesStrategy:GMSNavigationAlternateRoutesStrategyNone];
[navigator setDestinations:destinations
            routingOptions:routingOptions
                  callback:^(GMSRouteStatus routeStatus){...}];

