با مجموعهها، منظم بمانید
ذخیره و طبقهبندی محتوا براساس اولویتهای شما.
برای شروع استفاده از Google Photos API، پروژه خود را با فعال کردن Photos API های مورد نیاز خود با استفاده از Google API Console و تنظیم شناسه مشتری OAuth 2.0 پیکربندی کنید.
برنامه شما از طرف یک کاربر Google Photos با Google Photos تعامل دارد. برای مثال، وقتی آلبومهایی را در کتابخانه Google Photos کاربر ایجاد میکنید یا موارد رسانه را در حساب Google Photos کاربر آپلود میکنید، کاربر این درخواستهای API را با استفاده از پروتکل OAuth 2.0 تأیید میکند.
شناسه مشتری OAuth 2.0 به کاربران برنامه شما اجازه می دهد تا وارد سیستم شوند، احراز هویت کنند و از این طریق از Photos API استفاده کنند. APIهای Photos از حسابهای سرویس پشتیبانی نمیکنند. برای استفاده از این APIها، کاربران باید به یک حساب Google معتبر وارد شوند.
برنامه خود را پیکربندی کنید
ابتدا API را فعال کنید، سپس یک شناسه مشتری OAuth 2.0 درخواست کنید.
API را فعال کنید
قبل از اینکه بتوانید از Photos API استفاده کنید، باید آنها را در پروژه خود فعال کنید.
از نوار منو، یک پروژه را انتخاب کنید یا یک پروژه جدید ایجاد کنید.
برای باز کردن یکی از APIهای Google Photos، از منوی پیمایش، APIs & Services > Library را انتخاب کنید.
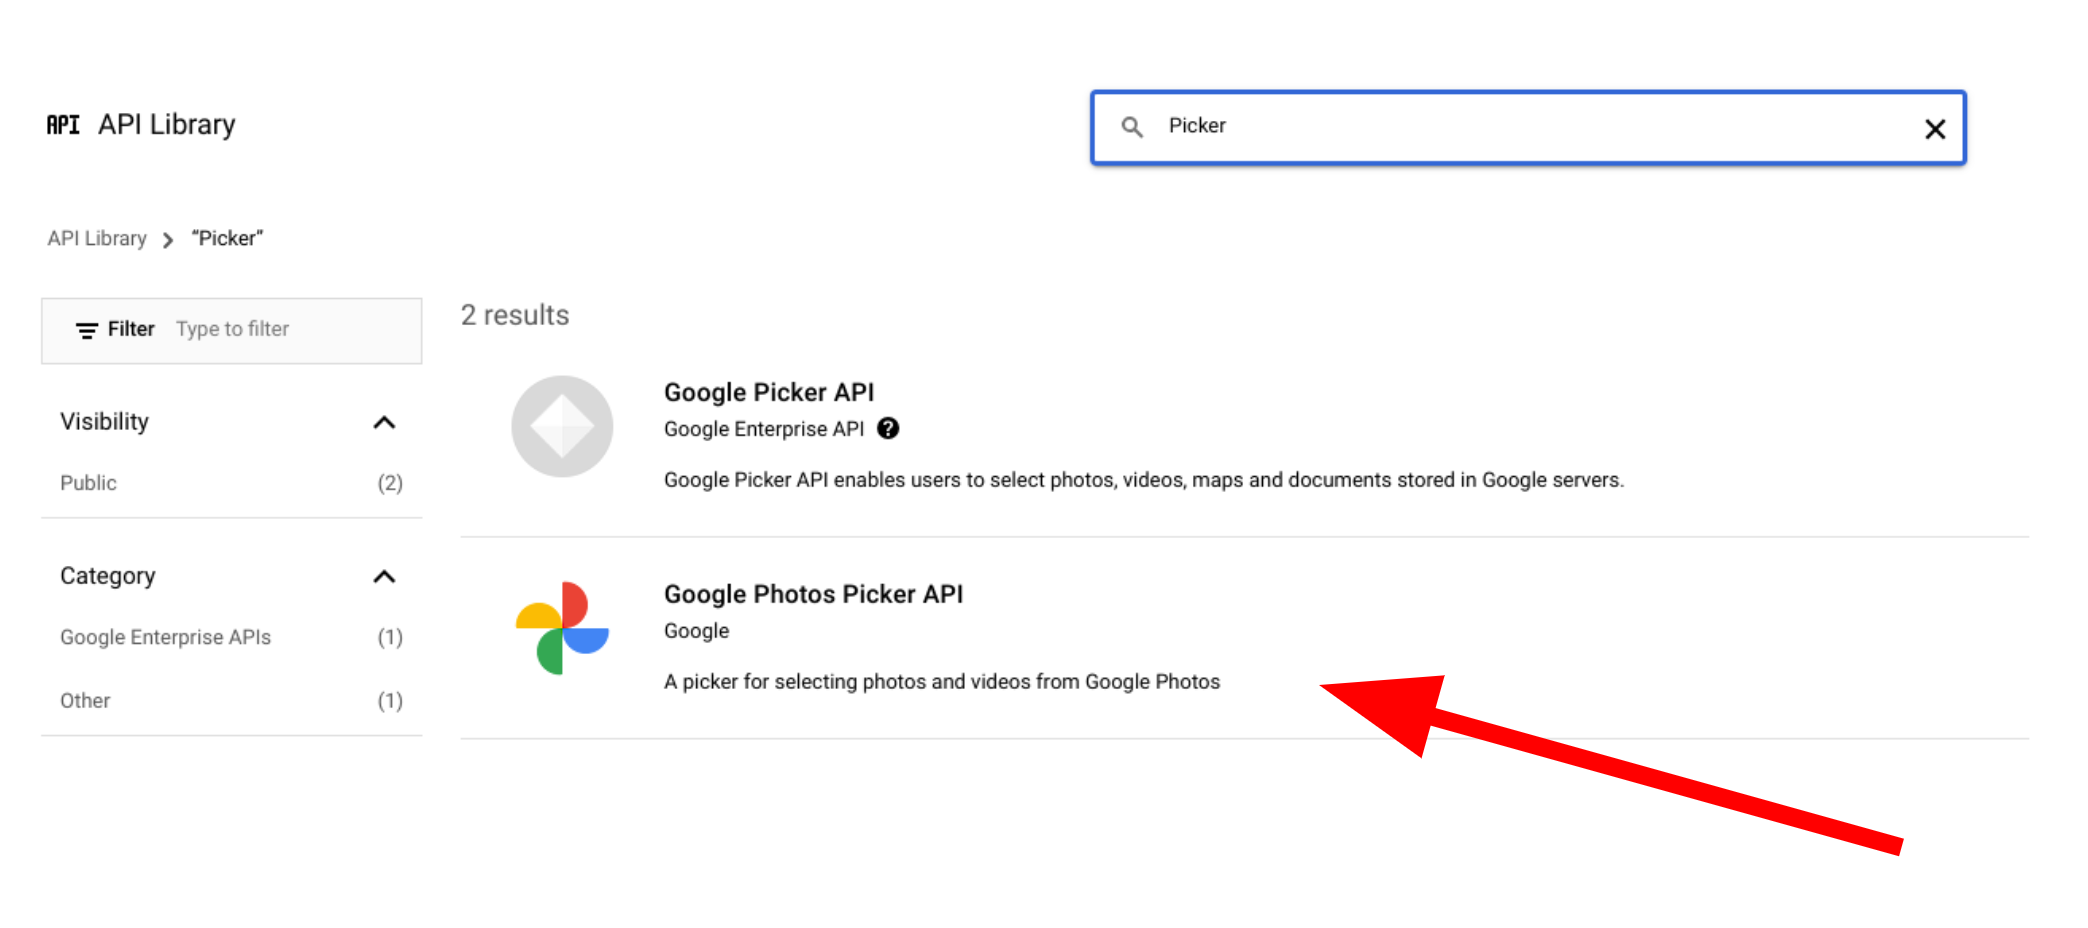
جستجو برای "عکس". یک یا چند مورد از Photos API را انتخاب کنید و روی Enable کلیک کنید.
شناسه مشتری OAuth 2.0 را درخواست کنید
برای درخواست شناسه مشتری OAuth و پیکربندی آن برای برنامه خود، این مراحل را دنبال کنید. این مثال از برنامهای استفاده میکند که در آن کل جریان OAuth در سمت سرور مدیریت میشود، مانند نمونههای ما. فرآیند راه اندازی ممکن است برای سایر سناریوهای پیاده سازی متفاوت باشد.
از منو، APIs & Services > Credentials را انتخاب کنید.
در صفحه اعتبارنامه ، روی ایجاد اعتبارنامه > شناسه مشتری OAuth کلیک کنید.
نوع برنامه خود را انتخاب کنید. در این مثال، نوع برنامه کاربردی وب است.
مبداهایی را که برنامه شما از آنجا اجازه دسترسی به APIهای Google را دارد به شرح زیر ثبت کنید:
برای شناسایی شناسه مشتری، یک نام وارد کنید.
در قسمت Authorized JavaScript origins ، مبدا برنامه خود را وارد کنید. این فیلد حروف عام را مجاز نمیداند.
میتوانید چندین منبع را وارد کنید تا به برنامهتان اجازه دهید روی پروتکلها، دامنهها یا زیر دامنههای مختلف اجرا شود. URL هایی که وارد می کنید مجاز به شروع درخواست OAuth هستند.
مثال زیر یک URL توسعه محلی (نمونه های ما از localhost:8080 استفاده می کنند) و یک URL تولید را نشان می دهد.
قسمت Authorized Redirect URI نقطه پایانی است که پاسخها را از سرور OAuth 2.0 دریافت میکند. به طور معمول، این شامل محیط توسعه شما می شود و به مسیری در برنامه شما اشاره می کند.
از کادر گفتگوی مشتری OAuth، موارد زیر را کپی کنید:
شناسه مشتری
راز مشتری
برنامه شما میتواند با استفاده از این مقادیر به Google APIهای فعال دسترسی پیدا کند.
قبل از اینکه بتوانید یک برنامه عمومی را راه اندازی کنید که به Photos API دسترسی دارد، برنامه شما باید توسط Google بررسی شود. هنگامی که برنامه خود را آزمایش می کنید، پیام "برنامه تایید نشده" روی صفحه ظاهر می شود تا زمانی که تأیید شود.
بعد از اینکه برنامه خود را پیکربندی کردید، برای شروع آماده هستید:
منابع ایجاد شده از طریق هر یک از APIهای Google Photos فقط با استفاده از شناسه مشتری اصلی که برای ایجاد آنها استفاده شده است قابل دسترسی یا اصلاح هستند. به عنوان مثال، اگر یک session در Picker API با شناسه مشتری خاص ایجاد کنید و بعداً آن شناسه مشتری را در برنامه خود تغییر دهید، برنامه شما دسترسی به منابع API ایجاد شده با شناسه مشتری قبلی را از دست خواهد داد.
با دقت برنامه ریزی کنید و نوع شناسه مشتری مناسب را برای Photos API که استفاده می کنید انتخاب کنید. شناسه مشتری خود را فقط در صورت لزوم تغییر دهید تا از مشکلات دسترسی جلوگیری کنید.
تاریخ آخرین بهروزرسانی 2025-08-29 بهوقت ساعت هماهنگ جهانی.
[null,null,["تاریخ آخرین بهروزرسانی 2025-08-29 بهوقت ساعت هماهنگ جهانی."],[[["\u003cp\u003eTo use Google Photos APIs, enable them in your Google API Console project and set up an OAuth 2.0 client ID for user authentication.\u003c/p\u003e\n"],["\u003cp\u003eGoogle Photos APIs require user sign-in with a Google Account and do not support service accounts.\u003c/p\u003e\n"],["\u003cp\u003eBefore launching publicly, your application needs to be verified by Google to remove the "Unverified app" message.\u003c/p\u003e\n"],["\u003cp\u003eResources created with a specific client ID can only be accessed or modified using the same ID; changing it may lead to access issues.\u003c/p\u003e\n"],["\u003cp\u003eYou can get started with either the Picker API or the Library API after configuring your application.\u003c/p\u003e\n"]]],["To utilize Google Photos APIs, enable them in your project via the Google API Console. Then, request an OAuth 2.0 client ID, selecting your application type and registering authorized JavaScript origins and redirect URIs. Copy the client ID and secret for your app's use. Note that user sign-in via a valid Google Account is necessary. Applications must be verified by Google before public launch, and client ID changes can cause access issues to previously created resources.\n"],null,["# Configure your app\n\nTo start using the Google Photos APIs, configure your project by enabling the Photos\nAPIs you need using the Google API Console and setting up an OAuth 2.0 client ID.\n\nYour application interacts with Google Photos on behalf of a\nGoogle Photos user. For example, when you create albums in a user's\nGoogle Photos library or upload media items to a user's\nGoogle Photos account, the user authorizes these API requests using the\n[OAuth 2.0](/identity/protocols/OAuth2) protocol.\n\nThe OAuth 2.0 client ID allows your application users to sign in, authenticate,\nand thereby use the Photos APIs. The Photos APIs don't support\nservice accounts; to use these APIs, users must be signed in to a valid Google\nAccount.\n\nConfigure your app\n------------------\n\nFirst enable the API, then request an OAuth 2.0 client ID.\n\n### Enable the API\n\nBefore you can use the Photos APIs, you must enable them in your project.\n\n1. Go to the [Google API Console](https://console.developers.google.com/apis/library).\n2. From the menu bar, select a project or create a new project.\n3. To open one of the Google Photos APIs, from the Navigation menu, select **APIs \\& Services \\\u003e Library**.\n4. Search for \"Photos\". Select one or more of the Photos APIs and click **Enable**.\n\n| **Note:** When searching Google APIs, you may also see the \"Google Picker API\", which is different from the Google Photos Picker API.\n\n### Request an OAuth 2.0 client ID\n\nFollow these steps to request an OAuth client ID and configure it for your\napplication. This example uses an application where the entire OAuth flow is\nhandled server-side, such as the one in our samples. The setup process may vary\nfor other [implementation scenarios](/identity/protocols/OAuth2).\n\n1. Go to the [Google API Console](https://console.developers.google.com/apis/library) and select your project.\n2. From the menu, select **APIs \\& Services \\\u003e Credentials**.\n3. On the **Credentials** page, click **Create Credentials \\\u003e OAuth client ID**.\n\n | **Note:** If you're setting up a new project, you may be prompted to configure your project's consent screen.\n4. Select your **Application type** . In this example, the application type is\n **Web application**.\n\n5. Register the origins from which your app is allowed to access the Google\n APIs as follows:\n\n 1. To identify the client ID, enter a name.\n 2. In the **Authorized JavaScript origins** field, enter the origin for\n your app. This field doesn't allow wildcards.\n\n You can enter multiple origins to allow your app to run on different\n protocols, domains, or subdomains. The URLs you enter are allowed to\n start an OAuth request.\n\n The following example shows a local development URL (our samples use\n `localhost:8080`) and a production URL. \n\n http://localhost:8080\n https://myproductionurl.example.com\n\n 3. The **Authorized redirect URI** field is the endpoint that receives\n responses from the OAuth 2.0 server. Typically, this includes your\n development environment and points to a path in your application.\n\n http://localhost:8080/auth/google/callback\n https://myproductionurl.example.com/auth/google/callback\n\n 4. Click **Create**.\n\n\u003c!-- --\u003e\n\n6. From the resulting OAuth client dialog, copy the following:\n\n - Client ID\n - Client secret\n\n Your app can access the enabled Google APIs using these values.\n\nBefore you can launch a public application that accesses the Photos APIs,\nyour app must be reviewed by Google. An \"Unverified app\" message appears on the\nscreen when you test your application, until it is\n[verified](https://support.google.com/cloud/answer/7454865).\n\nAfter you've configured your app you're ready to get started:\n\n- [Get started with the Picker API](/photos/picker/guides/get-started-picker)\n- [Get started with the Library API](/photos/library/guides/get-started-library)\n\nChanging your client ID\n-----------------------\n\nResources created through any of the Google Photos APIs can only be accessed or\nmodified using the original client ID used to create them. For example, if you\ncreate a `session` in the Picker API with a specific client ID and later change\nthat client ID in your app, your app will lose access to any API resources\ncreated with the previous client ID.\n\nPlan carefully and choose the correct client ID type for the Photos API you are\nusing. Only change your client ID if absolutely necessary to avoid access\nissues."]]