انتخاب عکس: آنچه کاربران می بینند
با مجموعهها، منظم بمانید
ذخیره و طبقهبندی محتوا براساس اولویتهای شما.
این راهنما به شما کمک می کند تا تجربه کاربر خود را هنگام انتخاب موارد رسانه درک کنید.
به دنبال جریان استاندارد Picker API ، انتخاب موجودات پس از نمایش برنامه pickerUri
، و زمانی که برنامه شما در حال نظرسنجی است تا mediaItemsSet
به درستی بازگردد.
برای مشاهده هر یک از این مراحل در دستگاه خود، برنامه نمونه ما را بررسی کنید.
جلسه چیدن را شروع کنید
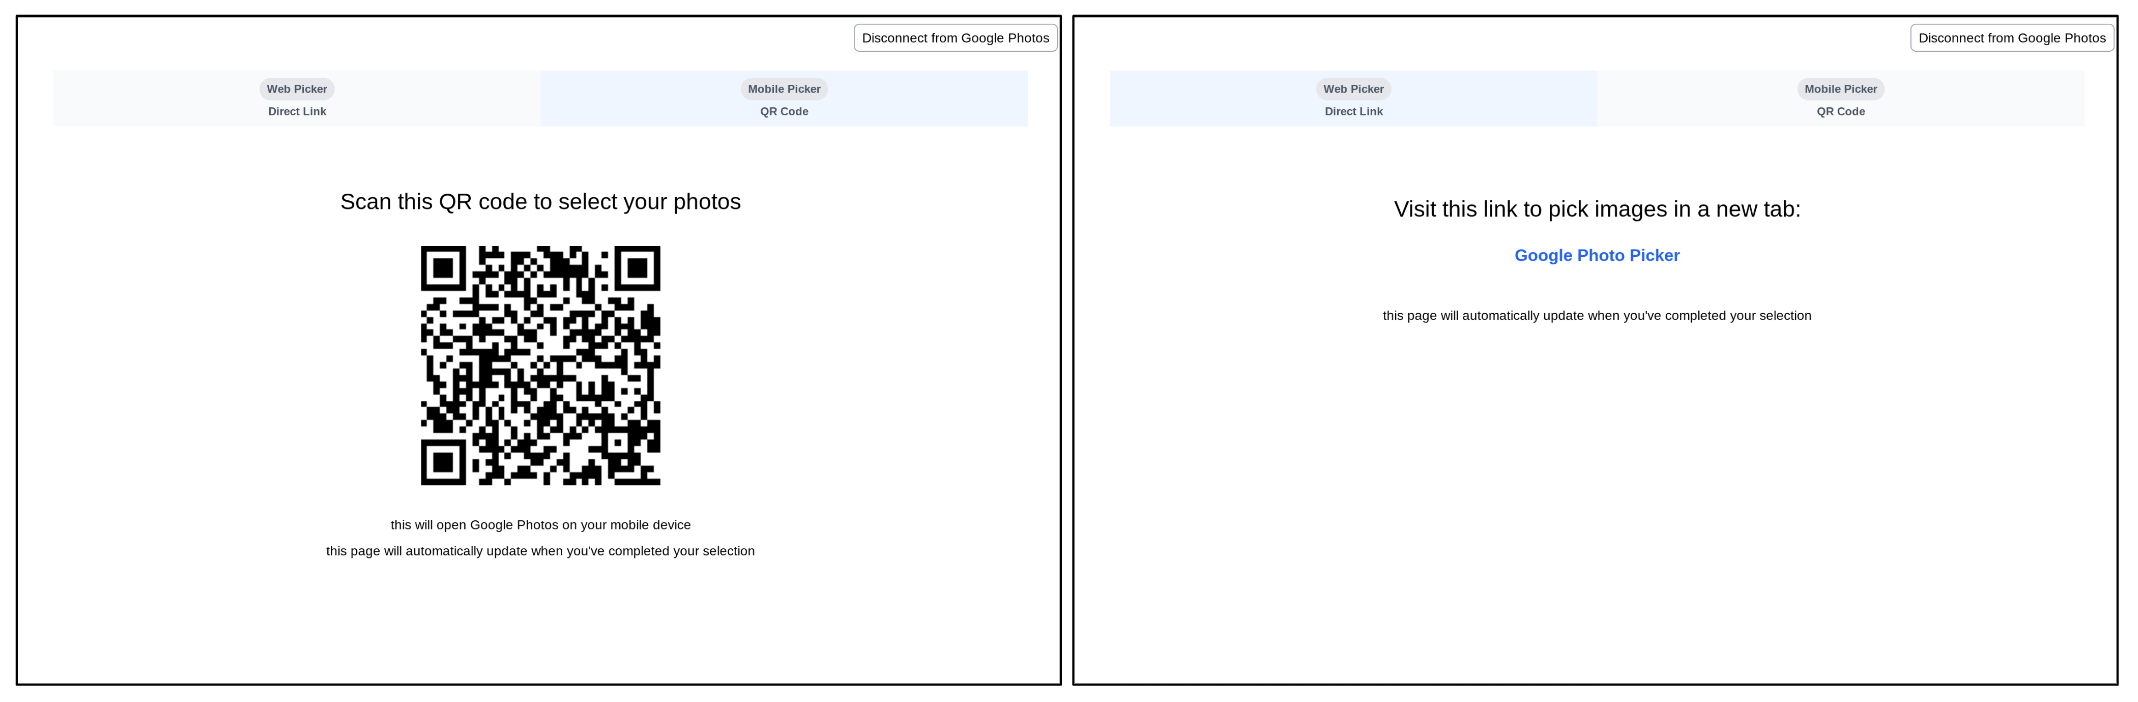
پس از ایجاد موفقیت آمیز یک جلسه، برنامه شما باید pickerUri
به کاربران شما نمایش دهد.
-
pickerUri
هم به عنوان کد QR و هم به عنوان URL نمایش دهید. - متن مفید را در کنار
pickerUri
ارائه دهید. به عنوان مثال، "این کد را اسکن کنید تا Google Photos باز شود و موارد خود را انتخاب کنید.". - برای دستگاههایی با قابلیتهای ورودی محدود (مانند کیوسکها، تبلتها، تلویزیونهای هوشمند)، توصیههای سازنده سختافزار خود را در مورد اندازه متن و عرض کد QR بررسی کنید.

عکس ها را جستجو و انتخاب کنید
وقتی کاربر به pickerUri
دسترسی پیدا میکند، به صفحه انتخاب عکس در برنامه Google Photos منتقل میشود.
این صفحه همیشه جدیدترین عکسها را از کتابخانه Google Photos کاربر شما نمایش میدهد. آلبومها، موارد دلخواه و سایر دستههای عکسهای رایج مستقیماً نشان داده نمیشوند. کاربران می توانند عکس ها را با استفاده از معیارهای مختلف مانند کلمات کلیدی، تاریخ، مکان و عنوان آلبوم جستجو کنند.
اگر برنامه شما از آلبومها، تاریخها یا سایر دستههای عکسهای رایج استفاده میکند، با درخواست از کاربران خود برای جستجو پس از ورود به برنامه Google Photos، به آنها کمک کنید.
به عنوان مثال، اگر از کاربران خود میخواهید آلبوم خاصی را به اشتراک بگذارند، میتوانید متن زیر را در همان صفحهای که کاربرانتان به Google Photos متصل میکنند قرار دهید: «به Google Photos متصل شوید، سپس آلبومی را که میخواهید به اشتراک بگذارید جستجو کنید».

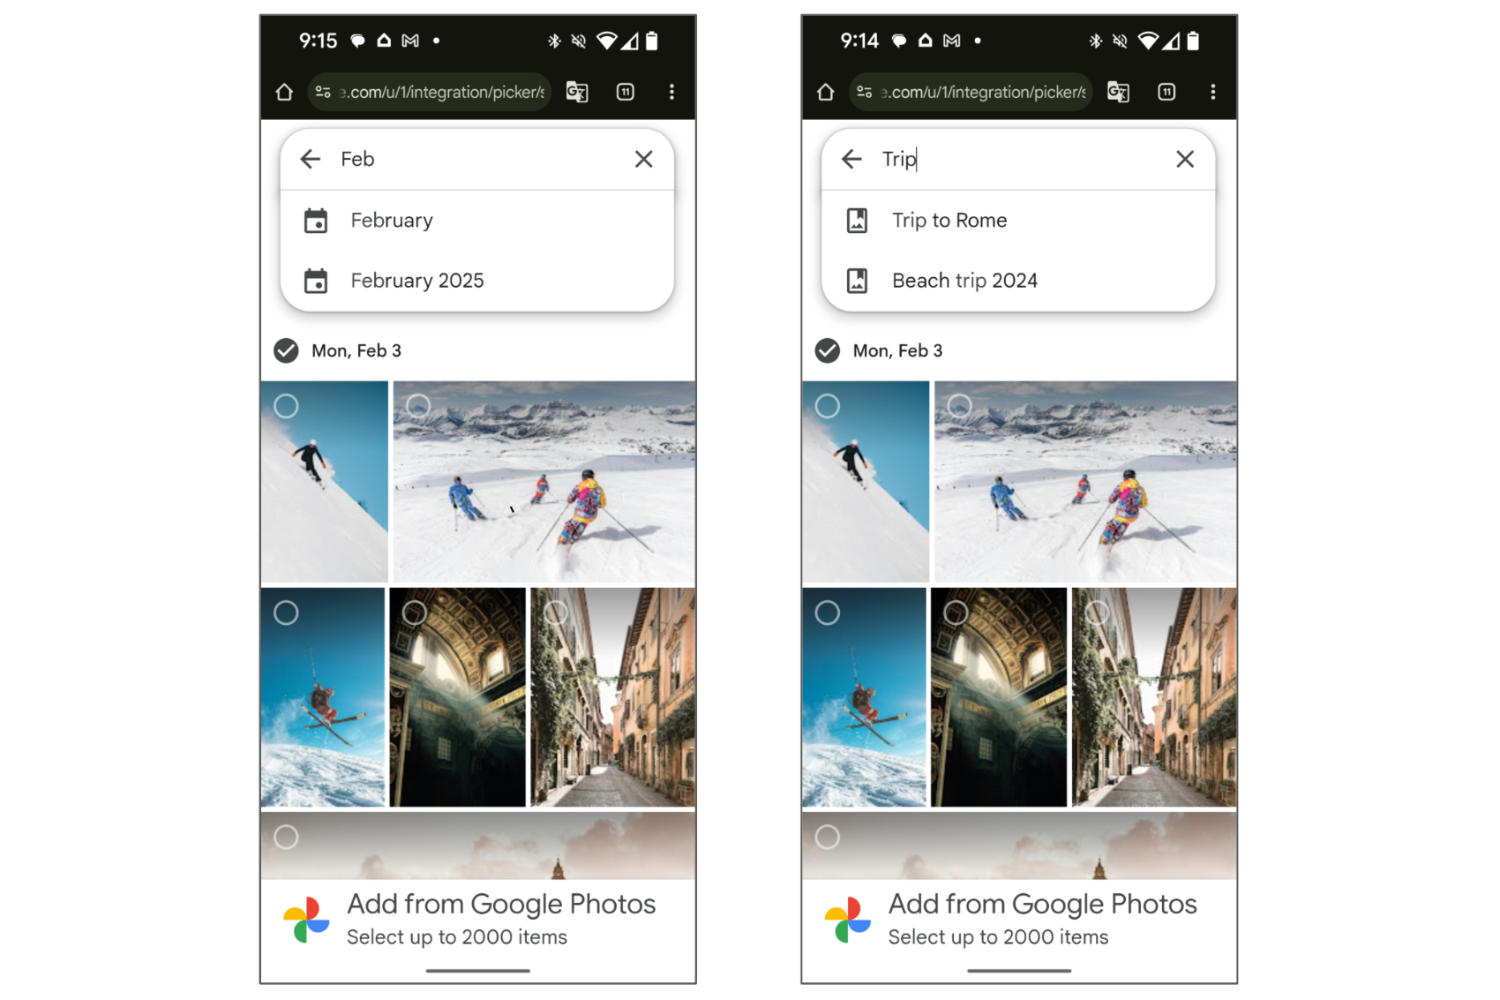
پس از جستجو، کاربر می تواند یک یا چند مورد را از نتایج انتخاب کند.
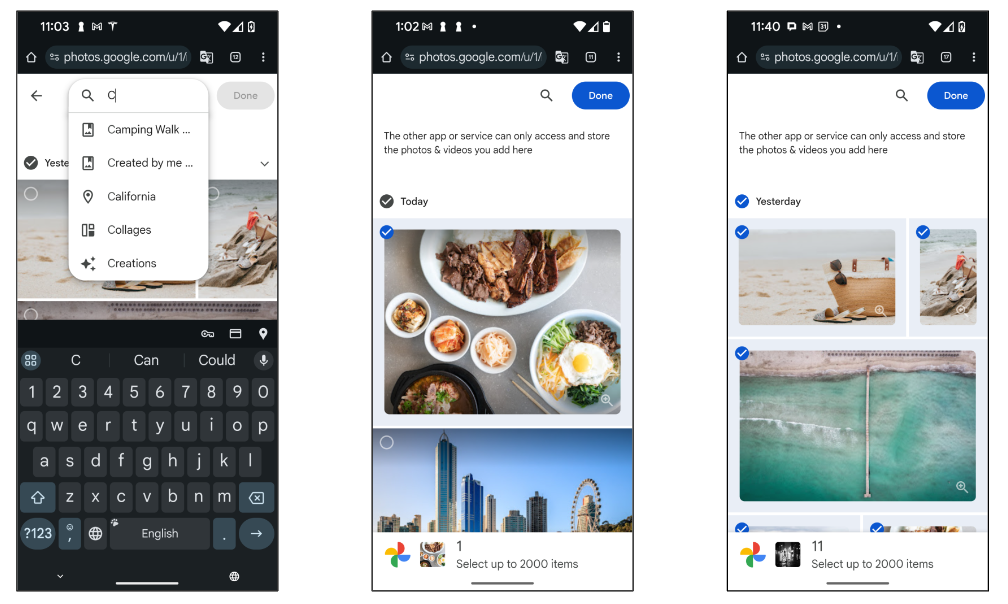
صفحه نمایش تمام شد

هنگامی که کاربر روی دکمه "انجام شد" ضربه زد و انتخاب را کامل کرد، صفحه "انجام شد" را مشاهده خواهد کرد. با این کار جلسه انتخاب به پایان می رسد و pickerUri
فعلی دیگر کار نخواهد کرد.
برای ارائه گزینه انتخاب عکس های بیشتر به کاربران خود، یک جلسه انتخاب جدید ایجاد کنید و pickerUri
دوباره در برنامه خود نمایش دهید.
جز در مواردی که غیر از این ذکر شده باشد،محتوای این صفحه تحت مجوز Creative Commons Attribution 4.0 License است. نمونه کدها نیز دارای مجوز Apache 2.0 License است. برای اطلاع از جزئیات، به خطمشیهای سایت Google Developers مراجعه کنید. جاوا علامت تجاری ثبتشده Oracle و/یا شرکتهای وابسته به آن است.
تاریخ آخرین بهروزرسانی 2025-08-29 بهوقت ساعت هماهنگ جهانی.
[null,null,["تاریخ آخرین بهروزرسانی 2025-08-29 بهوقت ساعت هماهنگ جهانی."],[[["\u003cp\u003eThis guide explains the user experience within the Google Photos app when selecting media items using the Picker API.\u003c/p\u003e\n"],["\u003cp\u003eUsers initiate the process by accessing the \u003ccode\u003epickerUri\u003c/code\u003e displayed in your app, which opens a photo selection page within Google Photos.\u003c/p\u003e\n"],["\u003cp\u003eUsers can search and select photos from their Google Photos library using various criteria before confirming their choices.\u003c/p\u003e\n"],["\u003cp\u003eAfter selection, users are presented with a "Done" screen, and your app can re-display the \u003ccode\u003epickerUri\u003c/code\u003e to allow for further selections in a new session.\u003c/p\u003e\n"]]],["The core process involves displaying a `pickerUri` (QR code and URL) to users, prompting them to access it. This takes them to Google Photos for photo selection. Users can search using keywords, dates, or locations to find specific photos. Upon selection and pressing \"Done,\" the process ends. Apps can offer to display the `pickerUri` again to initiate a new picking session, to select more items. While the app is polling for the media selection the process has begun.\n"],null,["# Photo picking: what users see\n\nThis guide helps you understand your user's experience when picking media items.\n\nFollowing the [standard Picker API flow](/photos/picker/guides/get-started-picker#the_picker_api_flow),\npicking beings after your app displays the [`pickerUri`](/photos/picker/reference/rest/v1/sessions#PickingSession.FIELDS.picker_uri),\nand while your app is polling for [`mediaItemsSet`](/photos/picker/reference/rest/v1/sessions#PickingSession.FIELDS.media_items_set) to return true.\n\nTo view any of these steps on your own device, check out our [sample app](/photos/picker/samples).\n\nStart the picking session\n-------------------------\n\nAfter successfully creating a session your app should display the `pickerUri` to\nyour users.\n\n- Display the `pickerUri` as both a QR code and a URL.\n- Provide helpful text alongside the `pickerUri`. For example, \"Scan this code to open Google Photos and select your items.\".\n- For devices with limited input capabilities (e.g., kiosks, tablets, smart TVs), check your hardware manufacture's recommendations on text size and QR code width.\n\nSearch and select photos\n------------------------\n\nWhen a user accesses the `pickerUri`, they are taken to a photo selection page\nwithin the Google Photos app.\n\nThis page will always display the most recent photos from your user's Google\nPhotos library. Albums, favorites, and other common photos categories are not\nshow directly. Users can search for photos using various criteria,\nsuch as keywords, dates, locations, and album titles.\n\nIf your app utilizes albums, dates, or other common photos categories, help your\nusers by prompting them to search once they enter the Google Photos app.\n\nFor example, if your asking your users to share a specific album, you could\ninclude the following text on the same page your users connect to Google Photos:\n\"Connect to Google Photos, then search for the album you want to share.\"\n\nAfter searching, the user can select one or more items from the results.\n\nDone screen\n-----------\n\nOnce the user taps the \"Done\" button and completes picking, they will see\nthe \"Done\" screen. This ends the picking session and the current `pickerUri`\nwill no longer work.\n\nTo provide your users the option to select more photos, create a new picking\nsession and display the `pickerUri` again in your app."]]