開發人員可以使用 Google 代碼管理工具,在行動應用程式中導入及管理評估代碼和像素,不必重建應用程式二進位檔並重新提交至應用程式市集。使用 Google Analytics for Firebase SDK 的開發人員可以輕鬆新增代碼管理工具,即使應用程式已發布,也能管理及變更導入作業。
開發人員可以記錄重要事件,稍後再決定要觸發哪些代碼或像素。
必要條件
事前準備:
- 在 Firebase 主控台內,將您的應用程式新增至 Firebase 專案中。
- 為應用程式設定 Google Analytics,包括在 Firebase 專案中啟用 Google Analytics,以及在應用程式中新增 Google Analytics for Firebase SDK。
- 建立代碼管理工具帳戶。
- 設定 Google 代碼管理工具容器。
以下各節將逐步說明如何在 Android 應用程式中設定及使用 Google 代碼管理工具。
1. 在專案中加入 Google 代碼管理工具
在模組 Gradle 檔案 (通常為
app/build.gradle) 中,新增對代碼管理工具程式庫的下列依附元件:dependencies { // ... compile 'com.google.android.gms:play-services-tagmanager:18.3.0' }登入代碼管理工具帳戶。
選取行動容器。
按一下頂端導覽列的「版本」。
按一下要使用的容器版本。
點選 [下載]。
如果
app/src/main/assets/containers資料夾不存在,請建立該資料夾。將下載的容器複製到資料夾。
2. 記錄事件和變數
代碼管理工具會使用 Google Analytics for Firebase SDK 記錄的事件、參數和使用者屬性,觸發及建立您在 Google 代碼管理工具中設定的代碼。
請參閱 Firebase 開發人員說明文件,瞭解如何記錄事件和設定使用者屬性。
在代碼管理工具中設定變數
如要擷取事件參數和使用者屬性的值,以便在 Google 代碼管理工具中使用,您可以在代碼管理工具介面設定變數。
舉例來說,您可以在應用程式中記錄下列自訂事件:
Bundle params = new Bundle();
params.putString("image_name", name);
params.putString("full_text", text);
mFirebaseAnalytics.logEvent("share_image", params);
接著,您可以在代碼管理工具中設定新的事件參數變數,如下所示擷取 image_name 和 full_text parameter 值:
- 變數名稱:圖片名稱
- 變數類型:事件參數
- 事件參數鍵名稱:
image_name
和:
- 變數名稱:全文
- 變數類型:事件參數
- 事件參數鍵名稱:
full_text
同樣地,您可以在應用程式中設定下列使用者屬性:
mFirebaseAnalytics.setUserProperty("favorite_food", mFavoriteFood);
接著,您可以在 Google 代碼管理工具中設定新的 Firebase 使用者屬性變數,擷取 favorite_food 值:
- 變數名稱:喜愛的食物
- 變數類型:Firebase 使用者屬性
- 事件參數鍵名稱:
favorite_food
修改和封鎖事件
代碼管理工具可讓您在 Google Analytics for Firebase SDK 記錄事件前,修改及封鎖事件。修改事件可協助您新增、移除或變更事件參數的值,或調整事件名稱,而無須更新應用程式。Google Analytics for Firebase SDK 會記錄未遭封鎖的事件。
Google Analytics for Firebase SDK 也會自動記錄部分事件和使用者屬性。您可以在代碼管理工具中使用自動收集的事件和屬性,不必新增任何程式碼。但無法封鎖對方。
3. 傳送事件
Firebase 事件名稱變數、Firebase 事件參數變數和其他變數可用於設定觸發條件。每當您記錄 Firebase 事件,系統就會評估觸發條件。根據預設,Google Analytics for Firebase 事件會自動觸發。您可以在代碼管理工具中新增 Google Analytics for Firebase 代碼,封鎖事件傳送至 Google Analytics。
4. 預覽、偵錯及發布容器
發布容器版本前,請先預覽版本,確認運作正常。Google 代碼管理工具可讓您在網頁介面中產生連結和 QR code,並使用這些連結和 QR code 開啟應用程式,預覽容器版本。您也可以啟用詳細記錄模式,偵錯任何非預期行為。
預覽容器
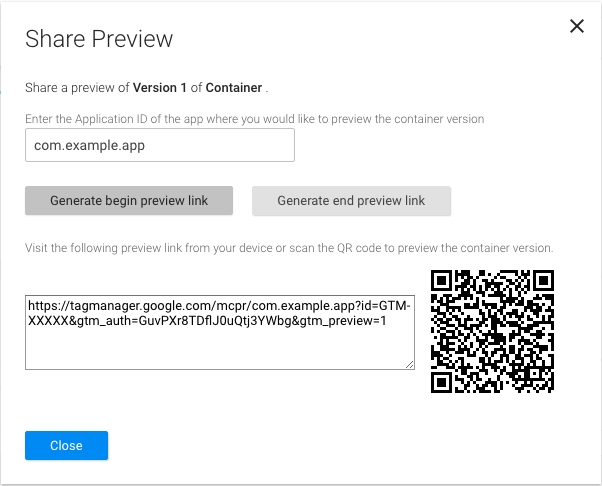
預覽容器前,請先在 Google 代碼管理工具網頁介面中產生預覽網址,方法是選取要預覽的容器版本,然後選取「預覽」。請儲存這個預覽網址,稍後會用到。
如要預覽容器 (如果您使用 Android Studio,請跳至步驟 3):
將這個預覽活動新增至
AndroidManifest檔案:<!-- Add preview activity. --> <activity android:name="com.google.android.gms.tagmanager.TagManagerPreviewActivity" android:noHistory="true"> <!-- optional, removes previewActivity from activity stack. --> <intent-filter> <data android:scheme="tagmanager.c.com.example.app" /> <action android:name="android.intent.action.VIEW" /> <category android:name="android.intent.category.DEFAULT" /> <category android:name="android.intent.category.BROWSABLE"/> </intent-filter> </activity>將這行變更為包含應用程式的套件名稱:
<data android:scheme="tagmanager.c.com.example.app"/>在 Google 代碼管理工具網頁介面中,產生預覽連結:
- 登入代碼管理工具帳戶。
- 選取行動容器。
- 按一下頂端導覽列的「版本」。
- 找到要預覽的容器版本,然後依序點選「動作」>「預覽」。
- 輸入應用程式的套件名稱。
- 按一下「產生開始預覽連結」。
停止應用程式,然後使用產生的預覽連結或 QR code 啟動應用程式。
如要退出預覽模式,請按一下網頁介面中「產生結束預覽連結」選項產生的連結。
偵錯容器
如要排解容器導入問題,請啟用詳細記錄功能:
$ adb shell setprop log.tag.GoogleTagManager VERBOSE
發布容器
預覽容器並確認運作正常後,即可發布容器。發布容器後,行動應用程式使用者就能使用代碼設定。
後續步驟
請參閱「進階設定」。