Page Summary
-
This guide explains how to track Android app install conversions with Google Ads by using Google Tag Manager and conversion tracking tags.
-
The process involves setting up a new conversion in Google Ads, creating a corresponding trigger and tag in Google Tag Manager, and updating your app's
AndroidManifest.xmlfile. -
You need to push a specific event to the data layer within your app to trigger the Google Ads conversion tracking tag in Google Tag Manager.
-
If your app utilizes deep linking, additional code is necessary to record deep linking conversions by pushing the link information to the data layer.
-
Finally, you need to publish your Google Tag Manager container to deploy these changes and start tracking conversions.
Google Tag Manager provides Google Ads conversion tracking tags to support flexible, rule-based Google Ads conversion tracking for Android apps.
This guide shows you how use Google Tag Manager to track Android app install conversions with Google Ads conversion tracking tags:
- Create a new conversion in Google Ads
- Create a trigger to fire a Google Ads conversion tracking tag
- Create a Google Ads conversion tracking tag
- Update file
AndroidManifest.xml - Push the conversion event to the data layer
- Record deep links
- Publish the container
1. Create a new conversion in Google Ads
To create a new conversion in Google Ads:
- Sign in to your Google Ads account.
- At the menu bar, select Tools > Conversions.
- Click + CONVERSION.
- Select App.
- Select Android and App installs (first open) and click Continue.
- Enter the following:
- Click Name to the name of the Android app and click Done.
- Click Value to enter a value for each install of the app, or select Don't assign a value to this install, and click Done.
- Click Package name to enter the package name of your Android app within Google play and click Done.
- Click Optimization, which is turned off by default. To turn on optimization, click OFF to toggle it to ON and click Done.
- (Optional). Click Postback URL to enter the URL from your analytics provider where you’d like conversions to be posted and click Done.
- Click Save and continue.
- Review your conversion settings. To change them, click Edit settings.
- Under Set up your tracking method, select
Put tracking code into the app.
See the screenshot of setting up conversion tracking.
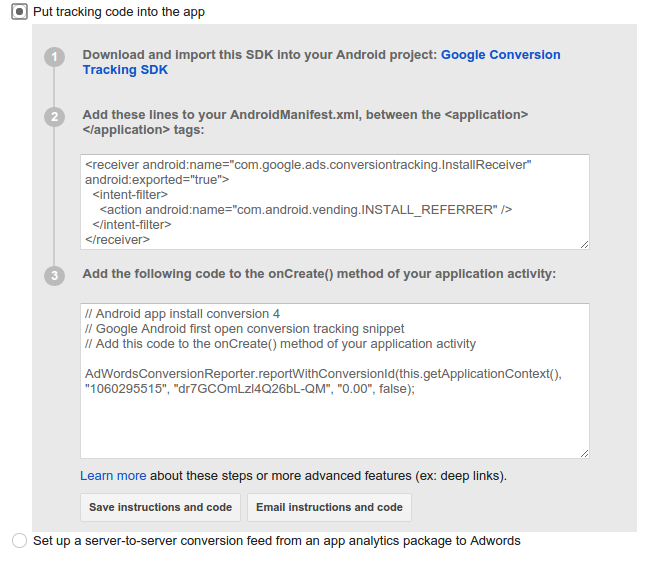
- Click Save instructions and code or Email instructions and code to save the conversion ID and conversion label, which are required to create a Google Ads conversion tracking tag.
- Click Done.
2. Create a trigger to fire a Google Ads conversion tracking tag
To create a trigger in Google Tag Manager to fire the Google Ads conversion tracking tag:
- Sign in to your Google Tag Manager account.
- Select a mobile container.
- On the left navigation bar, click Triggers.
- Click New.
- Under Fire On, enter the following conditions:
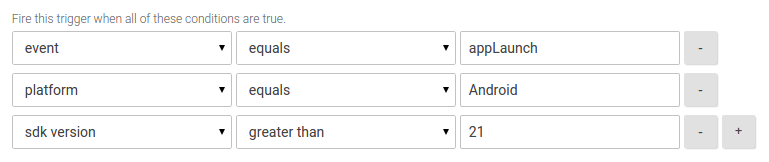
- Click Create Trigger.
- Enter a trigger name.
- Click Save.
3. Create a Google Ads conversion tracking tag
To create a Google Ads conversion tracking tag:
- Sign in to your Google Tag Manager account.
- Select a mobile container.
- On the left navigation bar, click Tags.
- Click New.
- Choose product Google Ads.
- Choose tag type Google Ads Conversion Tracking.
- Enter the Conversion ID and Conversion Label.
- Select Unrepeatable.
- Click Continue.
- Under Fire On, select Custom event.
- Select the trigger created in step 2.
- Click Save.
- Click Create Tag.
- Enter a tag name (e.g. Android App Install Conversion).
- Click Save.
4. Update file AndroidManifest.xml
In Android Studio, open the AndroidManifest.xml file to add
the following within the <application> tag:
<service android:name="com.google.android.gms.tagmanager.InstallReferrerService"/>
<receiver
   android:name="com.google.android.gms.tagmanager.InstallReferrerReceiver"
   android:exported="true">
   <intent-filter>
       <action android:name="com.android.vending.INSTALL_REFERRER" />
   </intent-filter>
</receiver>
5. Push the Google Ads conversion event to the data layer
First initialize Google Tag Manager (GTM). Then add the following code you to your app to push the Google Ads conversion event to the data layer, which will enable GTM to evaluate the trigger and fire the matching tag:
DataLayer dataLayer = TagManager.getInstance(context).getDataLayer();
dataLayer.pushEvent("appLaunch", DataLayer.mapOf());
6. Record deep links
If your app uses deep linking, to record a deep linking conversion,
push the link to the data layer as "gtm.url" in the activities
launched by your intents:
if (this.getIntent() != null && this.getIntent().getData() != null ) {
  TagManager.getInstance(this).getDataLayer().push("gtm.url", this.getIntent().getData().toString());
}
7. Publish the container
You can now publish your container to begin firing the Google Ads conversion tag. For details, see Adding, Updating and Publishing Tags on Setup and Workflow (Mobile Apps).