Untuk menyediakan Badge Perusahaan baru, pengguna harus menyelesaikan alur autentikasi dan pengaitan di perangkatnya. Tindakan ini menautkan akun pengguna eksternal mereka ke akun Google Wallet. Dokumen ini menjelaskan proses tersebut secara umum di berbagai platform.
Menambahkan ke Google Wallet dari aplikasi Android
Di bagian ini, kami menjelaskan alur untuk menyimpan kartu ke Google Wallet dari aplikasi Android Penyedia Layanan.
Alur pengguna
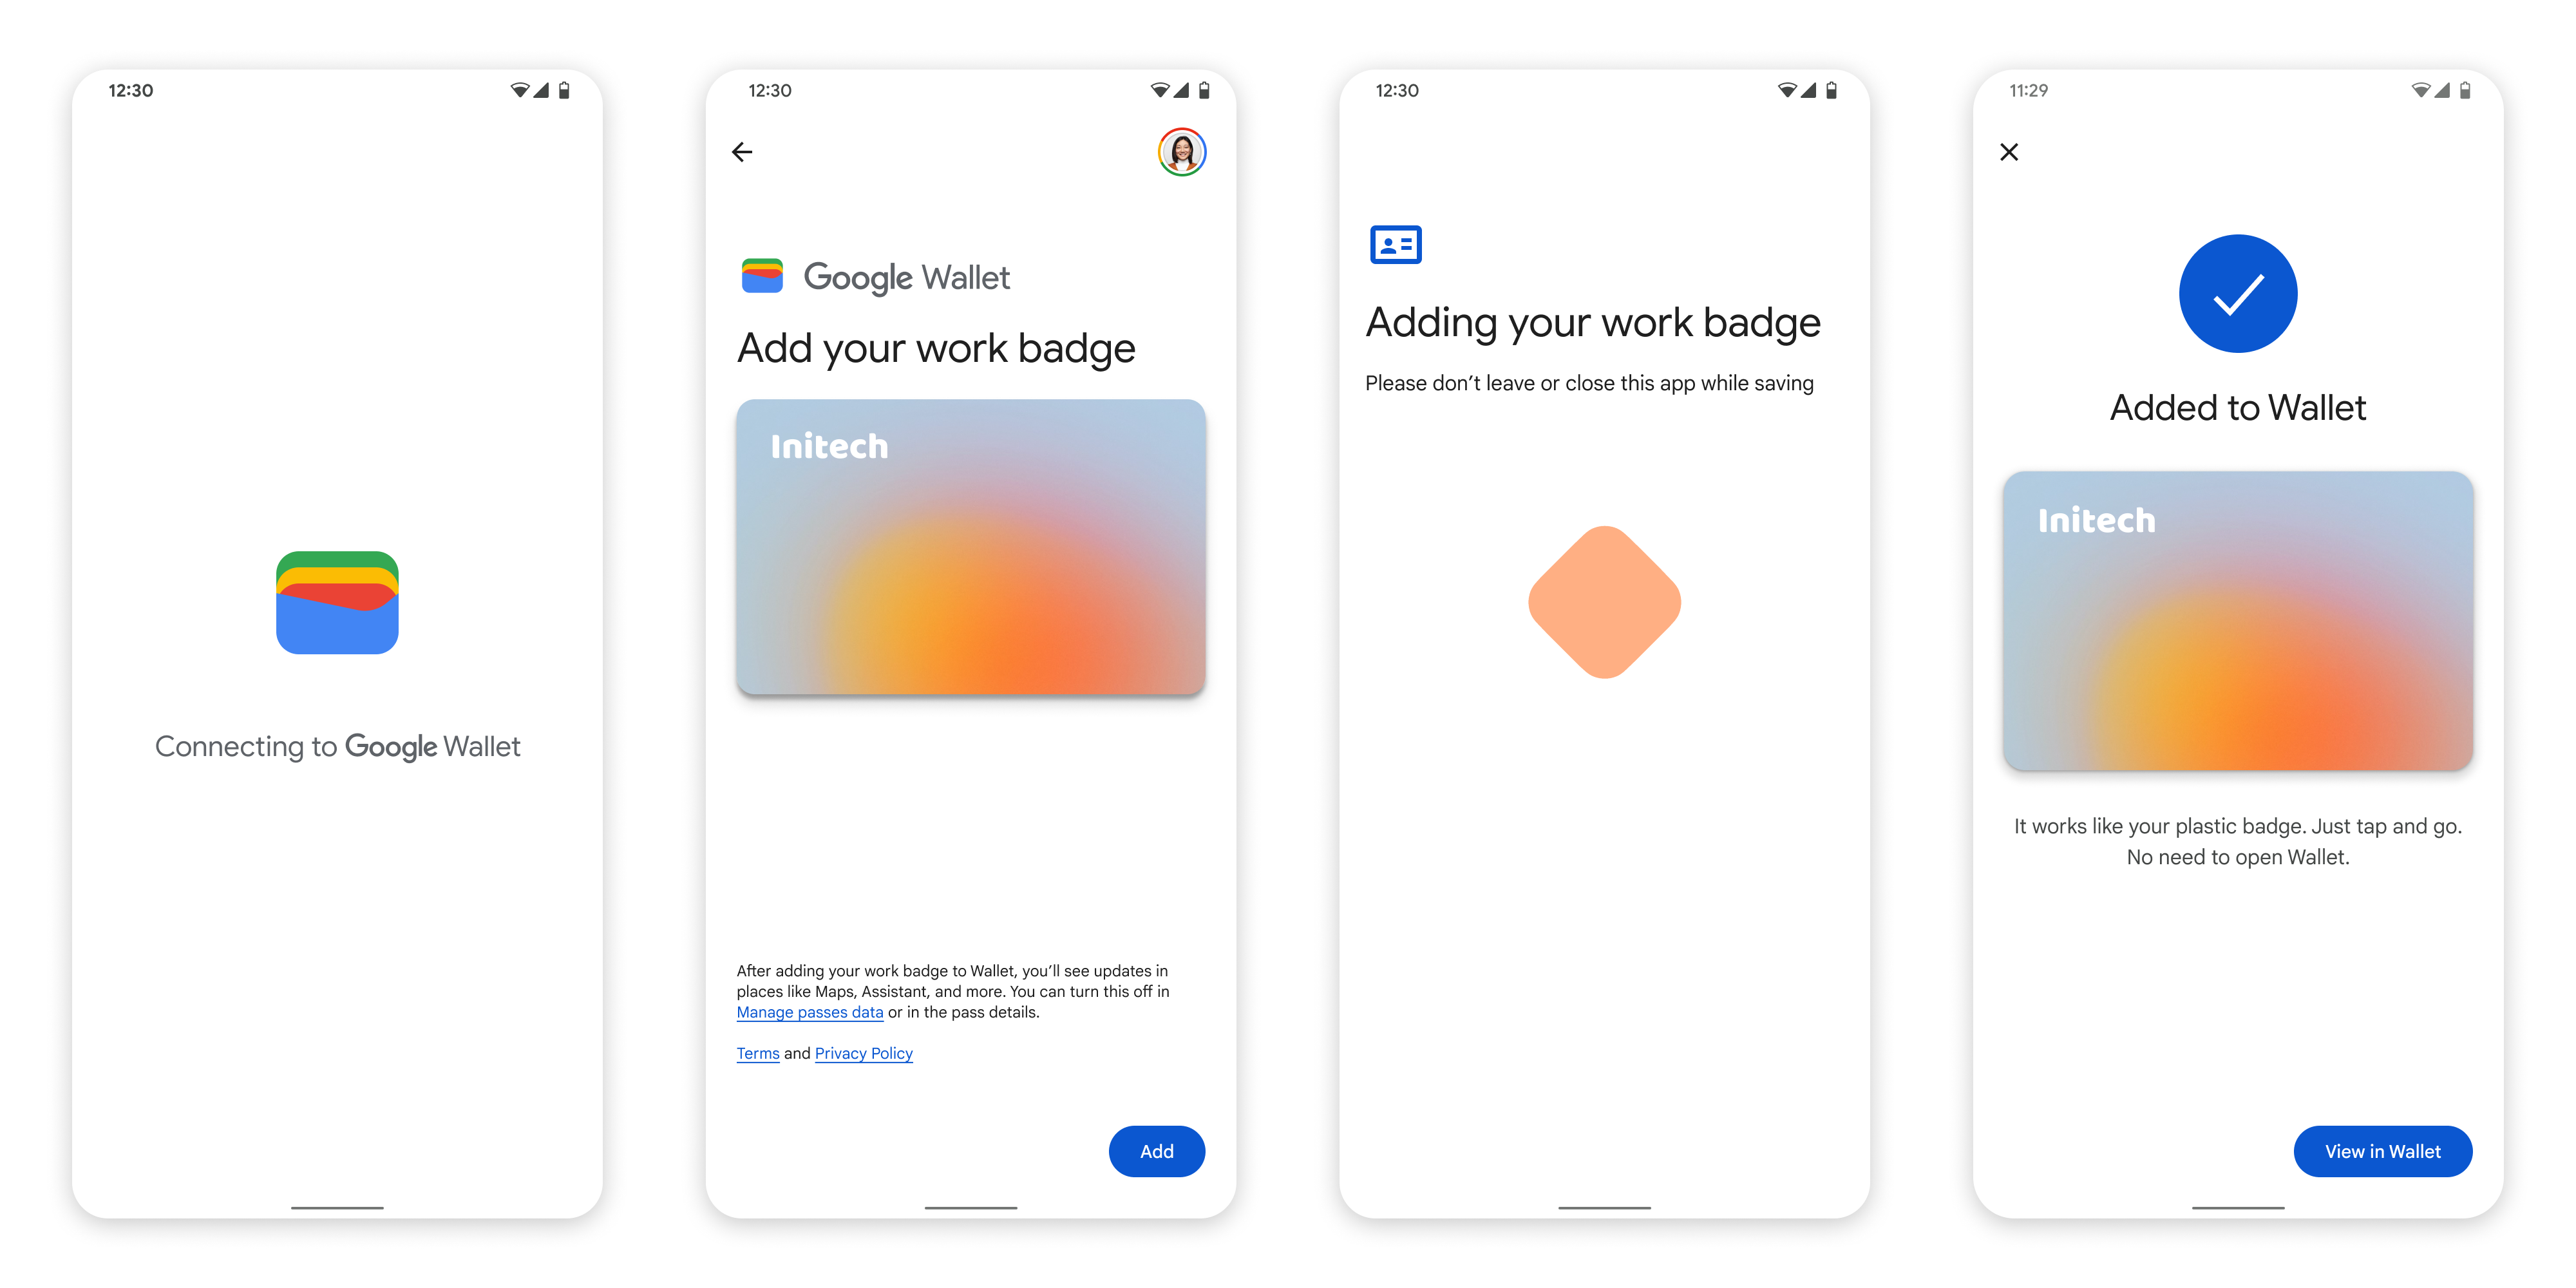
Gambar ini menggambarkan alur pengguna untuk menyediakan Badge Perusahaan dari perspektif Google Wallet.
- Animasi koneksi berputar ditampilkan kepada pengguna saat konektivitas jaringan dan layanan awal dikonfigurasi.
- Setelah selesai, pengguna menyetujui Persyaratan Layanan dan melanjutkan alur.
- Animasi penyimpanan berputar ditampilkan kepada pengguna saat layanan latar belakang menyediakan akun di perangkat.
- Setelah layanan selesai, layar berhasil akan muncul.
- Pengguna mungkin diminta di layar berikutnya untuk mendownload aplikasi Google Wallet, jika aplikasi tersebut belum ada di perangkat mereka.
Poin utama
- Jika kartu sudah disimpan ke Akun Google yang dipilih, pengguna akan melihat link untuk membuka kartu di aplikasi Google Wallet, tempat mereka dapat melihat detail kartu.
- Jika kartu disimpan ke Akun Google selain yang digunakan pengguna untuk login, pengguna akan menerima pesan yang menunjukkan bahwa Akun Google lain telah menyimpan kartu tersebut.
- Jika pengguna mencoba menambahkan kartu dan tidak memiliki Akun Google, perintah untuk membuat akun akan muncul. Setelah pembuatan Akun Google, alurnya akan berlanjut seperti biasa.
- Aplikasi yang mendukung alur Badge Perusahaan harus terintegrasi dengan API layanan Google Play. Namun, panggilan metode dari aplikasi Penyedia Layanan ke layanan Google Play tidak tersedia di versi layanan Google Play yang didistribusikan secara publik. Developer aplikasi Penyedia Layanan harus menambahkan dan mendapatkan akses ke modul kustom untuk memanggil metode tertentu. Hubungi Penyedia Layanan Anda untuk mengetahui informasi selengkapnya.
Menambahkan ke Google Wallet di Perangkat Wearable dari aplikasi Android
Pengguna dapat melakukan penyediaan ke Perangkat Wearable dengan memulai alur penyediaan di ponsel dan memilih satu Perangkat Wearable, seperti yang terlihat pada gambar ini:
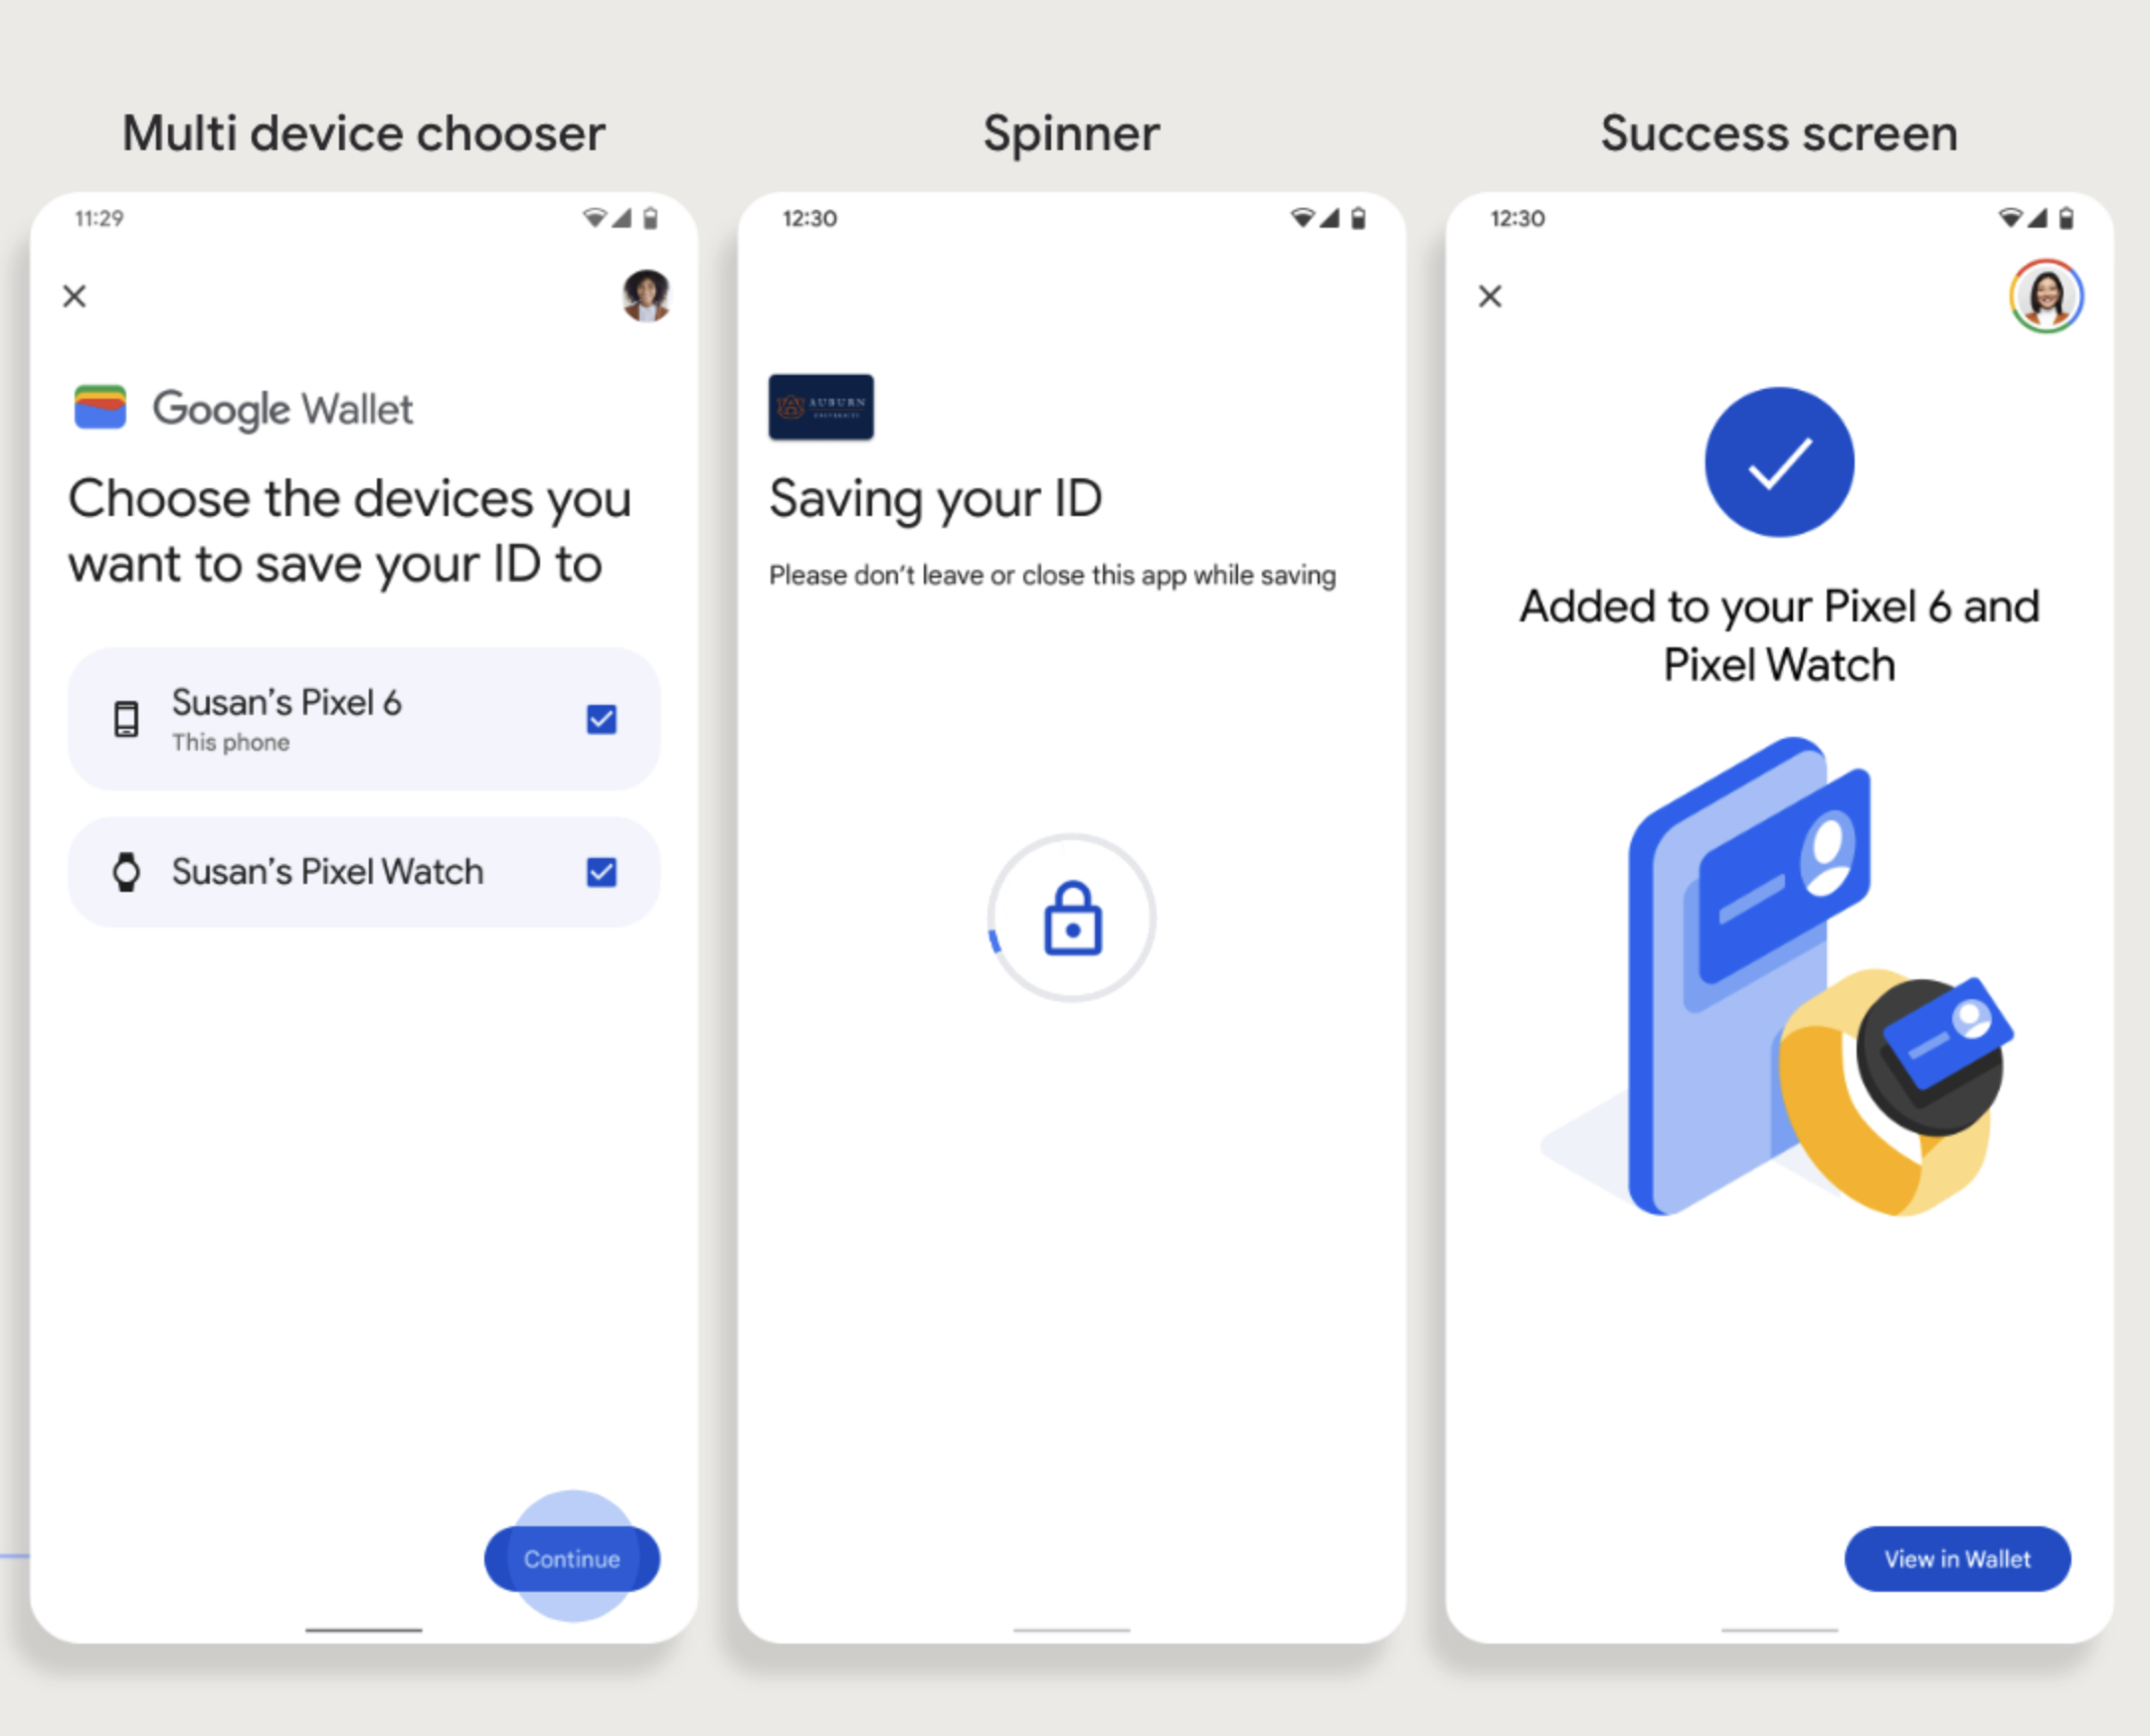
Poin utama
- Penyediaan ke Perangkat Wearable memerlukan ponsel yang dapat menyediakan kartu; oleh karena itu, keduanya harus disambungkan.
- Pengguna dapat melakukan penyediaan ke ponsel dan Perangkat Wear dalam satu alur, atau mereka dapat memulai ulang alur untuk menambahkannya ke Perangkat Wear setelah penyediaan pertama ke ponsel selesai.
- Pengguna harus dibatasi oleh Penyedia Layanan untuk hanya menyediakan satu Perangkat Wearable.
- Jika Perangkat Wearable tidak disetel dari ponsel, kartu digital akan tetap ada di perangkat, tetapi pengguna tidak akan dapat menyediakan kartu ke Perangkat Wearable ke-2 tanpa menghapus yang pertama.
- Tanyakan kepada Penyedia Layanan Anda tentang ketersediaan penyediaan Perangkat Wearable.
- Aplikasi yang mendukung alur Badge Perusahaan harus terintegrasi dengan API layanan Google Play. Namun, panggilan metode dari aplikasi Penyedia Layanan ke layanan Google Play tidak tersedia di versi layanan Google Play yang didistribusikan secara publik. Developer aplikasi Penyedia Layanan harus menambahkan dan mendapatkan akses ke modul kustom untuk memanggil metode tertentu. Hubungi Penyedia Layanan Anda untuk mengetahui informasi selengkapnya.
Menambahkan ke Google Wallet dari Situs
Bagian ini menjelaskan alur untuk menyimpan kartu ke Google Wallet dari situs penerbit.
Langkah 1: Login ke Situs
Langkah pertama dalam alur ini adalah login ke situs penerbit dan memilih tombol Tambahkan ke Google Wallet.
Langkah 2: Login dengan Google
Pengguna menyelesaikan Login dengan Google, lalu melihat layar pemuatan di situs penerbit sebelum dialihkan ke Google Wallet pada langkah berikutnya.
Langkah 3: Selesaikan Penyediaan
Pengguna menyelesaikan alur penyediaan dalam Google Wallet.
Menambahkan ke Google Wallet dari aplikasi di profil kerja
Jika pengguna telah menginstal aplikasi Penyedia Layanan di Profil Kerja Android, mereka tetap dapat menambahkan Badge Perusahaan ke Google Wallet, yang berjalan di profil pribadinya. Saat pengguna mengetuk tombol Tambahkan ke Google Wallet dari aplikasi di profil kerja, Google Wallet akan mengarahkan pengguna ke aplikasi Google Wallet di profil pribadi tempat pengguna dapat melanjutkan penambahan kartu mereka. Pengelolaan kartu lainnya konsisten dengan cara pengelolaan kartu dilakukan saat kartu disimpan langsung dari profil pribadi.