Mantieni tutto organizzato con le raccolte
Salva e classifica i contenuti in base alle tue preferenze.
Per eseguire il provisioning di un nuovo badge aziendale, l'utente deve completare un flusso di autenticazione
e associazione sul proprio dispositivo. In questo modo, l'account utente esterno viene collegato a un account Google Wallet.
Questo documento descrive il processo a un livello generale su diverse piattaforme.
Aggiungere a Google Wallet da un'app per Android
In questa sezione viene descritto il flusso per salvare una carta su Google Wallet dall'app per Android di un fornitore di servizi.
Procedura
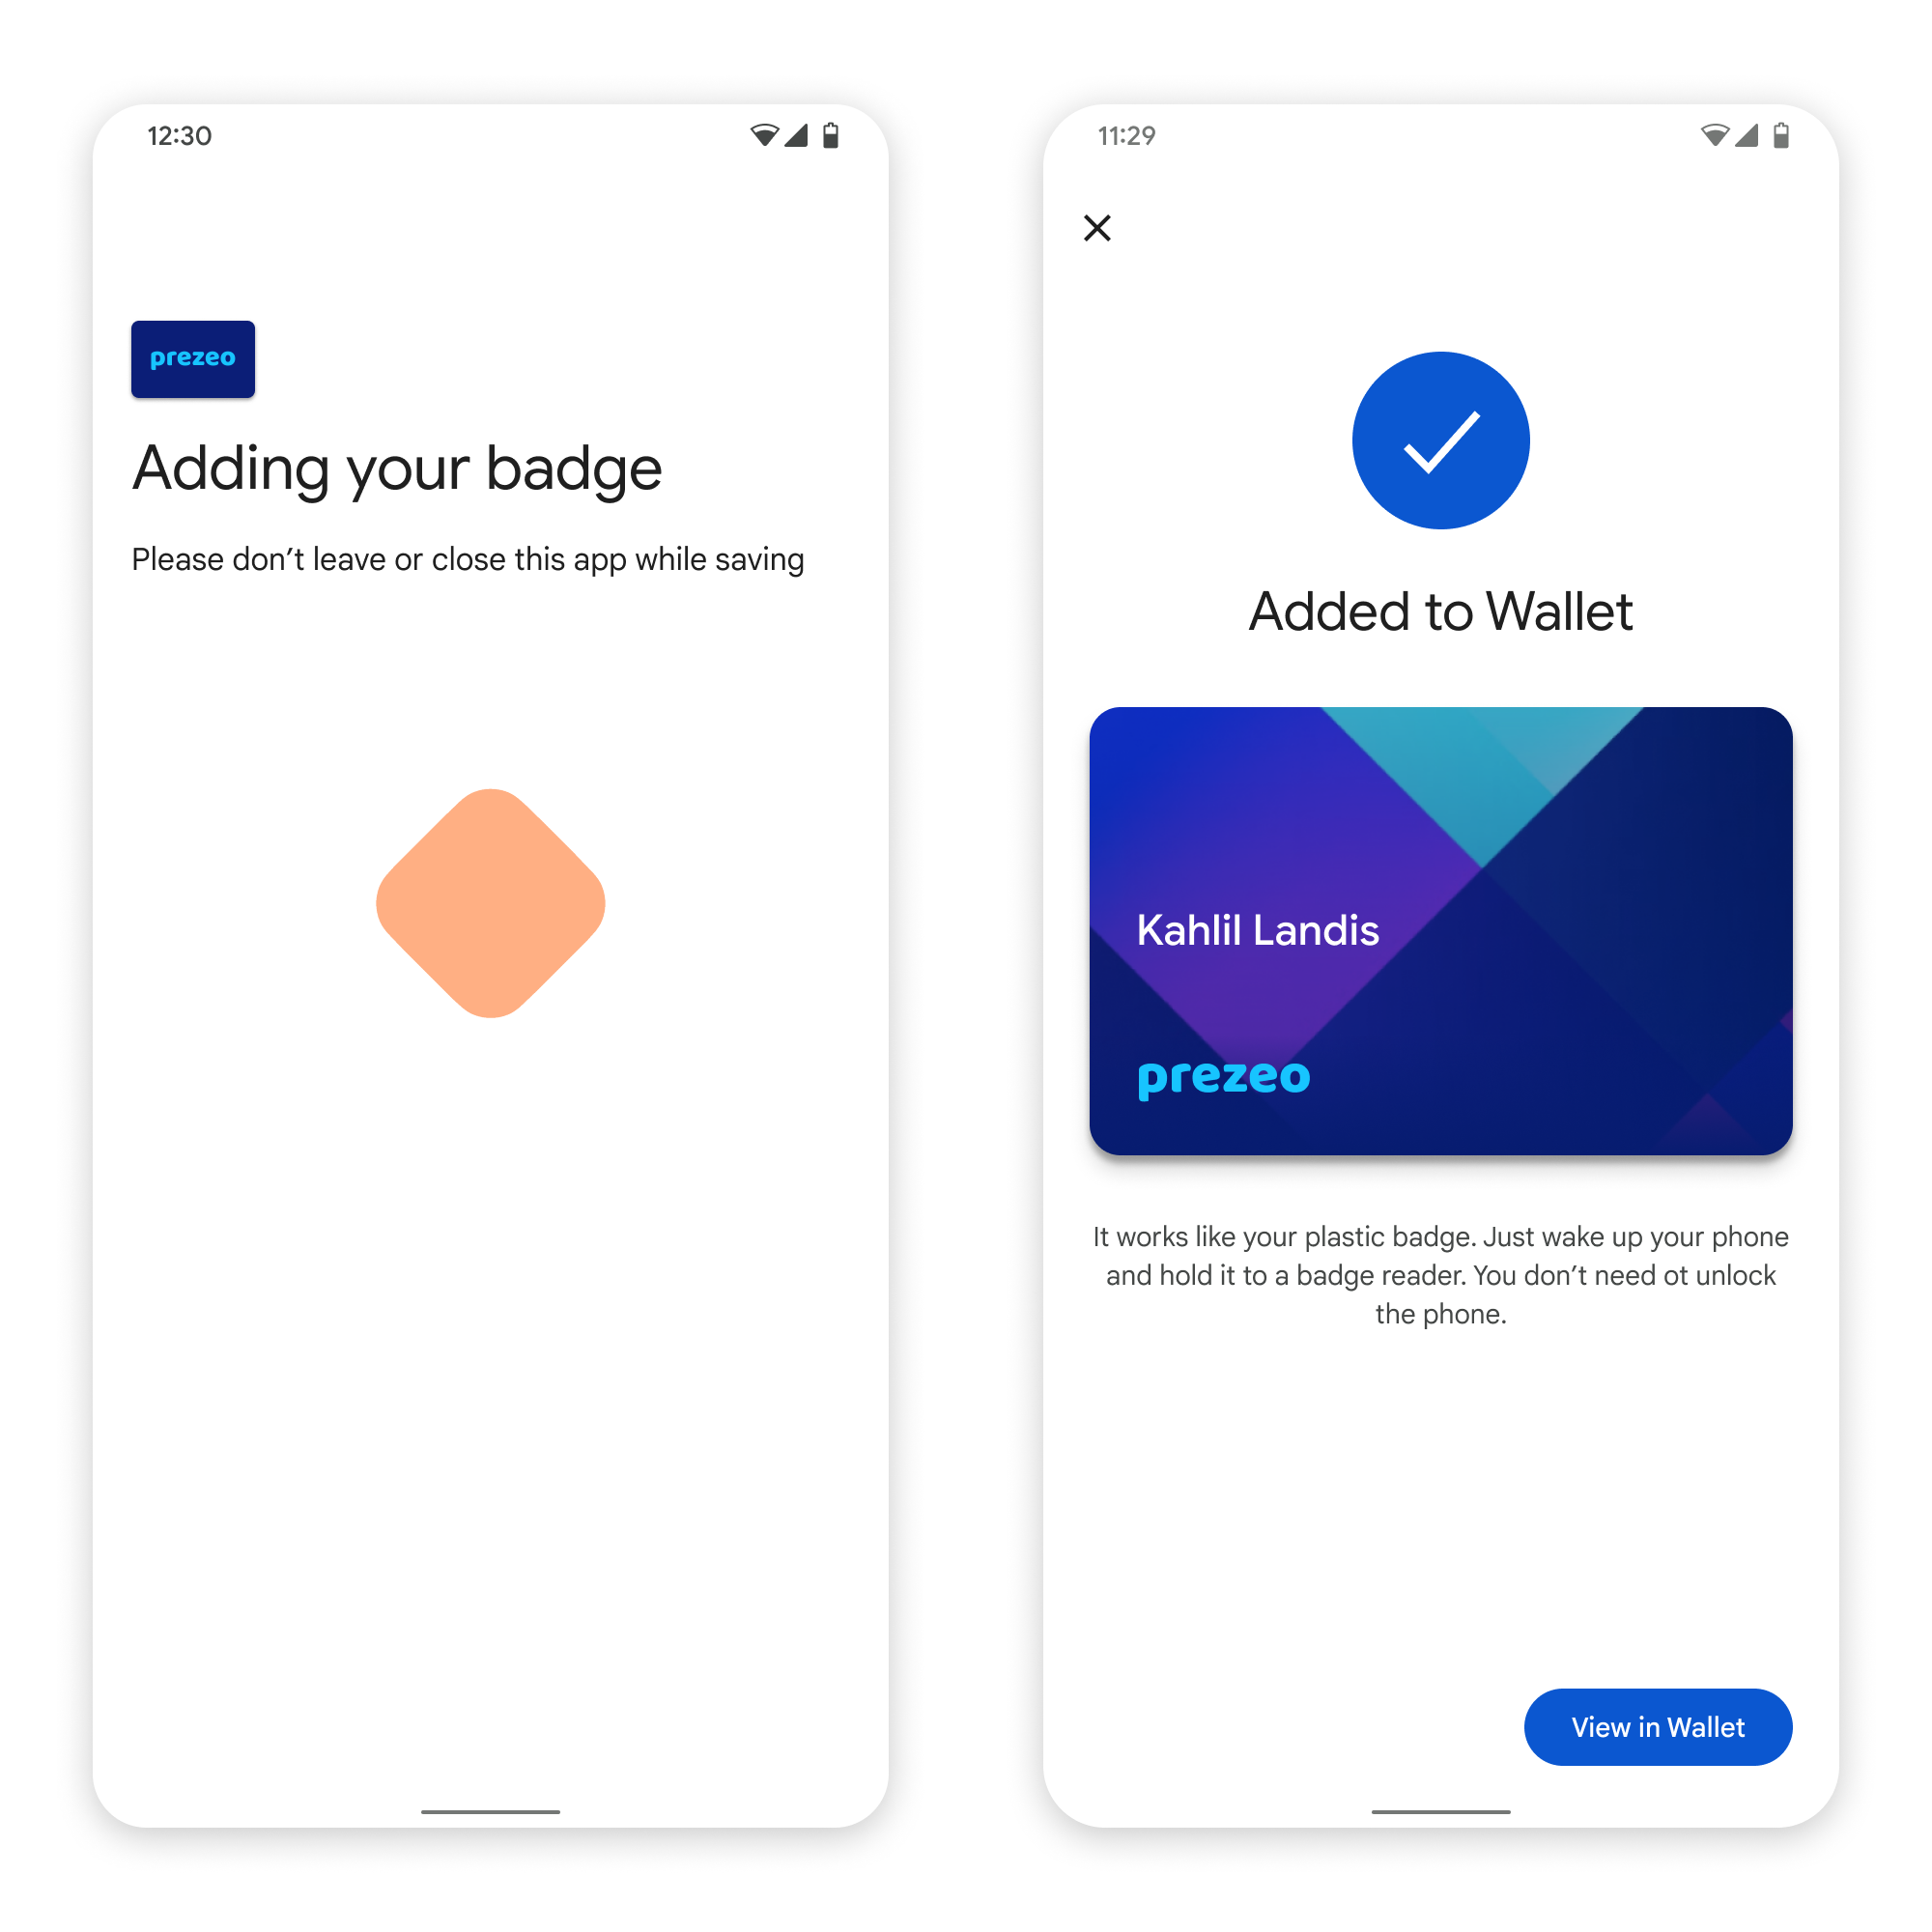
Queste figure illustrano il flusso utente per il provisioning di un badge aziendale dal punto di vista di Google Wallet.
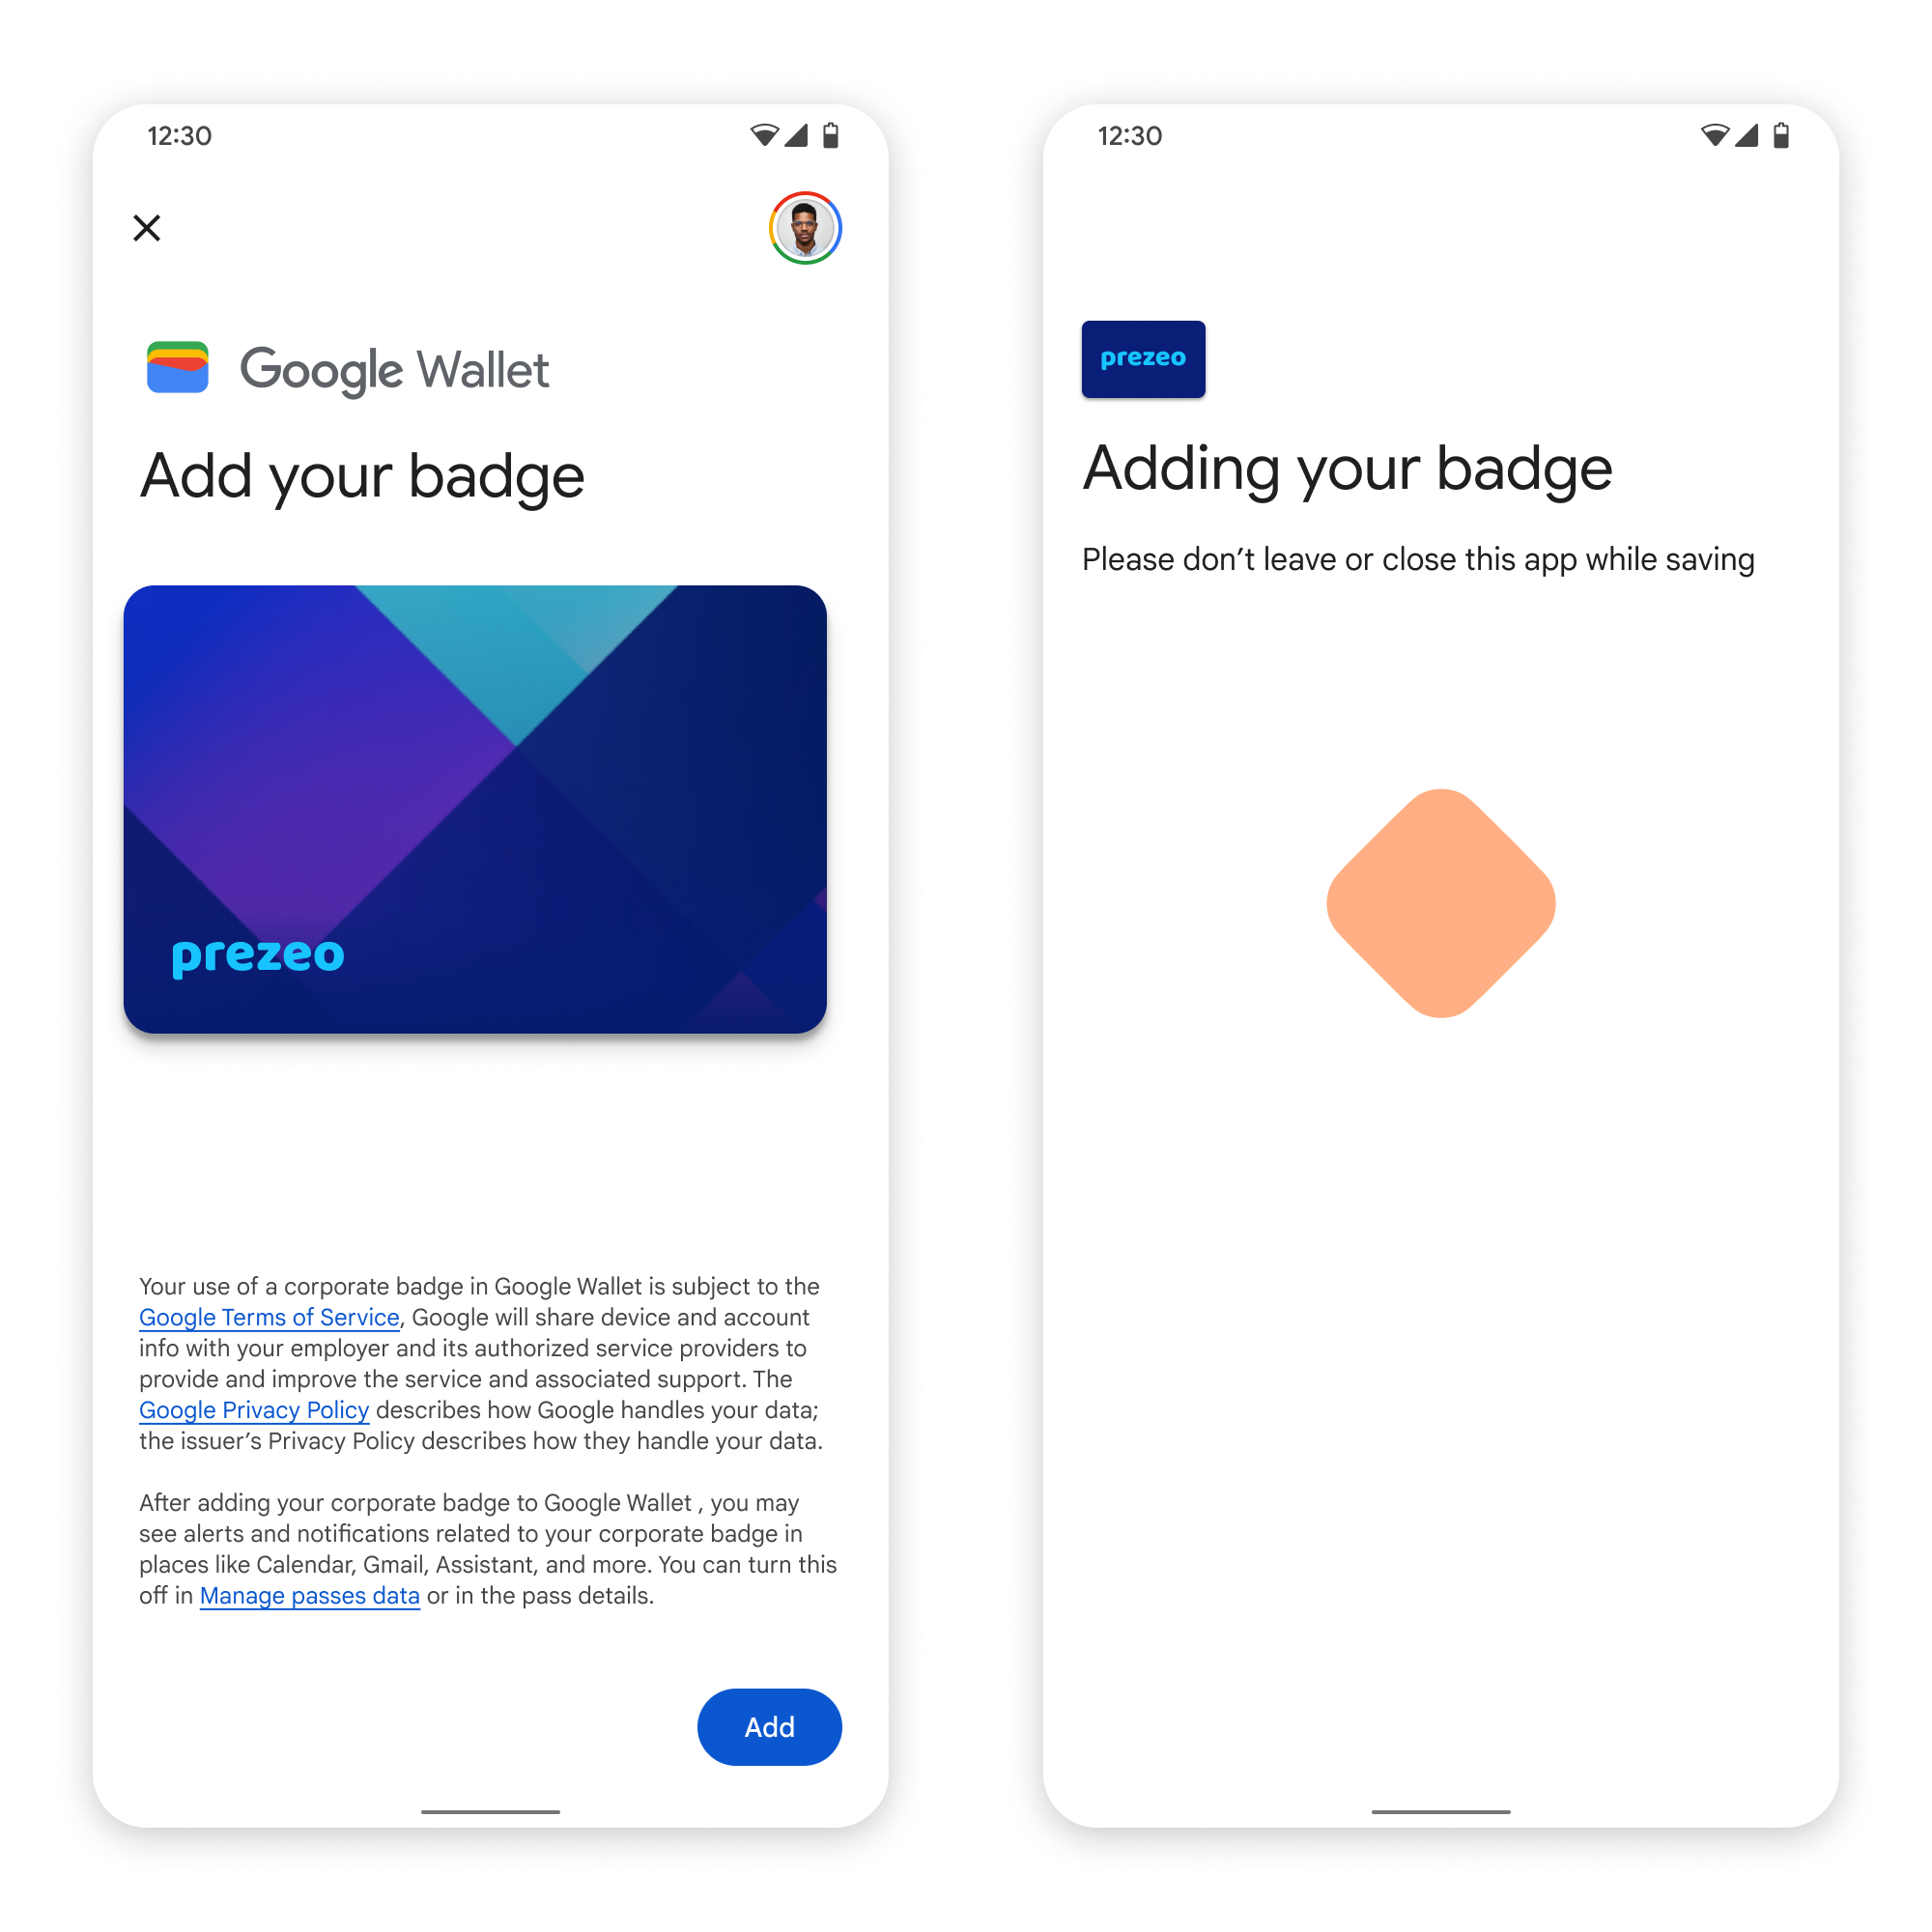
Figura 1: un utente inizia a eseguire il provisioning della carta e accetta i Termini di servizio.
Durante la configurazione della connettività di rete e dei servizi iniziali, all'utente viene mostrata un'animazione di connessione in rotazione.
Al termine, l'utente accetta i Termini di servizio e procede con il flusso.
Figura 2: il provisioning degli utenti è stato completato.
All'utente viene mostrata un'animazione di salvataggio in rotazione mentre i servizi in background
eseguono il provisioning dell'account sul dispositivo.
Al termine dei servizi, viene visualizzata una schermata di conferma.
Nelle schermate successive, all'utente potrebbe essere chiesto di scaricare l'app
Google Wallet, se non è già presente sul suo
dispositivo.
Punti chiave
Se la carta è già salvata nell'Account Google selezionato, all'utente viene invece mostrato un link per aprire la carta nell'app Google Wallet, dove può visualizzarne i dettagli.
Se la carta è salvata in un Account Google diverso da quello a cui ha eseguito l'accesso, l'utente riceve un messaggio che indica che un altro Account Google ha già salvato la carta.
Se l'utente tenta di aggiungere una carta e non ha un Account Google, viene visualizzata una richiesta di creazione di un account. Dopo la creazione dell'Account Google, il flusso continua normalmente.
Le app che supportano i flussi di badge aziendali devono essere integrate con le API di Google Play Services. Tuttavia, le chiamate ai metodi dall'app del fornitore di servizi a Google Play Services non sono disponibili nella versione distribuita pubblicamente di Google Play Services.
Lo sviluppatore dell'app del fornitore di servizi deve aggiungere e ottenere l'accesso ai moduli personalizzati per chiamare determinati metodi. Per maggiori informazioni, rivolgiti al tuo fornitore di servizi.
Aggiungere a Google Wallet su un dispositivo indossabile da un'app per Android
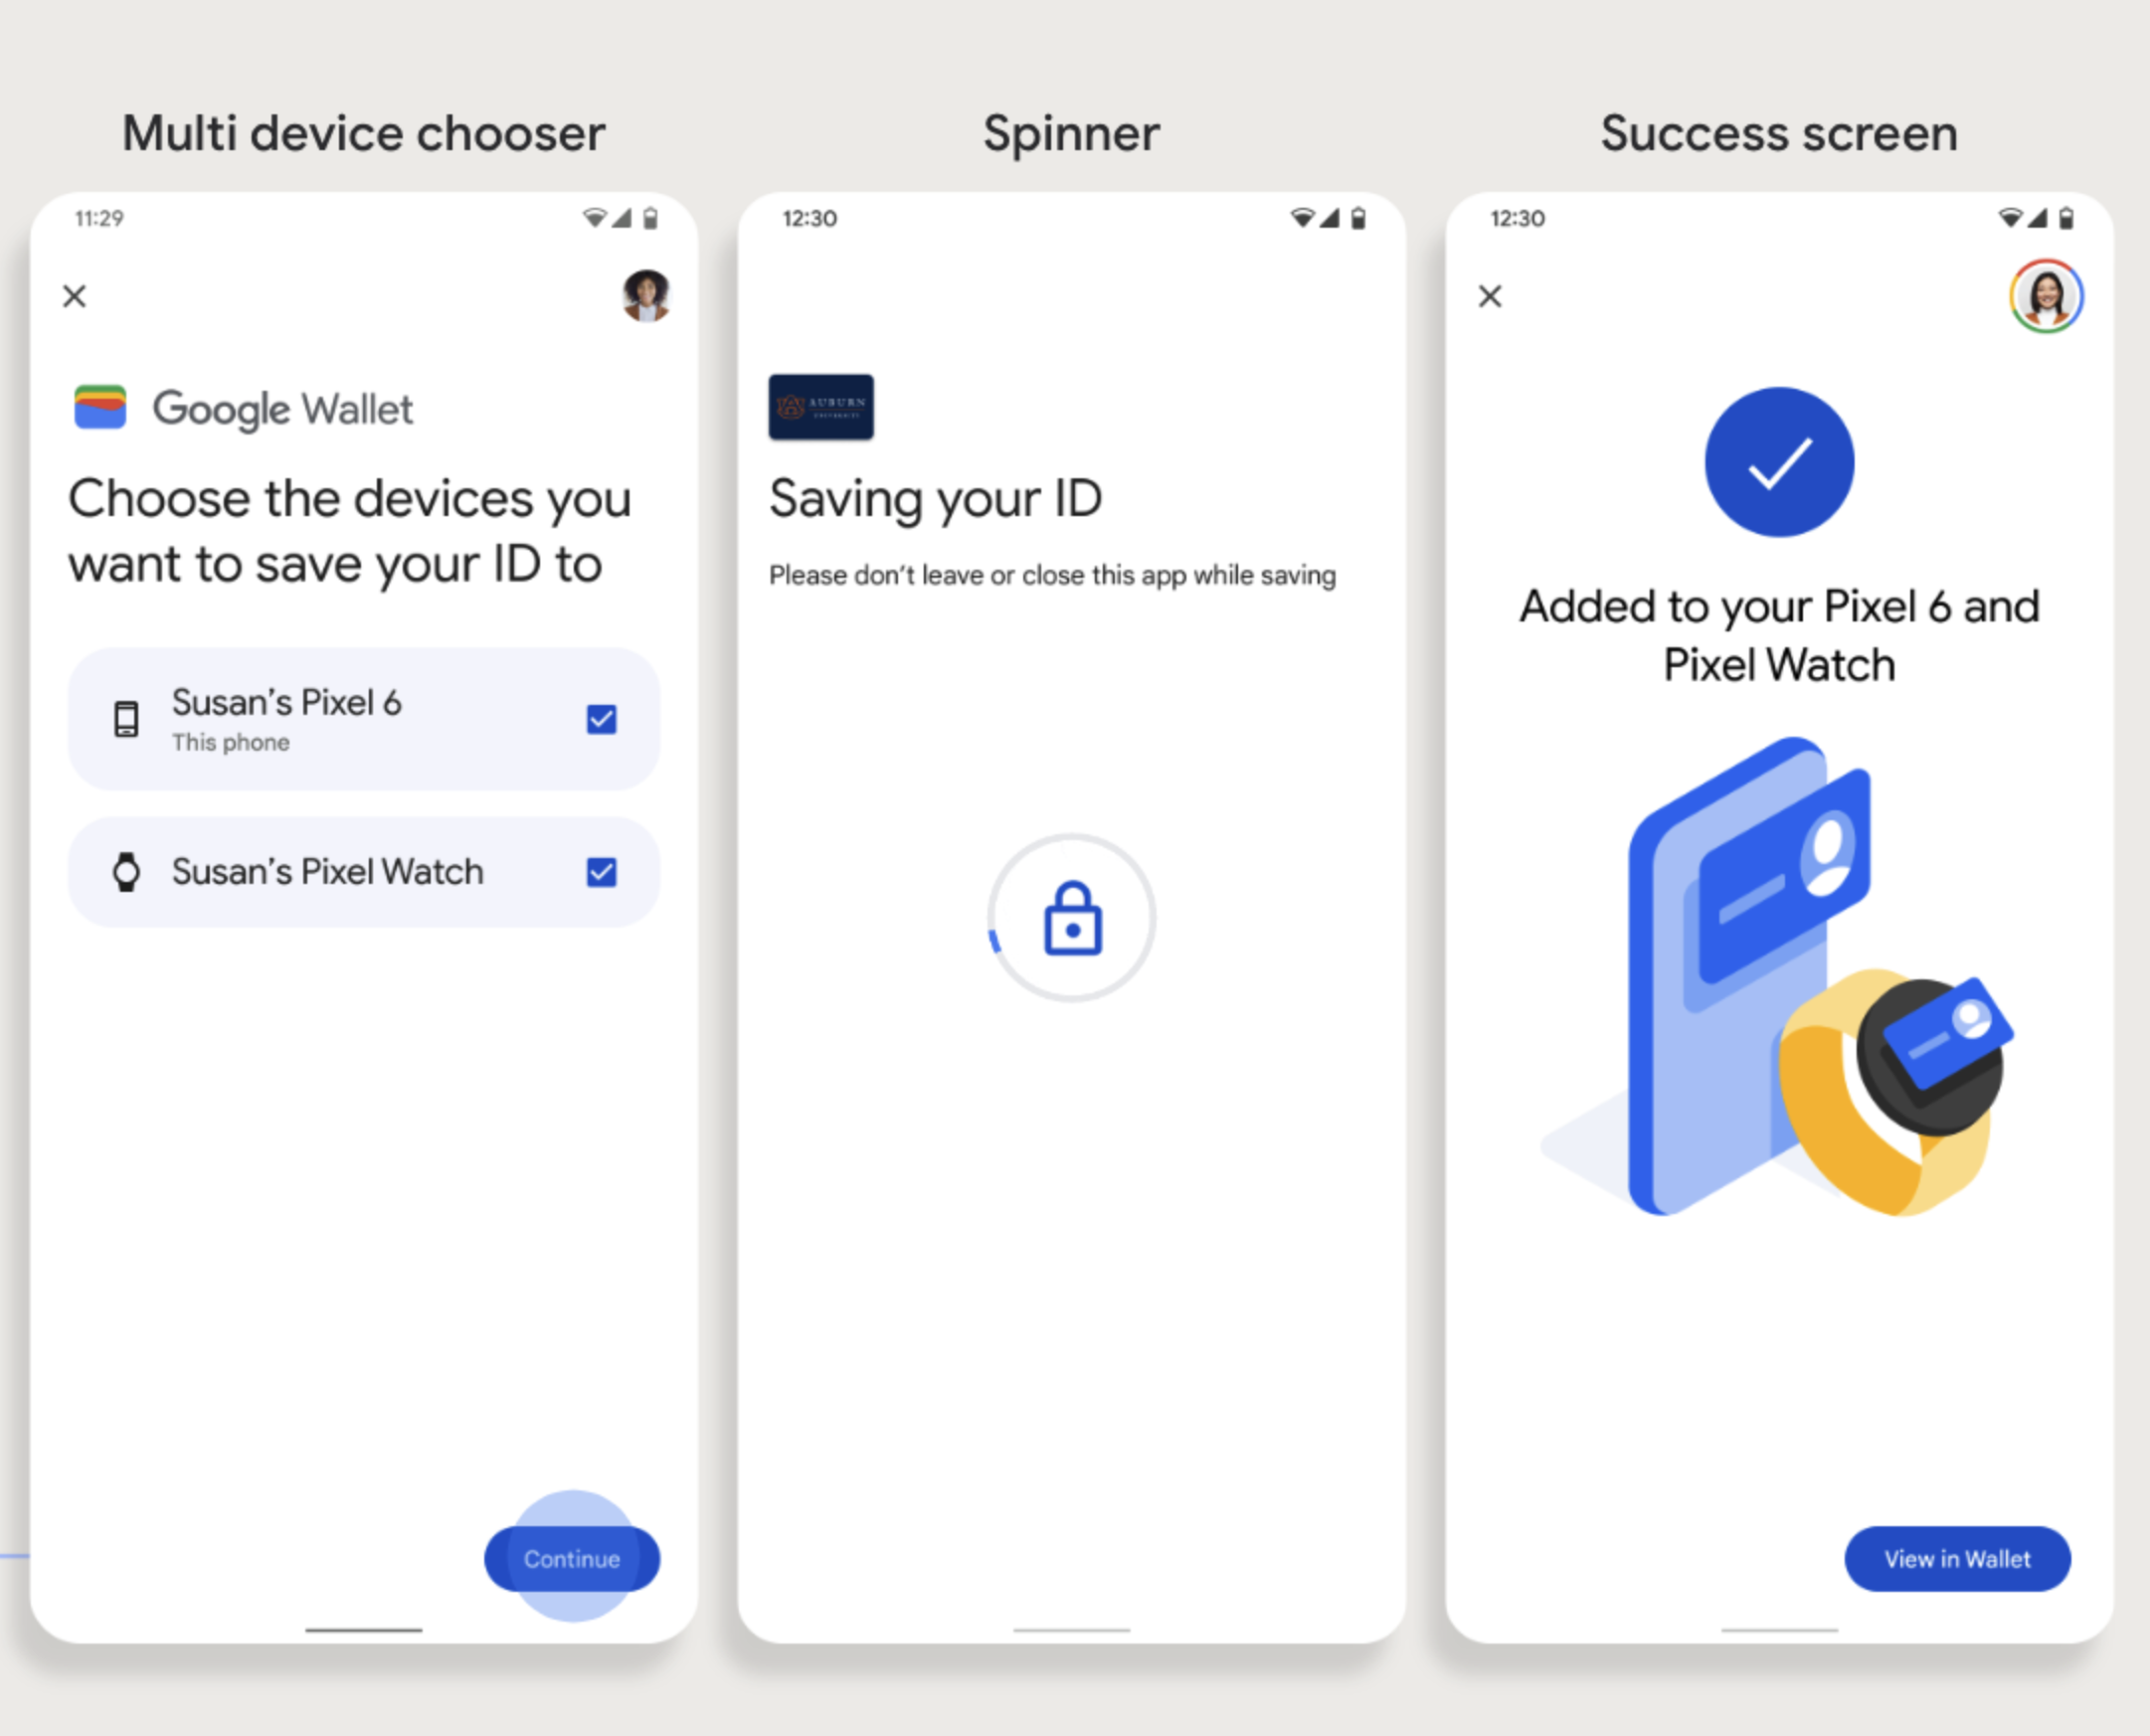
Gli utenti possono eseguire il provisioning sui propri dispositivi indossabili avviando la procedura sul proprio smartphone e selezionando un singolo dispositivo, come mostrato in questa figura:
Figura 1: flusso di provisioning del dispositivo indossabile.
Punti chiave
Per eseguire il provisioning su un dispositivo indossabile è necessario uno smartphone in grado di eseguire il provisioning di una scheda.
Gli utenti possono eseguire il provisioning sul telefono e sul wearable in un unico flusso oppure possono riavviare il flusso per aggiungerlo a un wearable dopo il completamento del primo provisioning sul telefono.
Gli utenti devono essere limitati dal fornitore di servizi al provisioning di un solo Wearable.
Rivolgiti al tuo fornitore di servizi per informazioni sulla disponibilità del provisioning per i dispositivi indossabili.
Le app che supportano i flussi di badge aziendali devono essere integrate con le API di Google Play Services. Tuttavia, le chiamate ai metodi dall'app del fornitore di servizi a Google Play Services non sono disponibili nella versione distribuita pubblicamente di Google Play Services.
Lo sviluppatore dell'app del fornitore di servizi deve aggiungere e ottenere l'accesso ai moduli personalizzati per chiamare determinati metodi. Per maggiori informazioni, rivolgiti al tuo fornitore di servizi.
Aggiungere a Google Wallet da un sito web
Questa sezione descrive la procedura per salvare una carta su Google Wallet dal sito web di un emittente.
Passaggio 1: accedi al sito web
Il primo passaggio del flusso consiste nell'accedere al sito web dell'emittente e selezionare il pulsante Aggiungi a Google Wallet.
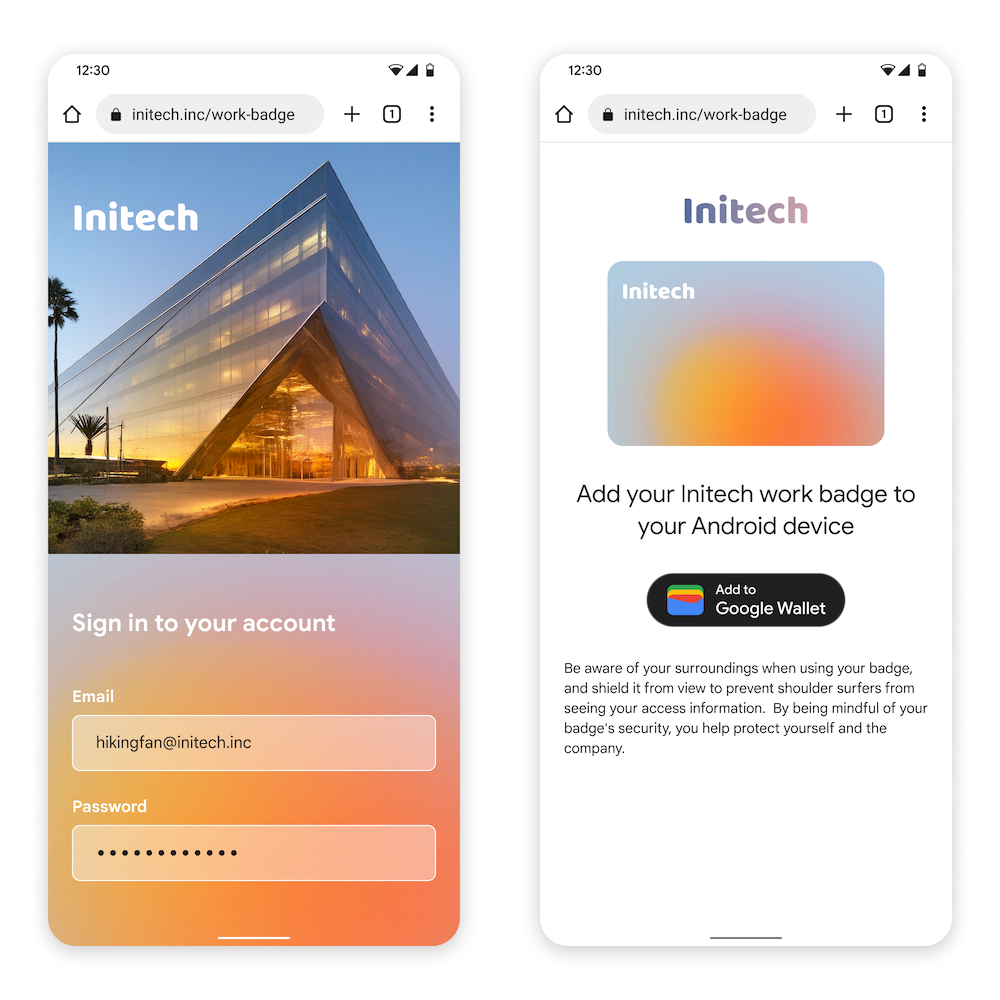
Figura 3: un utente accede a un sito web e accede al pulsante
Aggiungi a Google Wallet.
Passaggio 2: accedi con Google
L'utente completa l'accesso con Google e poi visualizza una schermata di caricamento sul sito web dell'emittente prima di essere reindirizzato a Google Wallet nel passaggio successivo.
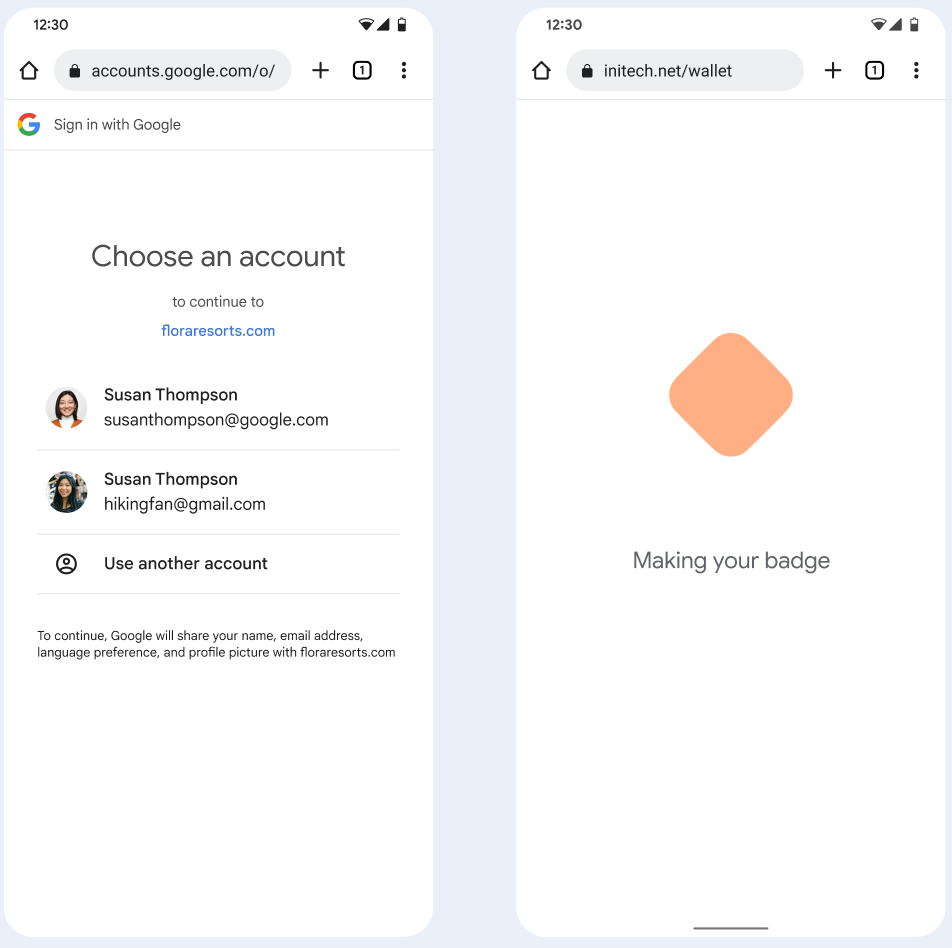
Figura 3: un utente sceglie un Account Google da collegare al suo badge aziendale.
Passaggio 3: completa il provisioning
L'utente completa il flusso di provisioning in Google Wallet.
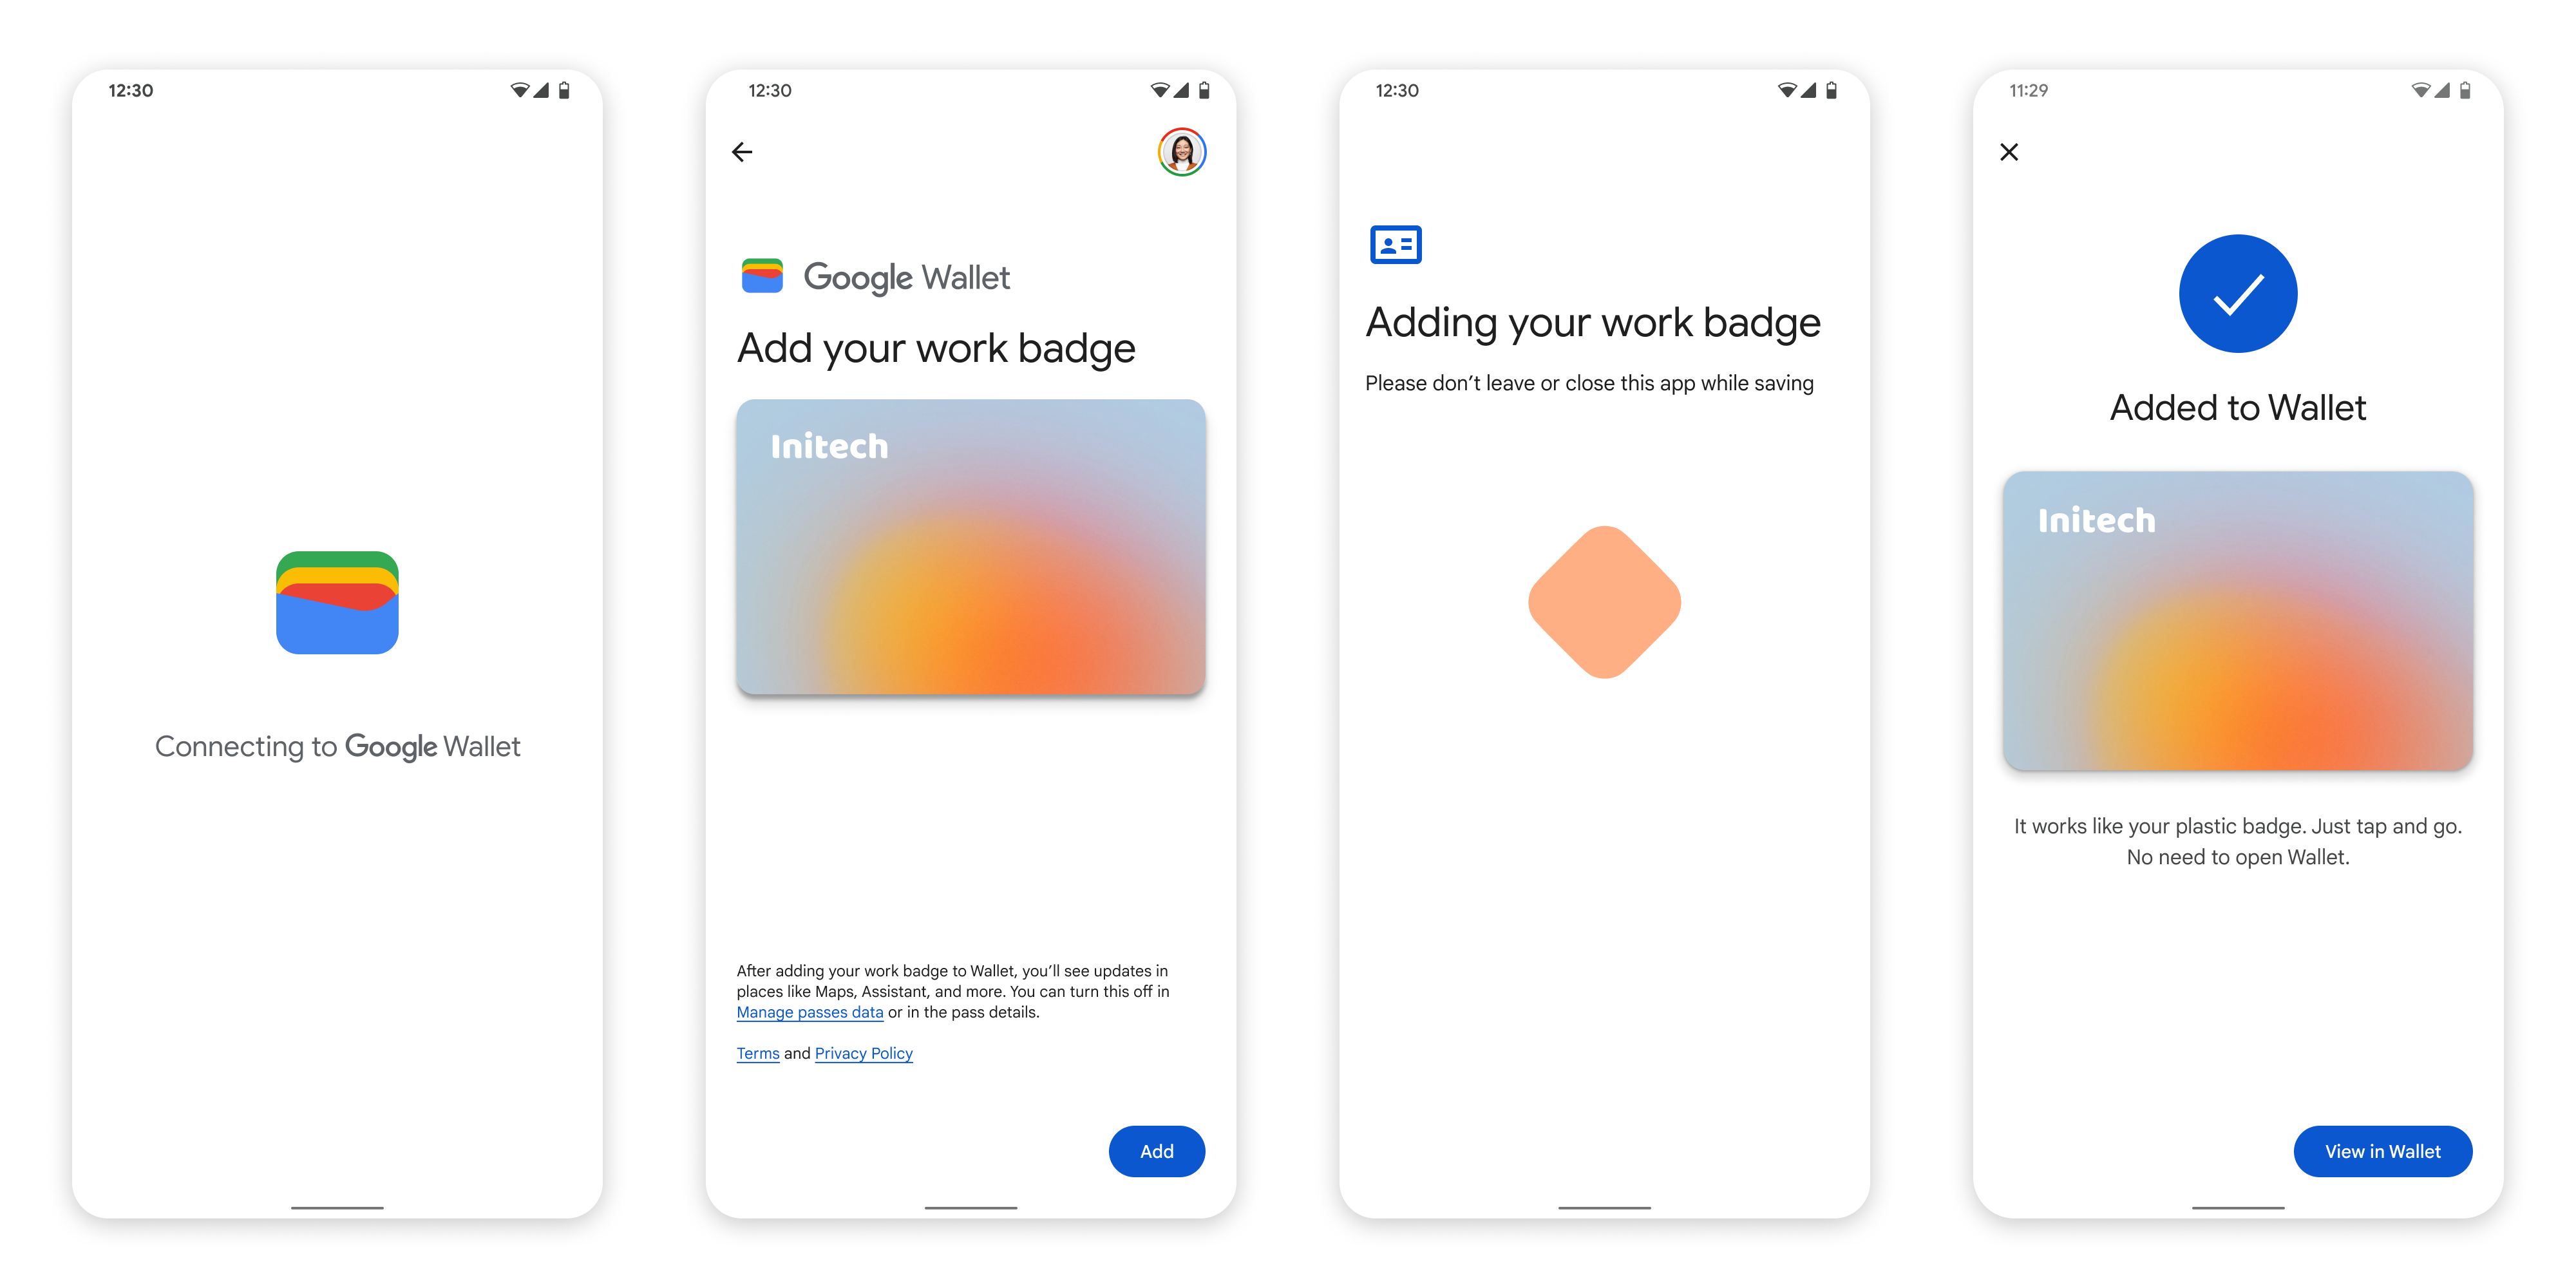
Figura 3: un utente continua con il provisioning, accetta i Termini di servizio e completa il flusso.
[null,null,["Ultimo aggiornamento 2025-07-25 UTC."],[[["\u003cp\u003eCorporate Badges are provisioned by linking an external user account to a Google Wallet account through an authentication and association flow.\u003c/p\u003e\n"],["\u003cp\u003eUsers can add Corporate Badges to Google Wallet from Android apps, Wearables (initiated from a phone), and websites.\u003c/p\u003e\n"],["\u003cp\u003eThe provisioning process involves accepting terms of service, account creation (if needed), and background service configuration.\u003c/p\u003e\n"],["\u003cp\u003eService Providers might have specific requirements and limitations regarding Wearable provisioning and access to Google Play services APIs for integration.\u003c/p\u003e\n"],["\u003cp\u003eWebsites initiating Corporate Badge provisioning should integrate "Sign in with Google" and leverage a loading screen during the redirect to Google Wallet.\u003c/p\u003e\n"]]],["Users provision a Corporate Badge by authenticating and associating their account with Google Wallet. From an Android app, users select \"Add to Google Wallet,\" accept terms, and wait for provisioning to complete. On Wearables, provisioning is initiated from a phone. From a website, users sign in, select \"Add to Google Wallet,\" link a Google account, and complete the process in Google Wallet. Google Account creation may be required. Service Provider apps must integrate with Google Play services APIs via custom modules.\n"],null,["# Provision a new card\n\nTo provision a new Corporate Badge, the user must complete an authentication\nand association flow on their device. This links their external\nuser account to a Google Wallet account.\nThis document describes that process at a high level across different surfaces.\n\nAdd to Google Wallet from an Android app\n----------------------------------------\n\nIn this section, we describe the flow to save a card to\nGoogle Wallet from a Service Provider's Android app.\n\n### User flow\n\nThese figures illustrate the user flow to provision a Corporate Badge from a\nGoogle Wallet perspective.\n| **Note:** Before this flow begins, the user must authenticate within the Service Provider's app. Next, they must select the [Add to Google Wallet](/wallet/access/corporate-badge/get-started/brand-guidelines#add-to-google-wallet-button) button. If the user doesn't have a Google Account, they complete a flow to create one and then continue the flow to provision their card.\n**Figure 1**: A user begins to provision their card and accepts the Terms of Service.\n\n\n- A spinning connection animation is shown to the user while network connectivity and initial services configure.\n- After this completes, the user accepts the Terms of Service and continues with the flow.\n\n\u003cbr /\u003e\n\n**Figure 2**: User provisioning completes.\n\n\n- A spinning save animation is shown to the user while background services provision the account on the device.\n- After the services complete, a success screen appears.\n- The user might be prompted in subsequent screens to download the Google Wallet app, if it doesn't already exist on their device.\n\n\u003cbr /\u003e\n\n\u003cbr /\u003e\n\n### Key points\n\n- If the card is already saved to the selected Google Account, the user is instead shown a link to open the card in the Google Wallet app, where they can view card details.\n- If the card is saved to a Google Account other than the one the user is logged into, the user receives a message that indicates another Google Account has already saved that card.\n- If the user attempts to add a card and doesn't have a Google Account, a prompt to create an account appears. After creation of the Google Account, the flow continues normally.\n- Apps that support Corporate Badge flows need to integrate with Google Play services APIs. However, the method calls from the Service Provider app to Google Play services aren't available in the publicly distributed version of [Google Play services](https://developers.google.com/android/guides/overview). The Service Provider app developer must add and get access to custom modules to call certain methods. Check with your Service Provider for more information.\n\nAdd to Google Wallet on a Wearable from an Android app\n------------------------------------------------------\n\nUsers can provision to their Wearables by initiating the provisioning flow on\ntheir phone and selecting a single Wearable, as seen in this figure:\n**Figure 1**: Wearable provisioning flow.\n\n### Key points\n\n- Provisioning to a Wearable requires a phone capable of provisioning a card.\n- Users can provision to their phone and Wearable in a single flow, or they can restart the flow to add it to a Wearable after the first provisioning to their phone is complete.\n- Users should be limited by the Service Provider to provisioning only a single Wearable.\n- Inquire with your Service Provider about the availability of Wearable provisioning.\n- Apps that support Corporate Badge flows need to integrate with Google Play services APIs. However, the method calls from the Service Provider app to Google Play services aren't available in the publicly distributed version of [Google Play services](https://developers.google.com/android/guides/overview). The Service Provider app developer must add and get access to custom modules to call certain methods. Check with your Service Provider for more information.\n\nAdd to Google Wallet from a Website\n-----------------------------------\n\nThis section describes the flow to save a card to Google Wallet from\nan issuer's website.\n\n### Step 1: Sign in to Website\n\nThe first step in the flow is to sign in to the issuer's website and select\nthe Add to Google Wallet button.\n**Figure 3**: A user logs into a website and navigates to the Add to Google Wallet button. **Important:** Google requires that your website authenticates users before you show the Add to Google Wallet button. Sending the user an email with a \"secret\" link is not sufficient authentication.\n\n### Step 2: Sign in with Google\n\nThe user completes Sign in with Google and then sees a loading screen\non the issuer's website before being redirected to Google Wallet in the next\nstep.\n**Figure 3**: A user chooses a Google Account to link to their Corporate Badge. **Note:** You can download this [loading gif](/static/wallet/access/images/web-provisioning-loading.gif) for use on your website's loading page if you would like to match the Google Wallet loading screen.\n\n### Step 3: Complete Provisioning\n\nThe user completes the provisioning flow within Google Wallet.\n**Figure 3**: A user continues with provisioning, accepts terms of service, and completes the flow."]]