Aby udostępnić nowy klucz hotelowy, użytkownik musi przejść proces uwierzytelniania i skojarzenia na swoim urządzeniu. Powiąże to zewnętrzne konto użytkownika z kontem Portfela Google. W tym dokumencie opisujemy ten proces na różnych platformach.
Dodawanie do Portfela Google z aplikacji na Androida
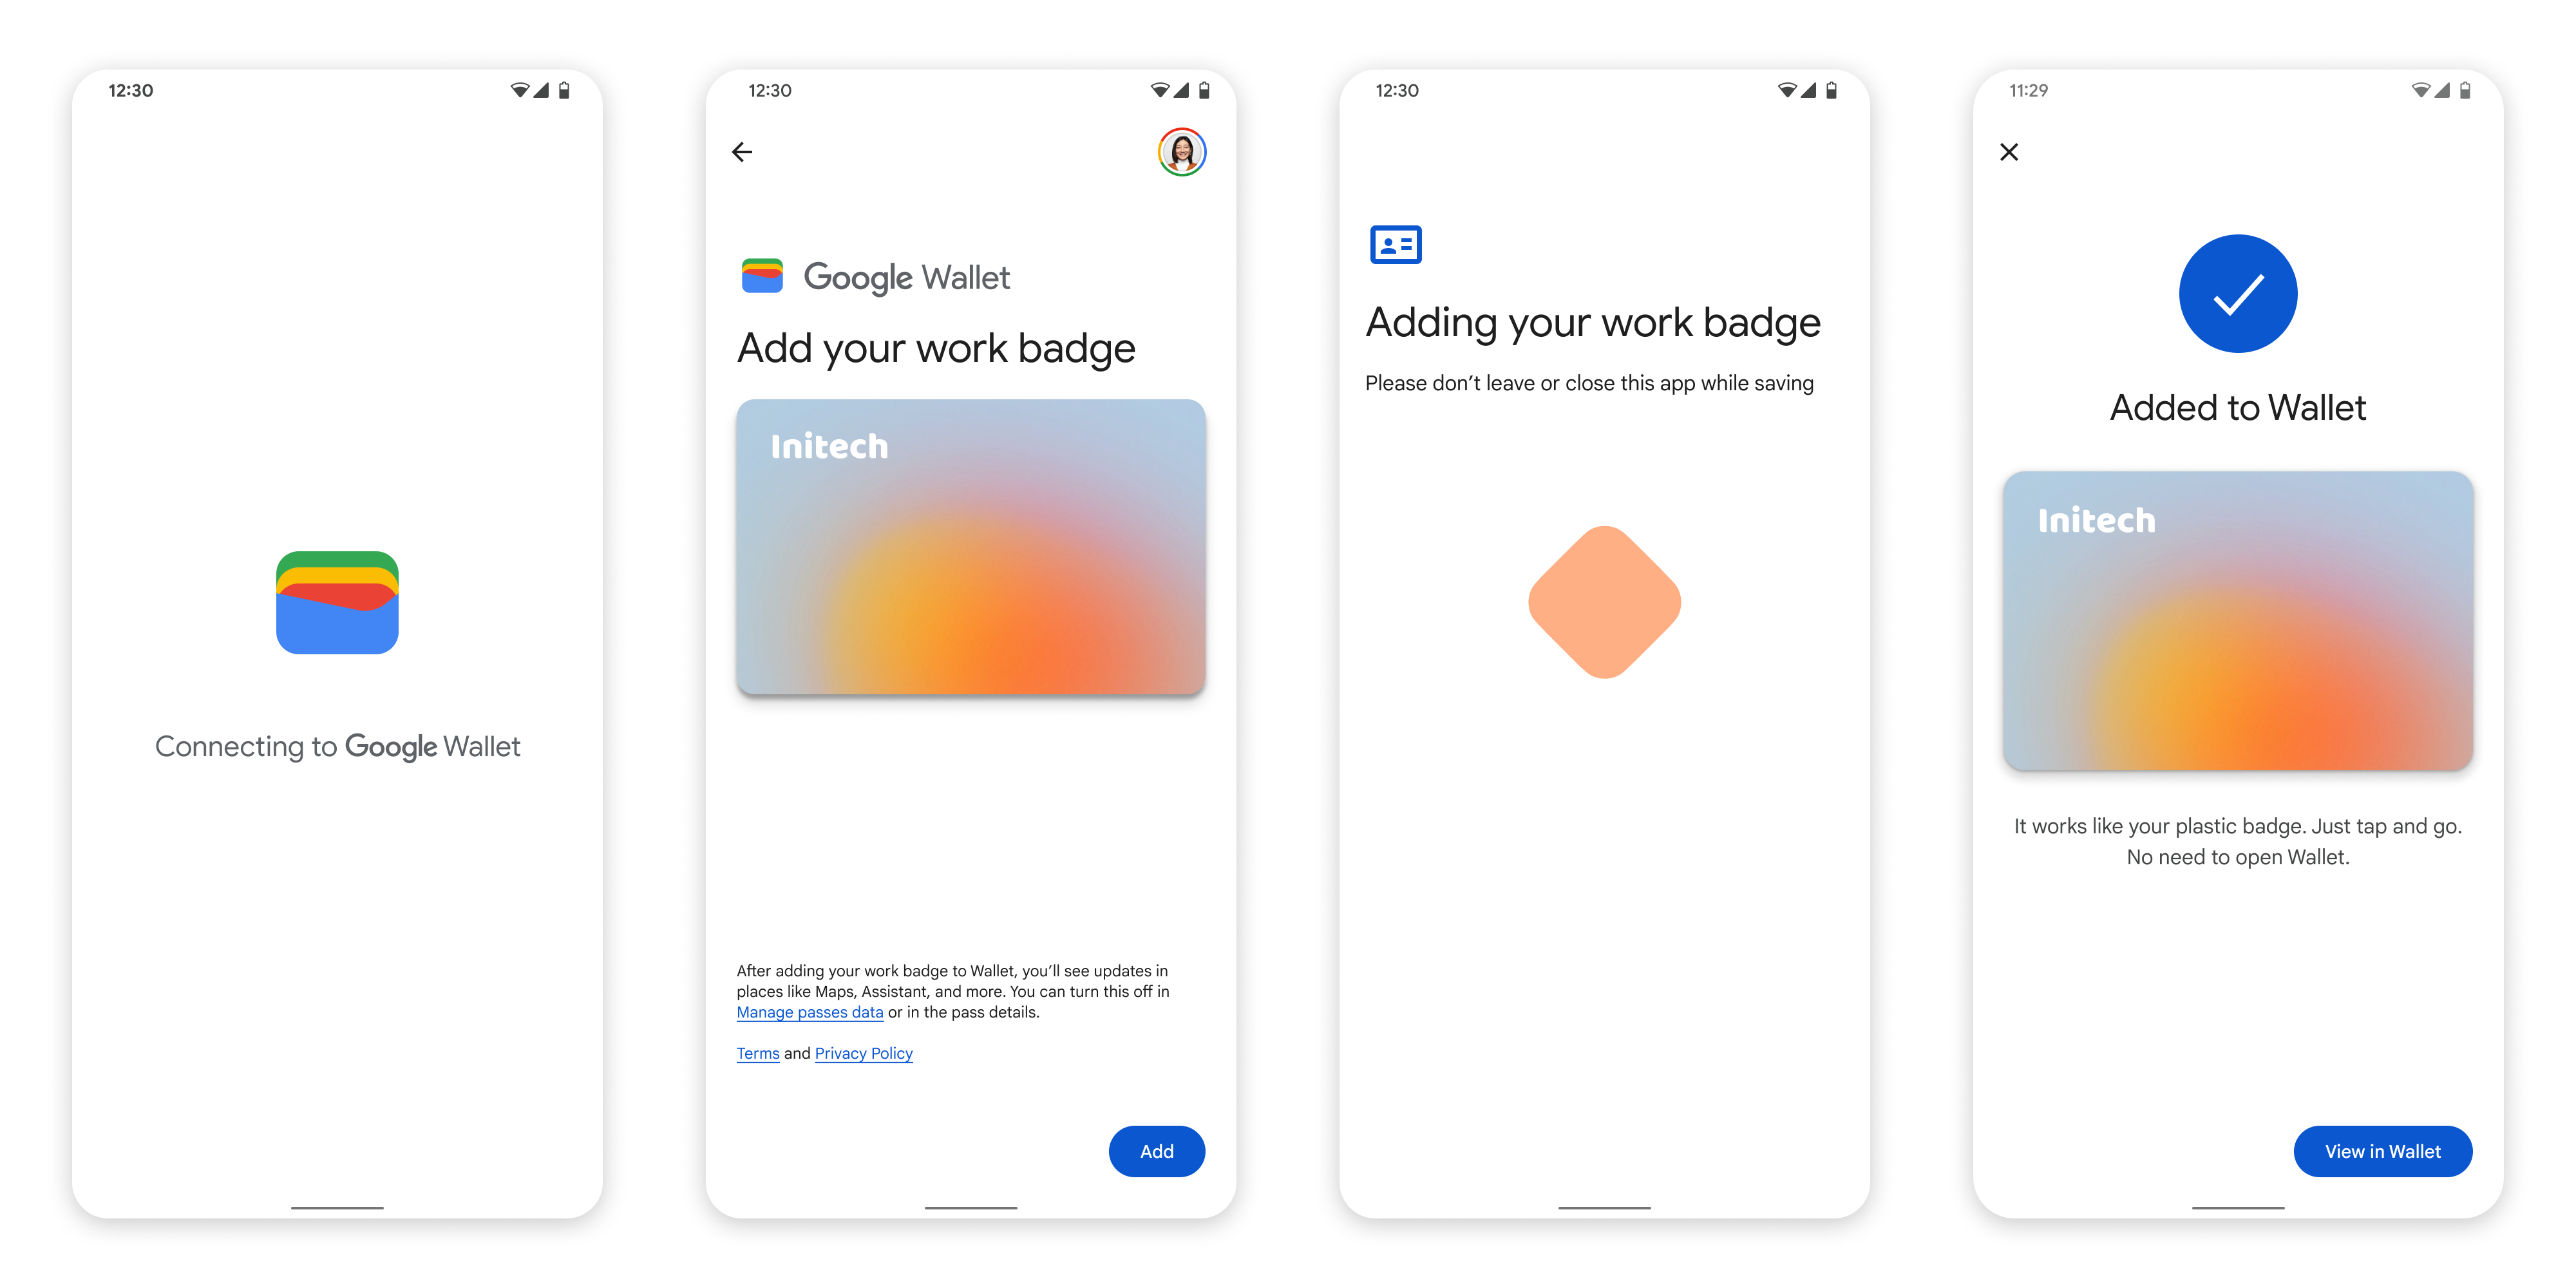
W tej sekcji opisujemy proces zapisywania karty w Portfelu Google z poziomu aplikacji na Androida dostawcy usług.
Wzorzec przeglądania
Ilustracje przedstawiają proces udostępniania klucza hotelowego z perspektywy Portfela Google.
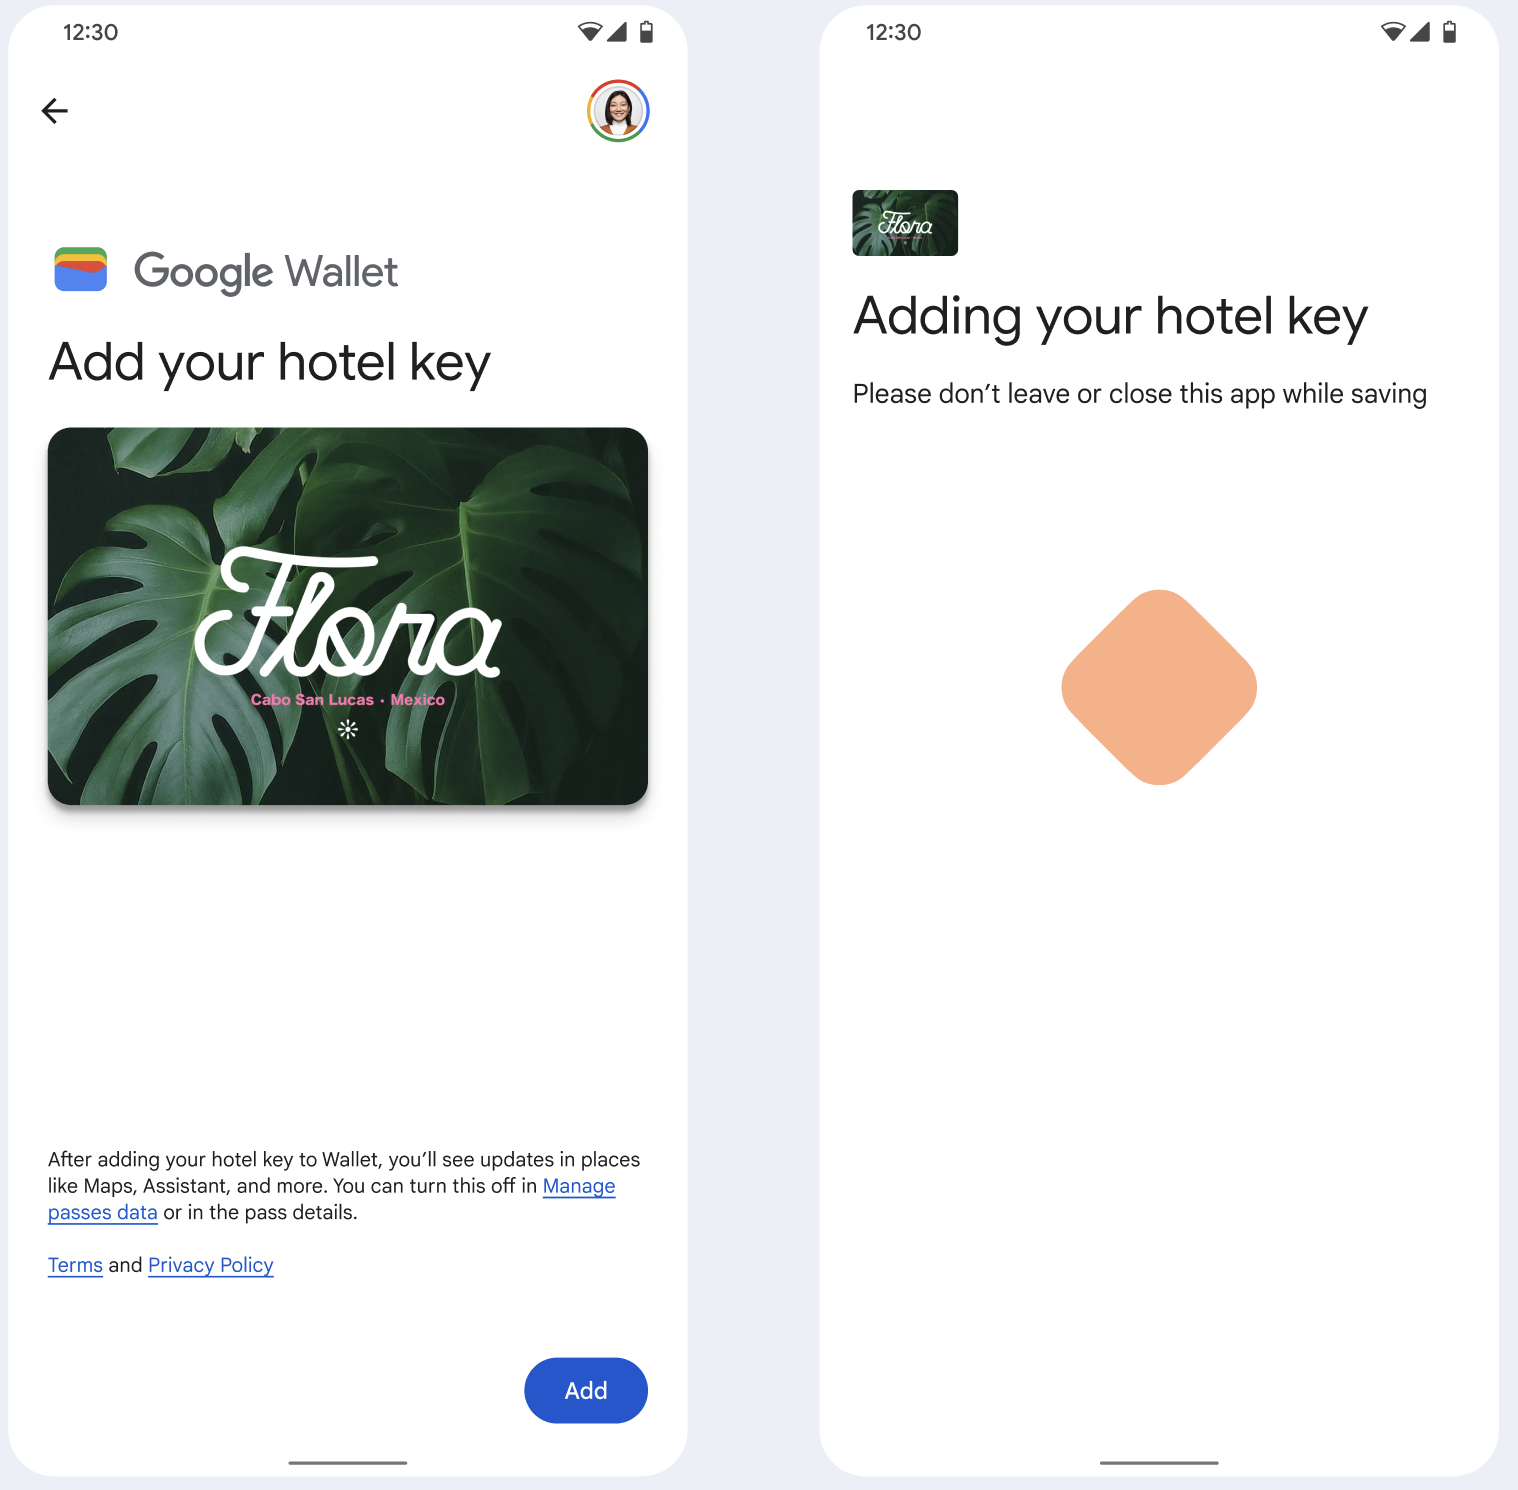
- Podczas konfigurowania połączenia sieciowego i usług początkowych użytkownikowi wyświetla się animacja połączenia.
- Po zakończeniu tego procesu użytkownik akceptuje Warunki korzystania z usługi i kontynuuje proces.
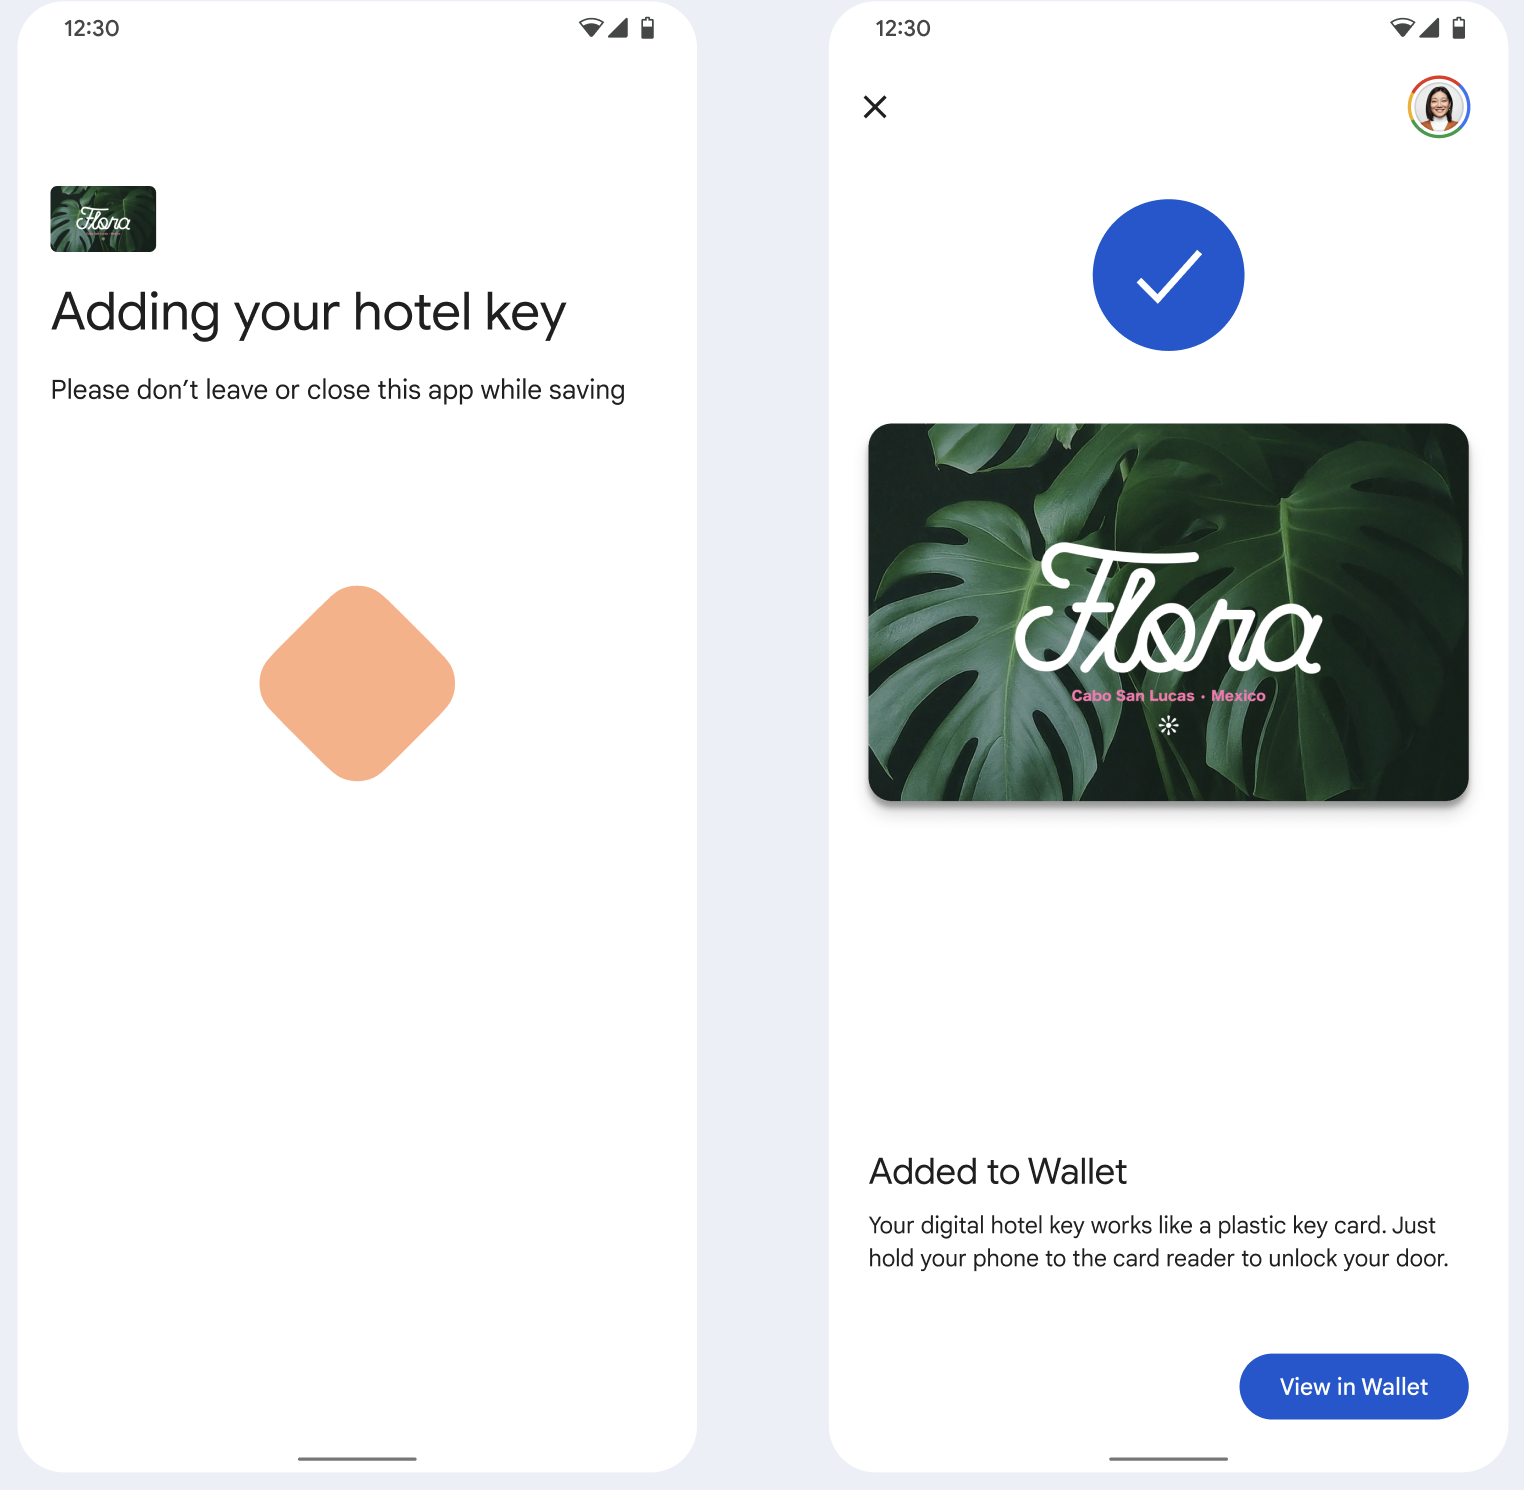
- Podczas gdy usługi działające w tle przygotowują konto na urządzeniu, użytkownik widzi animację zapisywania.
- Po zakończeniu usług pojawi się ekran z informacją o powodzeniu.
- Na kolejnych ekranach może pojawić się prośba o pobranie aplikacji Portfel Google, jeśli nie jest ona jeszcze zainstalowana na urządzeniu.
Najważniejsze kwestie
- Jeśli karta jest już zapisana na wybranym koncie Google, użytkownik zobaczy link do otwarcia karty w aplikacji Portfel Google, gdzie może wyświetlić szczegóły karty.
- Jeśli karta jest zapisana na innym koncie Google niż to, na które zalogował się użytkownik, otrzyma on komunikat z informacją, że ta karta jest już zapisana na innym koncie Google.
- Jeśli użytkownik spróbuje dodać kartę, a nie ma konta Google, pojawi się prośba o utworzenie konta. Po utworzeniu konta Google proces przebiega normalnie.
- Aplikacje obsługujące przepływy klucza hotelowego muszą być zintegrowane z interfejsami API usług Google Play. Jednak wywołania metod z aplikacji dostawcy usług do Usług Google Play nie są dostępne w publicznie rozpowszechnianej wersji Usług Google Play. Deweloper aplikacji dostawcy usług musi dodać niestandardowe moduły i uzyskać do nich dostęp, aby wywoływać określone metody. Więcej informacji uzyskasz od dostawcy usług.
Dodawanie do Portfela Google na urządzeniu do noszenia z aplikacji na Androida
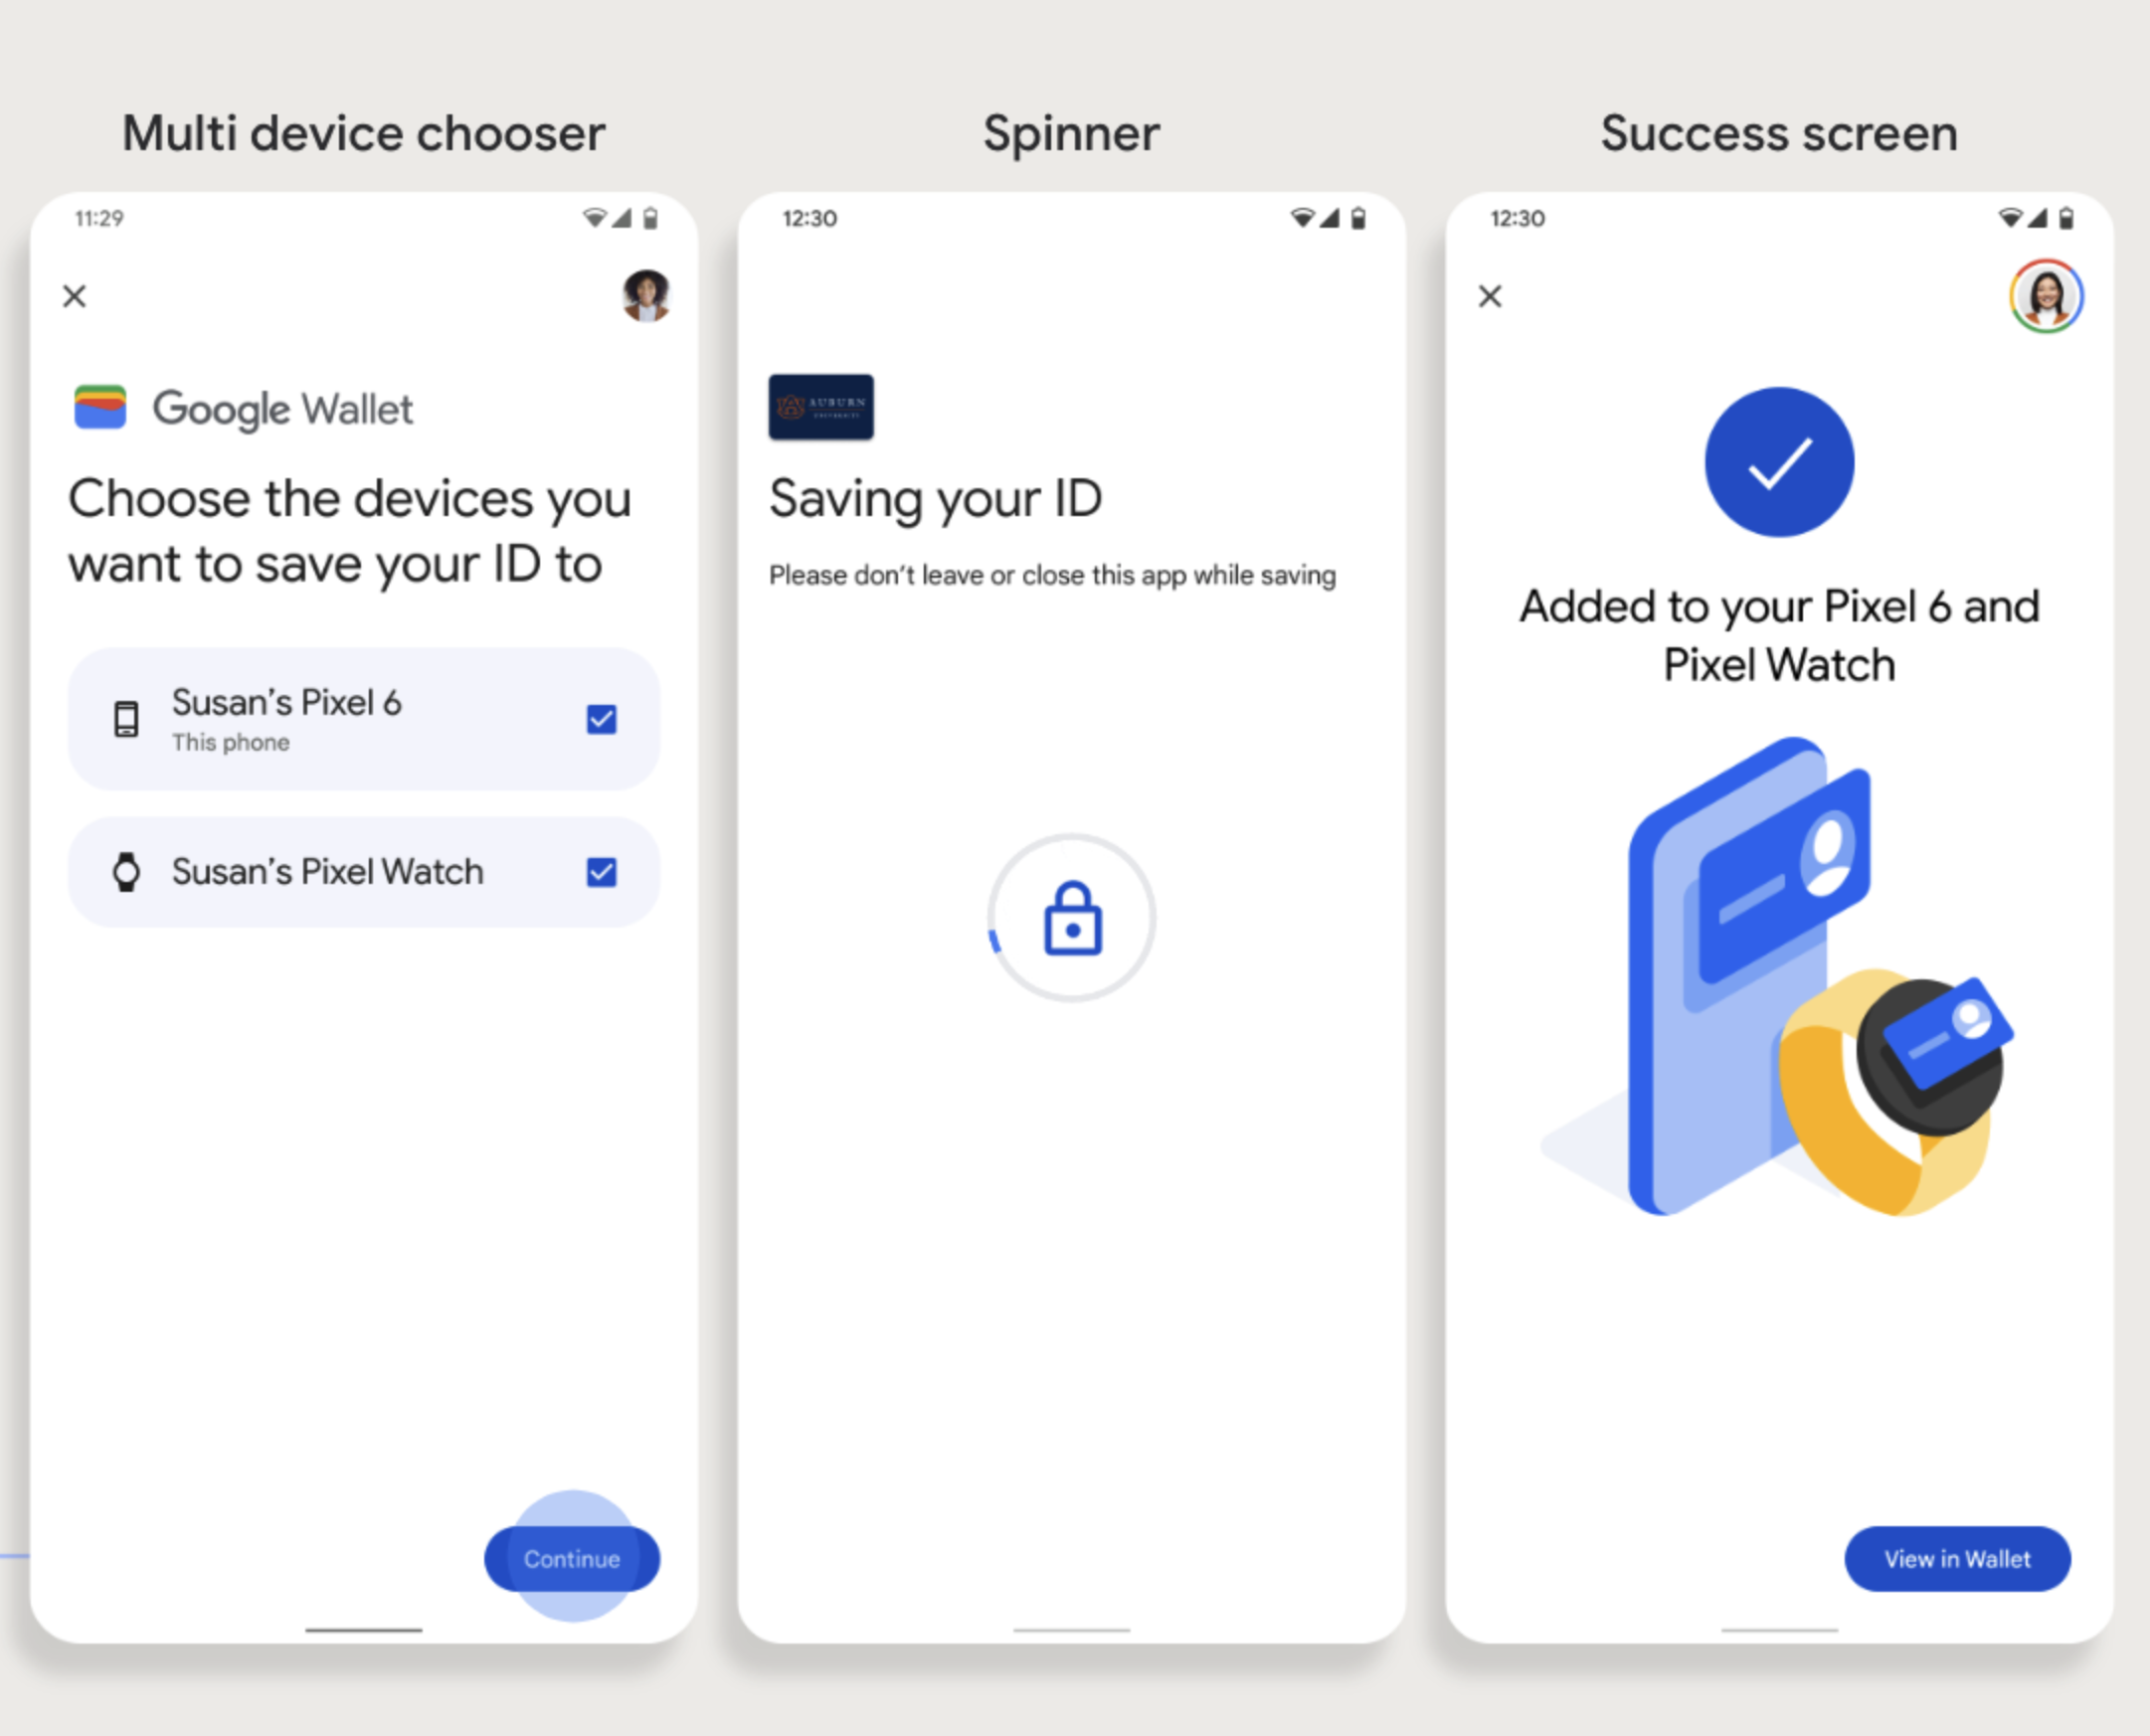
Użytkownicy mogą skonfigurować urządzenia do noszenia, rozpoczynając proces konfiguracji na telefonie i wybierając jedno urządzenie do noszenia, jak widać na tym rysunku:
Najważniejsze kwestie
- Aprowizacja na urządzeniu do noszenia wymaga telefonu, który może aprowizować kartę, dlatego oba urządzenia muszą być sparowane.
- Użytkownicy mogą skonfigurować telefon i urządzenie Wearable w ramach jednego procesu lub ponownie go uruchomić, aby dodać kartę do urządzenia Wearable po zakończeniu pierwszej konfiguracji na telefonie.
- Dostawca usług powinien ograniczyć użytkownikom możliwość udostępniania tylko jednego urządzenia do noszenia.
- Jeśli urządzenie Wearable zostanie odłączone od telefonu, karta cyfrowa pozostanie na urządzeniu, ale użytkownik nie będzie mógł dodać karty do drugiego urządzenia Wearable bez usunięcia pierwszego.
- Zapytaj dostawcę usług o dostępność funkcji udostępniania urządzeń do noszenia.
- Aplikacje obsługujące przepływy klucza hotelowego muszą być zintegrowane z interfejsami API usług Google Play. Jednak wywołania metod z aplikacji dostawcy usług do Usług Google Play nie są dostępne w publicznie rozpowszechnianej wersji Usług Google Play. Deweloper aplikacji dostawcy usług musi dodać niestandardowe moduły i uzyskać do nich dostęp, aby wywoływać określone metody. Więcej informacji uzyskasz od dostawcy usług.
Dodawanie do Portfela Google ze strony internetowej
W tej sekcji opisujemy proces zapisywania karty w Portfelu Google z witryny wydawcy.
Krok 1. Zaloguj się w Witrynie
Pierwszym krokiem jest zalogowanie się w witrynie wydawcy i kliknięcie przycisku Dodaj do Portfela Google.
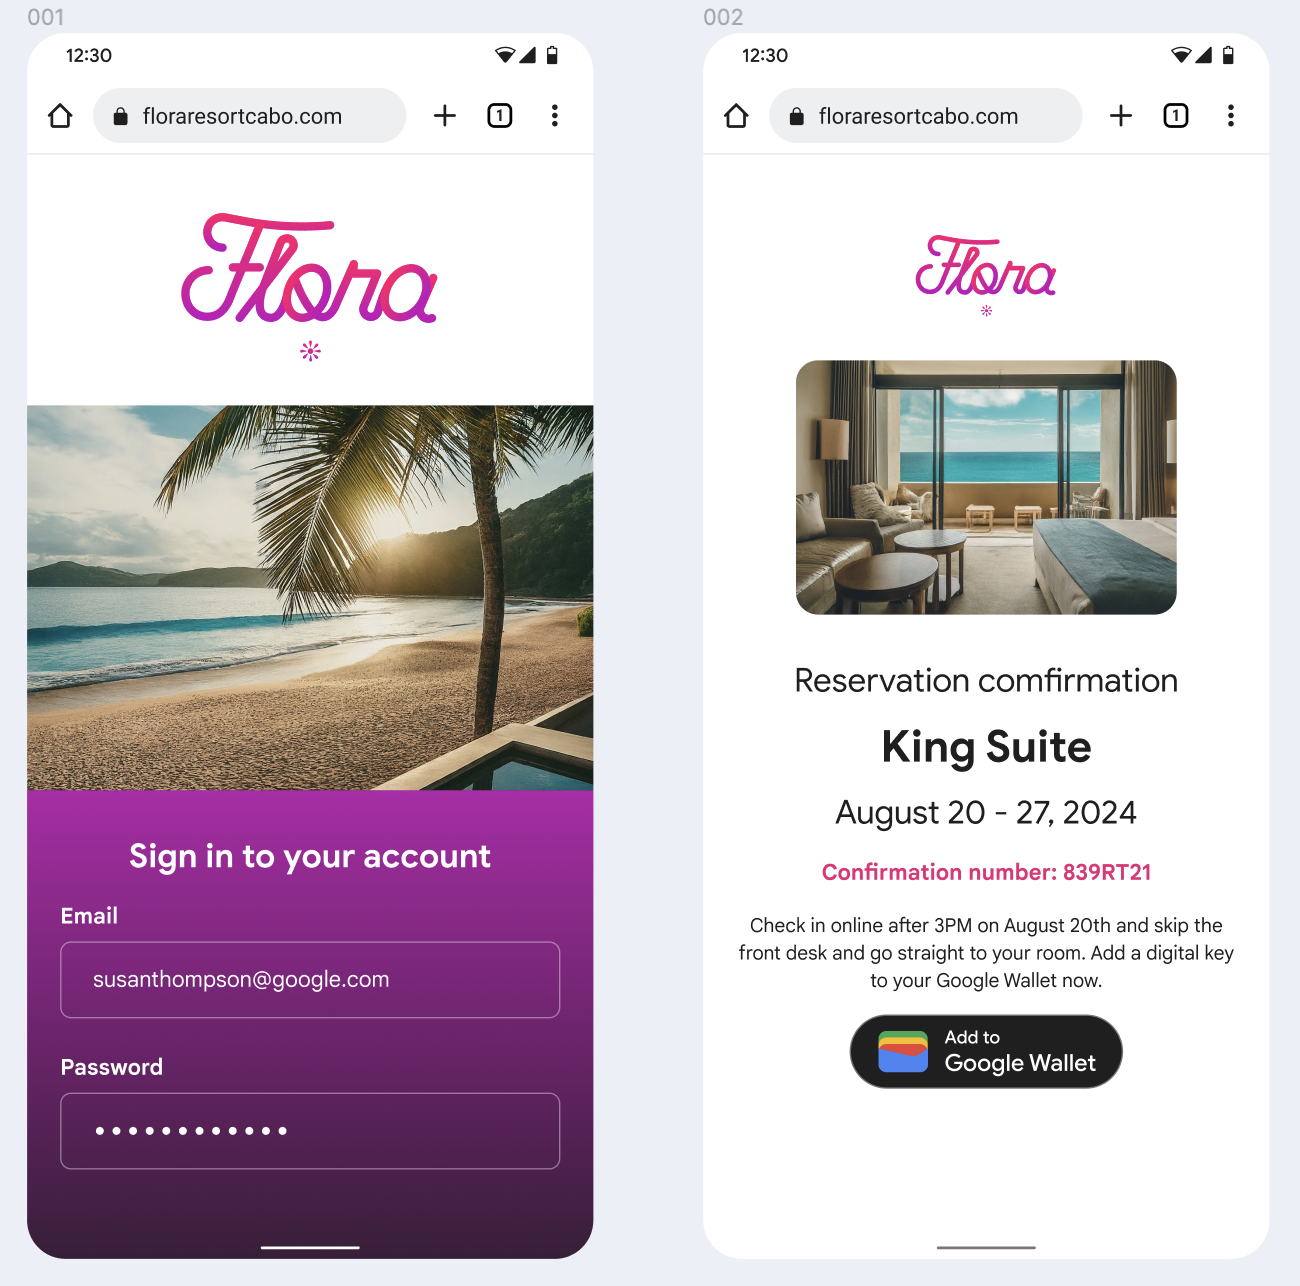
Krok 2. Zaloguj się przez Google
Użytkownik loguje się za pomocą Google, a następnie widzi ekran ładowania w witrynie wydawcy, po czym w następnym kroku zostaje przekierowany do Portfela Google.
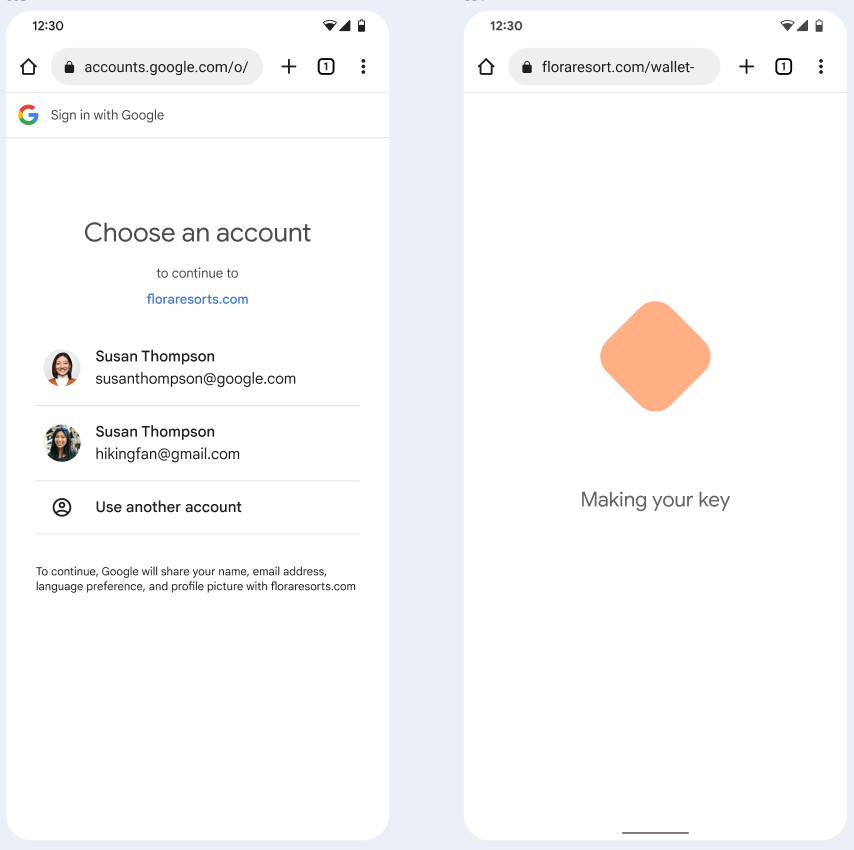
Krok 3. Zakończ aprowizację
Użytkownik przechodzi proces udostępniania w Portfelu Google.
Dodawanie do Portfela Google z aplikacji w profilu służbowym
Jeśli użytkownik ma zainstalowaną aplikację dostawcy usług w profilu służbowym Androida, nadal może dodać klucz do pokoju hotelowego do Portfela Google, który działa w jego profilu osobistym. Gdy użytkownik kliknie przycisk Dodaj do Portfela Google w aplikacji w profilu służbowym, Portfel Google przekieruje go do aplikacji Portfel Google w profilu osobistym, gdzie będzie mógł dodać kartę. Pozostałe funkcje zarządzania kartą są takie same jak w przypadku karty zapisanej bezpośrednio w profilu osobistym.